Umbrella Weather Rainbow Watercolour And Glitter Raindrops

by Joanne James11. April 2018 12:00

I have another information post lined up for you today with even more information on the Colour Revamp and the new ink pads, but first it's time for a little creative inspiration for this week's challenge over at Addicted to CAS that will hopefully bring a little colour to yet another grey, wet and miserable UK day as far as the weather is concerned:

My card is super simple with a loose, watercoloured rainbow background - take a look:


Here's the low-down on today's card:

Watercolour Rainbow - To create my background, I simply took a selection of inks - Real Red, Pumpkin Pie, Daffodil Delight, Old Olive, Pacific Point, Rich Razzleberry - and using my aquapainter, wet my watercolour paper and brushed the various colours across the background, allowing them to blend as I painted. No science to it - as simple as that! 

Farewell, Umbrella Weather - Once dried, I used my Umbrella Weather Framelits to cut out some clouds from my watercolour panel to reveal the grey clouds below. My black diecut umbrella is from the same set. Both the framelits and co-ordinating 'Weather Together' stamp set are retiring at the end of May, so if these are on your wishlist still you need to purchase them now before they are gone for good.

Epoxy Glitter Raindrops - These little glittery raindrops from the seasonal catalogue really are so pretty and really make this card; they catch the light and reflect the rainbow of colours beneath. 

This is one of those cards that definitely looks better in real life - so pretty with the variagated colour and the sparkly raindrops! A lovely pick-me up to brighten someone's day.

Here is the visual summary of the key products used on today's project for you to pin for easy reference:


You can see all of my 'How To' summaries on my 'How To - Tips and Techniques' Pinterest board in case you've missed any. 

Enjoy your day and I'll be back soon with another project. Until then, happy stampin'!


Stampin' Up! Supplies Used:

Table built using Product Table Builder by The Crafty Owl - Independent Stampin' Up! Demonstrator.

Showers Of Happiness To Welcome Little Miss Croghan Blog Hop

by Joanne James25. March 2017 14:00

Today I'm sharing a special baby card for a very special person!  The wonderfully talented and amazing Lesley Croghan, designer and creator of many popular online papercraft challenges, and her husband Corey, are expecting their first child, a little girl. To this end the lovely Lori Turner of Caffeinated Creativity has organised a fabulous blog hop to celebrate the forthcoming new arrival into the Croghan family.

No automatic alt text available.

I have participated in many of Lesley's challenges, am a regular reader of her blog, Always Playing With Paper and I am privileged to be a designer with The Paper Players, a challenge that Lesley founded some years ago that is still going strong. I have a lot to thank her for and am thrilled to be participating in this hop to celebrate the arrival of Little Miss Croghan.

I knew immediately what kind of card I wanted to create - it had to feature one of the cuties from the Moon Baby stamp set:


As my card was going to have to travel from the UK to Canada to reach Lesley, I decided I was best to stick to my clean and simple style. Here's the low-down on today's card:

Sugar and Spice and All Things Nice - I just had to go with 'Moon Baby' for my baby card this week - this is such a perfect baby set! You know how I am a fan of partial die cutting and today decided to use my sweet umbrella baby to overhang the top layer of my card for added visual interest. I watercoloured my baby and umbrella in Melon Mambo using my aquapainter to add a pop of colour to my pale pink card.

Hello, Hello, Hello - I decided to use one of the sentiments in the 'Moon Baby' set to create a repeat 'Hello Baby' background panel - a great way to combine the sentiments in the set. I used my stamp-a-ma-jig to get everything nicely lined up and staggered the words on each row to create a uniform pattern. 

A Shower of Hearts - I felt like my baby needed a shower of something to warrant the umbrella, so decided to use the hearts framelit from the Umbrella Weather set to create my shower. With the pink layer beneath, the little hearts against the beautiful lustre of the Shimmery White top layer look so pretty: 

Here is the visual summary of the key products used on today's project for you to pin for easy reference:


You can see all of my 'How To' summaries on my 'How To - Tips and Techniques' Pinterest board in case you've missed any. 

There are a huge number of people participating in today's blog hop; you can see the full collection of cards on Lori's blog here and it would be great if you could visit as many of these as possible and leave the owners some love. We have also sent our cards to Lesley for her to open today en masse, so you will get a sense of the wonderful shower of love we sent to the Croghan family this morning!

Enjoy the rest of your day and I'll be back tomorrow with another project for this week's challenge over at The Paper Players. Until then, happy stampin'!


Stampin' Up! Supplies Used:

Table built using Product Table Builder by The Crafty Owl - Independent Stampin' Up! Demonstrator.


Wishing You Brighter Days!

by Joanne James20. October 2016 08:05

I had a great workshop yesterday with a fabulous group of ladies making family tree home decor frames and watched the semi-finals of The Great British Bake Off on TV yesterday evening in lieu of a blog post. Today it's time for a new challenge over at Create With Connie and Mary and this week we have a sketch for you:


Now you all know how much I love a good sketch, but I must admit this one had me stumped for a little while until I figured out what to do with it. I was totally in the Christmas zone, but once I stepped away from the festive season it came to me - an umbrella! Take a look:


A seriously bright card to brighten someone's day! Here's the low-down on today's card:

Dimension and Layers - I used the fun Umbrella Weather Framelits from the annual catalogue to create the umbrella, clouds and shower of hearts on my card today. There's lots of layering and dimension on today's card, with the blue panel popped up to allow the hearts to stand in relief against the pink card base and the clouds around the umbrella.

Weather Together - The sentiment is from the co-ordinating stamp set 'Weather Together' and perfect for a cheery pick-me-up kind of card. I stamped my sentiment in Melon mambo to accentuate the colour of my card base, and added an enamel heart shape in the same colour to one of my clouds too.

Buy 3, Get 1 Free Paper Offer - Time To Party! - My colour scheme today was inspired by the colours in the Festive Birthday Designer Series Paper pack and I used the stripy pattern from this set for my umbrella canopy. This is one of the papers available as part of the October 'Buy 3, Get 1 Free' Designer Series Paper offer:

You can read all about it in this blog post here - a great offer and the perfect time to stock up so don't delay and get your party on!

Here is the visual summary of the key products used on today's project for you to pin for easy reference:


You can see all of my 'How To' summaries on my 'How To - Tips and Techniques' Pinterest board in case you've missed any. 

Do visit the other Design Team members to see what they did with this week's sketch; there's lots of inspiration over on their blogs too!

Another busy day today with a meeting first thing then an afternoon of housework in store. Enjoy your day and I'll be back tomorrow with another project; until then, happy stampin'!


Stampin' Up! Supplies Used:

Table built using Product Table Builder by The Crafty Owl - Independent Stampin' Up! Demonstrator.

Umbrella Weather - Not For a While Yet!

by Joanne James25. July 2016 07:00

Happy Monday everyone! For me this is officially the first day of the long school summer holiday! The James Juniors actually finished a couple of weeks ago, but having spent two weeks abroad on vacation today marks the start of our time at home - 6 weeks of no school runs, yay! So how long before I get cries of 'I'm booorrrreeeeedddd' do we think??!

I was pleasantly surprised to return home to the UK to find that summer has finally arrived, so I'm hoping that today's card doesn't tempt fate! I made it with a few challenges in mind:

       photo badge1_zpse398c447.jpg

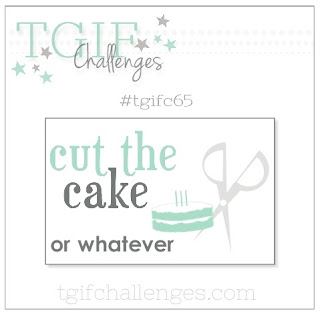
The team over at CASology have a cue card of 'rough', which can mean many things; I decided to go with a 'get well soon' sentiment and also included some diecutting which the team over at TGIF are looking for this week and a little paper piecing for the team over at Just Add Ink. Take a look:


Here's the low-down on today's card:

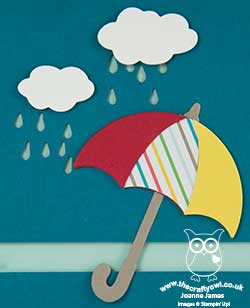
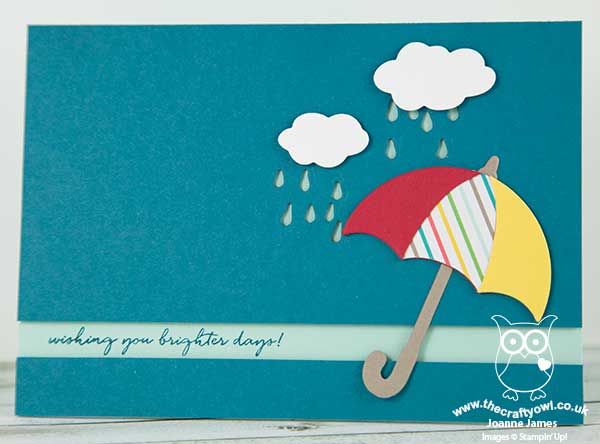
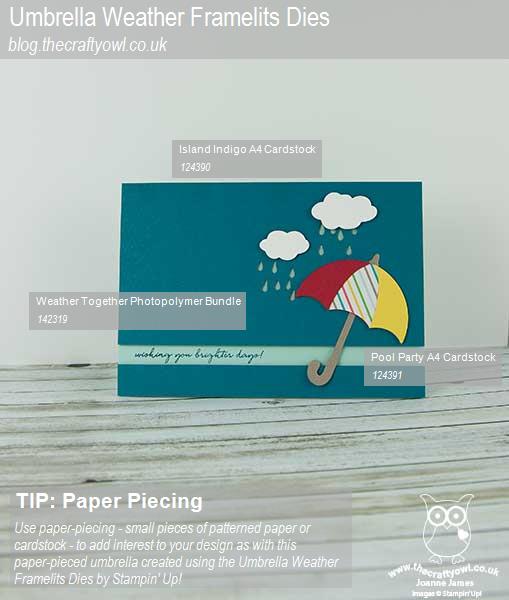
Umbrella Weather - With the exception of the sentiment, which comes from the co-ordinating 'Weather Together' stamp set, my card is all about diecutting today. The umbrella, clouds and raindrops are all part of the Umbrella Weather Framelits set. I've been wanting an umbrella set for ages (you can see my previous punch art attempt at creating my own umbrella here) and this framelit set is perfect: it contains two different umbrella types and lots of border patterns that you can use to customise them, in addition to clouds, hearts and raindrops. The framelits are a great standalone set and you don't need the stamp set to get great use out of these, although given that together they can be purchased as one of the many discounted bundles in the catalogue, I'm not sure why you would buy them alone (just saying :-) )

Paper Piecing - Paper Piecing, the technique that uses small pieces of paper or card to create a pattern, originates from an old quilting technique where the quilter sews small pieces of fabric onto paper in order to make it easier to join them together. On my card I decided to paper-piece the sections of my umbrella. I cut one complete umbrella out of Real Red, then cut a further three umbrellas - one red, one yellow, and one out of a scrap of retired Cherry on Top DSP from my scrap box - and fussy cut each of these by hand into three sections, that I then paper-pieced together and glued to the red base to create my colourful brolly.

Minimal Layers, Maximum Interest - I wanted to create interest not only with my use of bright blocks of colour but also in terms of dimension, with the raindrops, sentiment, clouds and umbrella all completing for layer space on my card. In order to maintain my 'clean and simple' feel, I created a recess in my top mat for my sentiment and popped this layer up on dimensionals to add depth to my raindrops. I then adhered my umbrella directly onto this layer, arching the recess, and finally popped the clouds onto dimensionals for a little lift too. 

Here is the visual summary of the key products used on today's project for you to pin for easy reference:


You can see all of my 'How To' summaries on my 'How To - Tips and Techniques' Pinterest board in case you've missed any. 

A brightly coloured card that should cheer someone having the roughest of times!

That's all from me today; I have a date with a huge basket of post-vacation ironing along with some time outdoors with the James Juniors making the most of the nice weather whilst it lasts. I'll be back tomorrow with another project; until then, happy stampin'!


Stampin' Up! Supplies Used:

Table built using Product Table Builder by The Crafty Owl - Independent Stampin' Up! Demonstrator.

Mini Catalogue

BROWSE THE CATALOGUE

The mini catalogue is now live! Read and download your copy here.

Shop Online

Access my online shop 24 x 7, 365 days of the year:

Current April hostess code:

VDKNV7BH

Shop Online

Join My Team

It's always a great time to join Stampin’ Up! New team members can get £130 worth of products for only £99 + free business supplies + free shipping + all the fun being a part of Stampin’ Up! Stampin' Up! has something for everyone: join my growing team and benefit from my support to enjoy Stampin' Up! however you choose.

If you're interested, call me for a chat to understand how I can help you realise your goals. Alternatively, if you have already decided to sign up and you just can't wait, please click here for the link to the online form where you can sign up and order your starter kit right away! 

Latest Kit!

Stampin Cut and Emboss

The Rock Legend Kit has all you need to make 8 cards with coordinating envelopes. Along with the new Panda Friends Kit, both are available from January 4th for just £14 each - get yours here!

2023-24 Annual Catalogue

BROWSE THE CATALOGUE

Click on the catalogue for a full list of current SU! supplies - if you would like to order any of the items featured, please drop me a line at [email protected] or give me a call on 07773 421446 - I'd be happy to help.

New Online Exclusives

There are new products available exclusively in the online store from 5 March - check them out here.

About Me

Hi I'm Joanne and live in Northampton and when I'm not looking after my husband and two beautiful children, am an avid crafter with a passion for all things Stampin' Up!

I must confess that I have never been a big rubber stamper - until I discovered Stampin' Up! that is. I love the fact that I can get such great results with co-ordinating stamps, inks, papers and punches - the possibilities are endless! Join me on my stamping journey as I share the things I love and be inspired to create amazing things yourself!

Follow Me

Monthly Newsletter

Box Builder

Click the button above to use Box Buster to create your custom box design using the Envelope Punch Board!

Kits Collection Now Available!

Stampin Cut and Emboss

The new Kits Collection from Stampin' Up! is now available!

Click here to see the current kits available and order yours online today.

I Design For


Stampin' Up Stuff

This is my personal blog and is not endorsed by Stampin’ Up! I hope you find it a plentiful source of ideas and personal inspiration but please don't copy my designs for contest submission or use for classes, publication or sale without express permission.