It's Your Day My Foxy Friend!

by Joanne James14. July 2016 08:05

Today it's time for a new challenge over at Create With Connie and Mary and this week we have a sketch for you:


For my card today I headed straight to my Little Foxy suite of products and decided on another card using the cute Foxy Friends set and co-ordinating Fox Builder Punch - I just couldn't resist!


Here's the low-down on today's card:

My Foxy Friend - I know I could have made so many animals with my Foxy Friends stamp set, but the fox won me over again! I stamped him in Calypso Coral and punched all the pieces out separately (I punched the tail backwards, as I still wanted it on the left, although it would have been much easier to stamp and punch the right way around and stick it on the right!) and layered them onto my tree stump, which I cut out by hand.

Toadstools Galore - I chose another of the great patterns from the A Little Foxy DSP stack for my feature panel and used its colour scheme to dictate the mat layers and base colour of my card. I went with a square base as per the sketch in Smoky Slate and left it plain; on reflection I think it could use some texture as it is a rather large expanse of plain cardstock, but I am not unhappy with it! I also added a swathe of Pool Party Satin Ribbon beneath my fox as one of the horizontal banners; I love this satin ribbon and am so pleased we now have it in more colours.

Sunburst Sayings - I went with a simple birthday sentiment from the 'Sunburst Sayings' set, continued on the inside of my card with 'Happy Birthday to you', stamped in Archival Grey directly onto my card base. Nothing too fussy as I think this card would work well as either a male or female card, so wanted to keep it neutral.

The Foxy Friends bundle just has so many creative possibilities! If you haven't bought yours yet, this month would be the perfect time to do so; if you purchase the bundle and a pack of the 'A Little Foxy' Designer Series Paper Stack together you will have spent £45 and so you will earn yourself a £4.50 money-off coupon any purchases next month too - bargain! Just click on the links below to hop on over to my online store to order yours today - and don't forget to add this month's hostess code 63RNATE3 to get a little thank you in the post from me too.

Here is the visual summary of the key products used on today's project for you to pin for easy reference:


You can see all of my 'How To' summaries on my 'How To - Tips and Techniques' Pinterest board in case you've missed any. 

Do visit the other Design Team members to see what they did with this week's sketch; there's lots of inspiration over on their blogs too!

Enjoy your day and I'll be back tomorrow with another project; until then, happy stampin'!


Stampin' Up! Supplies Used:

Table built using Product Table Builder by The Crafty Owl - Independent Stampin' Up! Demonstrator.

Moroccan Nights Lanterns Card

by Joanne James13. July 2016 07:00


Today I'm sharing the first of the cards from my recent technique class featuring the Moroccan Suite of products. Each of the ladies received a share of the products in the suite - designer series papers, ribbon and twine as well as the Moroccan Nights stamp set and the aim was to create a trio of cards that showcased each of the elements.

My first card was a CASE (Copy and Share Everything) of one of the samples on page 66 of the annual catalogue - take a look:


Here's the low-down on today's card:

Lantern Trio - The trio of lanterns on the die cut circle are each from the Moroccan Nights stamp set. The intricate detail on each of the stamps means that they don't need any special treatment - they can just be stamped in a single colour and are really effective, individually or when clustered as they are here. I stamped the outer two lanterns first, then the middle one last - this ensures even spacing and that you fit them all onto your diecut circle.

Moroccan Mosaic - The Moroccan Designer Series Paper has a wonderful collection of traditional Moroccan patterns, both in terms of colour and mosaic style - they are very reminiscent of the patterns I saw when I visited Marrakesh a few years ago. They work well both as background papers and as a feature in themselves. This card uses a full size piece with a neutral pattern for the card base and a panel in a bright blue diamond design on the centre of the card.

Washi Tape Wonder - One of the things I love about this card is the way it uses washi tape to add additional dimension to the paper pattern. Blue Moroccan Designer Washi Tape has been wrapped around the top third of the blue-patterned DSP panel to add yet more pattern and interest. My customers are always asking me for suggestions as to how they can use their washi tape and this idea works well where the products are part of a co-ordinating suite.

The addition of some gold metallic foil doily, Delightful Dijon mini striped ribbon and Emerald Envy twine completes this card. 

Here is the visual summary of the key products used on today's project for you to pin for easy reference:


You can see all of my 'How To' summaries on my 'How To - Tips and Techniques' Pinterest board in case you've missed any. 

Enjoy your day and I'll be back tomorrow with my card for this week's challenge over at Create With Connie and Mary; until then, happy stampin'!


Stampin' Up! Supplies Used: 

Table built using Product Table Builder by The Crafty Owl - Independent Stampin' Up! Demonstrator.

Tags: , , , , , , ,

Cards | Shop Online | Stamping

Happy Hello From A Foxy Friend

by Joanne James12. July 2016 18:00

I've been enjoying a nice couple of days of rest and relaxation but today am back to it from my sun lounger! I have a nice and easy Foxy Friends card for you, featuring the cute fox! Take a look:


Here's the low-down on today's card:

Take One Fox - I stamped the fox in Calypso Coral directly onto a circle of Whisper White, then stamped his head again onto a piece of scrap paper, punched it out and popped it over the main image on dimensionals. 

Spots and Chevrons - I paired the fox with a couple of pieces of patterned paper: the chevron pattern is from the A Little Foxy DSP Stack and the polka dot banner from the Subtles stack (my paper is actually the old design as I was using up some of my stash, but there is an almost identical pattern in the current Subtles DSP stack - the dots are just slightly bigger).

Add A Happy Hello - I finished my card with a sentiment from one of my 'go to' sentiment sets, Tin of Cards, stamped in Archival Black. I love the sentiments in this set - the font seems to go with everything and they are a great size for most cards.

I also added a piece of retired Basic Grey stitched ribbon, as this was all that I had to hand when I made this card; the new Smoky Slate stitched Ribbon would work beautifully for this card though - I've included the link for this in the supplies table below.

This is the card that I made at my last Coffee and Card session at Bell of Northampton before we broke up for the summer and this little chap proved very popular. The Foxy Friends bundle just has so many creative possibilities! If you haven't bought yours yet, this month would be the perfect time to do so; if you purchase the bundle and a pack of the 'A Little Foxy' Designer Series Paper Stack together you will have spent £45 and so you will earn yourself a £4.50 money-off coupon any purchases next month too - bargain! Just click on the links below to hop on over to my online store to order yours today - and don't forget to add this month's hostess code 63RNATE3 to get a little thank you in the post from me too.

Here is the visual summary of the key products used on today's project for you to pin for easy reference:


You can see all of my 'How To' summaries on my 'How To - Tips and Techniques' Pinterest board in case you've missed any. 

Back tomorrow with another project; until then, happy stampin'!


Stampin' Up! Supplies Used:

Table built using Product Table Builder by The Crafty Owl - Independent Stampin' Up! Demonstrator.

Blooms and Wishes For The Paper Players

by Joanne James10. July 2016 10:00

It's Sunday and time for a new challenge over at The Paper Players! It's the turn of our fearless leader the awesome Nance to host this week and she has a colour challenge for us to play along with:


For my card this week I decided to use this week's Freshly Made Sketches sketch and took my inspiration from the Blooms and Bliss suite to create my card today:


Here's the low-down on today's card:

Blooms and Bliss Colour Combo - The trio of colours chosen by Nance for today's challenge all appear in the Blooms and Bliss Suite and in particular the designer series paper of the same name, so I was drawn here for the starting point for today's card. Having ooh-ed and ahh-ed at the whimsical floral patterned papers, I eventually settled upon this rather bold, mostly Island Indigo, patterned paper for the base of my card. This pattern is great for a background as it doesn't interfere with the detail of the focal image and the watercolour-like flecking adds a softness to this otherwise strong colour.

Blooms and Wishes - I decided to create a randomly stamped floral panel as the focal point for my card, featuring each of the challenge colours and using the co-ordinating Blooms & Wishes stamp set to create an almost watercoloured effect. I used a combination of both first and second generation stamping for each of the colours to add depth and overlapped the flowers slightly too. This is the only place where there is any Sweet Sugarplum on my card, yet it performs an important role: without it the card would be perfectly co-ordinated, but rather flat. The addition of the warm lilac tones prevents this card from being too 'cold' and clinical I think. I finished with my sentiment stamped in Island Indigo onto Mint Macaron cardstock, for an additional burst of strong colour.

A Simple Oval - I don't use ovals all that often on my cards, but since the sketch asked for one here I thought I would follow it literally and do think it makes a pleasant change from squares or circles and is the perfect shape for my florals. I left it frameless to enable the white to really stand out against the background and added nothing more than a few pearls for a subtle embellishment. 

The Blooms and Bliss suite is such a pretty set of co-ordinating products, with plenty of scope for artistic expression.

Here is the visual summary of the key products used on today's project for you to pin for easy reference:


You can see all of my 'How To' summaries on my 'How To - Tips and Techniques' Pinterest board in case you've missed any. 

Before you reach for your ink and papers, check out what our amazing team has created to inspire you this week:

The Paper Players Design Team
 
 
Here's a quick recap of our challenge rules:
 
1.  Create a new paper project
2.  Upload your creation to your blog with a link back to us and provide a direct link to the post featuring your challenge submission.
3.  Please link your card to no more than four challenges, TOTAL.
4.  Have FUN! 


I look forward to seeing what you create with Nance's colour combination this week.

I am looking forward to a day of rest and relaxation in the sun today and some quality family time. Back in the next day or so with another project; until then, happy stampin'!


Stampin' Up! Supplies Used: 

Table built using Product Table Builder by The Crafty Owl - Independent Stampin' Up! Demonstrator.

Stampin' Up! Bonus Day Money-Off Coupons Are Here For One Month Only!

by Joanne James7. July 2016 09:00


This is my second post for today; you can see my earlier post with my card for this week's Connie and Mary challenge here. Today I have exciting news of a Stampin' Up! promotion that is due to run for the rest of July - Bonus Days! 

Did you get everything you want from the new annual catalogue yet? Since it came out only a month ago, you probably still have some items on your wish list, and I have some great news for you! For every £45.00 you spend between today, 7 July and 31 July (before delivery), you’ll get a £4.50 Bonus Days coupon that you can use between 2 and 31 August . Since our new annual catalogue has only been out a month ago, you will probably still have some items on your wish list and this is a great opportunity to shop from it, whether you buy your favourite products now or later in August with your coupons!

There are some details in terms of small print that you need to take note of, as follows: 

  • Promotion period: 7–31 July 2016 
  • Redemption period: 2–31 August 2016 
  • An email address is required to participate in this promotion; Bonus Days coupon codes can only be delivered via email.
  • It is strongly recommended that you both save emails containing their Bonus Days coupon codes AND write down the coupon codes in a safe place. Codes cannot be resent if the email is lost, and lost codes cannot be recovered.
  • Bonus Days coupon codes can be redeemed for any product, excluding Starter Kits.
  • There is no limit to the number of coupons you can receive per order or throughout the duration of the promotion.
  • There is no limit on the number of coupons you can use on an order during redemption.

I'm so excited about this promotion - it really is the first of its kind, as Stampin' Up! has never offered money-off coupons before. Furthermore, there is also going to be a new exclusive bundle for sale from 2 August until 31 August called Thoughtful Branches, so you could get this limited-time product and use your coupons to get a great deal!

Don't forget if you are placing an order online to also include this month's hostess code 63RNATE3 to receive a free thank you gift from me too!

Here is a sneak peak of the exclusive bundle available from 2nd August - you can choose to spend your coupon on this bundle or any other items of your choice!


That's all from me today; happy shopping, knowing that get a spending spree next month too!

Tags: , , , , , , ,

Promotions | Shop Online | Stamping

Swirly Bird Flowers Thank You Card

by Joanne James7. July 2016 08:05

Today it's time for a new challenge over at Create With Connie and Mary and this week we have a colour combination for you:


I initially was drawn to the lovely Fruit Stand designer series paper to make today's card, but when I'd finished my card decided it didn't have enough Cucumber Crush so decided to take a different approach. I will share my Fruit Stand card another day, but for now this is the card I came up with:


Here's the low-down on today's card:

Swirly Bird Scribble Flowers - I've been longing to use my Swirly Bird stamp set and co-ordinating Swirly Scribbles Framelits to create a modern floral card and today's bright and fresh colour combination provided the perfect opportunity. I stamped the bases in Peekaboo Peach and used the Scribbles in Tangerine Tango for a real pop of juicy colour. The Cucumber Crush provides wonderfully bright leaves and I added a few enamel dots too here and there.

Playful Palette Border - The hatched pattern from the Playful Palette DSP stack comes in both pink and Peekabooo Peach and it provided the perfect border for my card. I added a strip of Customer Crush to the stamped panel too for definition and contrast.

Thank You Tin of Cards - The sentiments in the 'Tin of Cards' stamp set are some of my 'go to' sentiments, I love the size and style of the scripting so much. Thank you Stampin' Up! for keeping this set, even though the Tin of Cards kit has had a refresh and makeover and now has a new set that co-ordinates with it. 

Here is the visual summary of the key products used on today's project for you to pin for easy reference:


You can see all of my 'How To' summaries on my 'How To - Tips and Techniques' Pinterest board in case you've missed any. 

Do visit the other Design Team members to see what they did with this week's colours; there's lots of inspiration over on their blogs too!

Enjoy your day and I'll be back tomorrow with another project; until then, happy stampin'!


Stampin' Up! Supplies Used:

  • Swirly Bird Photopolymer Bundle
  • Playful Palette Designer Series Paper Stack
  • Tin Of Cards Photopolymer Stamp Set
  • Cucumber Crush A4 Cardstock
  • Very Vanilla A4 Cardstock
  • Tuxedo Black Memento Ink Pad
  • Peekaboo Peach A4 Cardstock
  • Cucumber Crush Classic Stampin' Pad
  • Peekaboo Peach Classic Stampin' Pad
  • 2016-2018 In Color Enamel Shapes

Swirly Scribbles Tree Teacher Thank You Cards

by Joanne James6. July 2016 07:00

Happy hump day one and all! Today as promised I have this year's teacher thank you cards to share with you. Both of the James Juniors are moving schools at the end of this term so it feels like there are even more people to thank thank usual. Coupled with the fact that terms ends this week and we have all had packed social calendars, a seriously CAS card capable of mass production was the order of the day! Those of you that follow my blog will know that I generally like to send school thank you cards that are school/teacher themed, so they will often feature school imagery or apples - I don't know if it's just me, but I still think that the 'apple for a teacher' thing holds true!

Here is my final design: 


Here's the low-down on today's card:

Clean and Simple - This card is literally all about the white space! I used Whisper White Extra Thick cardstock for my base and used one simple image - the apple tree - alongside my sentiment to serve as a focal point. I added Cucumber Crush thick baker's twine to one of the cards, but didn't add it to the remainder as it was too much for my ultra clean and simple look.

Swirly Scribbles Meets Tree Builder - I could have created my tree using the Tree Builder Punch in its entirety, but I love the stylised look you get when you switch out the leaves for a Swirly Scribble diecut. I actually used two pieces from the this framelit set: the round Cucumber Crush circle is the inner piece from the large swirly scribble, and the darker Garden Green is the smaller swirly scribble die cut. So don't throw away those middles of the larger scribbles diecut - they have their uses too!

Helping Me Grow - My two-tone sentiment comes from the 'Helping Me Grow' stamp set, which as much as I love the flowers in this set, I must confess I bought it for this sentiment primarily; is there anything more fitting to put on a teacher appreciation card?

Here is the visual summary of the key products used on today's project for you to pin for easy reference:


You can see all of my 'How To' summaries on my 'How To - Tips and Techniques' Pinterest board in case you've missed any. 

I'll be back tomorrow with another project for this week's new challenge over at Create With Connie and Mary; until then, happy stampin'!


Stampin' Up! Supplies Used:

Table built using Product Table Builder by The Crafty Owl - Independent Stampin' Up! Demonstrator.

Thank You Friend Ladybirds

by Joanne James5. July 2016 17:31

I've had a busy day today with my 'Jar of Love' technique class this morning and a wonderful afternoon of Project Life memory keeping. I made a quick card yesterday for a couple of challenges that I wanted to share with you today:

 PCCCS 162-205-011   AYSIBackground_Theme-001

I loved this sketch over at Paper Craft Crew and was attracted to the red and white theme over at As You See It, although I don't have a Canadian card I'm afraid! I've been keen to ink up the cute ladybird pair from the hostess set 'Love You Lots' so that was straight where I headed for today's card: 


Here's the low-down on the detail:

Thank You, Friend - This adorable ladybird pair comes in one of the new hostess sets in the annual catalogue called 'Love You Lots'. This is such a fun set with a fun frog, cute pair of hedgehogs, and an adorable elephant and mouse in addition to this spotted pair and is exclusively available to anyone who hosts a Stampin' Up! party or places a single order of £150 or more. I stamped my ladybirds in black and coloured them with my Real Red Stampin' Write marker and added my simple sentiment.

Faux Washi Tape Border - I used the striped stamp from Gorgeous Grunge that I used on my Jar of Blooms card yesterday (you can see that card here if you missed it) to create a border along the top of the central panel; I think it looks like washi tape, which would of course be a good alternative if you don't have this set. I added some white baker's twine, a red button and a tiny banner to finish this edge.

Paper With Meaning - For my background frame, I decided to use the scripted paper from the Brights designer series paper stack. I love this paper but as it's so busy I tend to use it with caution. The clean and simple central panel and the overall sentiment of my card made this paper a good choice here.

This card and a couple more just like it are headed to Rebecca's friends this week; I haven't made a monochromatic card in a while and this one is really fun.

Here is the visual summary of the key products used on today's project for you to pin for easy reference:


You can see all of my 'How To' summaries on my 'How To - Tips and Techniques' Pinterest board in case you've missed any. 

I'll be back tomorrow with another project; until then, happy stampin'!


Stampin' Up! Supplies Used:

Table built using Product Table Builder by The Crafty Owl - Independent Stampin' Up! Demonstrator.

Blue Jar of Thanks Card

by Joanne James4. July 2016 22:04

Happy Monday everyone! I hope yours was a good one; I had a very early class today, followed by school sports day for the James Juniors, the bad weather having caused it to be postponed from last week. Today was beautifully sunny though and there was some great sporting action out on the field. Back to a late blog post though as a result!

Whilst finishing up the preparations for my classes this week on Saturday I managed to sneak in an extra card too, using this week's Colour Q colours (or their closest current equivalents):


One of my classes this week features the Jar of Love stamp set, and I've been having so much fun stamping and cutting out the flowers that I decided to make another card with it - take a look:


Here's the low-down on today's card:

Jar of Blooms - The 'Jar of Love' set has a trio of jars, each a different size, with so many content options. My jar today is a vase filled with a mix of blue and orange blooms, stamped off first for the base layer of colour to allow for contrast - and cut out easily using my Big Shot and co-ordinating Everyday Jars Framelits Dies. There are also a host of co-ordinating sentiments. I've used the retro-styled 'thanks' on my card today, heat embossed in white onto Night of Navy cardstock.

Gorgeous Grunge Border - I used the striped stamp in the Gorgeous Grunge set for my border, stamped in Pumpkin Pie for a bright pop of orange.

Soften With Vellum - I stamped my jar, water and leaf stems directly onto my Whisper White cardstock. To soften the appearance of my glass jar, I used my framelits to cut a jar out of vellum and adhered it over the top, adding some Night of Navy twine around the neck of the jar and finishing with a bow.

Here is the visual summary of the key products used on today's project for you to pin for easy reference:


You can see all of my 'How To' summaries on my 'How To - Tips and Techniques' Pinterest board in case you've missed any. 

I'll be back tomorrow with another project; until then, happy stampin'!


Stampin' Up! Supplies Used:

Table built using Product Table Builder by The Crafty Owl - Independent Stampin' Up! Demonstrator.

A Little Foxy Festive Reindeer

by Joanne James3. July 2016 09:00

It's been a busy week with blogging every other day I'm afraid as there is just so much happening in the James household. Rebecca gave a sterling performance as Dorothy in the Wizard of Oz on Thursday and whilst Friday evening was a relatively quiet one, I did not manage a post! Yesterday I did manage to finish my preparations for next week's classes and make a few more cards, so onwards and upwards as the saying goes! 

Today it's Sunday and time for a new challenge over at The Paper Players! It's the turn of the lovely Sandy to host this week and she has a festive themed challenge for us to play along with:
       

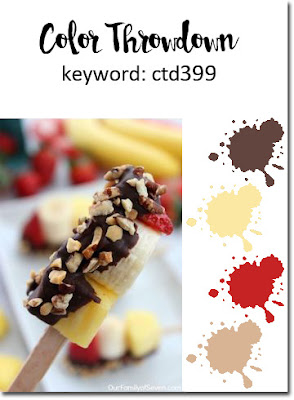
Christmas in July - now that is what I call organised! For my card this week I decided to use my Foxy Friends bundle again - this time to create a cute reindeer for my Christmas card. I also used this week's Mojo Monday sketch and the Color Throwdown colour palette for my creation:
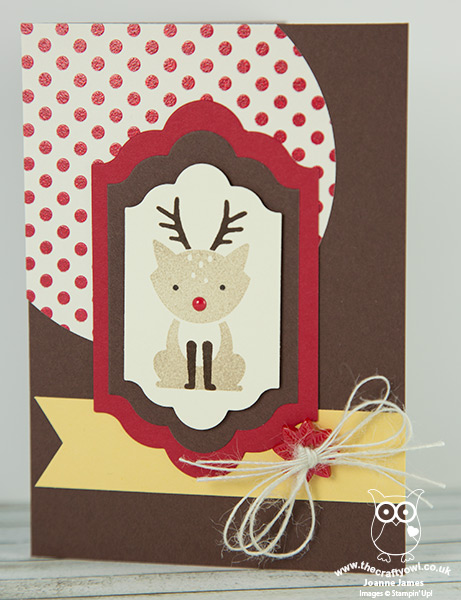
 

Here's the low-down on today's card:

A Little Foxy Festive Reindeer - As I mentioned last week, the 'Foxy Friends' stamp set makes all kinds of cute baby critters and woodland animals - including a festive reindeer. Aren't those little antlers just adorable?

Lots of Labels - I decided to frame my stamped reindeer with a double mat in Real Red and Chocolate Chip using the Lots of Labels framelits. These framelits are great for layering and create a little more interest than a standard rectangle.

Red-Nosed Rudolf - I have used a number of retired products on my card today: the red button, the circle framelits to cut the background circle and the paper that I used for it (it's so vintage I don't even remember its name!) but since the background paper has a lovely glittery red polka dot pattern, I decided I did need to use one of my new favourite embellishments to finish my card in style: a Real Red Enamel Shape circle - the perfect finishing touch for my reindeer's nose!

I just love the versatility of this stamp set; that coupled with my first Christmas card of the year I think makes this a worthy card! Here is the visual summary of the key products used on today's project for you to pin for easy reference:
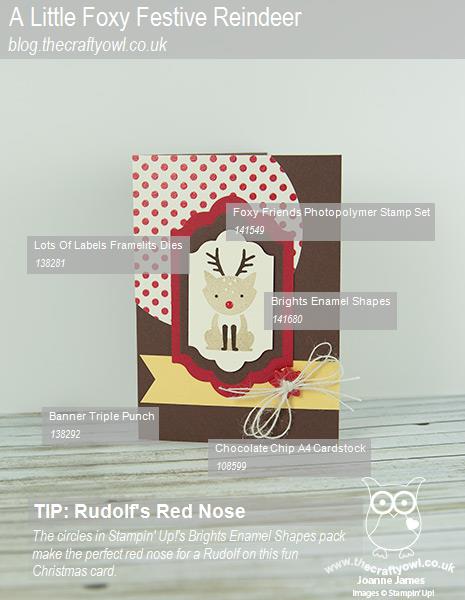
 

You can see all of my 'How To' summaries on my 'How To - Tips and Techniques' Pinterest board in case you've missed any. 

Before you reach for your ink and papers, check out what our amazing team has created to inspire you this week:

The Paper Players Design Team
 
 
Here's a quick recap of our challenge rules:
 
1.  Create a new paper project
2.  Upload your creation to your blog with a link back to us and provide a direct link to the post featuring your challenge submission.
3.  Please link your card to no more than four challenges, TOTAL.
4.  Have FUN! 

I look forward to seeing your Christmas creations in the gallery this week.

It is another big day in the James household today: Ben was selected for the Northamptonshire county allstars under-10s basketball team and he has his first match against Oxfordshire this afternoon. It's a big deal as he is one of only 12 children selected across the whole of the county - and we are all going to cheer him on for his match. Wish him luck!

Back tomorrow with another project; until then, happy stampin'!


Stampin' Up! Supplies Used:

Table built using Product Table Builder by The Crafty Owl - Independent Stampin' Up! Demonstrator.

Mini Catalogue

BROWSE THE CATALOGUE

The mini catalogue is now live! Read and download your copy here.

Shop Online

Access my online shop 24 x 7, 365 days of the year:

Current April hostess code:

VDKNV7BH

Shop Online

Join My Team

It's always a great time to join Stampin’ Up! New team members can get £130 worth of products for only £99 + free business supplies + free shipping + all the fun being a part of Stampin’ Up! Stampin' Up! has something for everyone: join my growing team and benefit from my support to enjoy Stampin' Up! however you choose.

If you're interested, call me for a chat to understand how I can help you realise your goals. Alternatively, if you have already decided to sign up and you just can't wait, please click here for the link to the online form where you can sign up and order your starter kit right away! 

Latest Kit!

Stampin Cut and Emboss

The Rock Legend Kit has all you need to make 8 cards with coordinating envelopes. Along with the new Panda Friends Kit, both are available from January 4th for just £14 each - get yours here!

2023-24 Annual Catalogue

BROWSE THE CATALOGUE

Click on the catalogue for a full list of current SU! supplies - if you would like to order any of the items featured, please drop me a line at [email protected] or give me a call on 07773 421446 - I'd be happy to help.

New Online Exclusives

There are new products available exclusively in the online store from 5 March - check them out here.

About Me

Hi I'm Joanne and live in Northampton and when I'm not looking after my husband and two beautiful children, am an avid crafter with a passion for all things Stampin' Up!

I must confess that I have never been a big rubber stamper - until I discovered Stampin' Up! that is. I love the fact that I can get such great results with co-ordinating stamps, inks, papers and punches - the possibilities are endless! Join me on my stamping journey as I share the things I love and be inspired to create amazing things yourself!

Follow Me

Monthly Newsletter

Box Builder

Click the button above to use Box Buster to create your custom box design using the Envelope Punch Board!

Kits Collection Now Available!

Stampin Cut and Emboss

The new Kits Collection from Stampin' Up! is now available!

Click here to see the current kits available and order yours online today.

I Design For


Stampin' Up Stuff

This is my personal blog and is not endorsed by Stampin’ Up! I hope you find it a plentiful source of ideas and personal inspiration but please don't copy my designs for contest submission or use for classes, publication or sale without express permission.