Thanks A Latte With Coffee Cafe

by Joanne James31. January 2018 07:00

Today I'm sharing a card using the sketch over at Fab Friday that also fits the theme over at Fusion:


I decided to break away from the heart shape on the sketch (and turned it through 180 degrees) and decided to give my Coffee Cafe set some love and feature a coffee cup instead, which led me to my second attempt at the current Fusion challenge - take a look:


Here's the low-down on today's card:

Satisfy Your Coffee Craving - Coffee shops are so big right now; even in this nation of tea drinkers, coffee shops are continuing to take the nation by storm. So if you are a fan of the bean, the Coffee Cafe Suite is the perfect way to indulge and satisfy your coffee craving. There is a stamp set with co-ordinating framelits that are available as a bundle and some of the framelits fit the images on the Coffee Break co-ordinating designer series paper. You can also create your own textured coffee collar, as the framelit for this embosses too. The designer series paper has some great themed patterns and some good neutral patterns, such as spots and leaves that work well with other types of product too.  

Thanks A Latte - Always a sucker for a punny sentiment, and partial to a skinny grande latte, this sentiment is perfect for me! I also think it works really well for a gift card holder with a Starbucks gift card inside - and who wouldn't want a coffee and muffin as a treat once in a while? Just sayin' :-) The Coffee Cafe stamp set also has two other sentiments that are perfect to send to a coffee-loving friend.

It's In The Details - The Coffee Cafe Suite also includes some fun corrugated elements - I used one behind my sentiment - that are great for adding a little texture to your projects. My card also features some of the lovely Crumb Cake woven ribbon - no bow on this card though, as I think it will be heading to one or other of the James Juniors teachers, who are both male, so I didn't want it to look too feminine.

Here is the visual summary of the key products used on today's project for you to pin for easy reference:


You can see all of my 'How To' summaries on my 'How To - Tips and Techniques' Pinterest board in case you've missed any. 

Enjoy your day and I'll be back tomorrow with another project. Until then, happy stampin'!


Stampin' Up! Supplies Used:

Table built using Product Table Builder by The Crafty Owl - Independent Stampin' Up! Demonstrator.

Flying Home Welcome To Your New Home Card PP378

by Joanne James28. January 2018 09:00

It's Sunday and time for this week's new challenge over at The Paper Players! It's the turn of our wonderful team leader Nance to host this week and she has my favourite, a sketch challenge, for you to work with:


Whether you stay with the circle or use an alternative shape, this is a sketch with many possibilities. I decided to keep with the circle as it was perfect to showcase a new stamp I haven't used yet and have fun with a little colouring - take a look:


I've had a few friends that have either recently moved or are in the process of moving, so I needed to replenish my stock of 'new home' cards and the 'Flying Home' stamp set had the perfect image. Here's the low-down on today's card:

Flying Home - I was lucky enough to receive the 'Flying Home' stamp set at Onstage in November, but had yet to ink it up. This set is perfect for a new home card, or even a new baby card; in fact the whimsical line drawings work for lots of card types. The other great thing about this set is that it is made for colouring. I used my Stampin' Blends to colour in my main image and I stamped the little bird twice so that I could fussy cut one and pop him up on a tiny piece of a dimensional for added lift.

A Petal Garden Colour Combo - I pulled the colours for my stamped image directly from the Petal Garden designer series paper that I used for my background panel and added a co-ordinating ribbon trim too. I love these fresh colours, perfect for spring - here's the colour palette for you to save if you'd like to use it for your future projects:


New Home Congratulations - The 'Flying Home' stamp set is sentiment-free, so I decided to go on the hunt through my other sets for a small sentiment that I could add to my horizontal Pool Party strip. I found the perfect stamp in 'At Home With You'  - and followed up inside my card with 'congratulations'.

Here is the visual summary of the key products used on today's project for you to pin for easy reference:


You can see all of my Product and 'How To' summaries on my 'How To - Tips and Techniques' Pinterest board in case you've missed any. 

Before you reach for your ink and papers, check out what our amazing team has created to inspire you this week:

Here's a quick recap of our challenge rules:
 
1.  Create a new paper project
2.  Upload your creation to your blog with a link back to us and provide a direct link to the post featuring your challenge submission.
3.  Please link your card to no more than four challenges, TOTAL.
4.  Have FUN!

I can't wait to see what you create with this week's sketch and look forward to visiting your blogs this week! Enjoy the rest of your weekend as it will be over all too quickly. I'm hoping to fit in a little more crafty time today along with some precious family time. I'll be back tomorrow with another project; until then, happy stampin'!


Stampin' Up! Supplies Used: 

Table built using Product Table Builder by The Crafty Owl - Independent Stampin' Up! Demonstrator.

Have a Fun Night In With A Lots of Happy Card Kit

by Joanne James22. January 2018 20:00

I've started the week with one of the James Juniors home from school with the dreaded lurgy, so no time to craft 'from scratch' today. Days like this are perfect days to work on a kit though, where all the hard work and prep is done for you. So today I'm sharing not one card but 5 - yes the five different all-occasion card designs that feature in the fabulous new 'Lots of Happy Card Kit' - take a look:


Here's the low-down on this kit:

Lots of Happy, Lots To Love - There's lots to love in this all-inclusive kit: with 4 each of 5 designs, you can create a total of 20 all-occasion cards using the included 'Lots of Happy' stamp set and then colour these using the Watercolour Pencils that are also included in the kit. two of the four pencils that are included are exclusive to this kits and not available with the standard pencil set. Here are each of the 5 designs individually:


A Fun Night In - The Lots of Happy Card Kit is perfect for a fun night in with friends - if ever you needed an excuse to get together on a wintry afternoon or evening and have some fun, this is it! No skill or previous experience necessary, so whether you consider yourself a crafter or a complete novice that just loves to send beautiful handcrafted cards, this kit is for you! The theraputic benefits of colouring are well-known (you can read all about that in my previous post here) - add some refreshments - tea and cake or wine and nibbles, either works! - and a fun night is guaranteed! If you would be interested in hosting a fun evening with friends, do get in touch - I would love to help you to host a night to remember! What's more if you invite 7 friends to participate during Sale-A-Bration - each kit costs £31.50 each - as the hostess you can get your kit for FREE!

And There's More - This fabulous kit also has a refill available, so if you enjoyed it the first time around, you can reuse your stamp set, block, ink and pencils and create even more cards! A refill costs just £19 - that's less than £1 per card, bargain!

Also the lovely people at Stampin' Up! have also produced a video showing this kit in more detail if you'd like a closer look:

Here is the visual summary of the key products used on today's project for you to pin for easy reference:


You can see all of my 'How To' summaries on my 'How To - Tips and Techniques' Pinterest board in case you've missed any. 

I know I often say this when a new kit comes along, but this really is a good one - the end results are so contemporary and pretty, I love it! Contact me to get one for yourself today!

I'll be back tomorrow with another project. Until then, happy stampin'!


Stampin' Up! Supplies Used:

Table built using Product Table Builder by The Crafty Owl - Independent Stampin' Up! Demonstrator.

Clean And Simple Panda Love Notes For The Paper Players PP377

by Joanne James21. January 2018 09:00

It's Sunday and time for this week's new challenge over at The Paper Players! It's my turn to host this week and I have a topical clean and simple challenge for you to work with:


It's almost February and with Valentine's Day around the corner love is definitely in the air, so what better time to send a little love note or two to the one you love? I have a super clean-and-simple card to share with you this week that is also perfect for this week's challenge over at Less Is More - take a look:


Here's the low-down on today's card:

Love You Panda - I couldn't resist using another of these cute little pandas on my card today - this time it had to be the one proudly holding his own little love note, perfect for my theme! I simply stamped him in black, coloured in the heart on his envelope and surrounded him with bright pink love hearts, from the Heart Happiness set. Inside I stamped my sentiment, also from the 'Party Pandas' stamp set, along with another spray of hearts:

And that's it - super simple, super cute!

The Perfect Note - I used one of the new Whisper White Narrow Note Cards for my one-layer love note today - they measure 6.4cm x 11.4cm, small and narrow and the perfect size for a note to tuck into a pocket, lunch box or gift package. 

Painted With Love Envelope Liners - My little note card was so quick and easy to put together, I decided to add another surprise pop of colour with an envelope liner on the flap of my envelopes. I simply punched a whole bunch of circles out of the Painted With Love Specialty Designer Series Paper using my 2" circle punch and adhered them to the inner flap of my envelope. 

I love my little note card so much, I made a whole bunch of them - I used a selection of papers and stamped my pandas both horizontally and vertically, with hearts in each of the colours that feature in the Painted With Love paper - here's a shot of a bunch of them together:


These are perfect for me to slip into the James Juniors' blazer pockets for a surprise note at school; we are also going to make a whole bunch more for the children to share with their friends too - it's nice to let your besties know they are loved too! They really are so simple to make - it's taken me longer to write this blog post that to actually make all of these cards!

Here is the visual summary of the key products used on today's project for you to pin for easy reference:


You can see all of my Product and 'How To' summaries on my 'How To - Tips and Techniques' Pinterest board in case you've missed any. 

Before you reach for your ink and papers, check out what our amazing team has created to inspire you this week:

Here's a quick recap of our challenge rules:
 
1.  Create a new paper project
2.  Upload your creation to your blog with a link back to us and provide a direct link to the post featuring your challenge submission.
3.  Please link your card to no more than four challenges, TOTAL.
4.  Have FUN!

Don't forget the theme is clean and simple this week - so minimal layers and embellishments and lots of white space. I can't wait to see what you create and look forward to visiting your blogs this week! Enjoy the rest of your weekend as it will be over all too quickly. I'll be back tomorrow with another project; until then, happy stampin'!


Stampin' Up! Supplies Used: 

Table built using Product Table Builder by The Crafty Owl - Independent Stampin' Up! Demonstrator.

Tags & Trimmings Festive Christmas Stocking Gift Box For The Paper Players PP374

by Joanne James10. December 2017 09:00

It's Sunday and time for this week's new challenge over at The Paper Players- what's more, it's the last one of 2017! It's the turn of my good friend, the lovely and talented Claire, to host this week and she has a bright colour challenge for us to end the year with:
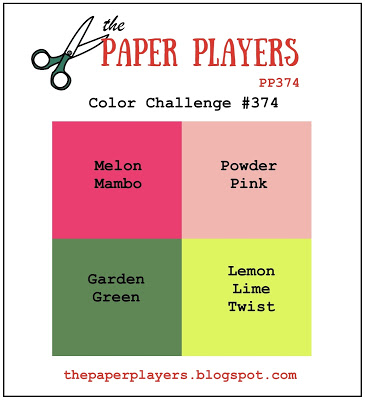
 

This is a palette with lots of options - you could still craft for Christmas, or use these colours for a non-festive project, it's up to you. Our design team this week has done a little of both, so there's lots of inspiration for you. I took the opportunity to squeeze in another Christmas project, but went with a 3D gift box rather than a card today. In fact, a Christmas stocking - take a look:
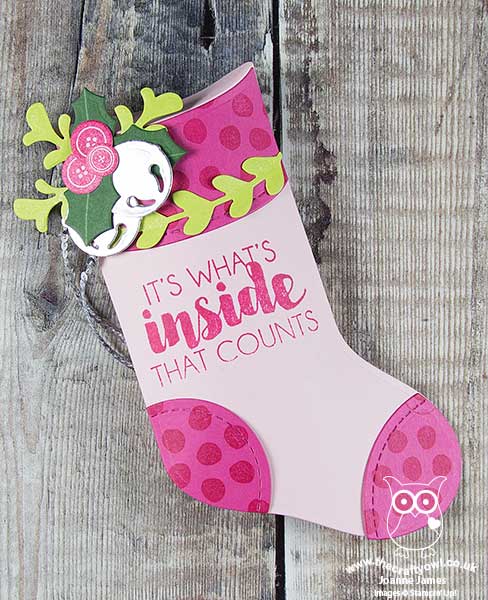
 

Here's the low-down on today's project:

Trim Your Stocking - These colours were perfect for a pink and girly Christmas stocking, complete with spotty heel, toe and cuff trim then finished off with a sprig of festive greenery. I've used the Trim Your Stocking Thinlits on this card previously but whatever your project, this set has an abundance of useful dies that are perfect for all kinds of embellishments. 

It's What's Inside That Counts - I love this sentiment! Whether it's a little chocolate - the content of choice of Rebecca - or money (most definitely the content of choice for my teenage niece!), the pillow box on the reverse of this stocking is just big enough for either. I haven't yet decided who this stocking will be heading for and for me how it looks on the outside is the most important thing, but one thing is for sure, for the recipient it's definitely what's inside that counts!

A Little Added Sparkle - I couldn't resist adding in a little sparkle to my festive stocking, with a silver foil bell, some mini sequin trim and a liberal dose of clear Wink of Stella on the lime green pieces - I'm hoping Claire considers silver (almost) a neutral such that I can get away with it - I just couldn't resist, those jingle bell dies are my favourite! 

Here is the visual summary of the key products used on today's project for you to pin for easy reference:
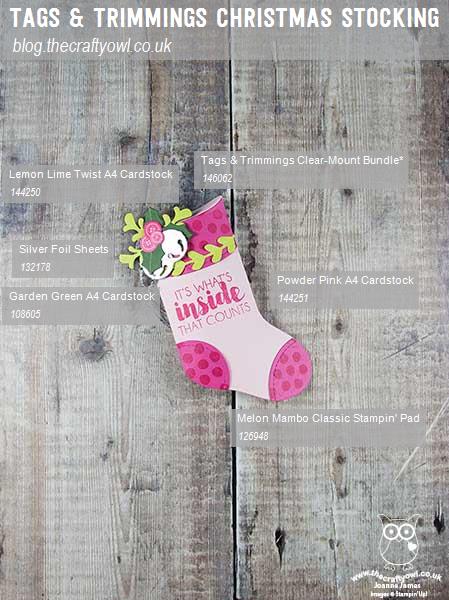
 

You can see all of my Product and 'How To' summaries on my 'How To - Tips and Techniques' Pinterest board in case you've missed any. 

Before you reach for your ink and papers, check out what our amazing team has created to inspire you this week:

The Paper Players Design Team
 
 
Here's a quick recap of our challenge rules:
 
1.  Create a new paper project
2.  Upload your creation to your blog with a link back to us and provide a direct link to the post featuring your challenge submission.
3.  Please link your card to no more than four challenges, TOTAL.
4.  Have FUN! 


I look forward to seeing what you create with this week's colour palette. As I mentioned above, this is our last challenge for 2017; we will be taking a two week break before returning with a fresh new set of challenges for 2018 starting on Sunday 7th January 2018. Thanks to everyone who plays along each week, to this year's guest designers, Crystal and Valentyna, Deanne, Jan and Annie, and everyone of you who visits our blogs and leaves us encouraging comments each week - it's great to know that you enjoy our creations! We will be announcing our new guest designers for the first half of 2018 this coming Wednesday, in my mid-week reminder post, so be sure to check back then to see who will be joining us to kick off the Paper Players fun at the start of 2018!

Enjoy the rest of your weekend as it will be over all too quickly; we are hoping to put our Christmas tree up and decorate the house tomorrow - then it really will feel like Christmas! I'll be back soon with another project; until then, happy stampin'!


Stampin' Up! Supplies Used: 

Table built using Product Table Builder by The Crafty Owl - Independent Stampin' Up! Demonstrator.

Layered Gingerbread In A Jar - The Perfect Homemade Christmas Gift PP373

by Joanne James3. December 2017 09:00

It's Sunday and time for this week's new challenge over at The Paper Players! The lovely Laurie is the hostess this week and she has a rather delicious seasonal theme for us to work with:


I'm also linking up with the team over at Stamp Ink Paper this week who are looking at Christmas wrapping and packaging solutions. I love to make gingerbread at this time of year but it's still a little early for me to have baked and wrapped creatively, so instead I decided to share with you a little something that I've been preparing for Ben's school Christmas Fayre the week after next that fits Laurie's theme perfectly. They are having a 'Jam Jar Tombola' stall, so I've been busy making up jars of all kinds for the children to win, including some jars of dry ingredients that they can use for their own festive baking. Here's one of my jars for gingerbread cookies - take a look:


These really are so easy to make: you simply layer the dry ingredients into a kilner jar, then decorate and add a tag with the details of any ingredients you need to add and the method. 

I used the 'December Deliciousness' stamp from the 'My Little Things' stamp set to decorate my jar, using my markers to selectively colour each of the elements in and adding a heat-embossed sentiment banner across the middle to create a decorated top to my jar. I paired it with some retired paper that fits perfectly with my theme for a folded tag that includes the ingredients and recipe, some ribbon and a wooden spoon that I will be tying to the side of the jar too ready for stirring - you could also add a gingerbread cutter if you have one.

I'm a big fan of homemade gifts at Christmas and there is no limit to the things you can put in a jar; with a little decoration this kind of thing can make a thoughtful, presentable gift.

If you would like to make a jar like mine, I've included the details from the inside of my folded tag below:

Easy Gingerbread Biscuits

This jar contains:

  • 100g soft light brown sugar
  • 1 tsp ginger, ¼ tsp allspice
  • ¼ tsp cinnamon, 225g plain flour
  • ½ tsp baking powder
  • ½ tsp bicarbonate of soda


You will need to add:

  • 150g melted butter
  • 1 tbsp golden syrup
  • 1 egg yolk


Method:

  • Mix 150g melted butter with 1 tbsp golden syrup and 1 egg yolk.
  • Add to the dry ingredients, mix well, then knead to a dough.
  • Chill for 15 mins then roll out.
  • Cut into biscuits and bake at 200C/180C fan/gas 6 for 8-10 mins. Cool on a wire rack.


Here is the visual summary of the key products used on today's project for you to pin for easy reference:


You can see all of my Product and 'How To' summaries on my 'How To - Tips and Techniques' Pinterest board in case you've missed any. 

Before you reach for your ink and papers, check out what our amazing team has created to inspire you this week:

The Paper Players Design Team
 
 
Here's a quick recap of our challenge rules:
 
1.  Create a new paper project
2.  Upload your creation to your blog with a link back to us and provide a direct link to the post featuring your challenge submission.
3.  Please link your card to no more than four challenges, TOTAL.
4.  Have FUN! 


I look forward to seeing what you create with this week's theme. Enjoy the rest of your weekend as it will be over all too quickly; my Christmas festivities have truly started in earnest this week and I am busier than ever! I am off to run a pre-Christmas Stampin' Up! party for a customer and her friends this afternoon, then will be returning home to put the finishing touches to my class preparations for my Delightful Daises Technique Class tomorrow and complete my 100 card challenge for the Ronald McDonald Christmas Cheer campaign that is happening in the UK this weekend.

I'll be back as soon as time allows with more projects; until then, happy stampin'!


Stampin' Up! Supplies Used: 

Table built using Product Table Builder by The Crafty Owl - Independent Stampin' Up! Demonstrator.

Snowflake Sentiments For The Paper Players PP372

by Joanne James26. November 2017 09:00

It's Sunday and time for this week's new challenge over at The Paper Players! It's my turn to host this week and I have my favourite kind of challenge, a sketch, for you all to work with:


My card today is all about the snowflakes and uses the Snowflake Sentiments bundle - take a look:


Here's the low-down on today's card:

Snowflake Inspiration - I used the piece of snowflake patterned paper from the Christmas Round The World DSP pack as the starting point for my card today; the dark grey reminds me of a snowy sky and is the perfect backdrop for those pale blue and white snowflakes.

Swirly Snowflake Border - The paper pairs beautifully with the stamps and thinlits in the Snowflake Sentiments bundle. I used the Swirly Snowflake thinlits to create my layered border and snowflake embellishment. The detail on these delicate cuts makes for some really pretty pieces, especially when cut from Dazzling Diamonds glimmer paper - the snowflakes are so sparkly against the Pool Party layer and the grey of the background paper. The thinlits are designed to cut with a straight edge to one side of the border, but I wanted them to be a mirror image so I snipped away the excess from the snowflakes and cut the background piece in the same way.

Open To Interpretation - I added a ribbon and bow to my sketch as I don't often add bows to the front of my card, yet when I came to make my card, I chose not to add a bow as I didn't want to obscure the detail of those pretty snowflakes, although I did add a strip of ribbon between the border layers. I also moved up the position of my snowflake embellishment to provide a better balance with the positioning of my sentiment. These changes don't make my card 'wrong' - they are just one way to interpret the sketch. I can't wait to see how it inspires you!

Here is the visual summary of the key products used on today's project for you to pin for easy reference:


You can see all of my Product and 'How To' summaries on my 'How To - Tips and Techniques' Pinterest board in case you've missed any. 

Before you reach for your ink and papers, check out what our amazing team has created to inspire you this week:

The Paper Players Design Team
 
 
Here's a quick recap of our challenge rules:
 
1.  Create a new paper project
2.  Upload your creation to your blog with a link back to us and provide a direct link to the post featuring your challenge submission.
3.  Please link your card to no more than four challenges, TOTAL.
4.  Have FUN! 


I look forward to seeing your interpretations of my sketch in the gallery this week. Enjoy the rest of your weekend as it will be over all too quickly; we are ice-skating later with the swimming squad - our first Christmas party of the season! I'll be back tomorrow with another project; until then, happy stampin'!


Stampin' Up! Supplies Used: 

Table built using Product Table Builder by The Crafty Owl - Independent Stampin' Up! Demonstrator.

Warm and Cozy Clean And Simple Christmas Sweater PP371 GDP113

by Joanne James19. November 2017 09:00

It's Sunday and time for this week's new challenge over at The Paper Players! It's the turn of the super-talented Sandy, to host this week and she has a fun clean and simple challenge for us to work with:


I'm a little late with my post today - I am still struggling to keep up with everything as I am so very busy at the moment - but I couldn't miss the opportunity to join in with Sandy's clean and simple 'warm and cozy' challenge in this week's Global Design Project challenge colours - take a look:


Here's the low-down on today's card:

Warm and Cozy - When I think of cold winter days, I think of mittens, gingerbread latte and woolly jumpers; so what better than a Christmas jumper to fit with the 'warm and cozy' theme? There are some fun sweaters in the 'Christmas Sweaters' stamp set; I decided to go with the simple striped one with a snowflake centrepiece for my clean and simple card. With a nod to the lovely Sandy who is such an expert colourer, I decided to get out my new Stampin' Blends to colour my sweater. I'm not sure I'm as good as Sandy when it comes to colouring, but it sure is fun and allowed me a peaceful 10 minutes in my otherwise hectic day!

Deck The Halls - I knew I wanted to use a few simple embellishments and I didn't want to add too many layers to my clean and simple card, so I decided to create a little patterned background with my sentiment to sit behind my sweater. I used my stamp-a-ma-jig to line up my sentiment and just stamped it repeatedly in Cherry Cobbler ink. Keeping this detail to one area of the card allows me to preserve the 'white space' that is a key feature of a clean and simple card.

All Good Things Come In Threes - Along with the trio of festive colours that feature on my sweater, I have also used a trio of embellishments: a (retired) wooden snowflake, a Pool party twine bow and some Pool Party enamel shapes for some added fun detail. I tried to keep my embellishments to a minimum given this week's theme but couldn't resist these additional touches to complete my warm and cozy card.

Here is the visual summary of the key products used on today's project for you to pin for easy reference:


You can see all of my Product and 'How To' summaries on my 'How To - Tips and Techniques' Pinterest board in case you've missed any. 

Before you reach for your ink and papers, check out what our amazing team has created to inspire you this week:

The Paper Players Design Team
 
 
Here's a quick recap of our challenge rules:
 
1.  Create a new paper project
2.  Upload your creation to your blog with a link back to us and provide a direct link to the post featuring your challenge submission.
3.  Please link your card to no more than four challenges, TOTAL.
4.  Have FUN!

Don't forget the theme is clean and simple this week - so minimal layers and embellishments and lots of white space. I can't wait to see what you create and look forward to visiting your blogs this week! Enjoy the rest of your weekend as it will be over all too quickly; I'll be back later with news of a fantastic week of promotions that will be starting tomorrow and hope to resume something like normal blogging service this week. Until then, happy stampin'!


Stampin' Up! Supplies Used: 

Table built using Product Table Builder by The Crafty Owl - Independent Stampin' Up! Demonstrator.

Holiday Pines Hug In A Mug For PP369

by Joanne James5. November 2017 09:00

It's Sunday and time for this week's new challenge over at The Paper Players! My good friend LeAnne is the hostess this week and she has a seasonal theme for us to work with:


I was rather pressed for time this week and had been wanting to play along with the team over at Merry Monday with that fun inspiration photo so took the opportunity to use some of my hoarded retired Adventure Bound DSP along with my new 'Hug In A Mug' Stamp Set and combined the two to come up with this card - take a look:


My pines were in-situ and ready to go so I simply heat-embossed my sentiment in white, having already created a shadow in Early Espresso, to enable it to stand out against the wood effect DSP, fussing cut my little mug and added some puffy frosting to my hot chocolate having added white embossing powder to Tombo glue and heated it to create the puffy effect - I made a video tutorial on this technique previously that you can see here. I added a stamped striped candy cane and that was my card done - so easy to recreate.

Here is the visual summary of the key products used on today's project for you to pin for easy reference:


You can see all of my Product and 'How To' summaries on my 'How To - Tips and Techniques' Pinterest board in case you've missed any. 

This card is destined for a good friend of mine who recently emigrated to the USA; I miss our chats over coffee so I know this is one piece of happy mail that will surely brighten her day. 

Before you reach for your ink and papers, check out what our amazing team has created to inspire you this week:

The Paper Players Design Team
 
 
Here's a quick recap of our challenge rules:
 
1.  Create a new paper project
2.  Upload your creation to your blog with a link back to us and provide a direct link to the post featuring your challenge submission.
3.  Please link your card to no more than four challenges, TOTAL.
4.  Have FUN! 


I look forward to seeing what you create with this week's theme. Enjoy the rest of your weekend as it will be over all too quickly; I'll be back tomorrow with another project; until then, happy stampin'!


Stampin' Up! Supplies Used: 

Table built using Product Table Builder by The Crafty Owl - Independent Stampin' Up! Demonstrator.

Leaf Punch Christmas Wreath PP368

by Joanne James29. October 2017 09:00

It's Sunday and time for this week's new challenge over at The Paper Players! The clocks went back last night here in the UK so whilst this heralds the official arrival of winter, it also means an extra hour in bed - bliss! It's the fifth week of the month and the turn of the lovely Jaydee to host this week. She has a tic-tac-toe board to challenge our creative juices:


Tic-tac-toe week is always fun as the gallery is full of so many different creations as each of us work with a different combination of squares. For once I knew exactly where I was going with this one: straight across the middle. I took the opportunity to make another Christmas card, this time a larger 6" x 6" square card - take a look:


Here's the low-down on today's card:

Leaf Punch Wreath - I used my leaf punch to create the oversize Christmas wreath on my card today. I stamped a whole bunch of leaves using each of the stamps in the 'Painted Harvest' stamp set in Garden Green onto Garden Green cardstock, then punched them out and layered them around my heat-embossed sentiment. Whilst this punch is part of the Painted Autumn Suite in the seasonal catalogue, today's card proves it will stretch beyond autumn into spring, summer and winter seasons too. 

Watercolor Christmas - The sentiment on my card is from the 'Watercolor Christmas' stamp set, that co-ordinates with the Christmas card kit of the same name. I love the big, bold scripted sentiments in this set! I know this set will be a 'keeper' for me, long after this catalogue is gone. I decided to heat emboss my sentiment in gold onto Basic Black cardstock, to tone in with the rich colours of my designer series paper border.

Grab Some Tartan -  The tartan border on my card uses one of my favourite patterns in the Around the World Designer Series Paper pack. This is one of the packs of paper that is included in the 'Buy 3, Get 1 Free' designer series paper promotional offer. This offer runs until the end of October so you have three more days to take advantage of this offer - why not stock up today? Just click on the links in the table below to go straight to my online store.

Here is the visual summary of the key products used on today's project for you to pin for easy reference:


You can see all of my Product and 'How To' summaries on my 'How To - Tips and Techniques' Pinterest board in case you've missed any. 

This card really isn't post-friendly because of the depth and fragile nature of the wreath and bow, however will be perfect to hand-deliver to someone special - it really is very pretty in real life and makes a great statement card.

Before you reach for your ink and papers, check out what our amazing team has created to inspire you this week:

The Paper Players Design Team
 
 
Here's a quick recap of our challenge rules:
 
1.  Create a new paper project
2.  Upload your creation to your blog with a link back to us and provide a direct link to the post featuring your challenge submission.
3.  Please link your card to no more than four challenges, TOTAL.
4.  Have FUN! 


I look forward to seeing what you create with our board this week. Enjoy the rest of your weekend as it will be over all too quickly; I'll be back tomorrow with another project; until then, happy stampin'!


Stampin' Up! Supplies Used:

Table built using Product Table Builder by The Crafty Owl - Independent Stampin' Up! Demonstrator.

Shop Online

Access my online shop 24 x 7, 365 days of the year:

Current May hostess code:

VDKNV7BH

Shop Online

2024-25 Annual Catalogue

BROWSE THE CATALOGUE

Click on the image to download your copy of the 2024-25 annual catalogue. For a full list of current SU! supplies, go to my online store. If you would like any help or advice, please drop me a line at [email protected] or give me a call on 07773 421446 - I'd be happy to help.

Join My Team

It's always a great time to join Stampin’ Up but during May it's even better! New team members can get £78.25 of new In Color products for FREE! That's in addition to another £130 worth of products of your choice for only £99 + free business supplies + free shipping + all the fun being a part of Stampin’ Up! Stampin' Up! has something for everyone: join my growing team and benefit from my support to enjoy Stampin' Up! however you choose.

If you're interested, call me for a chat to understand how I can help you realise your goals. Alternatively, if you have already decided to sign up and you just can't wait, please click here for the link to the online form where you can sign up and order your starter kit right away! 

Latest Kits!

Stampin Cut and Emboss

The City Sights Kit has all you need to make 8 cards with coordinating envelopes for £20. Along with the new Happy Hollyhocks Kit, a no stamping kit including 9 cards for just £14, both are available from May 1st - get yours here!

New Online Exclusives

There are new products available exclusively in the online store from 5 March - check them out here.

About Me

Hi I'm Joanne and live in Northampton and when I'm not looking after my husband and two beautiful children, am an avid crafter with a passion for all things Stampin' Up!

I must confess that I have never been a big rubber stamper - until I discovered Stampin' Up! that is. I love the fact that I can get such great results with co-ordinating stamps, inks, papers and punches - the possibilities are endless! Join me on my stamping journey as I share the things I love and be inspired to create amazing things yourself!

Follow Me

Monthly Newsletter

Box Builder

Click the button above to use Box Buster to create your custom box design using the Envelope Punch Board!

Kits Collection Now Available!

Stampin Cut and Emboss

The new Kits Collection from Stampin' Up! is now available!

Click here to see the current kits available and order yours online today.

I Design For


Mini Catalogue


The next mini catalogue will be live in September! 

Stampin' Up Stuff

This is my personal blog and is not endorsed by Stampin’ Up! I hope you find it a plentiful source of ideas and personal inspiration but please don't copy my designs for contest submission or use for classes, publication or sale without express permission.