Epic Celebration - You Rock for The Paper Players PP387

by Joanne James1. April 2018 09:00

Happy Easter Sunday wishes everyone! It's time for this week's new challenge over at The Paper Players! It's the turn of the amazingly talented Laurie to host this week and she has a fun theme challenge for you to work with:


I don't have much in the way of music-themed supplies in my collection and usually end up resorting to my e-cutter to create music-themed cards and gifts (you can see some of my previous examples here and here), so I was thrilled to see the Epic Celebrations set in this year's Sale-A-Bration promotion. As the wife of a guitarist and the other mother of two almost-teens, one of whom is in a band and both of whom are into either listening to or playing music in a big way, this set was a must-have for me. So whilst Sale-A-Bration has now ended, this set is a keeper and I just had to use it on today's card. I also used this week's sketch at Freshly Made Sketches for my layout - take a look:


Here's the low-down on today's card:

Epic Tone on Tone - I decided to use a simple tone-on-tone stamped background in Real Red using the guitar stamp to create some detail and to highlight my main focal image, which I stamped and heat embossed in black on watercolour paper, then coloured with my aqua painter. I added this to a collection of stars and bits and pieces to add a touch of 'glam rock' to my card. 

A LittleSheet Music - The border panel is a section of the background stamp 'Sheet Music', which I simply stamped onto Whisper White and cut out a section for added interest in keeping with the theme.

A Punny Sentiment - My punny sentiment is courtesy of the now-retired 'Crazy About You' set, which was perfect for this card. I also used the 'You're Awesome' sentiment from the Epic Celebrations set on the inside of my card:


Here is the visual summary of the key products used on today's project for you to pin for easy reference:


You can see all of my Product and 'How To' summaries on my 'How To - Tips and Techniques' Pinterest board in case you've missed any. 

This card is headed to my pile as a thank you for one of Rebecca's teachers; she will be performing the role of Brigitte in her whole school production of Rogers & Hammerstein's 'The Sound of Music' next term and there are an army of staff involved in making this happen, including her Maths teacher, who also plays electric guitar. The girls at school think he is super cool, so this card will be perfect for him!

Before you reach for your ink and papers, check out what our amazing team has created to inspire you this week:

Here's a quick recap of our challenge rules:
 
1.  Create a new paper project
2.  Upload your creation to your blog with a link back to us and provide a direct link to the post featuring your challenge submission.
3.  Please link your card to no more than four challenges, TOTAL.
4.  Have FUN!

I can't wait to see how you interpret this week's theme and look forward to visiting your blogs this week! Enjoy the rest of your weekend - enjoy your Easter egg hunts and eat as much chocolate as you can safely consume! I'll be back tomorrow with another project; until then, happy stampin'!


Stampin' Up! Supplies Used: 

Table built using Product Table Builder by The Crafty Owl - Independent Stampin' Up! Demonstrator.

A Picture Perfect Party Birthday Celebration PP386

by Joanne James25. March 2018 09:00

It's Sunday and time for this week's new challenge over at The Paper Players! It's the turn of my amazing friend Claire to host this week and she has my favourite, a sketch challenge, for you to work with:


I could have gone so many ways with this sketch! I have not one, but two cards, to share with you today - both with a fun party theme. Here's the first one - take a look:


Here's the low-down on today's card:

Picture Perfect Party - Both of my cards today feature papers with the bold, photographic images featured in the Picture Perfect Party DSP Stack. In bright, celebratory colours, these papers are perfect for a large expanse of background and work really well as the background for my fun, party-themed cards. I used the offcut from my card panel to continue the decoration through to my envelope to with a colourful envelope liner.

Picture Perfect Birthday - I used the co-ordinating Picture Perfect Birthday stamp set to decorate the sentiment circles on the front of my card. I was lucky to receive this set free when I attended Onstage last November, which really was fortunate for me as I think this is a set I might otherwise have overlooked. It contains some great, scripted fonts that work for birthdays and more general celebrations and has some fun confetti, candle, tooter and ribbon bow images too. In addition to using it to decorate the outside of my card, I added a little colour to the inside too:


Finishing Touches - To finish my cards, I added some gold tinsel trim and a strip of fringed cardstock to the one above and some silver baker's twine and mini silver sequin trim with a strip of fringed cardstock to the card below:


And here's the inside of this card too:

Two cards using the same layout and supplies, each with a different pattern and sentiment. The Picture Perfect Party Suite is perfect for creating batches of birthday cards with a minimum of supplies. Here is the visual summary of the key products used on today's project for you to pin for easy reference:


You can see all of my Product and 'How To' summaries on my 'How To - Tips and Techniques' Pinterest board in case you've missed any. 

Before you reach for your ink and papers, check out what our amazing team has created to inspire you this week:

Here's a quick recap of our challenge rules:
 
1.  Create a new paper project
2.  Upload your creation to your blog with a link back to us and provide a direct link to the post featuring your challenge submission.
3.  Please link your card to no more than four challenges, TOTAL.
4.  Have FUN!

I can't wait to see what you create with this week's sketch and look forward to visiting your blogs this week! Enjoy the rest of your weekend as it will be over all too quickly. We are minus one James Junior who is away on a short hockey tour for a few days, so will be spending the day researching hurricanes with James Junior number 2 for a geography project in between a little crafting too I hope!

I'll be back tomorrow with another project that also uses this same sketch but has a totally different feel, so do come back and take a look at that card; until then, happy stampin'!


Stampin' Up! Supplies Used: 

Table built using Product Table Builder by The Crafty Owl - Independent Stampin' Up! Demonstrator.

Sunshine and Rainbows For The Paper Players PP385

by Joanne James18. March 2018 09:00

It's Sunday and time for this week's new challenge over at The Paper Players! It's Nance's turn to host this week and she has a clean and simple challenge for you to work with:


I decided to take Nance's challenge literally and have a clean-and-simple rainbow card to share with you this week - take a look:


Here's the low-down on today's card:

Build A Rainbow The Easy Way - Today's card features a fun rainbow made using the Rainbow Builder Framelits Dies - these really do make building a rainbow super quick and easy. I ran all 7 pieces through the Big Shot at the same time and held them together with some washi tape across the back.

Myths and Magic - I don't usually use designer paper on a clean and simple card, but I couldn't resist a background of clouds and sky courtesy of this fun pattern fro the Myths and Magic Specialty DSP Pack. It makes the perfect backdrop for my bright rainbow and layered clouds.

Sunshine and Rainbows -  My card is mostly made up of diecuts and has very little stamping - just the sunshine and the sentiment. I decided to continue the rainbow theme into my sentiment stamp and coloured it with the colours of my rainbow using sponge daubers for a fun variegated effect.

Whilst my card is a little more layered than I usually go with for clean and simple, this card is really straightforward and super quick to put together and I love the pop of bright colour that the rainbow gives. Here is the visual summary of the key products used on today's project for you to pin for easy reference:


You can see all of my Product and 'How To' summaries on my 'How To - Tips and Techniques' Pinterest board in case you've missed any. 

Before you reach for your ink and papers, check out what our amazing team has created to inspire you this week:

Here's a quick recap of our challenge rules:
 
1.  Create a new paper project
2.  Upload your creation to your blog with a link back to us and provide a direct link to the post featuring your challenge submission.
3.  Please link your card to no more than four challenges, TOTAL.
4.  Have FUN!

Don't forget the theme is clean and simple this week - so minimal layers and embellishments and lots of white space. I can't wait to see what you create and look forward to visiting your blogs this week! Enjoy the rest of your weekend as it will be over all too quickly. I'm meeting an old school friend today and we are going on a course to brush up on our Copperplate Calligraphy skills, assuming the snow we are expecting here in the UK (again!) doesn't scupper our plans.

I'll be back tomorrow with another project; until then, happy stampin'!


Stampin' Up! Supplies Used: 

Table built using Product Table Builder by The Crafty Owl - Independent Stampin' Up! Demonstrator.

At Home With You Birthday Surprise Card PP384

by Joanne James11. March 2018 09:00

Firstly, an apology to my regular readers for my lack of blog posts this week; I was well and truly wiped out following the craft retreat I hosted last weekend! I had a fabulous time, but following my class at the start of this week I needed to take a few days out to catch up on some family things and get my office straight in order to start again.

As it's Sunday, I'm back with this week's new challenge over at The Paper Players! It's my turn to host this week and I have my personal nemesis, a colour challenge for you to work with:


Now since it's Mothering Sunday here in the UK today, you might think I would have a Mother's Day card to share with you, or maybe something floral - but no, instead I have a rather girly birthday card to share with you this week, with a fun surprise element too - take a look:


Here's the low-down on today's card:

Pretty In Pink - I chose to feature a combination of Pink Pirouette and Melon Mambo on my card today - who wouldn't love a pink house with a pink front door, right?! Using the stamps and framelits in the At Home With You bundle featured in the annual catalogue, I also added a pretty spring floral wreath and two flower pots, all coloured with my Stampin' Write markers to complete my doorstep scene.

A Birthday Surprise - The At Home Framelits Dies include a framelit that cuts and scores a hinged door, that allows for a fun feature and a hidden birthday surprise - take a look:


A birthday message and a gift too!

Textured Brick Wall - I continued the house theme by adding some textured bricks around the door using embossing paste and a stencil - I think it gives my card something of a cottage feel. I continued my stamping inside my card and onto my envelope for a finishing touch.

Here is the visual summary of the key products used on today's project for you to pin for easy reference:


You can see all of my Product and 'How To' summaries on my 'How To - Tips and Techniques' Pinterest board in case you've missed any. 

Before you reach for your ink and papers, check out what our amazing team has created to inspire you this week:

Here's a quick recap of our challenge rules:
 
1.  Create a new paper project
2.  Upload your creation to your blog with a link back to us and provide a direct link to the post featuring your challenge submission.
3.  Please link your card to no more than four challenges, TOTAL.
4.  Have FUN!

I can't wait to see what you create with this week's colours and look forward to visiting your blogs this week! Enjoy the rest of your weekend as it will be over all too quickly. I have had an early start today as I needed to be up at 4am to see one of my James Juniors off to school to board the coach for a week long school trip to Normandy, so I suspect that my day will involve a lot of caffeine and need to finish rather earlier than usual! I'll be back tomorrow with another project; until then, happy stampin'!


Stampin' Up! Supplies Used: 

Table built using Product Table Builder by The Crafty Owl - Independent Stampin' Up! Demonstrator.

Host A Party And Get Tranquil Tulips For Free PP383

by Joanne James4. March 2018 09:00

It's Sunday and time for this week's new challenge over at The Paper Players! It's the turn of the delightful Jaydee to host this week and she has a rather timely theme challenge for you to work with:


My card was totally inspired by the lovely inspiration photo Nance chose for Jaydee's challenge badge this week: those red tulips are just lovely so I had to feature some on my card today. We have been experiencing sub-zero temperatures here in the UK for the past week, along with significant snowfall and I for one am ready for Spring, even if only with my card today - take a look:


Here's the low-down on today's card:

Get Tranquil Tulips For Free - Tranquil Tulips is one of the hostess sets in the annual catalogue, that is available exclusive to those that host a Stampin’ Up! party or place a personal order of £150 or more. A gorgeous set with blooms that can be stamped directly or fussy cut and layered as I’ve done here. Sale-A-Bration is the best time of year to host a Stampin’ Up! party, as with qualifying sales you can earn an extra £20 in rewards on top of the usual levels. I’ve had lots of customers take advantage of this and earn this sets and lots of other free produc, whilst having a fun evening with friends into the bargain. If you would like to earn this set for free, then talk to me about hosting your own party - I still have a few slots left this month if you would like to squeeze one in before the end of the month, but you’ll have to be quick!

A Tutti Frutti Pattern - I paired my red tulips with some blue grape hyacinths and that inspired the colour scheme for the rest of my card. The background paper is from the Tutti Frutti paper stack - lots of bold fruit patterns here, but if these are not your thing there are some great patterns such as the one I’ve used today on the reverse of each sheet too.

A Spring Banner - I took the wording for my banner from the current ‘Hello Easter’ set and paired it with the banner from the Bunch of Banners set to fit my theme. Some navy crinkle seam binging ribbon finishes my card.

Here is the visual summary of the key products used on today's project for you to pin for easy reference:


You can see all of my Product and 'How To' summaries on my 'How To - Tips and Techniques' Pinterest board in case you've missed any. 

Before you reach for your ink and papers, check out what our amazing team has created to inspire you this week:

Here's a quick recap of our challenge rules:
 
1.  Create a new paper project
2.  Upload your creation to your blog with a link back to us and provide a direct link to the post featuring your challenge submission.
3.  Please link your card to no more than four challenges, TOTAL.
4.  Have FUN!

I can't wait to see how you interpret this week's theme and look forward to visiting your blogs this week! Enjoy the rest of your weekend as it will be over all too quickly.

I am spending today with a bunch of lovely ladies who braved the British weather to join me for my first residential luxury crafting retreat. Yesterday was a craft-packed day and theres just as much fun in store today. Wish you were here to join in the fun too!

I'll be back tomorrow with another project; until then, happy stampin'!


Stampin' Up! Supplies Used: 

Table built using Product Table Builder by The Crafty Owl - Independent Stampin' Up! Demonstrator.

You're Inspiring Stampin' Blends Easter Daffodils PP382

by Joanne James25. February 2018 09:00

It's Sunday and time for this week's new challenge over at The Paper Players! It's the turn of the super-talented Sandy to host this week and she has my favourite, a sketch challenge, for you to work with:


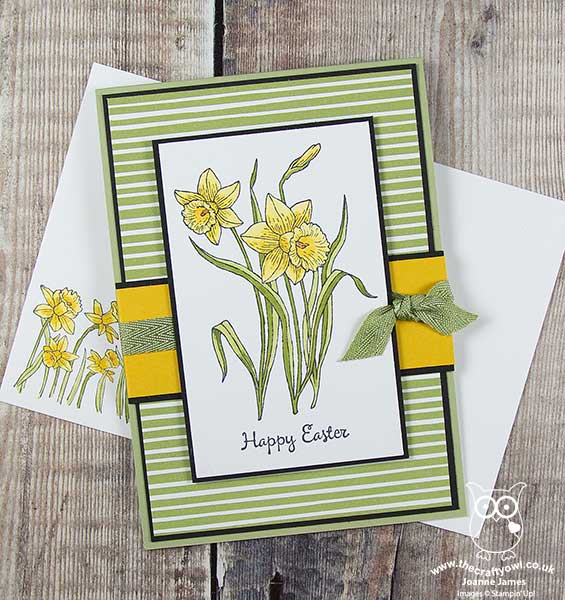
Now I have a slight confession: I have been working hard to put the finishing touches to my weekend craft retreat that is being held next weekend, so I have been working a little more in advance than usual and sketching out my cards without always having my laptop to hand. I instantly knew what I wanted to do with Sandy's sketch and set to work colouring my central panel; it was only after I glued everything together I realised I hadn't re-checked the sketch and so my background layers are regular rectangles, rather than the longer, narrower central panel. I did not have time to remake my card so I'm sharing with you as is. I know that the lovely Sandy will forgive me though - besides, i'm hoping she will be so impressed with my colouring in she might not even notice ;-) 

Anyway - my card contains one of my most favourite spring blooms so is also perfect for the challenge over at Stamp Ink Paper this week. As someone who hails from the rolling hills of Wales I could not pass up this set from the seasonal catalogue, it really was love at first sight! Here's my card - take a look:


Here's the low-down on today's card:

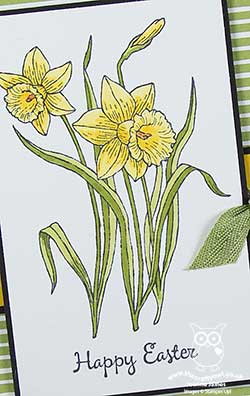
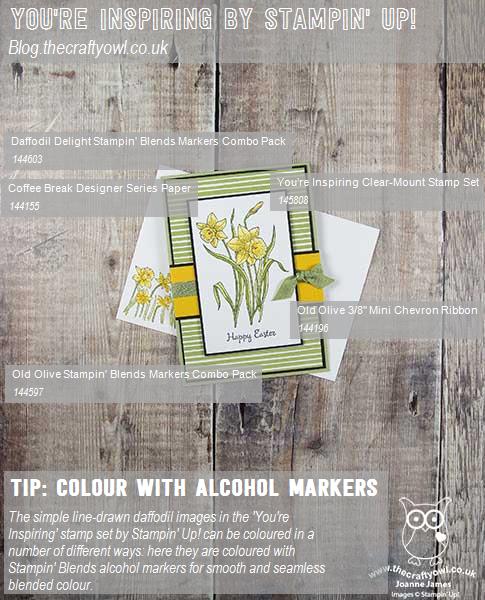
Daffodil Delights - I have longed for a daffodil stamp for ages so am delighted to have 'You're Inspired' to add to my stamp collection. With sentiments for Easter, Mother's Day, Birthday and a couple more besides, along with two beautiful line-drawn daffodil images, this is a great set for Spring and beyond. There are so many ways this image can be coloured and I will be sharing lots of cards that demonstrate the versatility of this set in coming weeks. For today's card I went for straight forward colouring with my Stampin' Blends Daffodil Delight and Old Olive markers on Whsiper White cardstock. 

Coffee Break Stripes - I paired my daffodil image with a background of white and old olive stripes from the Coffee Break Designer Series Paper pack. It has enough pattern to add interest but not so much to detract form the main image of those beautiful blooms. I added a Crushed Curry horizontal banner and finished it with some Old Olive ribbon to tie the elements of my design together.

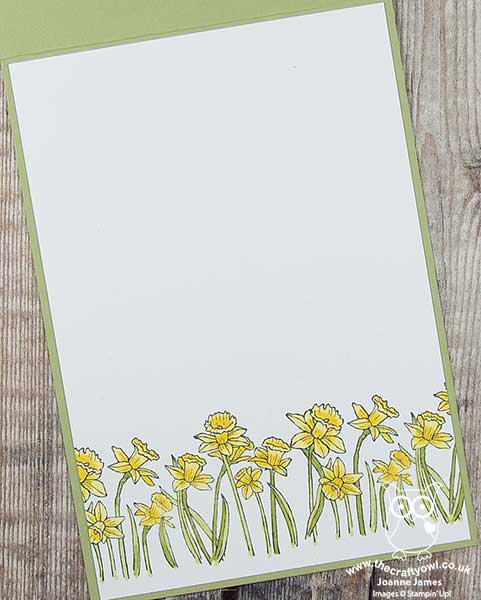
Down Dales And Up Hills - ... rows and rows of daffodils! This is the first line of a poem I learned in primary school to recite on St David's Day some 40 years ago and I can still remember it all these years on. I was reminded of it when I saw the stamp featuring a row of daffodils; I decided to repeat this image and create a border of daffodils for the inside of my card, take a look:

I know I am going to get so much use out of this stamp set and it will definitely be a keeper for me. I can't wait to make lots more with it!

Here is the visual summary of the key products used on today's project for you to pin for easy reference:


You can see all of my Product and 'How To' summaries on my 'How To - Tips and Techniques' Pinterest board in case you've missed any. 

Before you reach for your ink and papers, check out what our amazing team has created to inspire you this week:

Here's a quick recap of our challenge rules:
 
1.  Create a new paper project
2.  Upload your creation to your blog with a link back to us and provide a direct link to the post featuring your challenge submission.
3.  Please link your card to no more than four challenges, TOTAL.
4.  Have FUN!

I can't wait to see what you create with this week's sketch and look forward to visiting your blogs this week! Enjoy the rest of your weekend as it will be over all too quickly. I'll be back tomorrow with another project; until then, happy stampin'!


Stampin' Up! Supplies Used: 

Table built using Product Table Builder by The Crafty Owl - Independent Stampin' Up! Demonstrator.

Retro Hoop La La Mini Embroidery Hoop Clean and Simple Card PP381

by Joanne James18. February 2018 09:00

It's Sunday and time for this week's new challenge over at The Paper Players! It's my fabulous friend LeAnne's turn to host this week and she has a clean and simple challenge for you to work with:


This week's challenge was indeed 'sew' much fun and I have not one but two super clean-and-simple cards to share with you this week! This is also something of a 'something old, something new' post for me and perfect for the current challenge over at As You See It where they are asking us to remember the first tool or stamp set we bought or the one that made us fall in love with stamping, so I have a story for you today! First things first though - here is card number one:


Here's the low-down on today's card:

Take A Hoop - I've been wanting to use these cute little mini embroidery hoops in the seasonal catalogue and today gave me the perfect opportunity. Perfect for framing miniature works of art, they are just like the real thing. 

Cross Stitch With Hoop La La - The stamp set I've used today is an old set called 'Hoop La La'. It isn't the first stamp set I ever bought (that was called 'Sweetheart' I think and you could make treat cup cards with it - I still have it somewhere but couldn't find it anywhere when I looked this week!) but this was one of the first. I chose it because it combined two of my favourite hobbies: my love of cross stitch and my new passion for card making - I just had to have it and haven't been able to part with it since. On this card I used the house, coloured with my Stampin' Write markers in Pool Party and Bermuda Bay and added a red enamel heart. Another 'new home' card - I seem to be needing a lot of these lately! The stamp set includes a stamp of an embroidery hoop, but I love the dimension that the little wooden hoops give to the card.

Get Stitching - To continue the stitching theme, I used my stitched circle framelits to cut out my circle to sit inside the hoop (I popped it up on dimensionals). I also added a diecut needle from last season's Quilt Builder Framelits and threaded it with some Pool Party baker's twine. I also added a twine bow to the top of my hoop for decoration. 

Here's the second of my cards, this time using the smaller size embroidery hoop and adhering my stitched circle to the top of the frame for an alternative mount:


This one shows up a little better with the darker purple colour against the white - here is a close up of the hoop so that you can see the alternative mount on the smaller embroidery hoop:


I like this mix of old and new so much I think I'm going to have to get another pack of hoops and make up some more of these cards! 

Here is the visual summaries of the key products used on today's project for you to pin for easy reference:


You can see all of my Product and 'How To' summaries on my 'How To - Tips and Techniques' Pinterest board in case you've missed any. 

Before you reach for your ink and papers, check out what our amazing team has created to inspire you this week:

Here's a quick recap of our challenge rules:
 
1.  Create a new paper project
2.  Upload your creation to your blog with a link back to us and provide a direct link to the post featuring your challenge submission.
3.  Please link your card to no more than four challenges, TOTAL.
4.  Have FUN!

Don't forget the theme is clean and simple this week - so minimal layers and embellishments and lots of white space. I can't wait to see what you create and look forward to visiting your blogs this week! Enjoy the rest of your weekend as it will be over all too quickly. I'll be back tomorrow with another project; until then, happy stampin'!


Stampin' Up! Supplies Used: 

Table built using Product Table Builder by The Crafty Owl - Independent Stampin' Up! Demonstrator.

Bubble And Fizz - To Fussy Cut Or Not?

by Joanne James12. February 2018 06:00

Happy Monday everyone! The James Juniors are on their half-term holiday from school this week so whilst they are likely to be enjoying some much-needed R&R, I will be juggling as usual! I did manage to grab some time over the weekend to write up a ton of blog posts, so hopefully a more regular blogging service is about to resume. Today I'm sharing a card for this week's challenge over at CAS(E) This Sketch - take a look:


I haven't managed to play along here for a little while, so was super-happy to see this sketch as I immediately knew how I was going to tackle it! Now clean and simple my card might be, but it does include a fair bit of fussy cutting - take a look:

Here's the low-down on today's card:

Bubbles And Fizz - When I saw the sketch, I immediately thought of those mini bottles on the Bubbles and Fizz Designer Series Paper that can be yours free with a purchase of £45 or more during the current Sale-A-Bration promotion. These papers are designed to co-ordinate with the Bubble Over bundle in the seasonal catalogue - more on that another day! Whilst the paper really makes the most of the stamp set, it also stands up on its own: fabulous bright colours, with both bottle and alternative patterns in the set. 

To Fussy Cut Or Not - Three of the papers in the Bubbles and Fizz pack have patterns that can be cut out using the co-ordinating Bottles and Bubbles Framelit dies - the design I chose to use for my card is not one of them though! Undeterred, I grabbed my paper snips and set to work. I love a bit of fussy cutting, I actually find it quite theraputic - but I know it's not everyone's thing. We had a lively debate on my Facebook page where I shared my work-in-progress at the weekend; the jury was split 50:50 between the lovers and the haters - which side of the fence would you be on? Do leave me a comment below - I'd love to know! 

A Custom Banner - I played about with lots of backgrounds, colours and sentiment banners before finally deciding in white embossed on a Bermuda Bay banner for a bright pop of colour, courtesy of the Large Number Framelits. The sentiment is from the 'Colour Me Happy' stamp set.

Here is the visual summary of the key products used on today's project for you to pin for easy reference:


You can see all of my 'How To' summaries on my 'How To - Tips and Techniques' Pinterest board in case you've missed any. 

I haven't featured the 'Bubble Over' stamp set on my blog yet, despite having a ton of projects made with it as I was lucky enough to present this set at Onstage last November. I think this may be the week I put that right - look out for a ton of bottle projects to follow, including some 3D pieces.

Enjoy your day and I'll be back tomorrow with another project. Until then, happy stampin'!


Stampin' Up! Supplies Used:

Table built using Product Table Builder by The Crafty Owl - Independent Stampin' Up! Demonstrator.

Heart Happiness Valentine PP380

by Joanne James11. February 2018 09:00

It's Sunday and time for this week's new challenge over at The Paper Players! It's the turn of the wonderful Laurie to host this week and she has a fun colour challenge for you to work with:


I debated about where to take these colours and when I saw the current inspiration photo over at Inspired By All The Little Things I decided another Valentine's card was in order. All those red and white hearts, the love and even the bicycle against the neutral background - take a look:


Here's the low-down on today's card:

Heart Happiness - Today's card like last week's features hearts-a-plenty: I stamped a whole bunch of hearts from the 'Hearts Happiness' stamp set in Real Red onto Whisper White cardstock, diecut them with the Sweet & Sassy Framleits, along with a few additional red glimmer ones, and arranged them across my cardfront, along with a couple of doilies and some linen thread.

Love(ly Words) - Whilst I didn't use a bicycle on my card, I was inspired by the bike in the Inspired By photo to add my 'love' sentiment in black amongst my plethora of hearts. The thin frame of my love heart, like the thin frame of the bicycle, was made using the 'lovely' diecut from the Lovely Words framelits set - I snipped the sentiment between the 'e' and the 'ly' to make 'love' and tucked it in between my other hearts so that only 'love' was visible. 

A Custom Sentiment - Whilst this card could be used as a Valentine, it is also my wedding anniversary next week and so I actually made this card for my husband with that in mind. Inside I stamped two of the sentiments from the Petal Palette stamp set, but customised one of them with another stamp in the same set to change the meaning - take a look:


I altered the wording from 'you' to 'us' on the sentiment in the bottom right-hand corner  - a great way to make this sentiment appropriate for a partner rather than another couple; I used the 'US' from the sentiment I used in the centre of my card. Here are the stamps circled so you can see how they look before they were altered:


I hope you like my clever trick - yet another way to make the most of this fabulous set!

Here is the visual summary of the key products used on today's project for you to pin for easy reference:


You can see all of my Product and 'How To' summaries on my 'How To - Tips and Techniques' Pinterest board in case you've missed any.  I'm also linking up today's card with the team over at CAS-ual Fridays - it is after all hearts, hearts and more hearts!

Before you reach for your ink and papers, check out what our amazing team has created to inspire you this week:

Here's a quick recap of our challenge rules:
 
1.  Create a new paper project
2.  Upload your creation to your blog with a link back to us and provide a direct link to the post featuring your challenge submission.
3.  Please link your card to no more than four challenges, TOTAL.
4.  Have FUN!

I can't wait to see what you create with this week's colours and look forward to visiting your blogs this week! Enjoy the rest of your weekend as it will be over all too quickly. I'm off to the swimming pool today for the County Championships with one of my James Juniors - wish us luck! I'll be back tomorrow with another project; until then, happy stampin'!


Stampin' Up! Supplies Used: 

Table built using Product Table Builder by The Crafty Owl - Independent Stampin' Up! Demonstrator.

Painted With Love Hearts Valentine Card and Co-ordinating Fold Flat Top Heart Box

by Joanne James4. February 2018 09:00

It's Sunday and time for this week's new challenge over at The Paper Players! It's the turn of my lovely and talented friend Claire to host this week and she has a rather timely theme challenge for you to work with:


February at last and Valentine's is on the way! I have both a card and gift box to share with you this week and hearts were definitely on my mind when I started creating - take a look:


Here's the low-down on today's card:

Painted With Love - Whilst I used this week's sketch over at As you See It as the inspiration for the layout for my card today, the Painted With Love papers are most certainly the inspiration for my colour scheme. I couldn't wait to use these colourful papers with their gold foil accents on my project, and carried through the shades of purple and pink to the rest of my card design. Here's my colour palette in case you would like to save it for your future inspiration:


Hearts A Plenty - Both the teams over at CAS-ual Fridays and SUO Challenges are looking for hearts, hearts and more hearts this week. I've used a combination of hearts in all different sizes stamped from the 'Heart Happiness' stamp set and some diecuts using the Sweet and Sassy Framelit Dies, along with a sprinkling of gold metallic heart shapes for my full heart quota.

Love You - My sentiment is a combination of a 'love' diecut from the Sunshine Wishes Framelits and 'YOU' from the Sale-A-Bration 'Celebrate You Thinlits' - I love being able to play around and take bits and pieces from my collection to create the perfect combination. I also added a little stamping to the inside - this lovely stamp from the 'Petal Passion' set: 

I also created a co-ordinating box with a heart fold flat closure in the same paper, perfect to enclose a Valentine's treat - here it is with my card: 


I may well do another blog post on the box - it's very pretty and turned out even better than I hoped it would! Here is the visual summary of the key products used on today's project for you to pin for easy reference:


You can see all of my Product and 'How To' summaries on my 'How To - Tips and Techniques' Pinterest board in case you've missed any. 

Before you reach for your ink and papers, check out what our amazing team has created to inspire you this week:

Here's a quick recap of our challenge rules:
 
1.  Create a new paper project
2.  Upload your creation to your blog with a link back to us and provide a direct link to the post featuring your challenge submission.
3.  Please link your card to no more than four challenges, TOTAL.
4.  Have FUN!

I can't wait to see how you interpret this week's theme and look forward to visiting your blogs this week! Blogland has lots of challenges with love in mind so I think this could be something of a theme around here in coming days! Enjoy the rest of your weekend as it will be over all too quickly. We were out at a swimming gala yesterday and Ben has a basketball tournament today, so it's all go here. I'll be back tomorrow with another project; until then, happy stampin'!


Stampin' Up! Supplies Used: 

Table built using Product Table Builder by The Crafty Owl - Independent Stampin' Up! Demonstrator.

Shop Online

Access my online shop 24 x 7, 365 days of the year:

Current May hostess code:

VDKNV7BH

Shop Online

2024-25 Annual Catalogue

BROWSE THE CATALOGUE

Click on the image to download your copy of the 2024-25 annual catalogue. For a full list of current SU! supplies, go to my online store. If you would like any help or advice, please drop me a line at [email protected] or give me a call on 07773 421446 - I'd be happy to help.

Join My Team

It's always a great time to join Stampin’ Up but during May it's even better! New team members can get £78.25 of new In Color products for FREE! That's in addition to another £130 worth of products of your choice for only £99 + free business supplies + free shipping + all the fun being a part of Stampin’ Up! Stampin' Up! has something for everyone: join my growing team and benefit from my support to enjoy Stampin' Up! however you choose.

If you're interested, call me for a chat to understand how I can help you realise your goals. Alternatively, if you have already decided to sign up and you just can't wait, please click here for the link to the online form where you can sign up and order your starter kit right away! 

Latest Kits!

Stampin Cut and Emboss

The City Sights Kit has all you need to make 8 cards with coordinating envelopes for £20. Along with the new Happy Hollyhocks Kit, a no stamping kit including 9 cards for just £14, both are available from May 1st - get yours here!

New Online Exclusives

There are new products available exclusively in the online store from 5 March - check them out here.

About Me

Hi I'm Joanne and live in Northampton and when I'm not looking after my husband and two beautiful children, am an avid crafter with a passion for all things Stampin' Up!

I must confess that I have never been a big rubber stamper - until I discovered Stampin' Up! that is. I love the fact that I can get such great results with co-ordinating stamps, inks, papers and punches - the possibilities are endless! Join me on my stamping journey as I share the things I love and be inspired to create amazing things yourself!

Follow Me

Monthly Newsletter

Box Builder

Click the button above to use Box Buster to create your custom box design using the Envelope Punch Board!

Kits Collection Now Available!

Stampin Cut and Emboss

The new Kits Collection from Stampin' Up! is now available!

Click here to see the current kits available and order yours online today.

I Design For


Mini Catalogue


The next mini catalogue will be live in September! 

Stampin' Up Stuff

This is my personal blog and is not endorsed by Stampin’ Up! I hope you find it a plentiful source of ideas and personal inspiration but please don't copy my designs for contest submission or use for classes, publication or sale without express permission.