Boy and Girl Moon Baby Cards

by Joanne James19. March 2017 09:00


It's Sunday and time for this week's new challenge over at The Paper Players! It's my turn to host again this week and I have a clean and simple challenge for us to work with:


I've had the need for a few baby cards recently - all girls, funnily enough, whereas the last time I had a run on baby cards it was all boys, funny how that happens! So I decided that this week's challenge would be a great opportunity to replenish my stock, especially as we have some great new Stampin' Up! baby sets in the Spring-Summer Catalogue. I decided to create two cards today, identical in design but one each in a boy and girl colour scheme, using this week's sketch over at CAS Colours and Sketches - I'm also linking up with the team over at TGIF Challenges where their challenge this week is also all things baby:

   #tgifc99 Baby! Oh, Baby!

I couldn't wait to ink up my 'Moon Baby' stamp set again for my cards today - take a look, here's the baby boy card:


And here is the baby girl card:


Here's the low-down on today's cards:

Twinkle, Twinkle Little Star - I stamped the moon baby onto Shimmery White cardstock and watercoloured them using my inks and aquapainters. I used my Stitched Shape Framelits to cut out my circle and added a layer of Clear Wink of Stella for added sparkle to my moon. I also added a gold metallic shape star to each of my cards for a fun detail.

Tone on Tone - To add interest to my background, I stamped the trio of stars randomly in the same colour ink as my cardstock base. This is a great way to add extra detail and interest whilst still keep your card clean and simple.

Blue For A Boy, Pink For A Girl - I used a duo of light and dark colours for each of my cards, with the darker colour for my card base and the lighter colour picked up in the banner. Here is my colour combination if you would like to save it:

Here is the visual summary of the key products used on today's project for you to pin for easy reference:


You can see all of my Product and 'How To' summaries on my 'How To - Tips and Techniques' Pinterest board in case you've missed any. 

I just love the images in the 'Moon Baby' stamp set - it makes for such cute baby cards! I can't decide which of these colour combinations I like the most - if you have a preference, why not let me know in the comments below - I love to hear your thoughts!

Before you reach for your ink and papers, check out what our amazing team has created to inspire you this week:

The Paper Players Design Team
 
 
Here's a quick recap of our challenge rules:
 
1.  Create a new paper project
2.  Upload your creation to your blog with a link back to us and provide a direct link to the post featuring your challenge submission.
3.  Please link your card to no more than four challenges, TOTAL.
4.  Have FUN! 


I look forward to seeing your clean and simple creations in the gallery this week. Enjoy the rest of your weekend - the James household is busy today with one of the James Juniors playing in a hockey tournament, whilst the other is attending a skills day in connection with school which will see him learning shooting and fencing (I think I'll be taking cover!!)

I'll be back tomorrow with another project; until then, happy stampin'!


Stampin' Up! Supplies Used: 

Table built using Product Table Builder by The Crafty Owl - Independent Stampin' Up! Demonstrator.

Swirly Scribbles Bird's Nest Baby Card

by Joanne James22. May 2016 09:00


It's Sunday and time for a new challenge over at The Paper Players! It's the turn of the queen of diecuts, the lovely Laurie, to host our challenge this week and she has a fun sketch for you to play along with:


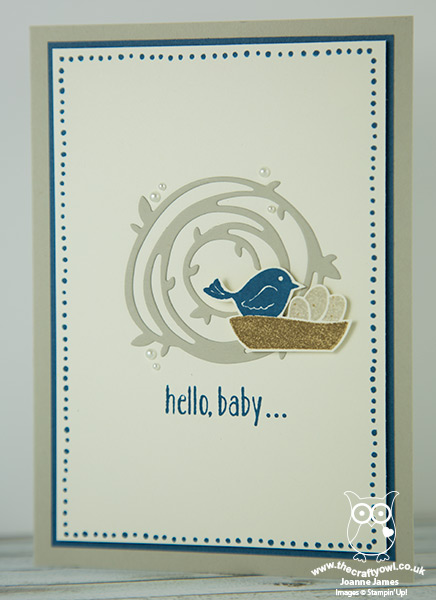
As you know, I love a good sketch and for my card this week I had so many ideas! I will be using this sketch for my card tomorrow too; today I decided to feature a die from one of my favourite sets from the new catalogue called the Swirly Scribbles Thinlits and make not one, but two, new baby cards featuring two of the new in-colours. 

Here is the first one, a baby boy card featuring the new blue, Dapper Denim:
 

Here is the second baby card, featuring the new pink, Flirty Flamingo: 
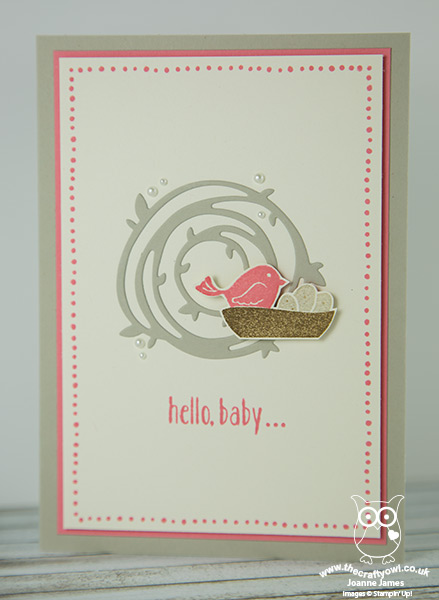
 

Now I know I'm biased, but aren't they just the cutest?! Here is the low-down on today's card:

Swirly Scribbles Thinlits - There are some great swirl, flower and leaf dies in this set - the one that I used here makes the cutest bird's nest backdrop for the cute birdie ready to welcome her babies to the world.

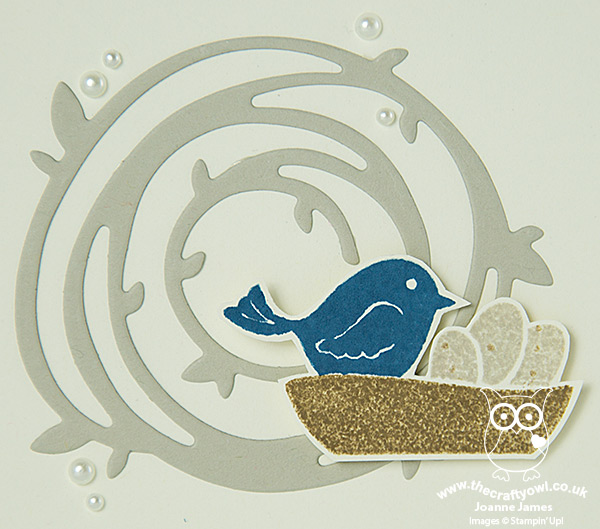
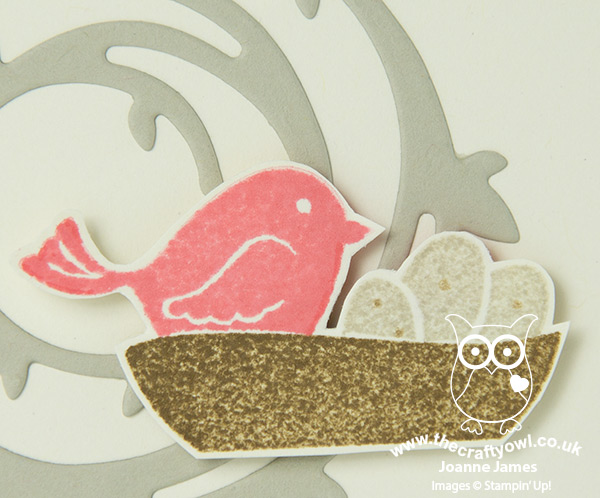
Swirly Bird Masking and Kissing - I did some masking and kissing of the stamps to create my little bird in her nest: first, I stamped the nest twice in Soft Suede, and cut one of them out and used it as a mask so that I could stamp my bird and eggs in the nest. I also created some light speckling on my eggs by inking the 'grunge' stamp in the set in Soft Suede, inking the eggs in Sahara Sand, then 'kissing' the two together before stamping them into the nest. You can get a closer look at this on these close up images below:
 

Perfectly Wrapped Border - I used a mat of each of the new in-colours that I featured on my cards to accentuate the colour and decided to add an additional border detail as per the stitched detail on the sketch. I used one of the border stamps from the 'Perfectly Wrapped' stamp set; this set is photopolymer which makes lining up a breeze. 

Hello Baby Bear - I couldn't finish today's write-up without a nod to the sentiment on today's card. This is one from an adorable set called 'Baby Bear' that also features in the new catalogue and is finished on the inside of the card with '...welcome to the world!'. Perfect for today's card.

I love these dies and the co-ordinating stamp set; you can be sure you'll be seeing lots more projects with them. 

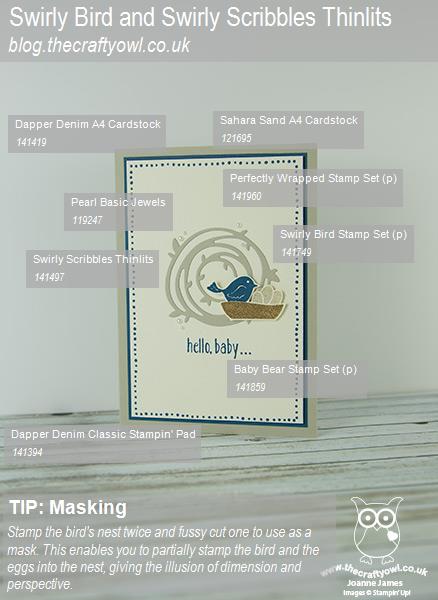
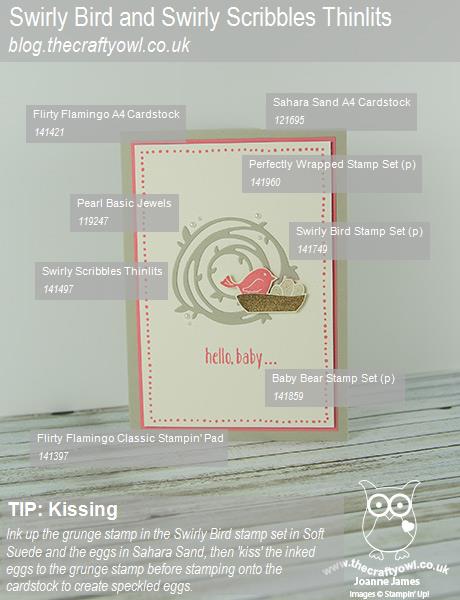
Here is the visual summary of the key products used on today's project for you to pin for easy reference:

Baby Boy Dapper Denim card, with a masking tip:
Flirty Flamingo baby girl card, with a kissing technique tip:
 

You can see all of my 'How To' summaries on my 'How To - Tips and Techniques' Pinterest board in case you've missed any. 

We do rather have birds on the brain in our house at the moment; the baby blue tits in our nesting box hatched about 10 days ago and we are watching the bird cam with interest on a daily basis. There are seven healthy babies and the mum and dad spend many hours each day flying in and out with caterpillars and bugs to feed the young chicks. Here is a photo of them waiting to be fed:


Apologies for the poor photo - the quality isn't great - but I can honestly say watching these little chicks grow is the best tv drama ever, they are so entertaining! Hopefully I'll be able to get some photos of them as they leave the nest when they are grown and share those at a later date.

Before you reach for your ink and papers, check out what our amazing team has created to inspire you this week:

The Paper Players Design Team
 
 
Here's a quick recap of our challenge rules:
 
1.  Create a new paper project
2.  Upload your creation to your blog with a link back to us and provide a direct link to the post featuring your challenge submission.
3.  Please link your card to no more than four challenges, TOTAL.
4.  Have FUN! 


I look forward to seeing how you interpret this week's sketch. We are off to basketball today and are then looking forward to a restful afternoon, with either some time in the garden weather-permitting or indoors watching a movie and the antics of our own baby bird family!

Back tomorrow with another card that also uses this sketch, but is quite different in terms of execution; until then, happy stampin'!


Friends and Flowers Peas In a Pod Baby Card

by Joanne James30. March 2016 08:00

Happy Wednesday everyone! I've already posted today's weekly deals here; don't forget you also have only 48 hours to still take advantage of this year's Sale-A-Bration offers too. Today I have a fun card using this week's sketch over at the As You See It Challenge:

AYSIChallenge129

The challenge brief doesn't restrict us to feathers; anything can be used as long as the card front can fit five of them! I decided that peas in a pod were the way to go for a fun baby card - take a look:

Cute, right? Here's the low-down on today's card:

Friends and Flowers - My peas in a pod are one of the stamps in the 'Friends and Flowers' stamp set. This is a versatile set that includes a variety of stamps that co-ordinate with the Festive Flower Builder punch; I've used the stamp set on its own for today's card. I decided to watercolour my peas, which also made it easier for me to obscure the baby faces on all but one of my pea pods to make one stand out.

Sweet Sentiment - This fun sentiment is from my favourite sentiment set of the moment, 'Suite Sayings' and just perfect for a baby card, especially one with a pea peeking out of a pod.

A Touch of Pink - I finished my card with a sprinkle of pink sequins and some glittery pink enamel dots from the Love Blossoms embellishment kit. This kit is worth it for the enamel dots alone!

Here's the visual summary of the key supplies used to make today's card for you to save for future reference:


I will be back with another card tomorrow for this week's new challenge over at Create With Connie and Mary; until then, happy stampin'!


Stampin' Up! Supplies Used:

Table built using Product Table Builder by The Crafty Owl - Independent Stampin' Up! Demonstrator.

Pearl Baby Lamb It's A Girl Card

by Joanne James23. February 2016 09:00

Hello everyone! Today I have a card for this week's challenge over at Pals Paper Arts where they have a sketch to work with:

PPA-288-Feb18

I love a good sketch and this one allowed me to get my Easter Lamb stamp out for the first time and try something that I've been wanting to do since I bought it - take a look:

The sketch is perfect for using the circle to create a stunning focal point - and this is where my cute lamb comes in! I decided to stamp it without the 'Happy Easter' sentiment as I wanted to make a card to celebrate the arrival of a baby girl. I stamped the image in Smoky Slate, adding a few touches of Blushing Bride and Mossy Meadow ink with my blender pen, then proceeded to add a pearl to each of the circles of the image to create my pearlescent woolly coat. Two packs of Pearl Basic Jewels and some time later, this was the result! I chose to use Blushing Bride and Mossy Meadow as my feature colours from the delicate spotty Birthday Bouquet designer series paper for my base and mat layers - whilst the green is quite dark for a pastel baby card, I was careful to use it sparingly to frame the paper and image only and to stamp my sentiment from the set 'A Dozen Thoughts'. I love this font but since I wanted a narrow banner, decided to make a feature of the loops and cut around them, which fits quite neatly to my circle too - bonus! Lastly, I decided that a strip of Blushing Bride Glimmer Paper was necessary for the vertical banner - just in case anyone was in any doubt that this is most definitely a card for a little lady! I may well be responsible for a run on packs of pearl jewels from the Stampin' Up! store with this card and I know that this is not the sort of card you would make every day, but for a special one-off to commemorate the addition of one more to the female race, I think it's totally worth it!

Here is today's visual summary for easy reference:


That's all from me today. I have lots to be getting on with, including last minute preparations for my new 'Coffee and Card' drop in class at Bells in Northampton tomorrow. Back tomorrow with another project and this week's new Weekly Deals; until then, happy stampin'!


Stampin' Up! Supplies Used: 

Table built using Product Table Builder by The Crafty Owl - Independent Stampin' Up! Demonstrator.

It's A Boy Sweet L'il Things Congratulations Card

by Joanne James10. August 2015 08:00

Happy Monday everyone! I am starting my week with a fun birth congratulations card for the challenges over at Freshly Made Sketches and Pals Paper Arts this week:

   Ppa262

I love the sketch but was initially perplexed when I saw the PPA colours this week as I wasn't sure I could make the Mint Macaron and Pool Party work together; I loved the colour combo though so thought I'd give it a bit more consideration and this is what I came up with:

With both Pool Party and Tip Top Taupe featuring in the Sweet L'il Things Designer Series paper pack, I decided to go with a new baby card - a boy of course! I just love the cloud pattern on the DSP sheet (it comes in the alternate colourway of Pool Party cloud outlines on Very Vanilla too) and whilst this is by no means only of use for a baby card, it provided the perfect backdrop for my little panel of 'zzzzz's' and my Very Vanilla panel with cute Pool Party babygro cut using my Baby's First Framelits. I paper-pierced the babygro to add interest and added a 3/4" Very Vanilla circle with a Mint Macaron punched heart, that I covered with one of the heart-shaped Itty Bitty Accents Epoxy Stickers - this looks so lovely in real life! The heart and banner were just enough Mint Macaron I think with the other two colours and I'm so pleased with my final card. It also made me realise just how much I love Tip Top Taupe - this isn't a colour I've used much at all to date, yet its soft tones work so well with pastels and paler colours, I must try and use it more often.

That's all from me; I am expecting a visit from my parents today, which is making Ben very excited since with his birthday tomorrow he is virtually assured of presents! - and I'm also expecting the arrival of my pre-order of SU! goodies from the new seasonal catalogue. I am beyond excited!!!

Back tomorrow with another project; until then, happy stampin'!


Stampin' Up! Supplies Used:

Table built using Product Table Builder by The Crafty Owl - Independent Stampin' Up! Demonstrator.


Retro Fresh Sweet Baby Card

by Joanne James26. January 2015 09:00

Today its Monday and I have a card for this week's Freshly Made Sketches challenge; I am also linking up with the Friday Mashup, where the challenge is to create a baby card, a card in brown aqua and tangerine - or as in my case, a mashup of both:


I decided that the 'any shape' allowed in the sketch was a great opportunity for me to use probably the only stamp that has never been inked up in my 'Something for Baby' stamp set - the pram. Here is my card:


I chose to use some retired 'Retro Fresh' DSP for my card, as it featured the mashup colours. Once I'd decided on my layers, this card came together surprisingly quickly, even leaving time to stamp the inside and decorate the envelope. I've not used this pram stamp previously as it's quite large - this type of sketch layout is just perfect for it though. I finished my pram wheels with a couple of candy dots for added interest and done! 

Back tomorrow with another project; until then, happy stampin'!


Stampin' Up! Supplies Used:

Table built using Product Table Builder by The Crafty Owl - Independent Stampin' Up! Demonstrator.

Baby We've Grown Baby Card for a Colour Me...! Double Bill

by Joanne James29. October 2014 10:00

It's Wednesday and time for this week's challenge over at Colour Me...! where we have not one but two colour palettes for you to choose from this week:


I'm playing along with option 2 this week, so I have the colour combination of Chocolate Chip, Lost Lagoon, Blushing Bride and a neutral (I chose Very Vanilla) to work with. Using the above sketch from CAS Colours & Sketches as the inspiration for my layout (I turned it through 90 degrees), I decided to make (another!) baby card using one of my favourite baby sets, Baby We've Grown. Here is my card:

I stamped my focal image in Chocolate Chip and coloured in using ink and my blender pens, to give a slightly vintage look to my owls. I matted this panel onto a piece of Chocolate Chip Cardstock, which overlays a vertical strip that has been edged with a piece of Lost Lagoon punched with the hearts border punch. I added my sentiment, again stamped in Chocolate Chip on Lost Lagoon cardstock, to finish. Although the base is Blushing Bride, I think this could be a good unisex baby card; you could always alternate the pink and blue elements if you wanted something more masculine in appearance.

So what do you think? Feel free to leave a comment on today's card, before hopping over to check out the amazing cards by the rest of the Colour Me...! team:

And our talented guest designer for October - Jen Mitchell
 
We look forward to seeing your creative creations - which colour scheme will you choose? 
 
I'm having a fun day with friends today, with all kinds of crafting the order of the day. Back tomorrow with another project; until then, happy stampin'!


Stampin' Up! Supplies Used:

Table built using Product Table Builder by The Crafty Owl - Independent Stampin' Up! Demonstrator.


Tags: , , , , , ,

Cards | Stamping

Colour Block Sweet Baby Card for Colour Me...!

by Joanne James15. October 2014 09:00

DON'T FORGET: 9 DAYS LEFT UNTIL THE FREE PACK OF PAPER FOR 6 MONTHS SIGN UP DEAL ENDS - CLICK HERE TO FIND OUT MORE AND JOIN MY STAMPIN' UP! TEAM TODAY!


It's Wednesday and time for this week's challenge over at Colour Me...! where we have a subtle colour palette for you to work with this week:

This colour palette presented me with the perfect opportunity for a card using the 'colour blocking' technique that I've had in my head for a while. Take a look at my card and then I'll explain:

Colour blocking is the technique of using large blocks of colour to create a solid background and works really well as a background for silhouette shapes in black or white or where you have one large image that you can reverse-block on top, as I've done here with the babygro onesie. I created my colour block background out of three equal pieces of cardstock in the challenge colours running horizontally across my card. I stamped my sentiment in the darkest colour, Island Indigo, onto the lightest one, Crisp Cantaloupe, and then picked out each of the colours in the embellishments: a Soft Sky button, some Island indigo baker's twine and a trio of Crisp Cantaloupe hearts.

Deceptively easy but rather effective I think and a technique that could work with lots of different colour combinations. So what do you think? Feel free to leave a comment on today's card, before hopping over to check out the amazing cards by the rest of the Colour Me...! team:

And our talented guest designer for October - Jen Mitchell
 
We look forward to seeing your subtle creations. 
 
Back tomorrow with another project; until then, happy stampin'!
 
 
Stampin' Up! Supplies Used:
Table built using Product Table Builder by The Crafty Owl - Independent Stampin' Up! Demonstrator.
 

Baby Block Box/Stair Step Card

by Joanne James17. September 2014 10:00

It's Wednesday and a busy day on my blog today! This is the second of today's posts featuring this week's Colour Me...! Design Team card (please click here for my earlier Colour Throwdown post). This week we have a Subtle colour palette for you to work with:

I decided that this week's colour palette would be perfect not only for a baby card, but specifically for a box/stair step card, as whenever I see one of those they remind me of baby blocks all stacked up. So here is my card:

Nicely gender-neutral, with a Whisper White card base and background. I used the Little Letters framelits to cut out the letters for the word 'Baby' and rather than use the actual letters, I used the squares and the negative space to add more colour to my card. The letters didn't go to waste though, as I used them to decorate the envelope. For the remaining two squares, I used the Baby's First Framelits to create the duck and bib shapes, and stamped the co-ordinating stamps on the white layer below. I added some thick Pool Party baker's twine (retired - Sale-A-Bration item from earlier this year) but didn't add anything else as I wanted it to be able to remain post-friendly - despite its dimension, this card folds flat and fits into a standard C6 envelope.

That's my Colour Me...! card for this week - why not visit the other Colour Me...! designers and check out their takes on this week's colour combination:

And our talented guest designer for September - Holly Endress
 
We look forward to seeing your subtle creations.

Back tomorrow with another project; until then, happy stampin'!


Stampin' Up! Supplies Used:

Table built using Product Table Builder by The Crafty Owl - Independent Stampin' Up! Demonstrator.


Sweet Baby Duck New Baby Card for Colour Me...!

by Joanne James3. September 2014 09:30

Wednesday already? This week is zipping by! Today I'm sharing my card for this week's challenge over at Colour Me...! where we have a monochromatic colour palette to work with:

Daffodil Delight yellow - a favourite of mine! - and white. I used this week's sketch over at CAS(E) This Sketch for my layout and this is what I came up with:

A simple card where the feature is this lovely piece of Daffodil Yellow DSP from the All Abloom DSP paper stack (the little white spots remind me of bubbles!). I overlaid this with my angled panel of Whisper White, having used my Big Shot and Baby's First framelits to cut out the duck shape to allow the DSP to peek through. I finished the duck with a simple white baker's twine bow before adding my Bitty Banner 'Sweet Baby' sentiment on dimensionals for added height.

A great 'welcome baby' card that is the perfect store cupboard standby as it would be suitable for a boy or a girl - I'm also linking up with SUO Challenges as it fits nicely with their 'clean and simple' theme. Why not visit the other Colour Me...! designers and check out their takes on this week's colour combination:

And our talented guest designer for September - Holly Endress
 
We look forward to seeing your bright monochromatic creations. Back tomorrow with another project; until then, happy stampin'!
 
Stampin' Up! Supplies Used:
 
Table built using Product Table Builder by The Crafty Owl - Independent Stampin' Up! Demonstrator.
 

Mini Catalogue

BROWSE THE CATALOGUE

The mini catalogue is now live! Read and download your copy here.

Shop Online

Access my online shop 24 x 7, 365 days of the year:

Current April hostess code:

VDKNV7BH

Shop Online

Join My Team

It's always a great time to join Stampin’ Up! New team members can get £130 worth of products for only £99 + free business supplies + free shipping + all the fun being a part of Stampin’ Up! Stampin' Up! has something for everyone: join my growing team and benefit from my support to enjoy Stampin' Up! however you choose.

If you're interested, call me for a chat to understand how I can help you realise your goals. Alternatively, if you have already decided to sign up and you just can't wait, please click here for the link to the online form where you can sign up and order your starter kit right away! 

Latest Kit!

Stampin Cut and Emboss

The Rock Legend Kit has all you need to make 8 cards with coordinating envelopes. Along with the new Panda Friends Kit, both are available from January 4th for just £14 each - get yours here!

2023-24 Annual Catalogue

BROWSE THE CATALOGUE

Click on the catalogue for a full list of current SU! supplies - if you would like to order any of the items featured, please drop me a line at [email protected] or give me a call on 07773 421446 - I'd be happy to help.

New Online Exclusives

There are new products available exclusively in the online store from 5 March - check them out here.

About Me

Hi I'm Joanne and live in Northampton and when I'm not looking after my husband and two beautiful children, am an avid crafter with a passion for all things Stampin' Up!

I must confess that I have never been a big rubber stamper - until I discovered Stampin' Up! that is. I love the fact that I can get such great results with co-ordinating stamps, inks, papers and punches - the possibilities are endless! Join me on my stamping journey as I share the things I love and be inspired to create amazing things yourself!

Follow Me

Monthly Newsletter

Box Builder

Click the button above to use Box Buster to create your custom box design using the Envelope Punch Board!

Kits Collection Now Available!

Stampin Cut and Emboss

The new Kits Collection from Stampin' Up! is now available!

Click here to see the current kits available and order yours online today.

I Design For


Stampin' Up Stuff

This is my personal blog and is not endorsed by Stampin’ Up! I hope you find it a plentiful source of ideas and personal inspiration but please don't copy my designs for contest submission or use for classes, publication or sale without express permission.