Co-ordination Product Release - Available Until 31 March Whilst Supplies Last

by Joanne James4. February 2020 10:00

I'm here today with a quick post to let you know about a new co-ordination product release that launches today and runs until the 31st March whilst stocks last. There is a collection of exclusive products that co-ordinate with Sale-A-Bration and the January-June mini catalogue items. Check them out:


One other thing to note is that Stampin' Up! has confirmed that the Nature's Thoughts Dies that co-ordinate with the Positive Thoughts stamp set and the Special Day Dies that co-ordinate with the Special Someone stamp set will both be carrying over into the new annual catalogue so will be available again to purchase from 4th June. 

There is no limit on how many items you can order, however they are only available for a limited time and whilst supplies last. Last year's co-ordination products sold out really quickly with some popular dies selling out within days, so don't leave it too long to get your hands on yours!

 My personal favourites are the Ladybugs Dies and the Happy Birrthday Dies, along with the Pleased as Punch paper - I can't resist a nice paper, especially one where you can punch out all the patterns!

You can find links to these items and the products they co-ordinate with in the online store are below - any questions, do get in touch. Happy shopping!


Table built using Product Table Builder by The Crafty Owl - Independent Stampin' Up! Demonstrator.
 
Table built using Product Table Builder by The Crafty Owl - Independent Stampin' Up! Demonstrator.

From My Heart Valentine's Card for PP476

by Joanne James2. February 2020 10:00

Today it's Sunday and time for this week's new challenge over at The Paper Players! It's the turn of my sweet friend Claire to host this week and she has a timely theme challenge for you to work with:


It's the first Sunday in February and the month of Valentine's so love is definitely in the air! I combined our challenge this week with the colour palette over at Global Design Project and Julee's Mojo Monday sketch and am linking up with Just Us Girls where they are looking for bows. All of these elements came together for my love-filled card - take a look:


Here's the low-down on today's card:

From My Heart - My card today features three of the patterns in the From The Heart specialty designer series paper. With playful patterns featuring red and pink foil accents on some designs, these papers are perfect for Valentine's Day cards and packaging. I used a pink and red random heart design for my largest panel and layered two of the foiled heart designs for the uppermost layer and focal point of my card. Check out the foil effect - so pretty:


Two Hearts Are Better Than One - I loved the layering of Julee's sketch and decided it would be a great way to showcase my favourite foiled heart pattern in the paper pack. I layered it on a pink heart from another of the designs, both of which I punched out using the punches in the Heart Punch pack: one has straight edges and the other scalloped and they nest together beautifully. I love it when you can punch shapes out of paper this easily - it makes card making a breeze! 

Add A Bow - I finished my card with a fancy glossy red satin ribbon bow. The foil detailing and the faceted gems make this card something special and a luxurious bow seemed like the perfect way to complete my card.

Here is the visual summary of the key products used on today's project for you to pin for easy reference:


You can see all of my Product and 'How To' summaries on my 'How To - Tips and Techniques' Pinterest board in case you've missed any. 

Before you reach for your ink and papers, check out what our amazing team has created to inspire you this week:

Here's a quick recap of our challenge rules:
 
1.  Create a new paper project
2.  Upload your creation to your blog with a link back to us and provide a direct link to the post featuring your challenge submission.
3.  Please link your card to no more than four challenges, TOTAL.
4.  Have FUN!

Enjoy your day; I will be crafting and getting ready for my technique class tomorrow and might even sneak in a movie this afternoon. To my fellow PP teamies and anyone else stateside who is watching the Super Bowl and hosting or attending a Super Bowl party - enjoy!

I'll be back tomorrow with another project. Until then, happy stampin'!


Stampin' Up! Supplies Used: 

Table built using Product Table Builder by The Crafty Owl - Independent Stampin' Up! Demonstrator.

Love At First Sight

by Joanne James30. January 2016 20:00

I hope you are all enjoying your weekends. So far mine has been spent doing laundry, assisting the James Juniors with their homework (Ted Hughes poetry and an art project today!) and preparing for my technique classes next week. I did find time to finish a card that I started yesterday though: another Valentine's card, using this week's sketch over at Freshly Made Sketches and the top line of the tic-tac-toe board over at Stamps, Ink, Paper and fitting with the 'love' theme over at Paper Craft Crew too.

   SIP Tic Tac Toe 32 800    Love Theme Challenge 179 for the Paper Craft Crew.

In order to fit in my large sentiment, I went with an unusual 8 1/4" x 5 1/2" sized card - take a look:

I stamped the 'l v e' from the 'Larger Than Life Alphabet and Numbers' stamp set in Versamark and heat embossed them in black, then substituted the 'o' from my 'love' sentiment with the heart from the 'First Sight' set, which I stamped in Real Red on Real Red cardstock, then overstamped again in Versamark and heat embossed with clear embossing powder for additional shine. I used a piece of Everyday Chic designer series paper for my border panel and finished off my sentiment inside the card with one of the 'Hello You' thinlits and an outline stamped red heart:


I even created a custom envelope with some Real Red envelope paper and the help of my trusty Envelope Expert tool, which I also decorated with a stamped red heart.

I love the layers of this card and the letters shine beautifully; I think this may be one of my favourite Valentine's cards that I've ever made. Today's blog title comes from the combination of one of the stamp sets I've used today and the sentiment and it got me thinking - I remember meeting my now husband for the first time and thinking even then he would be the man I would one day marry; I do believe there is such a thing as love at first sight - do you? Do leave me a comment below today's post - I would love to know what you think.  

That's all from me today; back tomorrow with a new card for this week's challenge over at The Paper Players. Until then, happy stampin'!


Stampin' Up! Supplies Used: 

Table built using Product Table Builder by The Crafty Owl - Independent Stampin' Up! Demonstrator.

Pink and Pretty Sheltering Tree Card

by Joanne James19. January 2015 10:45

It's Monday and I am filled with the enthusiasm of a new week! I managed to get some quality crafting time yesterday afternoon, so I'm hoping to tick off a few 'back burner' jobs this week. Today I'm sharing a card using this week's sketch over at Freshly Made Sketches, where Jen Timko has this sketch for us (and a great interpretation of it - you should really check out both her card and those of the other FMS designers):

I stuck with the circle for my shape and decided to go with a pink and pretty card today using the fab 'Sheltering Tree' stamp set from the new Spring-Summer catalogue. Here is my card:

I used Crumb Cake for my base and adhered a layer of Crumb Cake DSP with polka dots from the Neutrals DSP stack to the front. I stamped my tree on Whisper White in Crumb Cake, and the leaves twice, once in Pink Pirouette and once in Blushing Bride, then added some tiny pink hearts punched with my Confetti Heart Border Punch. The swing and sentiment are stamped in Chocolate chip for a little contrast and I embossed the top layer with the large polka dot embossing folder before adhering to my card with dimensionals. A small punched heart and tiny pearl complete the look. This stamp set offers so many possibilities; it was one of those sets that I bought 'for me' as I know I will get lots of use out if it. It's also photopolymer, so aligning the images is a doddle - no stamp-a-ma-jig required.

I am also linking today's card up with SUO Challenges where the current theme is dots; mine are subtle, but they are definitely there! This card would make a lovely Valentine's card or even a birthday or other occasion for a special little girl - I know my daughter would love it, although her fascination with the little bicycle that comes with this stamp set may require me to change out the swing with a two-wheeler!

Back tomorrow with another project; until then, stay warm (it's cold in the UK today!) and happy stampin'!


Stampin' Up! Supplies Used:

Table built using Product Table Builder by The Crafty Owl - Independent Stampin' Up! Demonstrator.


Minecraft Creeper Pop-Up Birthday Card

by Joanne James17. August 2014 08:00

Today I'm sharing my Design team card for this week's challenge over at The Paper Players. This week LeAnne is hosting and she has a clean and simple challenge to create a child's birthday card this week:

Those of you who follow LeAnne's blog, Wee Inklings, regularly will know that today young Miss Cassidy is celebrating her fourth birthday - hooray! having seen the other Design Team members cards this week, I can vouch for the fact that mine looks quite different to everyone else's! My cards today are not made with four year old girls in mind (nowhere near enough pink for that!) however as the mother of two young children, I make lots of children's cards. Whilst they are sometimes stamped, I am often asked to make something that reflects the current favourite game/toy/theme of the moment. Those of you who follow my blog will know I am partial to Lego and have created some great Lego punch art in the past (see my most recent one here), although this can be time-consuming and not all that clean and simple. Today though I am sharing two of my tried and tested punch art cards for young boys.

First I am sharing another of Ben's birthday cards from last week; this time, the one I made for him from his big sister. Now as is true for most young boys of his age, Minecraft is a game that provides hours of endless entertainment for him. I've made a few creeper cards that I haven't shared previously (creepers are the monsters that come out at night and take your life, so I'm told) - they really are so easy to make! - but I thought I'd share this one, as after a browse on Pinterest I saw this card and decided I wanted to make a creeper card with a difference. Here's the outside of my card:


A simple creeper face made from 1" punched squares, along with 2 pieces of 1" x 1 1/2", one cut in half lengthways, on a background of now retired Gumball Green (I think this is the best creeper colour, but you could substitute with Garden Green if you don't have any), then when you open the card, he really comes to life:


A simple pop-up - how fun is that?! This must be a record in terms of supplies, given that you can make one of these cards with some basic cardstock and not much else; it's also another 'no stamping' card - that's two in a week! Now I have to admit, as cards go it's not really my cup of tea, but then I'm not the target audience. The verdict? Rebecca thought it was awesome and Ben loved it, so if it ticks the box of the now seven year old, it's good enough for me!

I also wanted to share another clean and simple birthday card that I have made so many of, I can't quite believed I've never blogged before! All children seem to love shaped cards, and this cute Angry Bird is so easy to create using a few punches and a base made using the Circle Thinlits and the Big Shot:


A custom envelope from some co-ordinating Brights DSP made using the Envelope Punch Board and you are good to go. Two cards that are really clean and simple, quick and easy. Do pop over to The Paper Players to see what the other designers have come up with - I promise they will be quite different to mine!

It's Sunday and I'm off to town today to collect some frames for a private home décor class I'm teaching tomorrow along with a visit to the shoe shop for new trainers and school shoes for the children in readiness for the new school year. Still two more weeks to go, yet I'm sure it will fly by.

Back tomorrow with another project; until then, happy stampin!


Stampin' Up! Supplies Used:

Table built using Product Table Builder by The Crafty Owl - Independent Stampin' Up! Demonstrator.


True Love - Pals Paper Arts #187

by Joanne James13. January 2014 21:13

A busy day today: key highlights were getting to the bottom of the ironing basket (always worth celebrating!), finding Ben's mislaid PE training shoes at school and completing my card for this week's Pals Paper Arts Challenge. This week it's a colour challenge to incorporate the following colours:


I decided to stick with the Valentine's theme and use the contrasting colours to work up a card design that I've been wanting to have a go at for a while - here's my card:

I'm not sure what the term is for this angular layered design (or even if there is one!) but it's the perfect simple layout to highlight both the Eiffel Tower and 'True Love' sentiment from the 'Follow Your Heart' stamp set; I used my Stamp-a-ma-jig to ensure perfect placement. Lastly, I added a small punched red heart with a rhinestone on a dimensional for added interest. I love the simplicity of this card and the statement that the bold red colour makes against the white and soft sky.

I hope you like my card - there's lots more inspiration from the Design Team over at Paper Pal Arts using this colour combination if you fancy having a go.

Back tomorrow with another card; until then, happy stampin'!


Stampin' Up! Supplies Used:

Table built using Stampin' Up! Product Table Builder from The Crafty Owl.

Island Indigo Flowerfull Heart Slider Card

by Joanne James6. January 2014 21:09

Today has been a fun day, with my first class of the year. A fun - if quiet! - time was had by all, with all my ladies being very accommodating of my continued voiceless state. I'll share more on our class makes later in the week, but today I'm sharing a card that I am entering for this week's Pals Paper Arts challenge, PPA186, which is to use the following colours:


With this in mind, I inked up my Flowerfull Heart stamp again but this time made a slider card - take a look:


I stamped the heart in Versamark and heat embossed with gold embossing powder, then layered the heart on another one made from gold foil. When the ribbon end is pulled, it reveals the message inside:

The inside of the slider card is stamped with my favourite stamp from the 'Follow My Heart' set on the lower inside panel, and the valentine stamp from the 'Delightful Dozen' on the extending top section (I replaced the stamped heart with a gold foil one). I think this would make a lovely masculine valentine's card; the gold foil and embossing adds a real luxurious feel.

I will be sharing a video tutorial on how to make this card as soon as my voice returns, so stay tuned. Meanwhile, check out the inspiration from the designers and participants over at Pals Paper Arts here.

Back tomorrow with another card; until then, happy stampin'!


Stampin' Up! Supplies Used:

Table built using Stampin' Up! Product Table Builder from The Crafty Owl.


Love Is In The Air .... Already?!

by Joanne James1. December 2013 10:49

Good morning lovely readers - no blog post yesterday as I had some very important last-minute work to finish, but do not fear - today there will be (at least) two blog posts to make up for it!

So today we're having a short break from Christmas projects as it's the first of December and the launch of Stampin' Up's 'Whole Lot of Love' promotion - stamps and products designed with Valentine's Day in mind, but can be used for lots more besides. You may have noticed that Valentine's-themed projects didn't feature in the current seasonal catalogue, hence this special promotion to enable you to be prepared in good time for the big day. There are some great products in this set, ranging from cute (Monster Hugs - adorable! - available from 9th December) to practical (pre-cut card and envelope sets) and romantic (check out that Eiffel Tower!) to beautiful (the Flowerfull Heart - a keeper that would look just as beautiful on a birthday card for someone special). Here are the images for each set:

Aren't they great? I'll have some samples to share using a selection of these products in the not-too-distant future, but meanwhile in keeping with the theme I thought I would share this card with you that I made using the 'love' Thinlits die: 

If you're a fellow Stampin' Up! demonstrator and you attended our recent European Convention in Manchester, you may well have seen this card already. It was one of the projects I entered for the Convention Design Competition and whilst it didn't win, it was on the display boards for everyone to enjoy. My other project was 3D, but I chose this card as my second project as it's very clean and simple and typical of my papercrafting style. I am in love with these thinlits and also like how they can be used not only with the word itself, but you can use the relief too - no need to throw away this piece, a real two for one! I created an ombre background in the relief - I love this technique and think it looks great when done in inks with a brayer or sponged, but also like the clean look it gives with this kind of project. A few extra pieces and a small diamante just finish it off.

One of the funniest things that happened at Convention was that I attended an early Friday evening workshop and left my two downline team members who were attending Convention with me to browse the display boards. When I met up with them later, they both said to me 'You should come and see this card on the board - we love it and think you will too.' And the card? Without them knowing it was mine, they led me to this card! What can I say? Great minds clearly think alike! It did give me a lovely warm feeling inside though - love you, my little Crafty Owls!

Check out the product links below if you would like to have a go at either recreating my card or purchase any of the lovely new Valentine's products.

Back tomorrow with another creative project; check out today's other post though if you're a Stampin' Up! demonstrator - your life is just about to get a whole lot easier ....

Until then, happy stampin'!


Stampin' Up! Supplies Used (for love card):

Table built using Stampin' Up! Product Table Builder from The Crafty Owl.


Stampin' Up! Whole Lot of Love Products (Monster Hugs available from 9th December):

Table built using Stampin' Up! Product Table Builder from The Crafty Owl.


Christmas Banner Card PCCCS #66

by Joanne James12. November 2013 16:01

An earlier post than usual from me today, as I am out at school this evening to discuss 'wins and learns' from the weekend's bonfire and fireworks evening, which was a huge success. As promised, today's creative post is a very festive Christmas card created using the current Paper Craft Crew Challenge sketch as my inspiration. Here is the challenge sketch:

I haven't made a banner card for a while, so thought I would take the opportunity to create a festive one. Here's my card:

I chose Real Red, Whisper White and Gumball Green for my festive creation and whilst I followed the layered style of the sketch, I chose to change the shape of my card and create a long, slim card (for which I created a bespoke envelope with my new envelope punch board!). I also incorporated my sentiment into my banner, rather than across the bottom of my card - I haven't used the Occasions Alphabet before, but it seemed perfect for a flagged banner here. My Hearts a Flutter stamps and framelit set enabled this card to come together easily.

Hop on over to the PCC Challenge page here to see what the Design team and other participants did with the sketch - there are some great creative inspirations to enjoy.

Back tomorrow with another project; until then, happy stampin'!


Stampin' Up Supplies Used:


Tags: , , , , , , , ,

Cards | Stamping

Angry Birds Spiral Pop-Up Birthday Card

by Joanne James27. July 2013 20:23

Today I have a very special card to share with you. As my regular blog followers are aware, my soon-to-be six year old son and his friends are Angry Bird mad; I swear if we didn't ration access to all touch devices in our house he would turn into one of those little feathered creatures!! Anyway, a friend of his celebrates his birthday today and in addition to the card I made from us, which I will share with you another time, his Mum also asked me if I would make him a special birthday card. I saw a very simple Angry Bird pop up card by Julie Davidson a while ago which I loved (you can see Julie's card that was the inspiration for mine here), but I must confess I had something much more 'explosive' in mind. So this was the front of my card:
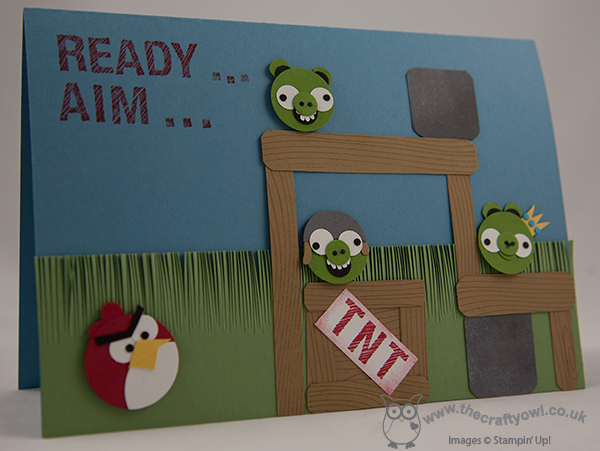
 

Lots of little pigs hiding amidst the wood and boulders, along with a box of TNT for good measure and a red Angry Bird ready for action. Open the card to reveal what happens once there's been a hit:
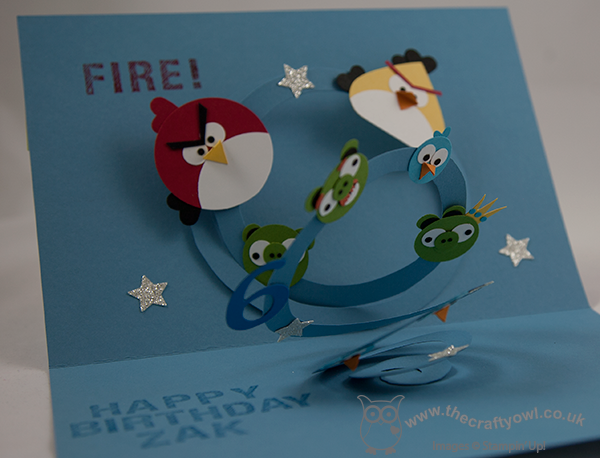
 

Birds, pigs and stars literally 'explode' out of the card. The decoration is all attached to a spiral pop-up, which is simply a large circle cut into a spiral with one end attached to each side of the card. Its really easy to do and if you made the spiral the same colour as the base card, it blends into the background and allows the birds to really 'fly'. Here's a close up of the pigs so that you can see what I mean:
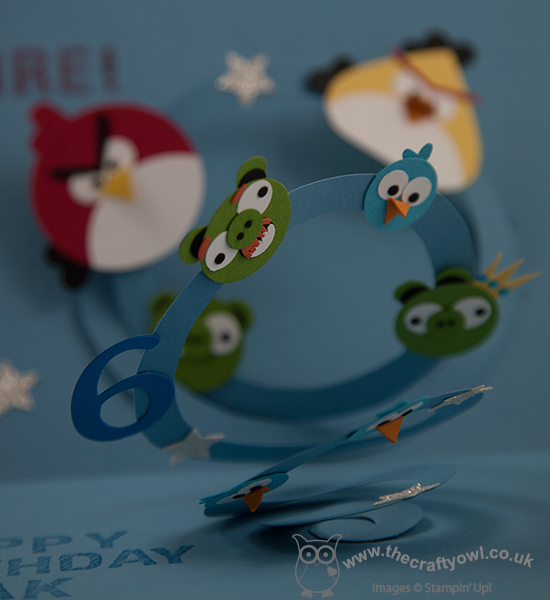
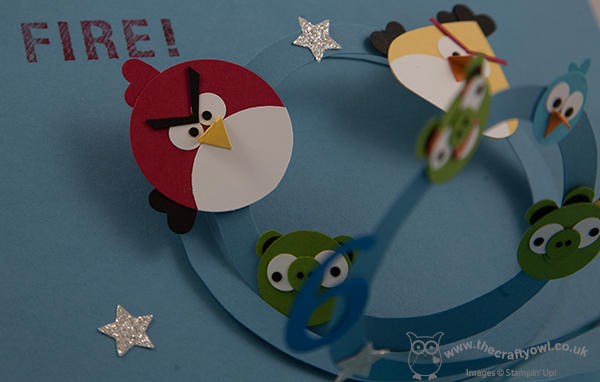
I added a number 6 and some glimmer stars and used the new Simply Sketched alphabet stamps to add the 'Ready, Aim ... Fire!' and a personalised message for the recipient. It has to be said, this card was something of a 'labour of love' - creating all the birds and pigs takes an absolute age, but it was so worth it for the impact of the resulting card, which I am reliably informed was well received!
It sounds like our very own TNT explosion in the garden at the moment; the thunder and lightening is flashing and crashing as I write and whilst lawns and gardens everywhere are I'm sure benefiting from the downpour, I'm personally hoping it is just a brief interlude in the glorious weather we've been having of late.

Back tomorrow with another project; until then, happy stampin'!


Stampin' Up Supplies:

Stamps: ABC-123 Sketch Alphabet & Numbers, Woodgrain

Cardstock: Real Red, Daffodil Delight, Basic Black, Whisper White, Crumb Cake, Gumball Green, Pumpkin Pie, Basic Grey, Marina Mist, Pacific Point, Tempting Turquoise

Inks: Real Red, Pacific Point, Chocolate Chip, Basic Grey, Whisper White

Tools: 1 3/4" Circle Punch, 1 1/4" Circle Punch, 3/4" Circle Punch, Handheld Circle Punch (retired), Small Heart Punch, Full Heart Punch, Owl Punch, Itty Bitty Shapes Punch (circle), Corner Punch, Merry Minis Punch (star), Sponge Dauber, Stamp-a-ma-jig

Finishing Touches: Silver Glimmer Paper


New Online Exclusives

There are new products available exclusively in the online store from 5 November - check them out here.

Latest Kits!

Stampin Cut and Emboss

The Layered Landscapes Kit and Nature's Paintings Kit are the latest kits in the online store - get yours here!

Shop Online

Access my online shop 24 x 7, 365 days of the year:

Current November hostess code:

9NKXDTTR

Shop Online

Mini Catalogue

BROWSE THE CATALOGUE

'Tis The Season - the new Stampin' Up! Mini Catalogue is here! For more details and to download your copy click here

Scrapbooking

Stampin' Up! has introduced a new range of 12x12" scrapbooking product and kit - the full range is now available to purchase online. To download a copy of the new digital Scrapbooking Catalogue click here.

2024-25 Annual Catalogue

BROWSE THE CATALOGUE

Click on the image to download your copy of the 2024-25 annual catalogue. For a full list of current SU! supplies, go to my online store. If you would like any help or advice, please drop me a line at joanne@thecraftyowl.co.uk or give me a call on 07773 421446 - I'd be happy to help.

Join My Team

It's always a great time to join Stampin’ Up! New team members can get £130 worth of products for only £99 + free business supplies + free shipping + all the fun being a part of Stampin’ Up! Stampin' Up! has something for everyone: join my growing team and benefit from my support to enjoy Stampin' Up! however you choose.

If you're interested, call me for a chat to understand how I can help you realise your goals. Alternatively, if you have already decided to sign up and you just can't wait, please click here for the link to the online form where you can sign up and order your starter kit right away! 

About Me

Hi I'm Joanne and live in Northampton and when I'm not looking after my husband and two beautiful children, am an avid crafter with a passion for all things Stampin' Up!

I must confess that I have never been a big rubber stamper - until I discovered Stampin' Up! that is. I love the fact that I can get such great results with co-ordinating stamps, inks, papers and punches - the possibilities are endless! Join me on my stamping journey as I share the things I love and be inspired to create amazing things yourself!

Follow Me

Monthly Newsletter

Box Builder

Click the button above to use Box Buster to create your custom box design using the Envelope Punch Board!

Kits Collection Now Available!

Stampin Cut and Emboss

The new Kits Collection from Stampin' Up! is now available!

Click here to see the current kits available and order yours online today.

I Design For


Stampin' Up Stuff

This is my personal blog and is not endorsed by Stampin’ Up! I hope you find it a plentiful source of ideas and personal inspiration but please don't copy my designs for contest submission or use for classes, publication or sale without express permission.