Way To Goat Grandpa PP507

by Joanne James6. September 2020 09:00

Today it's Sunday and time for this week's new challenge over at The Paper Players! It's the turn of the amazing Jaydee to host this week and she has a theme challenge for you to work with:
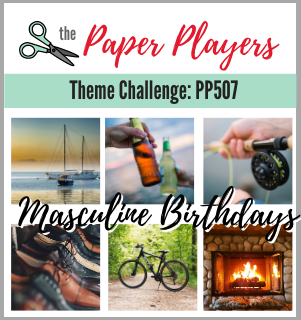
    

I have lots of birthdays this month and one of those is my Dad's. I made his card from me earlier this week (you can see that card here if you missed it) but I needed to make another one for the James Juniors to send to Grandpa, so Jaydee's theme is perfect timing! I used Julee's Mojo Monday sketch for my layout and set to work - take a look:
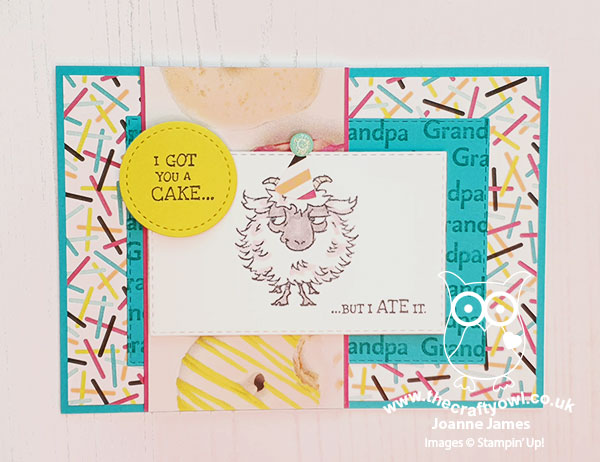
 

Here's the low-down on today's card:

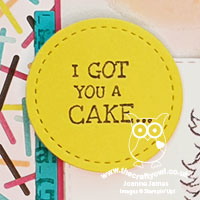
Way To Goat - I decided to make a fun and colourful card using the 'Way To Goat' stamp set, so paired my serious-looking stamped goat with some retired party-themed papers (I especially like the partially eaten doughnut, given the sentiment!) for some birthday wishes.

Another Way To Personalise - There are lots of layers on this card and I wanted the main sentiment to be the humorous one highlighted in the circle about the cake-eating goat. I wanted to be able to reference Grandpa too though (the stamp is from the retired set 'For My Family'), so decided to use some tone-on-tone stamping onto one of my layers. You can't see the whole word anywhere, but it's stamped enough times that you get the gist.

Crossing A Line? - I have been having lots of debates with the ladies attending my weekly Zoom sessions about this stamp set and how old you have to be for this stamp set to be funny - or equally, for it to be seen to be crossing a line. It's not the sentiment that I used on the front of my card that's up for the debate - rather the one that I used on the inside:
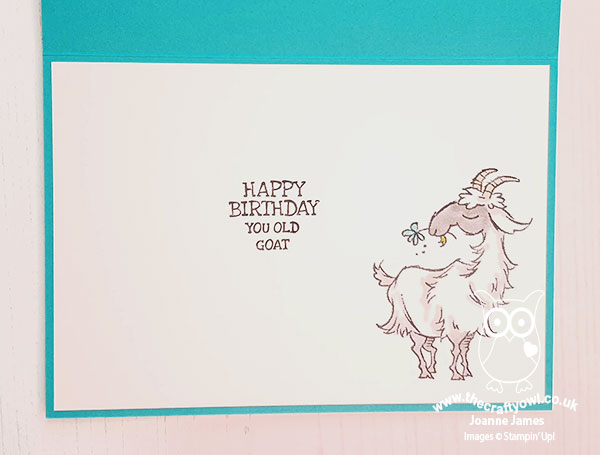
Personally, I think this set is hilarious - and I may or may not have been teasing my mother-in-law (who also has her birthday this month and is the same age as my Dad!) that I am going to use it to make a card for her birthday too, much to her dismay! My Dad has absolutely no interest in stamping so he won't have seen this set, so the children and I are looking forward to seeing his reaction when he opens his card! What do you think - funny or too close to the mark? Do leave me a comment below - I'd love to hear your thoughts! 

Here is the visual summary of the key products used on today's project for you to pin for easy reference:
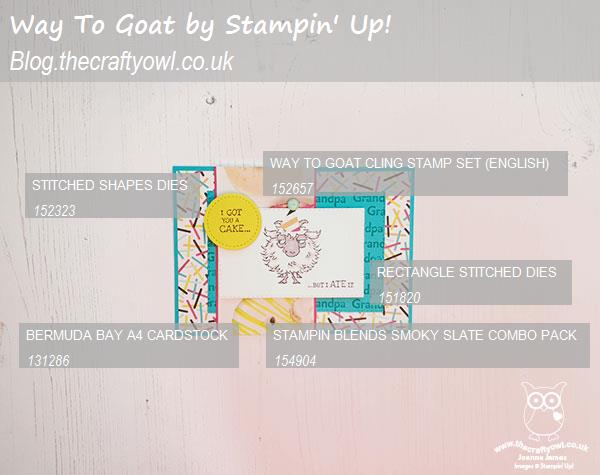
 

You can see all of my Product and 'How To' summaries on my 'How To - Tips and Techniques' Pinterest board in case you've missed any. 

Before you reach for your ink and papers, check out what our amazing team has created to inspire you this week:

Here's a quick recap of our challenge rules:
 
1.  Create a new paper project
2.  Upload your creation to your blog with a link back to us and provide a direct link to the post featuring your challenge submission.
3.  Please link your card to no more than four challenges, TOTAL.
4.  Have FUN!

You can see all of my 'How To' summaries on my 'How To - Tips and Techniques' Pinterest board in case you've missed any. 

Enjoy your day; we will be enjoying our final day of the long summer holiday for one of the James Juniors, who returns to school on Monday (Junior Number 2 isn't back until Wednesday) and doing things such as polishing shoes and packing school bags, for the first time complete with face masks. I'll be back tomorrow with another project. Until then, happy stampin'!


Stampin' Up! Supplies Used: 

Table built using Product Table Builder by The Crafty Owl - Independent Stampin' Up! Demonstrator.

Teacher Thank You Card

by Joanne James27. May 2015 21:42

So I'm back with the second of my cards for this week's challenge over at CAS(E) This Sketch:


As the end of the school year will be upon us soon enough, I decided to combine this card with this week's theme over at The Challenge and get ahead and make a teacher thank you card:

I used a base of Pear Pizzazz and a mat of real Red - apple colours! - and having cut a stencil of the word 'Thank' using my Silhouette e-cutter, I stamped the word Thanks from the 'Another Thank You' stamp set repeatedly in Memento Black into the space and sponged over the whole space in Pear Pizzazz to give the letters more definition. To complete the sentiment, I die cut the word 'you' using my Big Shot and 'Hello You' thinlits three times out of Real Red cardstock and stuck them together to create a raised piece, then painted it in Crystal Effects to give a glossy finish. I used a snippet of chalkboard paper and stamped the word 'teacher' in white kraft ink to give a chalkboard effect (the stamp is from the retired set 'for my family' - it's a keeper!) and added both to my card, along with a cardboard apple embellishment from my Project Life Playground accessory kit and also a 'vintage' wire paper clip. This final addition also enables me to link up to 'Less is More' this week, where the recipe is to add metal to your card. 

I really love the way this card turned out; I like the collage feel it has, yet still retaining my clean and simple style - here's a close up of the stamping and stencilling detail: 

It's a little more embellished than my usual LIM cards, so I'm hoping it will still be permissible although I know the lovely ladies over there will give me some pointers if I've strayed too far from the brief :-) This is however much more what I had in mind for the sketch, so I hope the CAS(E) This Sketch team like it! The James Juniors are already arguing about which of their teachers will be receiving it - I think I might have to make a few copies before the end of term approaches!

Back tomorrow with my card for this week's new challenge over at Create With Connie and Mary. Until then, happy stampin'!


Stampin' Up! Supplies Used:

Table built using Product Table Builder by The Crafty Owl - Independent Stampin' Up! Demonstrator.


You're How Old - Really??! Birthday Card

by Joanne James21. September 2014 07:00

It's Sunday so I'm here with my card for this week's challenge over at The Paper Players, where Jaydee has the following clean and simple challenge for us:


I also used the above sketch from Freshly Made Sketches again for my card this week and this week's card is a lot more 'clean' than last weeks - here is my card:

My card is really simple, with a piece of the numbered Typeset paper mounted on Basic Black as the central panel of my card, with a couple of strips of Flashback DSP behind to add some colour and the focal point word bubble 'You're How Old?' stamped in Real Red. I finished my card with the sentiment 'happy birthday Grandpa' (stamped with my vintage 'For My Family' stamp set - a keeper!) and a punched star.

Yesterday was my Dad's 70th birthday and I made this card for him from the children - they think 70 is positively ancient, so the word bubble was entirely appropriate! - however it occurred to me as I typed up my post that not only could you change out the sentiment to just say 'happy birthday' or include the role of any family member (dad, brother, uncle, etc.) this might also work as a fun tongue-in-cheek card with the sentiment as is. So beware any male that feels he's 'over the hill', because one of these cards could be heading your way Grandpa!

Do check out the other design team cards this week; as always, there is some great inspiration and I look forward to seeing your challenge entries in the gallery. Right, I'm off to prepare for Sunday lunch and hopefully enjoy a restful family day before the onset of a new week. Enjoy your weekends everyone!

Back tomorrow with another project; until then, happy stampin'!


Stampin' Up! Supplies Used:

Table built using Product Table Builder by The Crafty Owl - Independent Stampin' Up! Demonstrator.


Million & One Thanks Teacher Card and Gift Box

by Joanne James18. July 2014 15:53

Apologies for my blog absence yesterday - I spent most of the day icing biscuits for teacher thank you gifts as today is the last day of the academic year for my James Juniors. I promise my self I'll start earlier every year, but what always seems to happen is I squeeze in a few more commissions and then also a few extra names get surrepticiously added to the list of thank yous by the children which means even more baking and icing!

I've shared my teachers gifts on my blog previously - you can check them out here if you would like to be reminded - so today I thought I would share a matching card and gift box commission that I made for someone else to give to their teacher. So here is my card:

For my card I used the retired Gingham Garden DSP (this was requested - lucky I still have a pack!) however most of the other product is current and you could easily create this set in an alternative paper without the teacher tag as a thank you gift for someone special. The star of the show is definitely the 'Million and One' sentiment stamp - perfect to show your appreciation of someone special.

Here is the matching gift box - I love these kraft boxes, they are so useful and very sturdy, and at £2.75 for 4 represent great value. I'm doubly pleased that the Extra-Large Gift Boxes have returned and made it into the annual catalogue as a stock item - these are great for larger gifts. 

Right, I've a few more jobs to do before I go and pack a picnic - we're off to see an outdoor theatre production of Peter Pan and The Lost Boys this evening. I've seen this theatre company perform the Railway Children previously, so I'm expecting great things - I'll report back tomorrow! Until then, happy stampin'!

Stampin' Up! Supplies Used:

Table built using Product Table Builder by The Crafty Owl - Independent Stampin' Up! Demonstrator.


One Layer Teacher Thank You Card - with Fingerprints!

by Joanne James15. July 2014 22:24

No blog post yesterday and a late one today - so much going on at the moment as the end of the school year draws ever closer! I've been busy finishing commissions for teacher cards and gifts today and popped by the Less is More blog to see what the current challenge is, as I haven't managed to fit in the last couple due to other commitments. This week it's One Layer Challenge combined with a theme - and when I saw what it was I just had to have a go! Yes - it's doodle fingerprints:

I've made these with my children many times and we have a Christmas tradition of painting a plate with a picture made out of hand or fingerprints each year, but never thought I'd be using my Stampin' Up! inks to create a challenge card no less! Given that I've had teacher thank yous on my mind all week, I knew exactly what I wanted to make - a fingerprint caterpillar:

Isn't he cute?! I used one of the apple embellishments from the Project Life Playground kit as a stencil for my apple and had my first public attempt at colouring in with my Blendabilities (still more practice required!), then using Wild Wasabi ink fingerprinted my caterpillar book worm into place using Wild Wasabi ink. I doodled his face with my Project Life journaling pen and added a 'to my teacher' sentiment (from the retired set 'for my family').

Not the most time consuming of cards to be fair, but jolly good fun - I could have spent all afternoon doodling and fingerprinting, with so many ideas for more cards if only time allowed! This is also the kind of card you could easily create with little ones - great if they want to make their own teacher thank you cards.

That's me done for today; back tomorrow with my Design Team card for the Colour Me...! Challenge and the new Wednesday Weekly Deals. Until then, happy stampin'!


Stampin' Up! Supplies Used:

Table built using Product Table Builder by The Crafty Owl - Independent Stampin' Up! Demonstrator.


Tags: , , , , , , , ,

Cards | Stamping

Birthday Netballs!

by Joanne James29. October 2013 23:12

Today's blog post is a late one as I've been out this evening and had a reasonably hectic day and didn't get a chance to do it beforehand. I used sketch #64 over at Paper Craft Crew Challenges as the basis for this card and I'm just in time to sneak in a link up, so thought I'd better get typing! I had a commission card request for a female birthday card that featured netball. Whilst I knew the basketball stamp in 'Great Sport' would make the perfect netball, I was wondering how I was going to pull it all together. I decided to use the PPCC sketch this week as the basis for my design layout. Here's the sketch inspiration:

Stampin Up challenge blog card sketch

So, sunglasses at the ready - here is my interpretation:

The card is very orange, but having played around with various other colour combinations this really did seem to work best (and luckily, the recipient loves the colour orange!) Any of the colours I would ordinarily have paired with Tangerine Tango made the card look too masculine and really didn't work. I did use some Real Red as an accent colour and a little Basic Grey. Wondering how I created the netball hoop and net? I simply used my large oval punch to cut some thin strips of cardstock and adhered them to each other in a weave pattern.

And the moral of the story? Orange is for all cards, not just Halloween ones! Pop over to the Paper Craft Crew Challenge page and see how the designers and other participants have interpreted this week's sketch.

Back tomorrow with news of more great offers from Stampin' Up; until then, happy stampin'!


Stampin' Up Supplies Used:

Tags: , , , , , , , ,

Cards | Punch Art | Stamping

You Mean The World To Me

by Joanne James19. October 2013 19:26

Today I'm sharing a card that I made a few weeks ago, but couldn't share at the time. I actually made this card for my husband's birthday, but as he photographs all my cards for me I couldn't share until after the event. I used my This and That DSP as the inspiration for the colour scheme for my card (it's not just for journaling with!) and a stamp from the retired set 'Word Play' as the feature for this card:

I chose the hexagon map paper to fit with the globe in the sentiment; I stamped the sentiment twice and punched out one of the globes and coloured it with markers before putting on a dimensional. A nice shiny button tied with twine and done; these buttons are now available on Clearance Rack for only £2.19 - bargain!

Hope you like it; back tomorrow with another rather special project. Until then, happy stampin'!


Stampin' Up Supplies Used:

 This and That Epic Day Designer Series Paper3/4 Inch Circle Punch - by Stampin' Up!

Linen Thread - by Stampin' Up!Basic Gray Classic Stampin' PadWord Play Stamp Brush Set -- Digital DownloadSilver Basics Designer Buttons


Tags: , , , , , ,

Cards | Stamping

Football Mad Boy's Birthday Card

by Joanne James13. October 2013 20:57

Well, the weather here has been dreadful here but yesterday our monster home-grown pumpkin was harvested during one of the day's few dry spells (photos to follow!) and today we went to the theatre to watch 'Dinosaur Zoo', so all in all not a bad weekend. Today I've a change from Christmas cards for you: I thought I would share a birthday card commission I made for someone whose birthday it is today. Another football-mad Chelsea fan, so here's what I came up with:

 I used my 'Great Sport' football stamp to decorate a background base panel, then created a central panel with some great football paraphanelia: a trophy, a shirt with the recipient's player number (not age, as one of my eagle-eyed offspring was quick to point out!) and a football and finished the panel with some co-ordinating bunting, Chelsea blue, of course.

If you're a stamper and wondering where I got the trophy stamp from, it's from one of the stamps in the 'Tag It' set. I've just covered the wording with a DSP 'ribbon' so that it fits with my football theme.

Hope you like the card; tomorrow I'll be sharing another birthday card; until then, happy stampin'!


Stampin' Up Supplies Used:

 Basic Black Classic Stampin' PadPacific Point Classic Stampin' PadVersamark Pad - by Stampin' Up!White Stampin' Emboss Powder - by Stampin' Up!


Gold Metallic Encore PadWhite Bakers Twine - by Stampin' Up!Tag ItGreat Sport Clear-Mount Stamp SetPacific Point Patterns Designer Series Paper -- Digital Download

Tags: , , , , , , ,

Cards | Stamping

Golfer's Punch Art

by Joanne James22. September 2013 20:09

Today I've a quick post to share the second of the cards I made for my Dad's birthday. This one was from the grandchildren - a classic punch art card, which is fitting as he's a keen golfer:

This card took no time at all to make - the most complicated thing was creating the dimples on the golf ball with my Simply Scored stylus, hardly time-consuming!

In between playing golf, my Dad is also a keen gardener and has kept an allotment for many years. For some time now, he and his fellow allotmenteers have been plagued by a once tame pet rabbit gone wild, which is eating large quantities of their carefully tended crops. Ben thinks the whole thing is fascinating and spends much of his time hatching plans to catch the rabbit and discussing their merits with Grampa. Ben is utterly convinced that he is going to be the one to catch the rabbit; if he ever succeeds, I'll let you know!

Back tomorrow with another project; until then, happy stampin'!


Stampin' Up! Supplies Used:

Small Oval Punch, Simply Scored, Stamp-ma-jig, For my Family (retired), Brights DSP (retired)


Tags: , , , , , , , ,

Cards | Punch Art

A Patio Party Cupcake, Starburst Style!

by Joanne James17. September 2013 20:59

Did you know that 16-23rd September is National Cupcake Week here in the UK? Not that I need an excuse for a good cupcake, but this is surely reason enough! With this in mind, I have a cupcake card for you today, but alas of the paper rather than edible kind! Here's my card:

Starburst cards are very popular at the moment, so I thought I would take the opportunity to use up some of my retired Patio Party DSP which has a number of cake-themed papers to echo the punched cake that features in the foreground. This card would work equally well with any of the current papers though, if you wanted to create something similar. As you can see, the sentiment uses a combination of one of the ones in the Create a Cupcake stamp set and another personalisation from my retired 'For My Family' set. This was the card I made from the children for Granny's birthday last week, although I must confess the cakes on the card look somewhat more tasteful than the chocolate-covered rainbow sugar creations the children made the last time they baked with Granny - they definitely wouldn't taste as good though!

Back tomorrow with the first of my projects using some of my new Christmas goodies; until then, happy stampin'!


Stampin' Up! Supplies Used:

Cupcake Punch - by Stampin' Up!Create a Cupcake - Clear-Mount Stamp - Clear-Mount Stamp Set - by Stampin' Up!Ovals Collection Framelits DiesBasic Rhinestones Jewel Accents - by Stampin' Up!


New Online Exclusives

There are new products available exclusively in the online store from 5 November - check them out here.

Latest Kits!

Stampin Cut and Emboss

The Layered Landscapes Kit and Nature's Paintings Kit are the latest kits in the online store - get yours here!

Shop Online

Access my online shop 24 x 7, 365 days of the year:

Current November hostess code:

9NKXDTTR

Shop Online

Mini Catalogue

BROWSE THE CATALOGUE

'Tis The Season - the new Stampin' Up! Mini Catalogue is here! For more details and to download your copy click here

Scrapbooking

Stampin' Up! has introduced a new range of 12x12" scrapbooking product and kit - the full range is now available to purchase online. To download a copy of the new digital Scrapbooking Catalogue click here.

2024-25 Annual Catalogue

BROWSE THE CATALOGUE

Click on the image to download your copy of the 2024-25 annual catalogue. For a full list of current SU! supplies, go to my online store. If you would like any help or advice, please drop me a line at joanne@thecraftyowl.co.uk or give me a call on 07773 421446 - I'd be happy to help.

Join My Team

It's always a great time to join Stampin’ Up! New team members can get £130 worth of products for only £99 + free business supplies + free shipping + all the fun being a part of Stampin’ Up! Stampin' Up! has something for everyone: join my growing team and benefit from my support to enjoy Stampin' Up! however you choose.

If you're interested, call me for a chat to understand how I can help you realise your goals. Alternatively, if you have already decided to sign up and you just can't wait, please click here for the link to the online form where you can sign up and order your starter kit right away! 

About Me

Hi I'm Joanne and live in Northampton and when I'm not looking after my husband and two beautiful children, am an avid crafter with a passion for all things Stampin' Up!

I must confess that I have never been a big rubber stamper - until I discovered Stampin' Up! that is. I love the fact that I can get such great results with co-ordinating stamps, inks, papers and punches - the possibilities are endless! Join me on my stamping journey as I share the things I love and be inspired to create amazing things yourself!

Follow Me

Monthly Newsletter

Box Builder

Click the button above to use Box Buster to create your custom box design using the Envelope Punch Board!

Kits Collection Now Available!

Stampin Cut and Emboss

The new Kits Collection from Stampin' Up! is now available!

Click here to see the current kits available and order yours online today.

I Design For


Stampin' Up Stuff

This is my personal blog and is not endorsed by Stampin’ Up! I hope you find it a plentiful source of ideas and personal inspiration but please don't copy my designs for contest submission or use for classes, publication or sale without express permission.