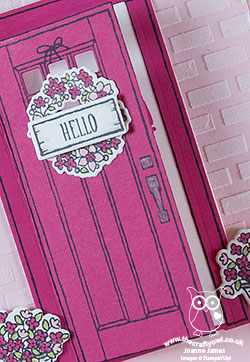
At Home With You Birthday Surprise Card PP384

by Joanne James11. March 2018 09:00

Firstly, an apology to my regular readers for my lack of blog posts this week; I was well and truly wiped out following the craft retreat I hosted last weekend! I had a fabulous time, but following my class at the start of this week I needed to take a few days out to catch up on some family things and get my office straight in order to start again.

As it's Sunday, I'm back with this week's new challenge over at The Paper Players! It's my turn to host this week and I have my personal nemesis, a colour challenge for you to work with:
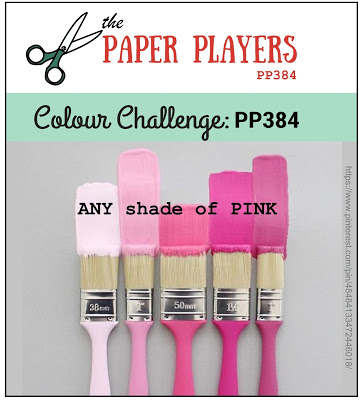
 

Now since it's Mothering Sunday here in the UK today, you might think I would have a Mother's Day card to share with you, or maybe something floral - but no, instead I have a rather girly birthday card to share with you this week, with a fun surprise element too - take a look:
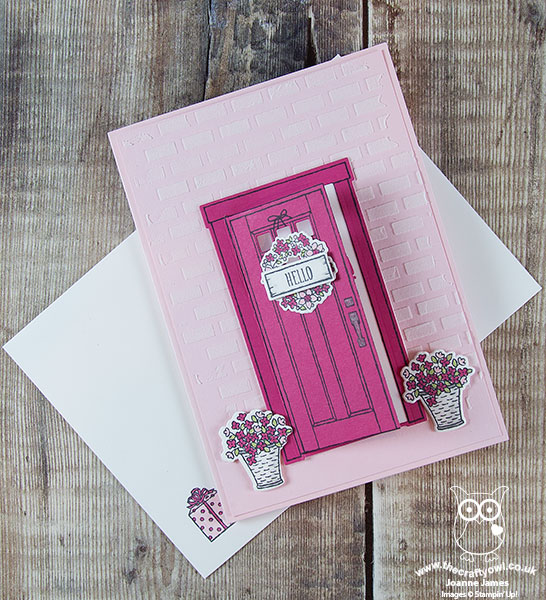
 

Here's the low-down on today's card:

Pretty In Pink - I chose to feature a combination of Pink Pirouette and Melon Mambo on my card today - who wouldn't love a pink house with a pink front door, right?! Using the stamps and framelits in the At Home With You bundle featured in the annual catalogue, I also added a pretty spring floral wreath and two flower pots, all coloured with my Stampin' Write markers to complete my doorstep scene.

A Birthday Surprise - The At Home Framelits Dies include a framelit that cuts and scores a hinged door, that allows for a fun feature and a hidden birthday surprise - take a look:
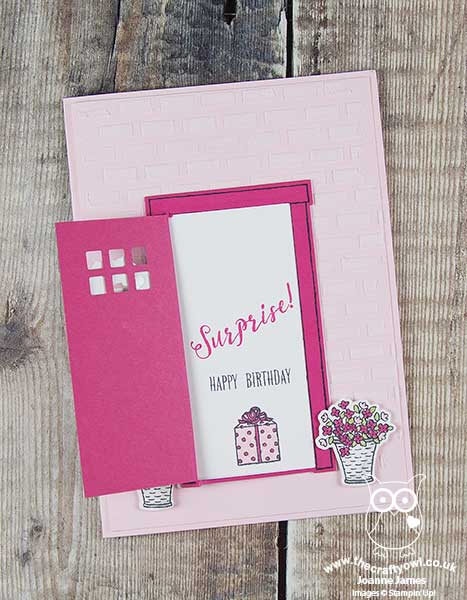
 

A birthday message and a gift too!

Textured Brick Wall - I continued the house theme by adding some textured bricks around the door using embossing paste and a stencil - I think it gives my card something of a cottage feel. I continued my stamping inside my card and onto my envelope for a finishing touch.

Here is the visual summary of the key products used on today's project for you to pin for easy reference:
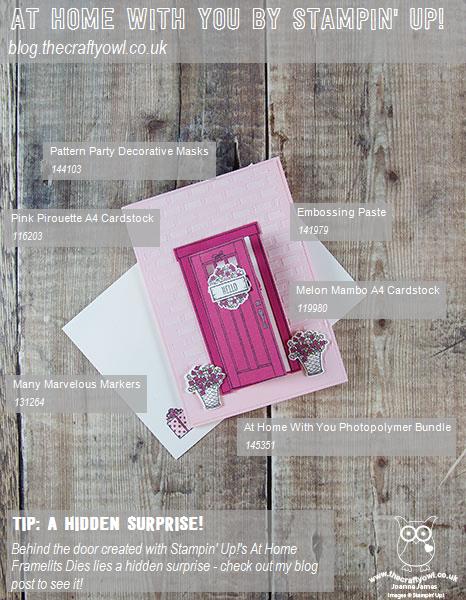
 

You can see all of my Product and 'How To' summaries on my 'How To - Tips and Techniques' Pinterest board in case you've missed any. 

Before you reach for your ink and papers, check out what our amazing team has created to inspire you this week:

Here's a quick recap of our challenge rules:
 
1.  Create a new paper project
2.  Upload your creation to your blog with a link back to us and provide a direct link to the post featuring your challenge submission.
3.  Please link your card to no more than four challenges, TOTAL.
4.  Have FUN!

I can't wait to see what you create with this week's colours and look forward to visiting your blogs this week! Enjoy the rest of your weekend as it will be over all too quickly. I have had an early start today as I needed to be up at 4am to see one of my James Juniors off to school to board the coach for a week long school trip to Normandy, so I suspect that my day will involve a lot of caffeine and need to finish rather earlier than usual! I'll be back tomorrow with another project; until then, happy stampin'!


Stampin' Up! Supplies Used: 

Table built using Product Table Builder by The Crafty Owl - Independent Stampin' Up! Demonstrator.

Flying Home Welcome To Your New Home Card PP378

by Joanne James28. January 2018 09:00

It's Sunday and time for this week's new challenge over at The Paper Players! It's the turn of our wonderful team leader Nance to host this week and she has my favourite, a sketch challenge, for you to work with:


Whether you stay with the circle or use an alternative shape, this is a sketch with many possibilities. I decided to keep with the circle as it was perfect to showcase a new stamp I haven't used yet and have fun with a little colouring - take a look:


I've had a few friends that have either recently moved or are in the process of moving, so I needed to replenish my stock of 'new home' cards and the 'Flying Home' stamp set had the perfect image. Here's the low-down on today's card:

Flying Home - I was lucky enough to receive the 'Flying Home' stamp set at Onstage in November, but had yet to ink it up. This set is perfect for a new home card, or even a new baby card; in fact the whimsical line drawings work for lots of card types. The other great thing about this set is that it is made for colouring. I used my Stampin' Blends to colour in my main image and I stamped the little bird twice so that I could fussy cut one and pop him up on a tiny piece of a dimensional for added lift.

A Petal Garden Colour Combo - I pulled the colours for my stamped image directly from the Petal Garden designer series paper that I used for my background panel and added a co-ordinating ribbon trim too. I love these fresh colours, perfect for spring - here's the colour palette for you to save if you'd like to use it for your future projects:


New Home Congratulations - The 'Flying Home' stamp set is sentiment-free, so I decided to go on the hunt through my other sets for a small sentiment that I could add to my horizontal Pool Party strip. I found the perfect stamp in 'At Home With You'  - and followed up inside my card with 'congratulations'.

Here is the visual summary of the key products used on today's project for you to pin for easy reference:


You can see all of my Product and 'How To' summaries on my 'How To - Tips and Techniques' Pinterest board in case you've missed any. 

Before you reach for your ink and papers, check out what our amazing team has created to inspire you this week:

Here's a quick recap of our challenge rules:
 
1.  Create a new paper project
2.  Upload your creation to your blog with a link back to us and provide a direct link to the post featuring your challenge submission.
3.  Please link your card to no more than four challenges, TOTAL.
4.  Have FUN!

I can't wait to see what you create with this week's sketch and look forward to visiting your blogs this week! Enjoy the rest of your weekend as it will be over all too quickly. I'm hoping to fit in a little more crafty time today along with some precious family time. I'll be back tomorrow with another project; until then, happy stampin'!


Stampin' Up! Supplies Used: 

Table built using Product Table Builder by The Crafty Owl - Independent Stampin' Up! Demonstrator.

At Home With You Doorstep Card - Three Ways To Incorporate Texture Into Your Projects

by Joanne James26. September 2017 05:00

Today I'm sharing a card from one of my recent monthly technique classes featuring the At Home With You bundle. This class was also all about ways to incorporate texture into your projects and so is perfect to link up with the team over at Just Add Ink this week where the theme is 'Just Add Texture':

Each of the cards that we made used texture in different ways: one using embossing paste, another using stencilling and dry embossing and this Autumnal new home doorstep card which actually features three different ways to incorporate texture into your project - take a look:


Aside from the obvious texture created by layering my diecut pieces, there are also more subtle textures added to this card. Here's the low-down on how I did it:

Adding Texture 1: Use Patterned Paper - I used a piece of the Wood Textures Designer Series Paper Stack for my front door - this is a quick and easy way to add texture to your project. I chose a piece of whitewashed wood pattern to stand out against my Bermuda Bay walls, however with each DSP stack containing 4 sheets each of 12 double-sided designs, you have 24 different wood effects to choose from - seriously spoilt for choice!

Adding Texture 2: Dry Embossing - To ground my door I added a strip of Crumb Cake cardstock across the lower part of my cardfront, but before I glued it in place I first embossed it with one of the hidden gem pieces in the Bike Ride Framelits set; did you know that this set, just like the Eclectic Layers Thinlits, includes a piece that embosses as opposed to diecuts? I've circled it so that you can see it in the set below:


This added a fun cobblestone-textured path outside my front door.

Adding Texture 3: Stamping - Lastly, I wanted my doormat to look like one of those rough, coir mats that are a traditional feature of a front doorstep. To achieve this look, I used one of the stamps in the 'Timeless Textures' stamp set and stamped it in Soft Suede onto Soft Suede cardstock, for a tone-on-tone textured look. I stamped off first so the effect is subtle, yet it adds a little detail that definitely contributes by adding further texture to my card.

There are lots of ways to add texture to your projects; I will have a few more to share in the other projects from this class and the gallery over at Just Add Ink also has lots of inspiration too.

Here is the visual summary of the key products used on today's project for you to pin for easy reference:


You can see all of my 'How To' summaries on my 'How To - Tips and Techniques' Pinterest board in case you've missed any. 

Enjoy your day and I'll be back tomorrow with another project. Until then, happy stampin'!


Stampin' Up! Supplies Used:

Table built using Product Table Builder by The Crafty Owl - Independent Stampin' Up! Demonstrator.

At Home With You Christmas Card and Matching Gift Bag Punch Board Gift Box

by Joanne James21. September 2017 18:59

Happy Friday everyone! I'm not sure where the time goes - I can't believe it's the end of the working week already - well, for some anyway! Today I'm sharing a another card along with a matching gift box from one of last month's monthly technique classes using the At Home With You bundle - take a look:


Here's the low-down on today's card:

At Home With You At Christmas - The At Home With You bundle is so versatile and works for lots of different seasons. Today's card features the gorgeous holly bough around the door, along with the holly wreath and the ornamental trees either side of the front door. I coloured them with my Stampin' Write markers and they were easily cut out with the framelits. I even decorated the inside and envelope for complete co-ordination.

More Ways To Add Texture - As with the last card I shared featuring this set (you can see that card here if you missed it), today's card has another three ways in which you can incorporate texture into your projects:

Adding Texture 1: Stamping To add to the Christmas feel, I wanted a red front door; by stamping my Real Red cardstock with the Hardwood stamp in Real Red, before stamping with the door outline in black, to add some tone-on-tone interest and texture for added kerb appeal.

Adding Texture 2: Dry Embossing On both my card and box I embossed the Smoky Slate base cardstock with my Brick Wall textured embossing folder to create some textured walls as a backdrop for my festive entrance.

Adding Texture 3: Embellish Sometimes on a card it helps to minimise bulk especially if you need it to be post-friendly, however this is rarely the case with packaging and the addition of bulky embellishments is less of an issue. On my gift box, in addition to a tag and ribbon, I added a boxwood wreath to my front door - I love the extra texture this adds.

A Matching Gift Box - It's always nice to be able to create fancy packaging for gifts and no more so than at this time of year. I made my simple gift box using the Gift Bag Punch Board (I just didn't score the side indents to make the bag shape) and created a little triangle roof for a lid (it's a simple hinged closure that is held in place with washi tape) that I stencilled some tile on using some Basic Grey ink and my brick pattern Patterned Party Decorative Mask and added a tag punched with the super-useful Everyday Label Punch:

This box measures approx. and is a reasonable size, big enough to accommodate most small gifts. Here's a picture of both items together:


Here is the visual summary of the key products used on today's project for you to pin for easy reference:


You can see all of my 'How To' summaries on my 'How To - Tips and Techniques' Pinterest board in case you've missed any. 

Enjoy the rest of your day and I'll be back tomorrow with another project. Until then, happy stampin'!


Stampin' Up! Supplies Used:

Table built using Product Table Builder by The Crafty Owl - Independent Stampin' Up! Demonstrator.

At Home With You CAS Card

by Joanne James26. June 2017 09:00

Another Monday, another week! I'm starting mine by sharing a card I made for this week's challenge over at CASology:

There are lots of great 'house' card options in the new Stampin' up! catalogue, not all great for clean and simple cards though. I decided that the 'At Home With You' set would fit the bill - take a look:


Here's the low-down on today's card:

Welcome Home - 'At Home With You' is the perfect set for new home cards and so much more besides. A large front door with all manner of pots, wreaths and accessories to fancy up your house for many different occasions. What's more, it is also available in a discounted bundle with the At Home Framelits Dies, which negate the need for lots of fussy cutting of the accessories and also allow you to create opening doors that can house a message or surprise behind the door - how fun! I used the framelits on today's card to cut out my pots with ease and popped them up on some dimensionals for added depth.

Keeping It CAS - At first glance, this set with it's large door and many added details might not be your first choice for a clean and simple or CAS card. In order to preserve the balance of white space on my card, I decided to only stamp part of the door image and use the welcome door mat as my focal point, with the addition of the dimensional pots to draw the eye towards it. It's quite clear that this is a front door, without needing the whole image - a great way to keep the design CAS but still be in keeping with the challenge theme. 

Who Lives In A House Like This? - I did a quick internet search on most popular front door colours and read an interesting article about what colour should you paint your front door. Many of us settle for the more traditional and popular black, white, grey, wood, blue, red or yellow, but there are equally many who use their front door as the place to express their inner craving for colour, with a bright turquoise, yellow or pink like this one:

  (Image: Getty)

I decided to use this hot pink door with cool aqua walls as the inspiration for my colourful card today - here's my colour combination if you'd like to save it to Pinterest for future inspiration:


Here is the visual summary of the key products used on today's project for you to pin for easy reference:


You can see all of my 'How To' summaries on my 'How To - Tips and Techniques' Pinterest board in case you've missed any. 

Enjoy your day. I'm off to catch up with a friend for lunch and then back to tackle my mountain of ironing - once I've replaced my iron that is, as mine gave up the ghost yesterday. A great excuse to not have to continue battling the basket, but the pile won't iron itself so a new one is needed! I'll be back tomorrow with another project. Until then, happy stampin'!


Stampin' Up! Supplies Used:

Table built using Product Table Builder by The Crafty Owl - Independent Stampin' Up! Demonstrator.

New Online Exclusives

There are new products available exclusively in the online store from 5 November - check them out here.

Latest Kits!

Stampin Cut and Emboss

The Layered Landscapes Kit and Nature's Paintings Kit are the latest kits in the online store - get yours here!

Shop Online

Access my online shop 24 x 7, 365 days of the year:

Current November hostess code:

9NKXDTTR

Shop Online

Mini Catalogue

BROWSE THE CATALOGUE

'Tis The Season - the new Stampin' Up! Mini Catalogue is here! For more details and to download your copy click here

Scrapbooking

Stampin' Up! has introduced a new range of 12x12" scrapbooking product and kit - the full range is now available to purchase online. To download a copy of the new digital Scrapbooking Catalogue click here.

2024-25 Annual Catalogue

BROWSE THE CATALOGUE

Click on the image to download your copy of the 2024-25 annual catalogue. For a full list of current SU! supplies, go to my online store. If you would like any help or advice, please drop me a line at joanne@thecraftyowl.co.uk or give me a call on 07773 421446 - I'd be happy to help.

Join My Team

It's always a great time to join Stampin’ Up! New team members can get £130 worth of products for only £99 + free business supplies + free shipping + all the fun being a part of Stampin’ Up! Stampin' Up! has something for everyone: join my growing team and benefit from my support to enjoy Stampin' Up! however you choose.

If you're interested, call me for a chat to understand how I can help you realise your goals. Alternatively, if you have already decided to sign up and you just can't wait, please click here for the link to the online form where you can sign up and order your starter kit right away! 

About Me

Hi I'm Joanne and live in Northampton and when I'm not looking after my husband and two beautiful children, am an avid crafter with a passion for all things Stampin' Up!

I must confess that I have never been a big rubber stamper - until I discovered Stampin' Up! that is. I love the fact that I can get such great results with co-ordinating stamps, inks, papers and punches - the possibilities are endless! Join me on my stamping journey as I share the things I love and be inspired to create amazing things yourself!

Follow Me

Monthly Newsletter

Box Builder

Click the button above to use Box Buster to create your custom box design using the Envelope Punch Board!

Kits Collection Now Available!

Stampin Cut and Emboss

The new Kits Collection from Stampin' Up! is now available!

Click here to see the current kits available and order yours online today.

I Design For


Stampin' Up Stuff

This is my personal blog and is not endorsed by Stampin’ Up! I hope you find it a plentiful source of ideas and personal inspiration but please don't copy my designs for contest submission or use for classes, publication or sale without express permission.