by Joanne James28. August 2015 19:00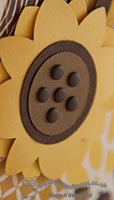
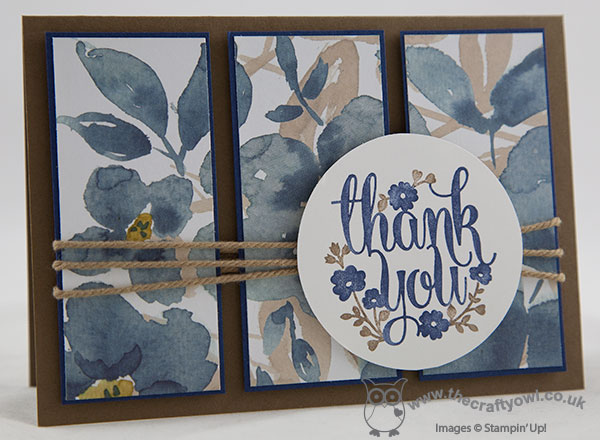
A quick card from me today showcasing some of the lovely papers in the Into The Woods DSP collection from the new catalogue and a rather new style of card for me: the ladies over at SUO Challenges are looking for 'cards without a sentiment' this week so I decided to have a go at creating a collage-style card. I love these, although my style is rather more 'clean and layered' so for me they are something of a challenge. Anyway, here goes - my card for today:
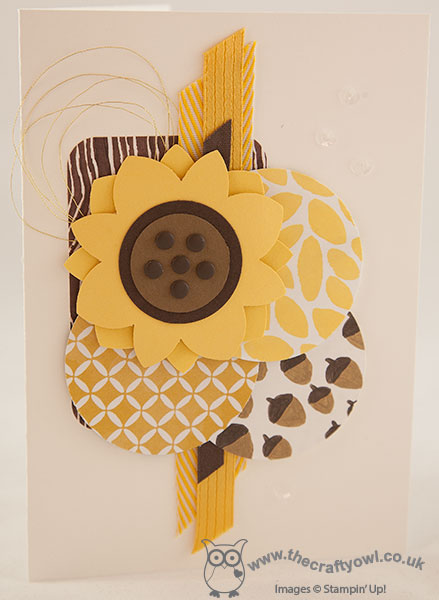
I was inspired by the lovely sunflowers my CCMC colleague Connie Babbert has been creating recently - you can see one of them in the SUO Challenge DT cards for this very challenge, although I chose to create mine with the Flower Medallion punch rather than the new Poinsetta punch (still waiting for that one to arrive!) I took a selection of Into the Woods papers, using my Project Life framelits to cut a rectangle and then punched a trio of flowers in my brown and yellow colour scheme and then adhered a mix of ribbons and some fine gold twine before adhering them to my card. I layered my flower and added further texture with some candy dots to represent my sunflower seeds.
I'm not sure this is the best example of a collage card, but I do love the bright colours and textures/layers and because the card is sentiment-free, I can use this card for any number of purposes. I think it would make a nice 'get well soon' card - the yellow is so cheery.
That's all from me today; I am having a lovely week at the seaside, but can honestly say that a week without a phone signal or internet connection is proving difficult for me! Back soon with another project; until then, happy stampin'!
by Joanne James27. August 2015 08:05
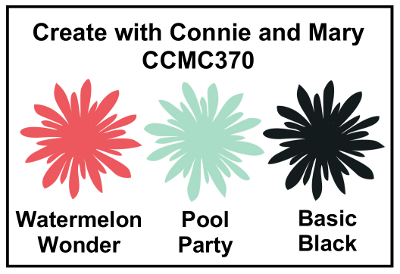
Today it's time for a new challenge over at Create With Connie and Mary and this week we have a great colour challenge for you:
Here's my card:
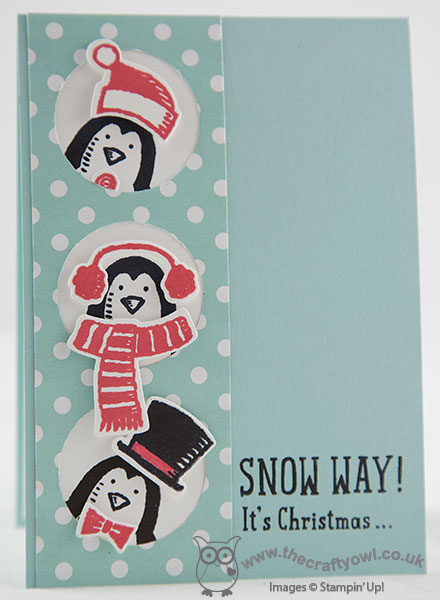
I am loving these cute little penguins (and the snowmen!) in the 'Snowplace' stamp set and the co-ordinating framelits make cutting them and their accessories out a cinch! For today's card, I used a Pool party base with a strip of Whisper White, onto which I stamped my penguins directly using the new Basic Black Archival ink. Each of them is peeking out of a hole punched with my 1 1/2" circle punch into a strip of School House DSP and their accessories stamped in a combination of Basic Black and Watermelon Wonder, which are popped up on dimensionals for a little added lift. I customised the sentiment as it wouldn't fit as per the stamp onto my card front; I continued the remainder inside, where I also added a few festive snowflakes to pretty things up a bit:
Isn't that fun? I have used this set so much already and I just know that I will get lots more use from it - it's already a favourite with my daughter!
Do visit the other Design Team members to see how they used this week's challenge colours; there's lots of inspiration over on their blogs too!
Enjoy your day and I'll be back tomorrow with another project; until then, happy stampin'!
Stampin' Up! Supplies Used:
* Snow Place - available September 1st
* Snow Friends Framelits - available September 1st
- Big Shot
- Magnetic Platform
- 1-1/2" Circle Punch
- Schoolhouse Designer Series Paper
- Pool Party A4 Cardstock
- Pool Party Classic Stampin' Pad
- Watermelon Wonder Classic Stampin' Pad
- Whisper White A4 Cardstock
by Joanne James21. August 2015 20:59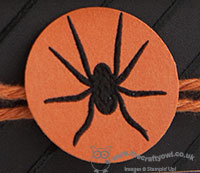
Today I'm breaking from my run of Christmas cards, however never fear, I have another 'sneak peek' for you, this time of some of the new Halloween products that are on the way. I used this week's Retrosketches challenge for my layout:

I used the main stamp in the set 'Witches Night' set; this is the set that accompanies the Witching Decor Project Kit (more on that another time!) but the stamps in the set can be used on lots more projects besides. Here's my card:
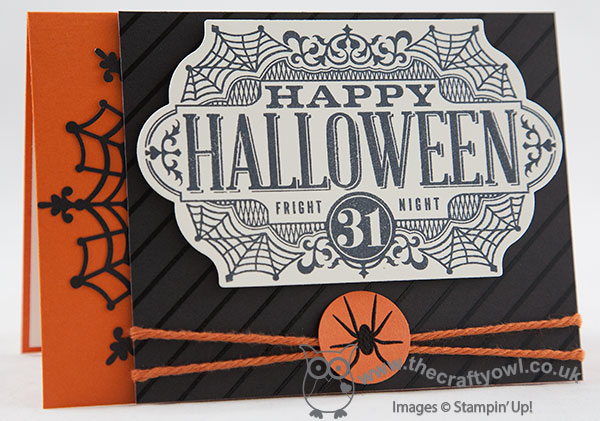
I used Tangelo Twist for my base, with a piece of Basic Black Color Me Irresistible Specialty Designer Series Paper on top raised on dimensionals. I tucked a spider web doily behind so that it peeked out across the orange, then stamped my main sentiment greeting on Memento Black onto Very Vanilla cardstock, and cut out with one of the Lots of Labels framelit dies. To finish, I stamped a spider from the new 'Cheer All year' set in Versamark onto Tangelo Twist and heat embossed in black to give it a lovely shine. I punched this out with a 1" circle punch and attached to the black panel with some of the retired SAB Tangelo Twist thick baker's twine.
This card came together quite quickly - the large decorative sentiment certainly makes a statement!
That's all from me today; I'll be back tomorrow another 'sneak peek', this time showcasing some of the lovely new Autumnal range. Until then, happy stampin'!
Stampin' Up! Supplies Used:
* Witches Night - available September 1st
*Cheer All Year - available September 1st
*Spider Web Doilies - available September 1st
66b7f74c-9234-4a78-af47-835aa015f467|0|.0|96d5b379-7e1d-4dac-a6ba-1e50db561b04
Tags: Big Shot, Halloween, circle punch, Lots Of Labels framelits, Witches Night, Cheer All Year, Stampin' Up, Stampin' Up Card, Stampin' Up Card ideas, Stampin' Up Supplies, Shop online, Shop Stampin' Up online
Cards | Stamping
by Joanne James15. August 2015 22:14Here's today's post - a little later than planned due to the activities of the day! - with a Christmas card I made for this week's Mojo Monday challenge:

Having unpacked my new seasonal pre-order goodies (demonstrator perks - let me know if you would like to know more!!), I have been keen to use some of new supplies. There's nothing like some new goodies to get you in the crafting mood! Here is my card, featuring the gorgeous holly pattern from the 'Home For Christmas' DSP and one of the stamps in the new 'Cup Of Cheer' stamp set:
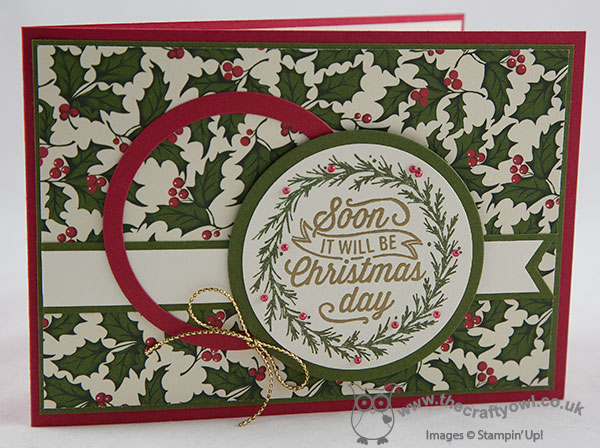
I matted my paper with Mossy Meadow on a Real Red card base and in addition to a thin circle of Real Red cut with my Circle Framelits, I used my framelits to cut another circle of Mossy Meadow which I used to mat my focal sentiment - this gorgeous stamp from the 'Cup of Cheer' stamp set. I stamped this sentiment in two stages, firstly masking off the outer wreath and stamping the centre with Versamark, then removing the mask and colouring the outer wreath in Mossy Meadow using my Stampin' Write marker. I then heat embossed the centre using gold embossing powder and added a few tiny pearl berries that I coloured with my red copic marker to finish, before punching out with my 2 1/2" circle punch. This card looks so lovely in real life - the sentiment is so shiny and the wreath has a dusting of gold too where the green ink was also slightly wet still prior to embossing. The photo really doesn't do it justice! Did you notice my bow too? This is some of the new Gold Cording Trim (it comes in silver too!) - love this!
This is actually the second card I made using this sketch; having made the first one, when I went to upload it to the gallery I saw one that was very similar to it, so I decided to go back to the drawing board to come up with something different. I love my first card though - rest assured I will be sharing it with you later this week!
Back tomorrow with a new challenge over at The Paper Players - and not a Christmas card in sight! Until then, happy stampin'!
Stampin' Up! Supplies Used:
*Cup Of Cheer - available September 1st
*Home for Christmas Designer Series Paper - available September 1st
*Cording Trim - available September 1st
2186ff26-b83a-4235-9a39-8c2bab787f49|0|.0|96d5b379-7e1d-4dac-a6ba-1e50db561b04
Tags: Big Shot, Christmas, circle punch, Circle Thinlit Card, Shop Stampin' Up online, Shop online, Stampin' Up Card, Stampin' Up Card ideas, Stampin' Up Supplies, Stampin' Up, Cording Trim, Cup Of Cheer, Home For Christmas
Cards | Stamping
by Joanne James14. August 2015 09:00Today I'm sharing the birthday card I made for Ben to celebrate his 8th birthday. Basketball and football are his two sporting passions and lately he has been football mad. He also has a belief that pop-up cards are the best; whilst this isn't quite a pop-up, it does have a fun flip element with the Circle Thinlit card base - here's my card:
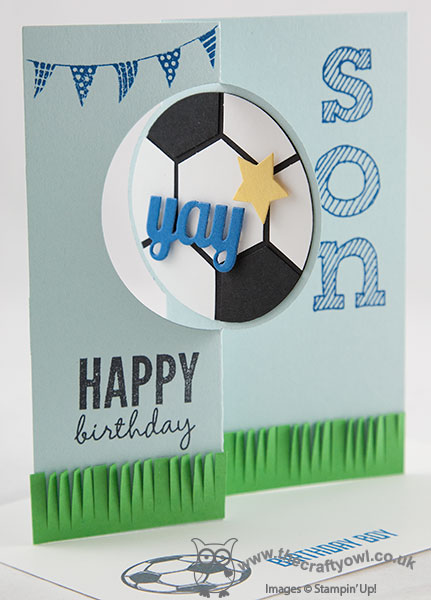
I used Soft Sky for my base and built my football out of a 2 1/2" circle punch and black and white hexagons and decorated my card with some grass cut with my fringe scissors and a bunting banner and greeting from Celebrate today, complete with personalisation using the Epic Alphabet set.
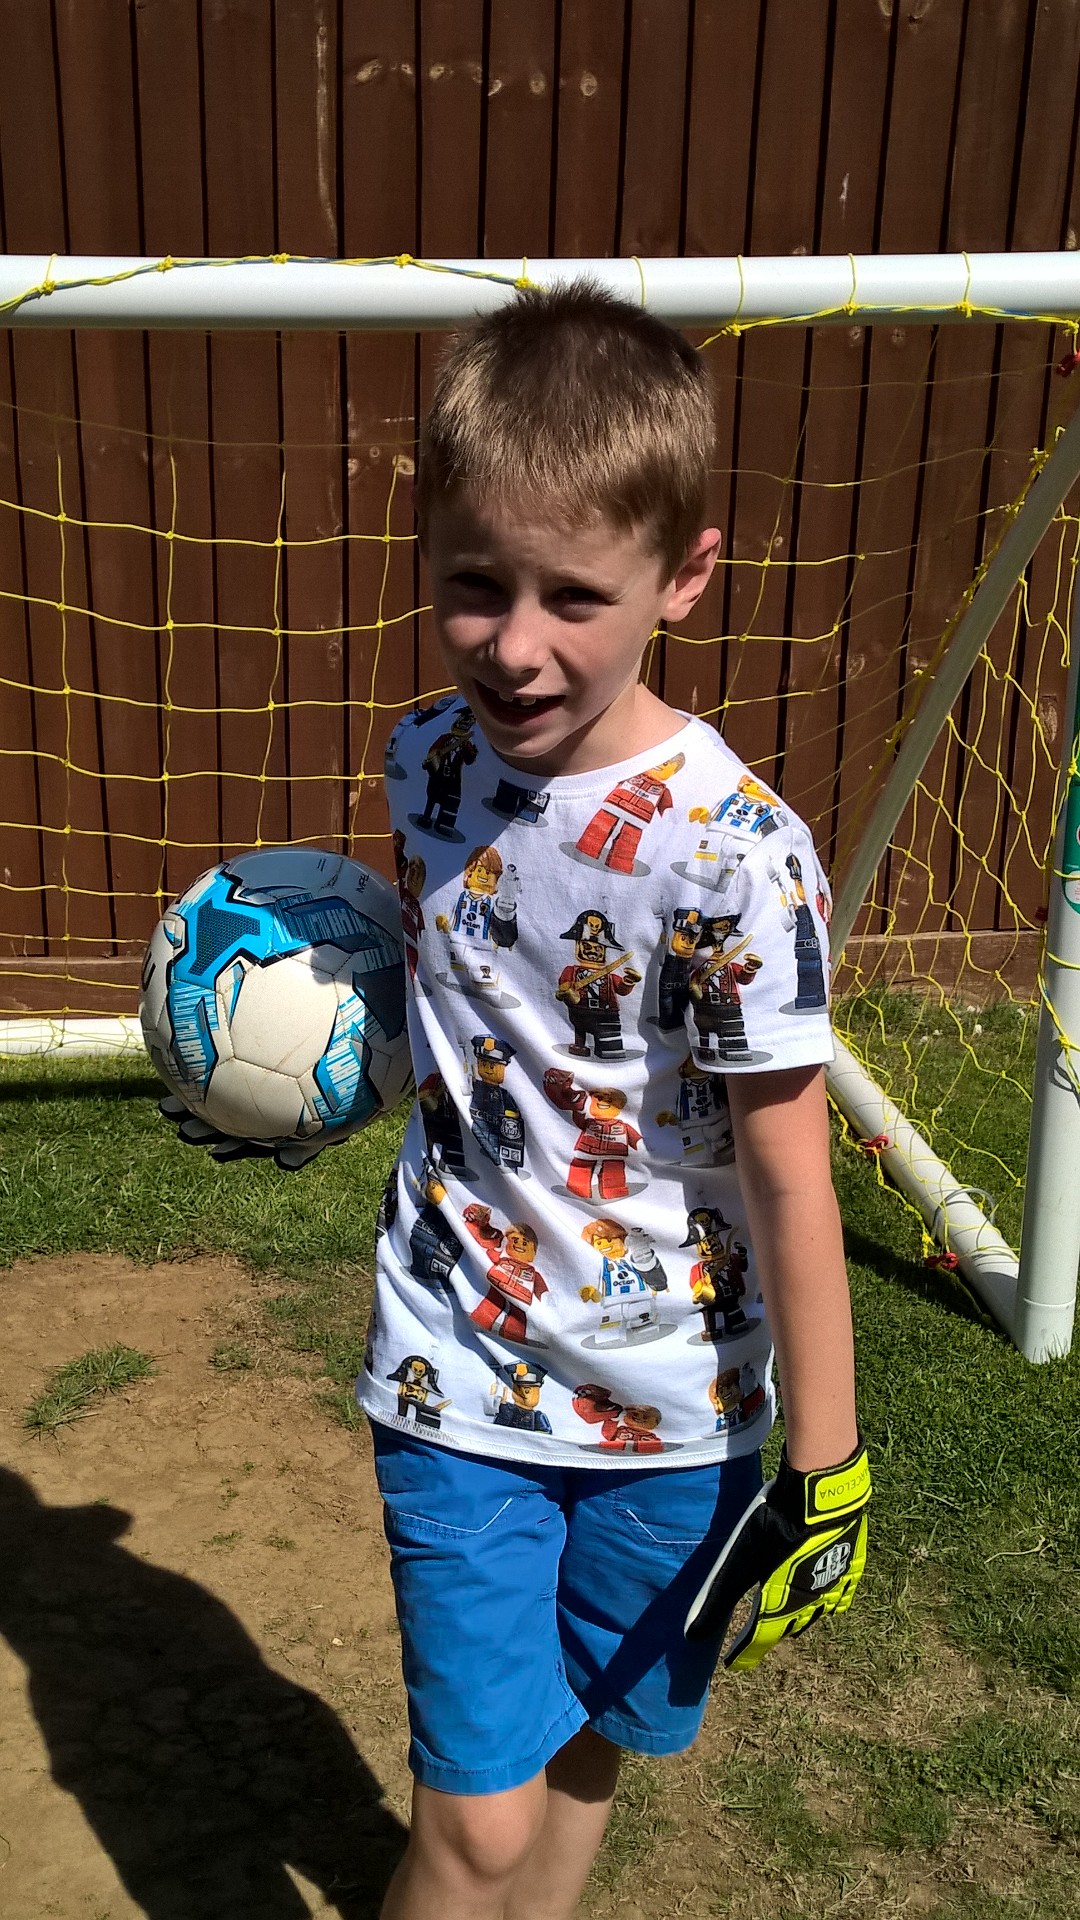
This card actually came together surprisingly quickly and Ben loved it - I'd forgotten quite how much fun a circle thinlit card could be! Here is a picture of the birthday boy blowing out the candles on his amazing birthday cake, made by one of my extended family, the super-talented Helen Vowles:

Ben declared his basketball cake the best ever and was mighty impressed. If you live in Northampton I would urge you to check out Helen's Facebook page here - she really does make the most amazing cakes! Here's another photograph of him in the garden trying out his new goalie gloves (don't look too closely at my lawn, it really doesn't appreciate being used as a football pitch!):
8 years old - my, where did those years go??!
That's all from me today; back tomorrow with another project - a Christmas card, no less! Until then, happy stampin'!
Stampin' Up! Supplies Used:
ea2df5b3-4cc4-4ac2-9302-712baa21967b|0|.0|96d5b379-7e1d-4dac-a6ba-1e50db561b04
Tags: Circle Thinlit Card, Epic Alphabet, Big Shot, Celebrate Today, Fringe Scissors, Hexagon Punch, circle punch, Shop online, Shop Stampin' Up online, Stampin' Up, Stampin' Up Card, Stampin' Up Card ideas, Stampin' Up Supplies
Cards | Stamping
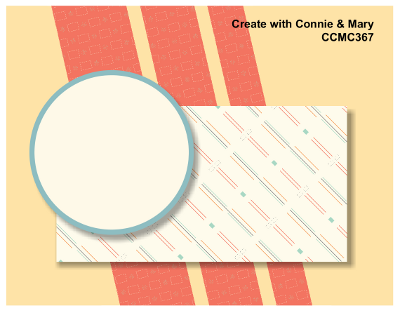
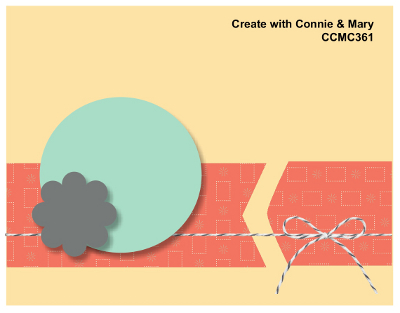
by Joanne James6. August 2015 08:05Today it's time for a new challenge over at Create With Connie and Mary and this week we have a great sketch challenge for you:
Having placed my pre-order for items from the forthcoming Autumn-Winter seasonal catalogue this week, I am totally in the Christmas groove. My new goodies haven't arrived yet, but luckily for me the annual catalogue now has a Christmas section again, so that's where I went for some supplies for today's card. Here's my card:
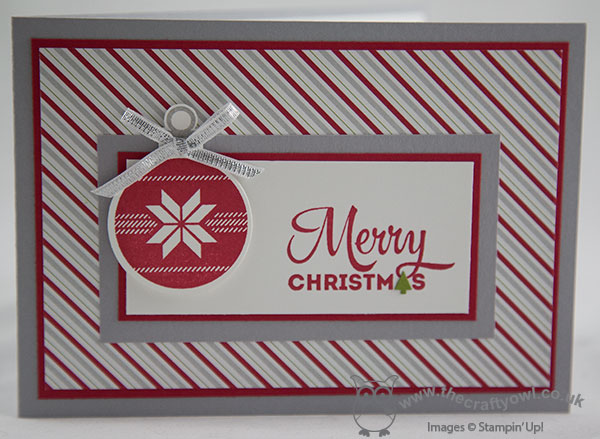
I used the new set 'Lots of Joy' and combined this with the lovely 'Merry Moments' DSP. I took the three diagonal stripes as inspiration for my card rather than literally - this paper has a lovely stripe pattern of varying thicknesses, so I think it works quite well. I stamped my bauble twice, once in Real Red and once in Smoky Slate, then cut the bauble top from the Smoky Slate one and adhered it behind my red bauble, before adding a silver ribbon bow. I stamped my sentiment in Real Red, then decided to paper-piece the little Christmas tree over the top in Old Olive - here's a close up photo so that you can see it in more detail:

This was quite easy to do - I simply stamped the sentiment again on a scrap of green cardstock, snipped out the tree and reversed it before adhering to my card. The pencil-thin stripe in the DSP is Old Olive and this was a great way to bring a little green into my predominantly red and grey coloured card. I hope you like today's card - I have another Christmas card using the same set to share with you tomorrow! Do visit the other Design Team members to see how they used this week's sketch; there's lots of inspiration over on their blogs too!
Enjoy your day and I'll be back tomorrow with another Christmas project; until then, happy stampin'!
Stampin' Up! Supplies Used:
- Lots Of Joy Wood-Mount Stamp Set
- Merry Moments Designer Series Paper
- 1" Circle Punch
- Silver 1/8" Ribbon
- Real Red Classic Stampin' Pad
- Real Red A4 Cardstock
- Smoky Slate Classic Stampin' Pad
- Smoky Slate A4 Cardstock
- Whisper White A4 Cardstock
- Old Olive A4 Cardstock
by Joanne James31. July 2015 08:00Good morning everyone - it's Friday! I'm sure you are all more pleased than I am since it might be nearing the end of the week but for me it means that there are only a few more days left of my vacation before I return to the dreary weather of the UK. Oh well, let's not dwell on that!
Today I have a card that I made with one of my card class customers in mind, that features the bold patterns of the English Garden DSP. Here is my card:
We had been perusing through my DSP samplers whilst taking orders for the latest round of paper shares and the English Garden DSP came in for much comment. It was universally liked but some of my customers were unsure just how they would go about using paper with such bold patterns of a card. We chatted about it but since 'a picture tells a thousand words' as the saying goes, I thought some examples would better explain and today's card is a great example. Some of the patterns in the pack have smaller patterns so can be used in smaller quantities to add interest to a card, however others such as the paper I've used on today's card really need to be a feature of the card, rather than an add-on - the bold patterns work best when you can see as much of them as possible.
On this card I used a base of Soft Suede, then cut a large piece of DSP into three equally sized panels and mounted each of these onto a piece of Night of Navy to give a narrow border before adhering them to my card. I could just as easily have stopped there, however on this occasion I added some retired Baked Brown Sugar thick baker's twine and a sentiment from the 'A Whole Lot of Lovely' hostess, coloured with my co-ordinating Stampin' Write markers, and added this to the front of my card. It compliments the paper without overshadowing it.
Another great example of how to use the bold patterns in this pack can be seen on this card, by my friend and fellow Paper Player the lovely LeAnne Pugliese:
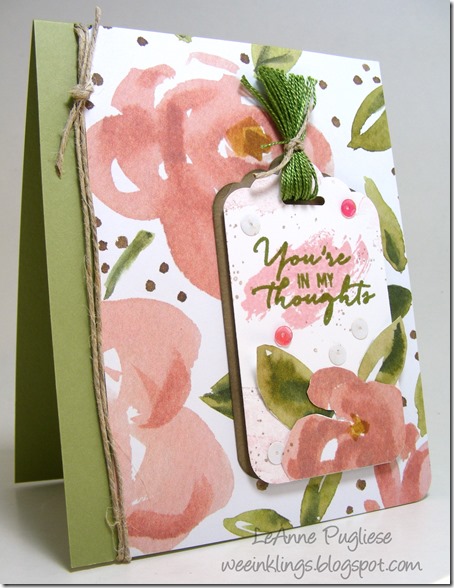
This too allows the paper to take centre stage with a sentiment treatment that compliments and not overshadows it. I hope you like both my card and LeAnne's - please do leave me a comment below with your thoughts and pop over to LeAnne at her Wee Inklings blog to leave he a comment on her card too - and I hope these cards inspire you to 'be bold' with the patterns in the English Garden Designer Series Paper Pack.
Back tomorrow with another project; until then, happy stampin'!
Stampin' Up! Supplies Used:
by Joanne James30. June 2015 09:54Good morning everyone! I have had a most enjoyable morning with two of my newest Stampin' Up! team members carrying out some induction training, all finished off with a little cream tea to reward them for their efforts! Today is the last day of the '2 free stamp sets' sign up offer where you can get any 2 catalogue stamp sets of your choice for free in addition to your £130 of goods for £99.

You don't want to miss out on this opportunity! You can get the full scoop here or if you're ready to sign up, just click here to join my team. If you're on the fence and are still wondering if my team is for you, then do give me a call for a chat before making your decision - I would love to tell you more.
Today I have a quick post for you to just squeeze in an entry to this week's challenge over at Pals Paper Arts where they have a great sketch challenge this week:

My card this week was very much inspired by the one that Mary Fish made using this sketch - you can see her card here, I just love her clean and graphic style - and I knew this layout offered me the perfect opportunity to add to my stash of end of term teacher thank you cards with a really quick make - take a look:
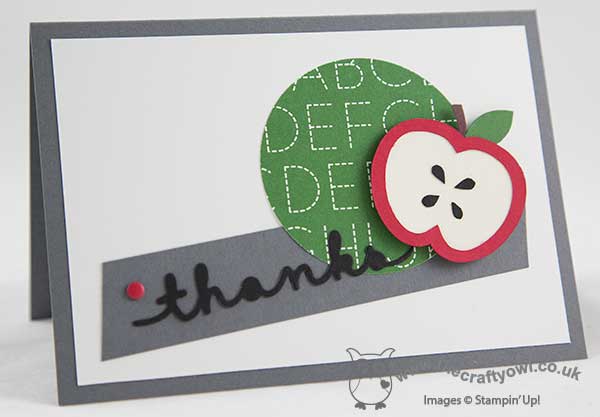
I decided to add to my collection of teacher thank you cards and combined a card base of Basic Grey with a mat and strip of Whisper White and a 2 1/2" circle of the Schoolhouse DSP in the alphabet pattern with an apple that I cut with my Silhouette Cameo e-cutter and a 'thanks' die cut using the new Greetings Thinlits in Basic Black.
Super simple, ultra modern and easy to re-create if you've lots of cards to make.
I hope you like today's card; I'll be back tomorrow with another creative project and news of this week's weekly deals, which from tomorrow until 4th August will be even better than usual, with lots more items with 30% off until the allocated stock at that price is gone, when it will revert back to standard catalogue price. The Clearance Rack is also due to update, with many items 60% off, so keep your eye out for some bargains!
Until then, happy stampin'!
Stampin' Up! Supplies Used:
by Joanne James29. June 2015 09:49Happy Monday everyone! Well, we didn't manage to barbeque yesterday as it was the worst weather day of the week here in the UK, but no matter - this week is supposed to be a scorcher, despite the fact that it's the start of Wimbledon Tennis Fortnight (a sure recipe for rain!) so I'm sure there will be lots of opportunity. My week is shaping up to be a busy one - with only three weeks until the end of the school term, there is something on pretty much every other day between now and the end of term so forgive me if my blogging becomes brief! Anyway, a good start to the week as I've two cards to share today! This first is my card for this week's challenge over at Colour Q:

Don't you just love those flip flops?! The colours along with the butterflies prompted me to create a fun 'cutting edge' card that I am also linking up with the current challenge over at SUO Challenges where they are asking us to create a card that features a cut edge that is something other than a straight line. This is what I came up with:
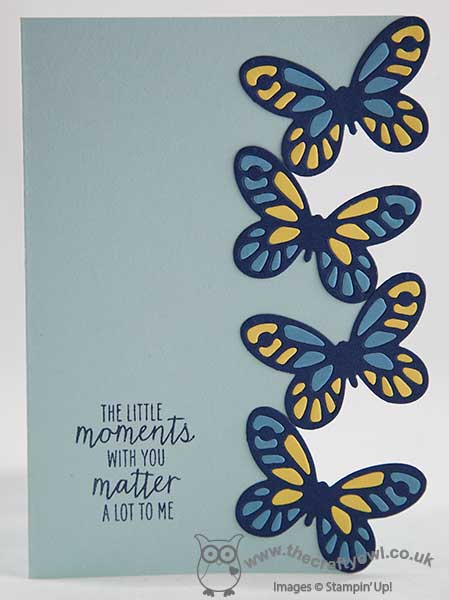
I used Soft Sky for my card base, then diecut four butterflies in Night of Navy using the smallest butterfly in the new Bold Butterfly framelits and adhered them to the edge of my card, carefully cutting around them by hand to remove the edge of the card base and expose the back panel. I then cut another two butterflies each in Daffodil Delight and Marina Mist and paper-pieced the small pieces into the navy butterflies. I stamped the sentiment from Watercolour Wonder onto the front of my card in Night of Navy and stamped the spotty strip repeatedly along the back inside edge of the card in Soft Sky for some added detail behind the butterflies, although you can't see this in the above photo as it's not flat and only visible when closed (I need to take another picture which I will add to this post later - these type of cards are so tricky to photograph!). This card looks so pretty in real life - the fussy cut edge really lifts this card and makes it something special.
My second card today is using this week's sketch over at Freshly Made Sketches where the lovely Jen Mitchell has a great sketch that would work so well for so many layouts:
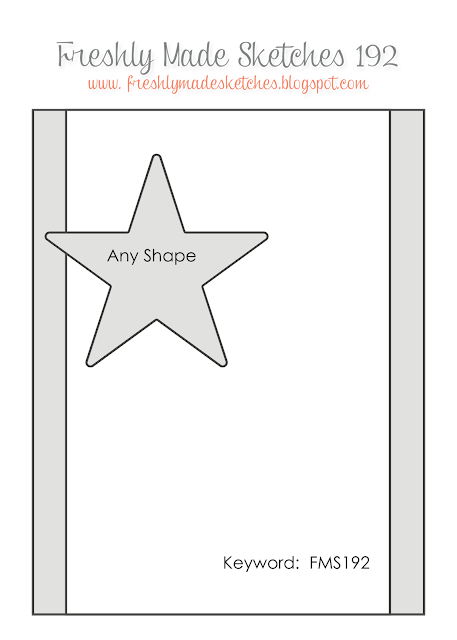
I flipped the sketch through 180 degrees (it's allowed!) to create a rather topical card that was inspired by a cupcake of all things that appeared in my Facebook feed over the weekend, commemorating the decision by the US Supreme Court over the weekend to legalise same sex marriage across all US states:
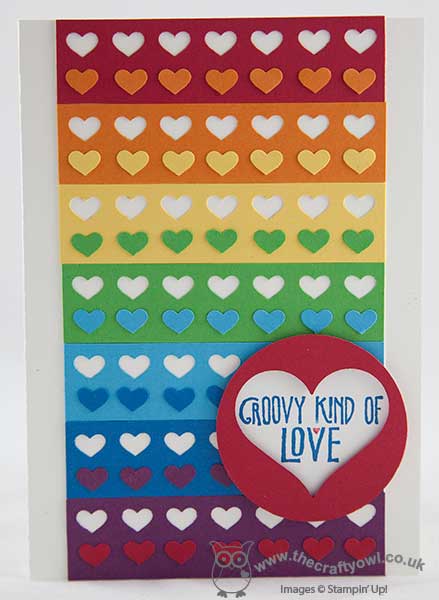
I used a rainbow of strips of cardstock, punching each with my Hearts Border punch before adhering to my base of extra-thick Whisper White cardstock (love this for card bases!) I then took the punched out hearts and adhered these individually in a row beneath the negative punched space on the strip above. My focal point is a couple of 2" circles, the first in Whisper White and stamped with one of the sentiments in the 'Groovy Love' stamp set, inked up with Pacific Point and Real Red Stampin' Write markers. The second circle was punched from Real Red cardstock, with a heart punched out of the centre using the Sweetheart punch so that the sentiment could show through the negative space and popped up over the first on Dimensionals for added depth. Very 'gay pride' with the hearts and rainbows, don't you agree? I am also entering this card into a demonstrator-only challenge that Stampin' Up! are currently running with the tagline #punchitup where we have to use a combination of two of four specific punches and as you can see, I went with hearts!
That's my creative post for today; I will be back tomorrow with another project and may be back in the meantime with other news, depending on how far I get through today's 'to do' list so do pop back later! Until then, happy stampin'!
Stampin' Up! Supplies Used:
Card One:
Card Two:
cf37e0b6-0757-4f9a-aa8f-aef99f5fa071|0|.0|96d5b379-7e1d-4dac-a6ba-1e50db561b04
Tags: Bold Butterfly Framelits, Watercolour Wonder, Big Shot, Hearts Border Punch, Stampin' Up, Stampin' Up Card, Stampin' Up Card ideas, Stampin' Up Supplies, Sweetheart Punch, circle punch, Punch Art, Groovy Love
Cards | Punch Art | Stamping
by Joanne James25. June 2015 08:00It's Thursday and you know what that means: time for a new challenge over at Create With Connie and Mary! This week we have a sketch challenge for you:
I decided to go with another card featuring the Pretty Petals DSP; this time, one of the really bold patterns in the stack:
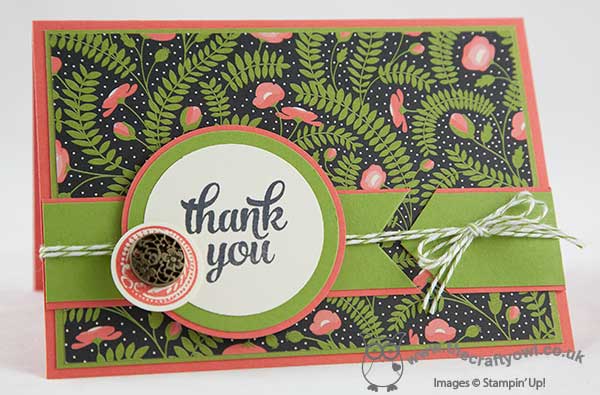
I used Calypso Coral and Old Olive for my mat and base layer and the band across the front of the card, then used the bold patterned DSP to cover my card front. After adhering the band, I tied two lengths of Old Olive baker's twine around the front of my card before adhering my layered circle. Given how busy the pattern of the paper is, I decided to leave my focal point 'clean' and stamped the thank you sentiment from the 'Tin Of Cards' stamp set onto a circle of Very Vanilla. For my embellishment, I stamped the round stamp from the 'Awesomely Artistic' stamp set in Calypso Coral onto Very Vanilla and punched it out with my 1" circle punch. I added an antique brad (deliberately offset) before adhering to my card.
This paper is quite different to the one I used on yesterday's card, but equally lovely I think. I can see me getting through this stack quite quickly!
That's all from me today; do check out the other DT member cards and we look forward to seeing you in the gallery this week.
I'll be back tomorrow with another project; until then, happy stampin!
Stampin' Up! Supplies Used:
- Pretty Petals Designer Series Paper Stack
- Tin Of Cards Photopolymer Stamp Set
- Awesomely Artistic Clear-Mount Stamp Set
- Calypso Coral A4 Cardstock
- Old Olive A4 Cardstock
- Stampin' Dimensionals
- Big Shot
- Magnetic Platform
- Circles Collection Framelits Dies
- 1-3/4" Circle Punch
- 2" Circle Punch
- Antique Brads
- Tuxedo Black Memento Ink Pad
- Old Olive Baker's Twine
- Calypso Coral Classic Stampin' Pad
- 1" Circle Punch