A Celebration of Let It Snow PP465

by Joanne James27. October 2019 09:00

Today it's Sunday and time for this week's new challenge over at The Paper Players! It's the turn of the fabulous Ann to host this week and she has my favourite, a sketch challenge for you to work with:
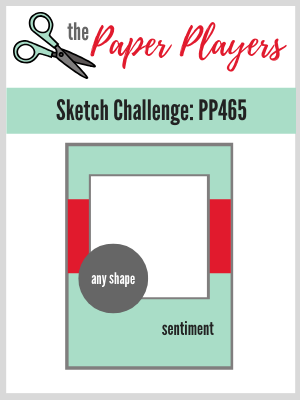
 

There were so many ways to go with this sketch - in the end I decided to 'Let It Snow' - in a big way! Take a look:
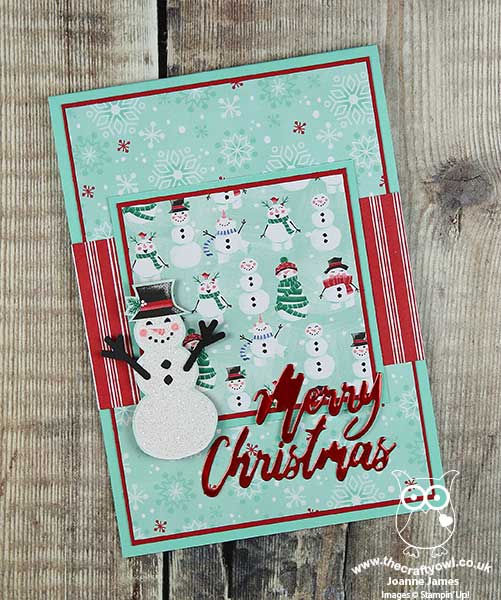
 

Here's the low-down on today's card:

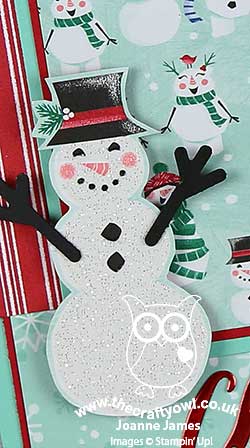
My card today is a celebration of the wintery-themed Let It Snow Specialty Designer Series Paper. This collection of cute snowmenwas at the top of my Christmas shopping list; my regular readers know how much I love DSP, and today's card uses not one, not two, not three, but four - yes four! - of the patterns in the pack. I used three of the non-glittery patterns for the layers (it was so hard not to use the sparkly designs on the reverse!) and fussy cut a glittery snowman for my corner embellishment from the fourth (I added some arms using the Snowman Builder Punch).

I added a diecut from 'Word Wishes' for the sentiment on the front of my card, although have a slight confession to make: this was supposed to be red glimmer paper for a touch of festive sparkle to compliment my glittery snowman, however could I find mine anywhere in my crafting square mile? Not a chance! I know I have some, but I couldn't find it anywhere so I resorted to some red foil instead. 

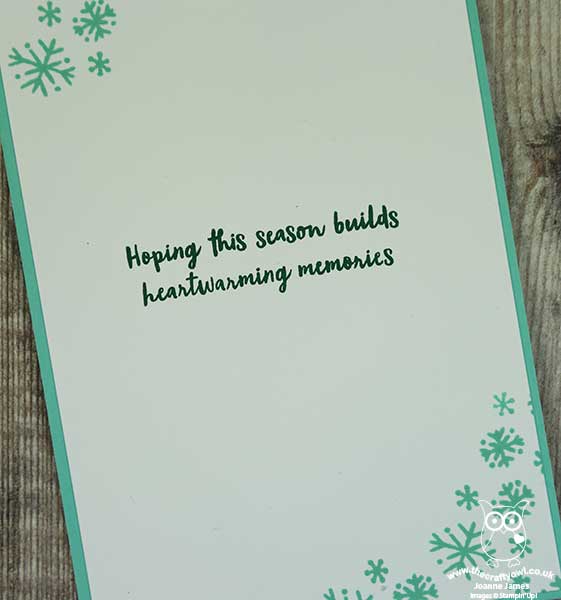
My card doesn't have a stitch of stamping on the front, although I did add a sprinkling of snowflakes and a sentiment from the 'Snowman Season' stamp set on the inside:
I love the combination of cool greens, white and red - it reminds me of candy canes - that feature in this paper pack and one thing is for sure: those glittery snowmen really are as sweet as sugar, and as sparkly too!

Here is the visual summary of the key products used on today's project for you to pin for easy reference:
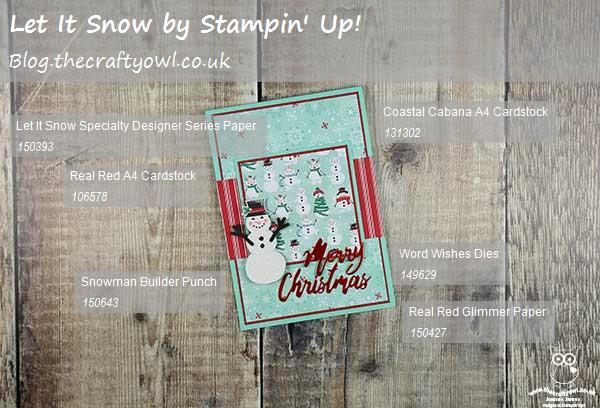
 

You can see all of my Product and 'How To' summaries on my 'How To - Tips and Techniques' Pinterest board in case you've missed any. 

Before you reach for your ink and papers, check out what our amazing team has created to inspire you this week:

Here's a quick recap of our challenge rules:
 
1.  Create a new paper project
2.  Upload your creation to your blog with a link back to us and provide a direct link to the post featuring your challenge submission.
3.  Please link your card to no more than four challenges, TOTAL.
4.  Have FUN!

You can see all of my 'How To' summaries on my 'How To - Tips and Techniques' Pinterest board in case you've missed any. 

Enjoy your day; today marks the official start of winter and with that an extra hour in bed - yay! My day will be a quiet one and hopefully I'll be back tomorrow with another project. Until then, happy stampin'!


Stampin' Up! Supplies Used: 

Table built using Product Table Builder by The Crafty Owl - Independent Stampin' Up! Demonstrator.

Halloween Tropical Chic For PP463

by Joanne James13. October 2019 09:00


Today it's Sunday and time for this week's new challenge over at The Paper Players! It's the turn of our queen of dies, the lovely Laurie, to host this week and she has a seasonal colour challenge for you to work with:


Laurie's Halloween-inspired colours were tough for me this week - I rarely make Halloween cards as they aren't a big thing here in the UK and I don't have many seasonal stamps that would work with all four of these colours. So I decided to go in a completely different direction and armed with Jacquie's sketch over at Freshly Made Sketches went for something more reminiscent of sunnier climes - take a look:


I used my Tropical Chic stamp set and dies to create a vibrant thank you card with a layered base, framing the diecut panel with a thin frame of Gorgeous Grape and adding a trio of blooms stamped in Pumpkin Pie and edged in Gorgeous Grape with a sponge dauber. A pair of dramatic black fern leaves and a glittery enamel dot complete my card.

So what do you think - does it work? This is one of those card that I think will pass, but I'm not sure I love it! Good job the rest of the team have some great cards to inspire you this week!

Here is the visual summary of the key products used on today's project for you to pin for easy reference:


You can see all of my Product and 'How To' summaries on my 'How To - Tips and Techniques' Pinterest board in case you've missed any. 

Before you reach for your ink and papers, check out what our amazing team has created to inspire you this week:

Here's a quick recap of our challenge rules:
 
1.  Create a new paper project
2.  Upload your creation to your blog with a link back to us and provide a direct link to the post featuring your challenge submission.
3.  Please link your card to no more than four challenges, TOTAL.
4.  Have FUN!

You can see all of my 'How To' summaries on my 'How To - Tips and Techniques' Pinterest board in case you've missed any. 

Enjoy your day; I am hoping to get some crafting done with more preparations for my retreat next weekend and maybe a catch a movie whilst I battle through an enormous pile of ironing - joy! I'll be back tomorrow with another project. Until then, happy stampin'!


Stampin' Up! Supplies Used: 

Table built using Product Table Builder by The Crafty Owl - Independent Stampin' Up! Demonstrator.

Country Home Thankful Cards for PP462

by Joanne James6. October 2019 09:00

Today it's Sunday and time for this week's new challenge over at The Paper Players! It's my turn to host this week and I have a seasonal theme challenge for you to work with:


At this time of year our thoughts often turn to giving thanks so I thought this would be a good theme for this week. I created not one but two cards this week, both using the colour combination over at TGIF Challenges. The first one uses this week's Fusion sketch (sketch only). I wanted to use the Country Home set for my cards today; it's one of my favourite sets for autumn thank you cards. For my first card I paired my milk churn of autumn foliage with some of the gorgeous patterned papers from the Woven Threads suite, along with some Grapefruit Grove coloured ribbon and pearls:


I tweaked my sentiment by replacing the stamped word 'happy' with a diecut from the Word Wishes Framelits set for added emphasis and finished my sentiment on the inside of my card:


My second card for Just Add Ink uses one of the other sentiments and foliage arrangements from the same set, this time with a piece of linen effect designer series paper from the Pressed Petals Specialty DSP that I embossed with my Tin Tile Embossing Folder for added texture:


You can see it more closely here, along with the detail on my cotton balls:


In Europe, due to ongoing customs issues we have been unable to obtain the Snowfall Accents Puff Paint on page 19 of the Autumn-Winter catalogue since the catalogue launch, which is a shame as it would be perfect to use on these. This week we learned that this product will not arrive before the catalogue end and as such has now been withdrawn from sale. Never fear though - I have a plan! I created exactly the same effect using some Tombo adhesive and white embossing powder using the same technique I used previously for an aeroplane smoke trail. I even made a video - here it is in case you aren't familiar with this technique and would like to see how it's done:

Give it a try and let me know how you get on and what you use it for - I'd love to see your projects!

Here is the visual summary of the key products used on today's projects for you to pin for easy reference:


You can see all of my Product and 'How To' summaries on my 'How To - Tips and Techniques' Pinterest board in case you've missed any. 

Before you reach for your ink and papers, check out what our amazing team has created to inspire you this week:

Here's a quick recap of our challenge rules:
 
1.  Create a new paper project
2.  Upload your creation to your blog with a link back to us and provide a direct link to the post featuring your challenge submission.
3.  Please link your card to no more than four challenges, TOTAL.
4.  Have FUN!

You can see all of my 'How To' summaries on my 'How To - Tips and Techniques' Pinterest board in case you've missed any. 

Enjoy your day; I am busy with preparations for my upcoming luxury weekend crafting retreat so I will hopefully be spending some time in my craft room ticking a few more jobs off my list, in between the usual weekend homework and a birthday party run for one of the James Juniors tomorrow afternoon. I'll be back soon with another project. Until then, happy stampin'!


Stampin' Up! Supplies Used: 

Table built using Product Table Builder by The Crafty Owl - Independent Stampin' Up! Demonstrator.


A Pumpkin Holiday Haul for PP461

by Joanne James29. September 2019 09:00


Today it's Sunday and time for this week's new challenge over at The Paper Players! It's the fifth Sunday of the month so my fellow Brit-turned Yank, the lovely Jaydee is host this week and she has a fun tic-tac-toe challenge for you to work with:


I always struggle with tic-tac-toe boards - almost too much choice! - so armed with this week's sketch over at Freshly Made Sketches and the Hand Stamped Sentiments colour palette I set to work and this is what I came up with:


Here's the low-down on today's card:

I liked this week's FMS sketch so much I ended up using it for a second time (which is weird, as I hardly ever use ovals on my cards - you can see tomorrow's card using the same sketch here). I thought that the HSS colours were perfect for an autumn-inspired card. I decided on a truck full of multi-coloured pumpkins and gourds, courtesy of the 'Holiday Haul' stamp set, one of the new sets exclusive to hostesses from the Autumn-Winter seasonal catalogue. I inked some of the pumpkins in Grapefruit Grove and added some Terracotta Tile with a sponge dauber for shading, then stamped some of the others in Mint Macaron and Pretty Peacock and fussy cut those and added them in. I created a Pretty Peacock frame for my oval using my Stitched Shapes Framelits and adhered my oval to my layered cardfront. My central panel was stamped tone-on-tone in Terracotta Tile all over with a cluster of leaves from a retired stamp set called 'A Little Something'. I couldn't find an appropriate sentiment in my stamp stash, so decided to leave it blank.

After all my fretting about which line of the tic-tac-toe board to complete, I ended up completing column 1 (fall, orange, leaves), row 3 (leaves, CAS, pumpkin) and the diagonal top left to bottom right (fall, diecut, pumpkin) - go figure!

My card will make the perfect notelet to send to my British penpal friend who now lives in the USA; she loves the way Americans embrace the season and I know she will already have started her collection of pumpkins to decorate her doorstep. If you like this fun set, it could be yours free with qualifying Stampin' rewards when you host a Stampin' Up! party - contact me to arrange yours.

Here is the visual summary of the key products used on today's project for you to pin for easy reference:


You can see all of my Product and 'How To' summaries on my 'How To - Tips and Techniques' Pinterest board in case you've missed any. 

Before you reach for your ink and papers, check out what our amazing team has created to inspire you this week:

Here's a quick recap of our challenge rules:
 
1.  Create a new paper project
2.  Upload your creation to your blog with a link back to us and provide a direct link to the post featuring your challenge submission.
3.  Please link your card to no more than four challenges, TOTAL.
4.  Have FUN!

You can see all of my 'How To' summaries on my 'How To - Tips and Techniques' Pinterest board in case you've missed any. 

Enjoy your day; we will be finishing our homework, having had a day of sport yesterday. I'll be back tomorrow with another project. Until then, happy stampin'!


Stampin' Up! Supplies Used: 

Table built using Product Table Builder by The Crafty Owl - Independent Stampin' Up! Demonstrator.

Brightly Gleaming Meets So Many Stars for PP460

by Joanne James22. September 2019 09:00

Today it's Sunday and time for this week's new challenge over at The Paper Players! It's the turn of the delightful Claire to host this week and she has my favourite, a sketch challenge, for you to work with:


Tall and skinny - what fun! I love occasionally to change things up and give cards a completely different look by altering their size and shape. It didn't take me long to decide where to take Claire's sketch this week - take a look:


Here's the low-down on today's card:

I took two of my favourite things - the navy and copper star patterned paper from the Brightly Gleaming set and my Stitched Stars Dies - along with some copper foil and star and foil elements, and created a layered star centrepiece. I heat embossed my sentiment from the 'So Many Stars' set in copper onto Night of Navy cardstock, fussy cut around it and popped it up on a stack of dimensionals to complete my card. 

Here is the visual summary of the key products used on today's project for you to pin for easy reference:


You can see all of my Product and 'How To' summaries on my 'How To - Tips and Techniques' Pinterest board in case you've missed any. 

I'm linking my card up with SUOChallenges where they currently have a Designer's Choice challenge. I love this card - so much so, I made a second one straight afterwards! I just need to use my trusty BoxBuster tool to make a couple of bespoke envelopes now ready to send them!

Before you reach for your ink and papers, check out what our amazing team has created to inspire you this week:

Here's a quick recap of our challenge rules:
 
1.  Create a new paper project
2.  Upload your creation to your blog with a link back to us and provide a direct link to the post featuring your challenge submission.
3.  Please link your card to no more than four challenges, TOTAL.
4.  Have FUN!

You can see all of my 'How To' summaries on my 'How To - Tips and Techniques' Pinterest board in case you've missed any. 

Enjoy your day; I am singing with my choir in a harvest festival service this morning, then will be home to assist in finishing homework and the like in the afternoon. I'll be back tomorrow with another project. Until then, happy stampin'!


Stampin' Up! Supplies Used: 

Table built using Product Table Builder by The Crafty Owl - Independent Stampin' Up! Demonstrator.

Brightly Gleaming Foil Elements CAS Bauble Christmas Card

by Joanne James21. September 2019 21:15

I am a bad blogger! I've had such a busy week that I have managed very little to either create or blog. So a quick share from me with another all-out copper clean and simple metallic, inspired by last week's Paper Players challenge that uses this week's CAS(E) This Sketch layout:


I created another super clean and simple Christmas card, this time featuring a couple of Brightly Gleaming Foil Elements baubles and a heat embossed sentiment from the 'Perfectly Plaid' stamp set - take a look:


My card is a simple extra thick Whisper White card base, a layer of copper foil cut with the Rectangle Stitched Framelits, then my copper heat-embossed sentiment on a panel of Whisper White with two foil element baubles hanging from some retired copper metallic thread - definitely clean and simple!

Here is the visual summary of the key products used on today's project for you to pin for easy reference:

 to follow

You can see all of my Product and 'How To' summaries on my 'How To - Tips and Techniques' Pinterest board in case you've missed any. 

Enjoy your evening; I'll be back tomorrow with this week's card for The Paper Players. Until then, happy stampin'!


Stampin' Up! Supplies Used: 

Table built using Product Table Builder by The Crafty Owl - Independent Stampin' Up! Demonstrator.

Clean and Simple Copper Metallic Christmas Tree for PP459

by Joanne James15. September 2019 09:00

Today it's Sunday and time for this week's new challenge over at The Paper Players! It's the turn of the fabulous Anne Marie to host this week and she has a fun clean and simple challenge for you to work with:


I couldn't resist going all-out copper for my metallic and created a super clean and simple Christmas card featuring a heat embossed tree from the 'Perfectly Plaid' stamp set - take a look:


Since it is clean and simple week, it's worth a reminder of what we at The Paper Players mean by Clean and Simple:

  • Minimal layers and embellishments
  • Plenty of open space, aka "white" space
  • Simple and uncluttered
My card is a simple extra thick Whisper White card base, a layer of copper foil cut with the Rectangle Stitched Framelits, then my copper heat-embossed Christmas tree on a panel of Whisper White with the addition of a simple single copper star embellishment - I didn't even add a sentiment to the front of my card. Just 3 layers with a single image and embellishment and a ton of white space - definitely clean and simple!

Here is the visual summary of the key products used on today's project for you to pin for easy reference:


You can see all of my Product and 'How To' summaries on my 'How To - Tips and Techniques' Pinterest board in case you've missed any. I loved this CAS challenge; I created another card for this theme too which I will hopefully share with you later in the week!

Before you reach for your ink and papers, check out what our amazing team has created to inspire you this week:

Here's a quick recap of our challenge rules:
 
1.  Create a new paper project
2.  Upload your creation to your blog with a link back to us and provide a direct link to the post featuring your challenge submission.
3.  Please link your card to no more than four challenges, TOTAL.
4.  Have FUN!

You can see all of my 'How To' summaries on my 'How To - Tips and Techniques' Pinterest board in case you've missed any. 

Enjoy your day; we are hoping to make the most of what is turning out to be a pleasantly warm weekend with possibly the last BBQ of the year, along with homework and more cooking of our gluts of home-grown produce. I'll be back tomorrow with another project. Until then, happy stampin'!


Stampin' Up! Supplies Used: 

Table built using Product Table Builder by The Crafty Owl - Independent Stampin' Up! Demonstrator.

Seasonal Leaves And Autumn Plaid For PP458

by Joanne James8. September 2019 09:00

Today it's Sunday and time for this week's new challenge over at The Paper Players! It's the turn of the fabulous Ann to host this week and she has a rather seasonal colour challenge for you to work with:


It has turned unseasonably cold here in the UK this week and the falling temperatures, combined with Ann's warm colour palette immediately turned my thoughts to Autumn leaves and warm and cozy check blankets, both of which inspired my card today - take a look:


Here's the low-down on today's card:

Autumn Plaid - I chose Crumb Cake as my neutral of choice (I didn't count the Very Vanilla since I took white or vanilla as a given!) and used it as the base to create a cosy strip of plaid to tie together the main colours on my card. I used the plaid stamp from the new 'Tiny Keepsakes' stamp set for my plaid; I could have used the 'Buffalo Check' background stamp but the plaid stamp in the 'Tiny keepsakes' set has a smaller check that worked better for my design. I stamped it in Merry Merlot, then added plaid lines with my Cajun Craze and Pretty Peacock Stampin' Write markers.

Seasonal Skeletal Leaves - For the focal decoration of my card, I cut three skeleton leaves using the Seasonal Layers Framelits in each of the main challenge colours, and tucked them in loosely behind my sentiment and swirl of burlap on a stitched rectangle of Very Vanilla. This die set is another perennial favourite of mine and I'm so glad it stayed in the annual catalogue this year - these framelits, along with the co-ordinating 'Colourful Seasons' stamp set, has served me well and I have used both many times, for all sorts of projects. 

Harvest Thanks - I took one of my favourite sentiments for this type of card, from the'Painted Harvest' stamp set, stamped it in Merry Merlot onto Very Vanilla and added this to a banner cut using the Lakeside Framelits, along with a couple of Pretty Peacock faceted dots to anchor it to my finished card.

Here is the visual summary of the key products used on today's project for you to pin for easy reference:


You can see all of my Product and 'How To' summaries on my 'How To - Tips and Techniques' Pinterest board in case you've missed any. 

Before you reach for your ink and papers, check out what our amazing team has created to inspire you this week:

Here's a quick recap of our challenge rules:
 
1.  Create a new paper project
2.  Upload your creation to your blog with a link back to us and provide a direct link to the post featuring your challenge submission.
3.  Please link your card to no more than four challenges, TOTAL.
4.  Have FUN!

You can see all of my 'How To' summaries on my 'How To - Tips and Techniques' Pinterest board in case you've missed any. 

Enjoy your day; I have no big plans today and am looking forward to continuing to enjoy my birthday weekend! I'll be back tomorrow with another project. Until then, happy stampin'!


Stampin' Up! Supplies Used: 

Table built using Product Table Builder by The Crafty Owl - Independent Stampin' Up! Demonstrator.

A Pig With Sparkle for PP457

by Joanne James1. September 2019 09:00


Today it's Sunday and the first of September; where is the year disappearing?! It's time for this week's new challenge over at The Paper Players and it's the turn of the fabulous LeAnne to host this week and she has a fun theme challenge for you to work with:


I had limited options for today's theme: cows, pigs or ducks! Limits are often helpful though as they really help focus the mind. I was so tempted to use my current farmyard favourite, those funny cows from the 'Over The Moon' set, however I decided to give some love to one of my other farmyard friends that has been a little neglected of late and took the opportunity to play along with the fourth week of the Freshly Made Sketches celebrations too - take a look:


Here's the low-down on today's card:

This Little Piggy - Whilst pigs are often to be found down on the farm, I'm not sure you'd see many of the flying variety! I do love this flying porcine creature though and I decided that on today's card she really needed wings to be proud of, so I created a stand-out pair in white glimmer paper and paper-pieced them - how cool are they?!

Artistic Touches - I used some of the patterned paper and felt accessories from the Follow Your Art Suite on my card today, heat embossing some clouds in white across my designer paper for added detail, along with a white twine bow. 

Frame It - I did a creative interpretation of the FMS sketch today and created a continuous scene, using a frame created from a pair of square Stitched Shape Framelits to draw the eye to my pig and sentiment and keep true to the sketch, rather than create my scene on a central square. 

Here is the visual summary of the key products used on today's project for you to pin for easy reference:


You can see all of my Product and 'How To' summaries on my 'How To - Tips and Techniques' Pinterest board in case you've missed any. 

Before you reach for your ink and papers, check out what our amazing team has created to inspire you this week:

Here's a quick recap of our challenge rules:
 
1.  Create a new paper project
2.  Upload your creation to your blog with a link back to us and provide a direct link to the post featuring your challenge submission.
3.  Please link your card to no more than four challenges, TOTAL.
4.  Have FUN!

You can see all of my 'How To' summaries on my 'How To - Tips and Techniques' Pinterest board in case you've missed any. 

Enjoy your day; we are enjoying the last few days of the summer holiday before the James Juniors begin a new school year later this week. I'll be back tomorrow with another project. Until then, happy stampin'!


Stampin' Up! Supplies Used: 

Table built using Product Table Builder by The Crafty Owl - Independent Stampin' Up! Demonstrator.

Come Sail Away Bermuda Bay and Copper Brusho Lighthouse Card TGIFC226

by Joanne James28. August 2019 09:00

Today I'm sharing a card for the current challenge over at TGIF Challenges where they challenging us to use a technique that I don't often feature on my cards:

I did experiment with splatters for my recent technique class featuring the Come Sail Away suite so having been using splatters a little more of late with this set in particular. You can see one of my previous cards here; this is another of the samples I prepared to demonstrate how splattering can be used to create unigue backgrounds: 


On this card I used some Bermuda Bay reinker and blue Brusho on Shimmery White cardstock, covered with scrunched up cling film before leaving to dry and then removed the cling film. I then covered with some splatters of copper shimmer and I added a collage of stamped and diecut bits and pieces from the Come Sail Away suite and some unravelled copper trim to complete my card. I'm not sure this type of card will ever feel natural to me - watercoloured backgrounds and collage-style cards are not my forte, but it's fun to step outside of your comfort zone every once in a while to try something different.

Don't forget to set your alarms for 6pm UK time this evening for your last chance opportunity to order trimmer blades for the discontinued Stampin' Up! trimmer - full details in my previous post here.

We have been busy harvesting fruit and veg from our garden and spent yesterday baking more goodies to eat and for the freezer I hope you enjoy your day and I'll be back tomorrow with another project. Until then, happy stampin'!


Stampin' Up! Supplies Used:

Table built using Product Table Builder by The Crafty Owl - Independent Stampin' Up! Demonstrator.

Shop Online

Access my online shop 24 x 7, 365 days of the year:

Current May hostess code:

3NR3FB9W

Shop Online

2024-25 Annual Catalogue

BROWSE THE CATALOGUE

Click on the image to download your copy of the 2024-25 annual catalogue. For a full list of current SU! supplies, go to my online store. If you would like any help or advice, please drop me a line at [email protected] or give me a call on 07773 421446 - I'd be happy to help.

Join My Team

It's always a great time to join Stampin’ Up but during May it's even better! New team members can get £78.25 of new In Color products for FREE! That's in addition to another £130 worth of products of your choice for only £99 + free business supplies + free shipping + all the fun being a part of Stampin’ Up! Stampin' Up! has something for everyone: join my growing team and benefit from my support to enjoy Stampin' Up! however you choose.

If you're interested, call me for a chat to understand how I can help you realise your goals. Alternatively, if you have already decided to sign up and you just can't wait, please click here for the link to the online form where you can sign up and order your starter kit right away! 

Latest Kits!

Stampin Cut and Emboss

The City Sights Kit has all you need to make 8 cards with coordinating envelopes for £20. Along with the new Happy Hollyhocks Kit, a no stamping kit including 9 cards for just £14, both are available from May 1st - get yours here!

New Online Exclusives

There are new products available exclusively in the online store from 5 March - check them out here.

About Me

Hi I'm Joanne and live in Northampton and when I'm not looking after my husband and two beautiful children, am an avid crafter with a passion for all things Stampin' Up!

I must confess that I have never been a big rubber stamper - until I discovered Stampin' Up! that is. I love the fact that I can get such great results with co-ordinating stamps, inks, papers and punches - the possibilities are endless! Join me on my stamping journey as I share the things I love and be inspired to create amazing things yourself!

Follow Me

Monthly Newsletter

Box Builder

Click the button above to use Box Buster to create your custom box design using the Envelope Punch Board!

Kits Collection Now Available!

Stampin Cut and Emboss

The new Kits Collection from Stampin' Up! is now available!

Click here to see the current kits available and order yours online today.

I Design For


Mini Catalogue


The next mini catalogue will be live in September! 

Stampin' Up Stuff

This is my personal blog and is not endorsed by Stampin’ Up! I hope you find it a plentiful source of ideas and personal inspiration but please don't copy my designs for contest submission or use for classes, publication or sale without express permission.