Scalloped Tag Stippled Blossoms Card

by Joanne James10. May 2014 20:55

A quick post from me this evening as I sit with my feet up relaxing following today's all day workshop. We had a lovely time and everyone left with lots of completed projects and plenty of leftover bits and pieces to make lots more things at home. The following card, designed by Monica Gale, was one of my favourite projects:

The feature of the card is a Stippled Blossoms rose that is stamped partially off the tag; this is backed with a couple of strips of Fresh Prints DSP and then finished with a red grosgrain ribbon bow and a sentiment cut with the word window punch. A simple enough card but a great way to use the Stippled Blossoms stamps and great practice for getting to grips with your stamp-a-ma-jig. I'm on a mission to make sure all my ladies can use theirs and truly reap the benefits (much to their dismay at times, I'm sure!) of this amazing little plastic sheet and its accompanying t-piece. Thanks ladies for your patience!

My next monthly card class is on Monday 2nd June and will be featuring the 'Springtime Hello' stamp set. If you live in or around Northampton and would like to come along, please do get in touch for more details - experienced and non-experienced crafters welcome.

Back tomorrow hopefully with a special blog post for you; until then, happy stampin'!


Stampin' Up! Supplies Used:

Table built using Product Table Builder by The Crafty Owl - Independent Stampin' Up! Demonstrator.


Fresh Prints Envelope Punch Board Tote and Notelets

by Joanne James9. May 2014 20:39

Good evening lovely blog readers! I've had a busy day today with lots of household chores and last minute preparations for an all day class that I'm running tomorrow with some of my favourite crafting ladies. Today I thought I would share with you one of the projects that we are making at our class tomorrow - a cute little tote made using the Envelope Punch Board:

This project was designed by Monica Gale and is one that I made at our last team quarterly training day. It's made using the papers from the Fresh Prints DSP stack and decorated with a tag stamped from the 'Hello Lovely' stamp set. I just love the colours and patterns in this paper stack and as a card maker these papers offer such great value for money at just £6.25 for 48 sheets. We are also making a set of thank you notelets to go inside - this would make such a nice little gift for someone. I'm looking forward to making this and lots of other projects with my ladies tomorrow; if you live in or around Northampton and would be interested in attending any of my cardmaking or project classes, you can find my current class schedule here or just contact me for more information.

That's all from me; back tomorrow with another project. until then, happy stampin'!

Stampin' Up! Supplies Used:

Table built using Product Table Builder by The Crafty Owl - Independent Stampin' Up! Demonstrator.


Video Tutorial: Scalloped Tag Topper Punch Concertina Card

by Joanne James8. May 2014 14:54

Hello everyone - my second video in a week! I'm cheating slightly, as I actually shot this video weeks ago but haven't got around to editing it until now. I made a lovely concertina fold Mother's Day card a while ago using the Scalloped Tag Topper Punch - you can see my original card here - which was based on a similar card made by Julie Kettlewell (you can see Julie's original card here). Having just gone to update my original post with the link to today's video, I realise I didn't mention her in my original post, which was very remiss of me and a complete oversight on my part, as I even mentioned her in today's video. Needless to say, I have now updated the original post!

I love this concertina fold card style - it's great if you need a card that's just a little different. I made another card based on my original one, this time adapting it to a birthday card for a friend of mine who always puts so much thought into cards for others, I thought she deserved something special for her birthday too; here's my latest scalloped tag topper punch concertina fold card:

The dimensions are exactly the same as my original card - there is still enough space to stamp 'happy' on one panel, with 'birthday' spelled out on the subsequent panels leaving the last panel blank for your message (I also stamped a little 'to you!' on this panel, just to complete my message). I also decorated one of the Stampin' Up! Kraft gift boxes with some co-ordinating Gingham Garden DSP to make some pretty packaging for my accompanying gift - finished with a tag made with the Scalloped Tag Topper Punch - well, what else?! Here's a picture of both pieces together:

So, if you would like to make a Scalloped Tag Topper Concertina Fold Card - either for the forthcoming international Mother's Day or a birthday card, here's my video tutorial showing you everything you need to know:


If you would like to purchase any of the Stampin' Up! supplies featured in today's project, just contact me or click on the links in the table below to go straight to my online store.

Back tomorrow with another project; until then, happy stampin'!


Stampin' Up! Supplies Used:

Table built using Product Table Builder by The Crafty Owl - Independent Stampin' Up! Demonstrator.


Stippled Blossoms Mother's Day Card

by Joanne James7. May 2014 22:08

Good evening all! I had an unexpected uninterrupted day at home today and with the exception of a large basket of ironing, I've spent pretty much the whole day crafting - bliss! I had lots of partially finished projects on my desk and am glad to have been able to complete a fair few of these and cleared some space. I also had some new goodies arrive today and when I saw this week's Colour Me ...! challenge colours and photo inspiration, I just knew I was going to have to ink one of them up to complete a card for this challenge! I also used this week's sketch over at Retrosketches for my layout and tied it in with Jaydee's theme of 'Mother' over at The Paper Players this week:

I always think of Cherry Cobbler as a Christmas colour, so it's nice to use it for something that isn't seasonal. Here is my card:

This card was the perfect excuse to ink up my new Stippled Blossoms stamp set. I've much admired this set for some time as I love the effect of the two-step stamping on the flowers, which look so typical of old English roses, but only recently purchased it. It's essential to use a stamp-a-ma-jig to get the images perfectly aligned - and there is no matching framelit, so the blossoms all need to be fussy cut by hand - but it is so worth it. I used my flowers to frame my central panel, a sheet of Watercolour Wonder DSP in White/Smoky Slate, onto which I heat-embossed the sentiment 'A Million and One Thanks' in Pewter. I matted this onto a square of Cherry Cobbler and used a Smoky Slate base. We've already celebrated Mothering Sunday here in the UK, but I decided to stay with this theme for my card. I thought this sentiment was quite appropriate; I know I don't thank my own Mother or Mother-in-law enough for everything they do for me and my family. I added a label (punched with the edge of the Decorative Label Punch) to incorporate 'to my delightful Mother' too and I finished off my card with a simple chevron ribbon trim and some rhinestones to add some sparkle.

Do check out the links to the challenges above for more design inspiration, especially Colour Me ...! where my long-distance Stampin' Up! buddy LeAnne Pugliese is the guest designer this month; you can check out her card on her Wee Inklings blog here.

Back tomorrow with another project (maybe even another video!); until then, happy stampin'!


Stampin' Up! Supplies Used:

Table built using Product Table Builder by The Crafty Owl - Independent Stampin' Up! Demonstrator.


New Wednesday Weekly Deals are here!

by Joanne James7. May 2014 21:56

It's still Wednesday (just!) and they're here: today's Wednesday Weekly Deals! This week's deals are included below - they will be available for one week only, before a new collection of deals is announced.

As always, if you want to take advantage of any of the deals on offer, you can support my business by placing your order online by clicking here or using the link to my store on the right hand side of my blog page where it says 'Shop Online' or with me in person. Don't forget to add the Hostess Code for May (you can find this under the 'Shop Online' section on the right. 

Here's a summary of this week's one-week only Wednesday deals - click on each item to go to the online store to purchase:

Table built using Product Table Builder by The Crafty Owl - Independent Stampin' Up! Demonstrator.

Embossing is the name of the game this week, with some great offers on dry embossing folders and powders and a heat gun for heat embossing. Back shortly with today's creative post; until then, happy shopping!


Tags: , , , , , ,

Promotions | Stamping

Video Tutorial: Stampin' Up! Hip Hip Hooray Card Kit in under 6 minutes!

by Joanne James6. May 2014 16:11

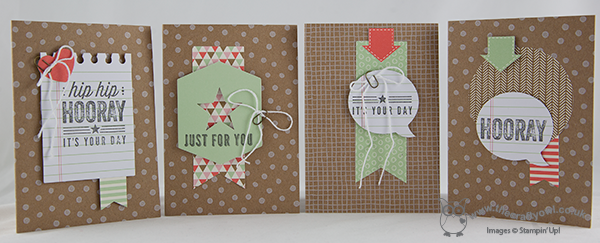
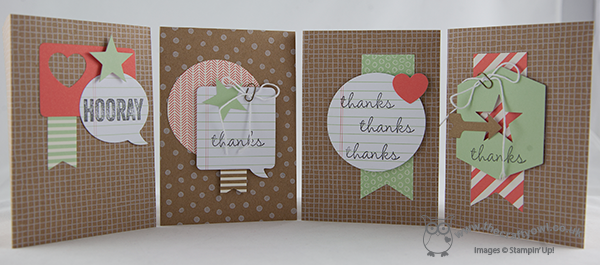
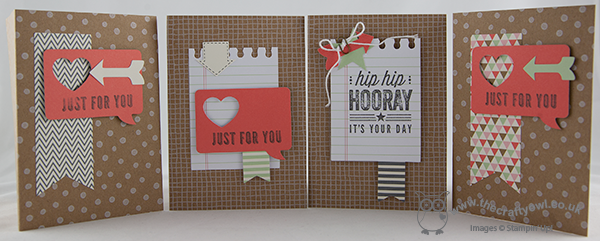
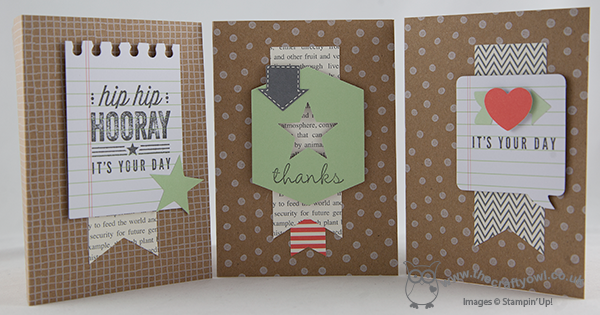
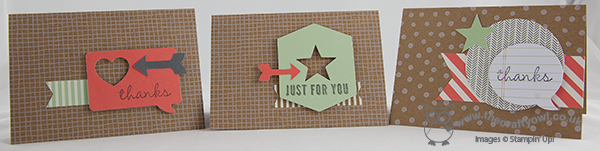
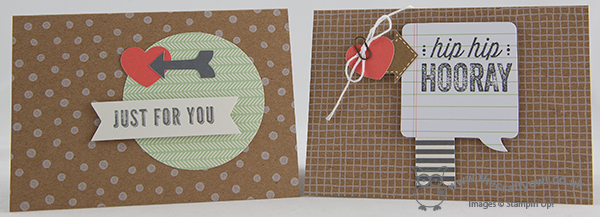
Today I'm sharing one of the latest additions to the Stampin' Up! range: the Hip Hip Hooray Card Kit. It costs just £17.95 and contains literally EVERYTHING you need to make 20 cards - tags, embellishments, cards, envelopes,  stamps, ink, block - yes, everything! This kit is great for seasoned crafters who want to stock up on cards in a hurry and those who are new to crafting - if you've never stamped before, this is the kit for you!

To see just how easy it is, check out my lighthearted video below where I make all 20 cards in under 6 minutes:


Ok, so there was some fast-forwarding in there!! In reality it took me just over an hour to make all 20 cards, which is still a great output for a short time investment. If you would like to purchase a Hip Hip Hooray Card Kit, get in touch or pop on over to my online store and place an order today. This kit would also make a great gift, maybe for a teenager or someone who likes crafting or to try new things - at less than £1 per card, it represents great value.

Better still, why not get together a group of friends and host your very own Hip Hip Hooray Card Party? I'll provide the kits, all you need to provide is the refreshments. I'll be on hand to help and answer any questions and I guarantee that by the end of the session you will have 20 cards to be proud of! Contact me to book your Hip Hip Hooray Card Party today!

And here's one more look at the finished cards:


Back tomorrow with another project; until then, happy stampin'!


Stampin' Up! Supplies Used:

Table built using Product Table Builder by The Crafty Owl - Independent Stampin' Up! Demonstrator.


Monochromatic Purple And To The Point!

by Joanne James5. May 2014 21:17

It's so nice to have an extra day added onto the weekend; a bonus day of family time and today with the added extra of a visit to some friends to see some of the cutest tiny black Labrador puppies EVER (no we didn't bring one home, although I think Rebecca was tempted to smuggle one out in her pocket!)

Today's card was initially inspired by the unusual sketch over at CAS(E) This Sketch this week:

I played about with a few ideas for this sketch and eventually settled on the following card:

I decided to make the swirl into a path of colour from my pencil, which is one of the stamps in the 'Making a Point' hostess set. I created a mask then sponged three blended shades of purple (Wisteria Wonder, Elegant Eggplant and Perfect Plum) to create my swathe of variegated colour. I then stamped the sentiment only from the pencil stamp directly onto the card base and stamped the pencil onto a separate piece of Whisper White cardstock, coloured with the same shades of purple and a blender pen, and cut out with my paper snips and mounted at an angle on dimensionals.

I'm also linking my 'Clean and Simple' card up with the challenge over at Less is More this week where the challenge is to use either three colours or three shades of one colour and The Card Concept where the challenge is to use monochromatic purple on your card.

Back tomorrow with another card; until then, happy stampin'.


Stampin' Up! Supplies Used:

Table built using Product Table Builder by The Crafty Owl - Independent Stampin' Up! Demonstrator.


Tags: , , , , , ,

Cards | Stamping

Bright Secret Garden Blooms

by Joanne James3. May 2014 21:56

What a lovely day - the weather here in the UK today has been glorious! We went to a restaurant for family breakfast, I baked and I even managed to get a little gardening done today; all in all a great start to the Bank Holiday weekend. Today's card uses the sketch layout over at Freshly Made Sketches and the colour combination of clashing pinks and oranges over at Colour Q this week:

 I based my card on the dress in the colour inspiration photo - here is my card:

 I used the retired Pretty in Pink for the card base and stamped a border across the bottom in the same colour using the butterfly from the 'This Day Forward' stamp set to add some background pattern. I used a doily semi-circle for shape and used a trio of flowers stamped from the Secret Garden stamp set and cut out with the co-ordinating framelits. I wanted to keep the flowers bold and bright, so I stamped them on the same colour cardstock and then used my aquapainter to wash more ink across the petals. I tucked in some Old Olive leaves behind and finished the flowers with some pearl centres and a Calypso Coral statement bow.

This card is much more feminine and girly than my usual style, but I like the way it turned out.

Back tomorrow with another card; until then, happy stampin'!


Stampin' Up! Supplies Used:

Table built using Product Table Builder by The Crafty Owl - Independent Stampin' Up! Demonstrator.

Tags: , , , , , , ,

Cards | Stamping

Happy Watercolour Square Punch Poppies Card

by Joanne James2. May 2014 20:28

Hello everyone - yes, it's Friday at last! And a three day weekend here in the UK too, so bonus! I've been busy working on wedding cards for commissions today so will share those another time. Today I'm sharing one of the cards I made with my ladies in my card class this month. The cards we made all featured the Happy Watercolour stamp set - today's card is a simple card stamped with the poppy stamp:

We punched three squares out of the front of the card (I used a retired square punch for this but you could use the Squares framelits as an alternative), then using the stamp-a-ma-jig to align the images on the inside of the card, we stamped the poppies in black so that they could be seen through the punched 'windows'. Each of the poppies was then overstamped with the large watercolour 'splodge' stamp (I think that is a genuine technical term!) like so:

A simple thank you sentiment on the front of this card provides the finishing touch. This card was as much about getting my ladies used to using a stamp-a-ma-jig; many of them own one, but weren't confident in using it so I've been making sure that at least one card in each class offers the opportunity to practice. You know what they say - practice makes perfect :-) I wouldn't be without mine, that's for sure.

Back tomorrow with another card; until then, happy stampin'!


Stampin' Up! Supplies Used:

Table built using Product Table Builder by The Crafty Owl - Independent Stampin' Up! Demonstrator.


Tags: , , , , , , ,

Cards | Stamping

Photopolymer Stamps are here - and you can get them free!

by Joanne James1. May 2014 11:06

Good morning everyone! I've bumped today's creative post as I have more exciting Stampin' Up! news to share with you: following on from successful trials in the USA, Stampin' Up! is introducing photopolymer stamps in Europe too!

Stampin' Up! have spent a long time trying to find the right material to introduce clear stamping to the Stampin' Up! range that gives the high standards of stamp and finish that you would expect of the Stampin' Up! brand and this is it! The forthcoming annual catalogue will now contain wood mount, clear mount and photopolymer stamp sets. There are lots of benefits to photopolymer stamps: they are great value (they are cheaper to produce so you get more stamps per set) and above all their transparency means that they make it so easy to line up your images, without the need for a guide or a stamp-a-ma-jig. Here's a short video showing you how they work:

Now for the best bit - FREE STAMPS!! To celebrate the introduction of the photopolymer range, Stampin' Up! are offering a limited offer on Stampin' Up! photopolymer sets. For every order of £60 or more between 1-31 May, you can choose one of a selection of photopolymer stampsets FREE! This offer is only available whilst stocks last though, so if you'd like one, you need to get your Stampin' Up! order placed as soon as possible! if you're ordering online, don't forget to use the online hostess code to be in with a chance of earning additional benefits. The icons below show the stamp sets on offer (these are not clickable through to my online store - you will be presented with the option to add them to your basket when you have an order with a qualifying spend). To order, simply follow the shop online link on the right of this page.

Table built using Product Table Builder by The Crafty Owl - Independent Stampin' Up! Demonstrator.

Back shortly with today's creative post; until then, happy stampin'!


Tags: , , , , ,

Promotions | Shop Online | Stamping

Shop Online

Access my online shop 24 x 7, 365 days of the year:

Current May hostess code:

VDKNV7BH

Shop Online

2024-25 Annual Catalogue

BROWSE THE CATALOGUE

Click on the image to download your copy of the 2024-25 annual catalogue. For a full list of current SU! supplies, go to my online store. If you would like any help or advice, please drop me a line at [email protected] or give me a call on 07773 421446 - I'd be happy to help.

Join My Team

It's always a great time to join Stampin’ Up but during May it's even better! New team members can get £78.25 of new In Color products for FREE! That's in addition to another £130 worth of products of your choice for only £99 + free business supplies + free shipping + all the fun being a part of Stampin’ Up! Stampin' Up! has something for everyone: join my growing team and benefit from my support to enjoy Stampin' Up! however you choose.

If you're interested, call me for a chat to understand how I can help you realise your goals. Alternatively, if you have already decided to sign up and you just can't wait, please click here for the link to the online form where you can sign up and order your starter kit right away! 

Latest Kits!

Stampin Cut and Emboss

The City Sights Kit has all you need to make 8 cards with coordinating envelopes for £20. Along with the new Happy Hollyhocks Kit, a no stamping kit including 9 cards for just £14, both are available from May 1st - get yours here!

New Online Exclusives

There are new products available exclusively in the online store from 5 March - check them out here.

About Me

Hi I'm Joanne and live in Northampton and when I'm not looking after my husband and two beautiful children, am an avid crafter with a passion for all things Stampin' Up!

I must confess that I have never been a big rubber stamper - until I discovered Stampin' Up! that is. I love the fact that I can get such great results with co-ordinating stamps, inks, papers and punches - the possibilities are endless! Join me on my stamping journey as I share the things I love and be inspired to create amazing things yourself!

Follow Me

Monthly Newsletter

Box Builder

Click the button above to use Box Buster to create your custom box design using the Envelope Punch Board!

Kits Collection Now Available!

Stampin Cut and Emboss

The new Kits Collection from Stampin' Up! is now available!

Click here to see the current kits available and order yours online today.

I Design For


Mini Catalogue


The next mini catalogue will be live in September! 

Stampin' Up Stuff

This is my personal blog and is not endorsed by Stampin’ Up! I hope you find it a plentiful source of ideas and personal inspiration but please don't copy my designs for contest submission or use for classes, publication or sale without express permission.