Layering Love New Baby Card

by Joanne James30. May 2017 19:00

Counting down now - only 2 days to go until the new 2017-18 Annual Stampin' Up! catalogue launches!


I have sent out copies to everyone on my catalogue mailing list who has purchased from me in the last 6 months - if you're not on this list but would like to receive one, then do give me a call on 07773 421446 or drop me an email and I will pop one in the post to you.

We are on the home straight for purchases from the current annual and spring-summer catalogue; there will be a full reminder of everything that is closing tomorrow, however meanwhile if you still have an order to place this month, don't forget to use the current online hostess code DXFJQZPN to receive a little thank you from me. This code will close tomorrow afternoon at 2pm, so be sure to have placed your orders online before this to benefit. If you are local to me and wish to save on postage, please ensure you have your order to me by midday tomorrow to be included on this order.

Today I'm sharing a card for this week's challenge over at CAS(E) This Sketch:

This sketch was perfect for an idea I've had in my head for a while using a stamp set from the annual catalogue - take a look:


Here's the low-down on today's card:

Layering Love - A new catalogue often means much less current stock in the stamp room, as old makes way for new and new consists of some select pre-order items. This has its advantages though - it encourages a look through those stamp sets that are carrying over from one annual catalogue to the next with fresh eyes - and in some instances, as with today's card, results in a set that has been languishing to be inked up for the first time (yay!) I bought the set some time ago because I love the big, bold feature sentiments it contains. The one I've used on today's card was the clincher though - not only is this a sweet sentiment for a new baby card, but is perfect for memory keeping and scrapbook pages or even a framed piece of wall art. I just had to have it - shame it's taken me so long to ink it up! The sentiment stamps are also designed to fit perfectly inside the various layering shapes framelits - bonus!

Sneak Peeks Times Two - I've mixed the old with the new on my card today too: I used the heart from a new set called 'Wood Words' to create a tone-on-tone border along the bottom part of my card using my trusty stamp-a-ma-jig to get my hearts neatly lined up and for my embellishment I added a sweet bunny that I fussy cut from the new Pick-A-Pattern Designer Series Paper. Full of eclectic hand-drawn images and quirky animals - I love this paper!

A Modern Colour Combo - I was tempted to go pink all the way with my card today, but decided to introduce black to tie in with my fussy-cut outlined bunny and I think it makes for a fresh and modern colour combination and tempers the brightness of Flirty Flamingo - feel free to save it if you would like to try it out on your projects:


Here is the visual summary of the key products used on today's project for you to pin for easy reference:


You can see all of my 'How To' summaries on my 'How To - Tips and Techniques' Pinterest board in case you've missed any. 

I'm a little later than anticipated posting today; the joys of having the James Juniors home for the half-term holiday! We spent the day running errands, posting and delivering catalogues and purchasing some things ready for one of them to embark on a Geography field trip next week. I'll be back tomorrow with another project, hopefully posted before our day begins. Until then, happy stampin'!


Stampin' Up! Supplies Used:

Table built using Product Table Builder by The Crafty Owl - Independent Stampin' Up! Demonstrator.

Flourish Thinlits Framed Sentiment Card

by Joanne James29. March 2017 10:00

Today I'm sharing a card for this week's challenge over at CAS(E) This Sketch which is also my second entry over at Less Is More this week:


Here's my card:


Here's the low-down on today's card:

Diecuts and Layers - When designing my card, I couldn't decide whether to stamp my base layer and diecut the sentiment, as suggested by the sketch, or whether to work it the other way around. The great thing about a sketch is that it's a starting point and always open to interpretation. I eventually opted for the latter, stamping my sentiment on my absolute base layer of Smoky Slate and heat embossing it in white, then creating a diecut oval in my top layers to frame my sentiment and then decorate this with my Flourish Thinlit diecut flowers. 

A Heartfelt Sentiment - Stampin' Up! sells some great stamp sets that have religious sentiment at the heart of their design and whilst they aren't for everyone there are a number that have a good mix and can be appreciated whatever your preference. Flourishing Phrases is one of those sets: some wonderful words of sympathy and marriage congratulation alongside some of general greeting and thanks. They also come in two parts: the inside of today's card is stamped with the second part of the one shown above, which reads "so he made you" - perfectly appropriate for the intended recipient of today's card.

A Flirt With 'That' Pink - When choosing my colour combination today, I started knowing that I wanted to use white for my floral diecut and so needed to choose a colour for my base that would highlight my embossed sentiment and another that would both compliment it and show off my white florals. I decided to go with Flirty Flamingo for my card front 'white space'; this is one of those colours that I find can be a little harsh when stamped, especially on white (you can see if on the envelope beneath my card in the photo above) yet the cardstock has a wonderful rich, yet soft warm pink tone and compliments Smoky Slate beautifully. Feel free to save this colour combination if it's one that appeals to you too:

Here is the visual summary of the key products used on today's project for you to pin for easy reference:


You can see all of my 'How To' summaries on my 'How To - Tips and Techniques' Pinterest board in case you've missed any. 

Enjoy the rest of your day and I'll be back tomorrow with another project. Until then, happy stampin'!


Stampin' Up! Supplies Used:

Table built using Product Table Builder by The Crafty Owl - Independent Stampin' Up! Demonstrator.

Basket Bunch Easter Egg Hunt Card

by Joanne James27. February 2017 20:44

Happy Monday everyone! I hope you've had a good day. I've had a busy start to the week with preparation for next week's classes followed by a pleasant hour watching Rebecca swim in a school swimming gala (she won all her races and the team won overall, so smiles all round.) Rebecca came second in her competition race yesterday too and had a new personal best time, so all good. Anyway, to today's cards - yes, two! I've made a couple of cards on the same theme using the same colours for a couple of different challenges:

Visit the Paper Craft Crew and play along with Card Sketch 232. #pcc2017 #cardsketch #papercraftcrew  www.papercraftcrew.com   

I decided I needed to get cracking (excuse the pun!) with my Easter makes, so today it's all about the Basket Bunch bundle  - take a look:


Paper Craft Crew have a great sketch this week and I really love the CAS Colours & Sketches colour combination - I will be so sad to see Cucumber Crush leave us in June! - and thought it was perfect for a little Easter egg hunt through the grass. I stamped and die cut a selection of eggs and interspersed them between my strip of grass. I layered it onto a piece of basket weave patterned paper from the Sale-A-Bration Carried Away Designer Series Paper and finished with this fun sentiment from the Basket Bunch stamp set, cut out with my Layering Ovals. May all your chocolate be solid - I love it!

Having completed this card, I thought it was probably a little too layered to qualify as truly 'clean and simple' for the lovely ladies over at CAS Colours and Sketches, so I die cut a few more pieces and created something a little more in keeping: 


Clean and simple with an alternative sentiment, yet no less colourful!

Here is the visual summary of the key products used on today's projects for you to pin for easy reference:


And for my second card:


You can see all of my 'How To' summaries on my 'How To - Tips and Techniques' Pinterest board in case you've missed any. 

Enjoy your day and I'll be back tomorrow with another project. Until then, happy stampin'!


Stampin' Up! Supplies Used:

Table built using Product Table Builder by The Crafty Owl - Independent Stampin' Up! Demonstrator.

Beautiful You And A Pop Of Pink

by Joanne James15. January 2017 09:00

It's Sunday and time for this week's new challenge over at The Paper Players! It's the turn of the talented Sandy to host this week and she has a fun colour challenge for us to work with:


I haven't been getting as much time to get in my office and craft as much as I'd like lately, so decided that today I was going to make a card using a set that was at the top of my wish list as soon as I set eyes on the Spring-Summer catalogue, along with the Fusion sketch for my layout - take a look:


Here's the low-down on today's card:

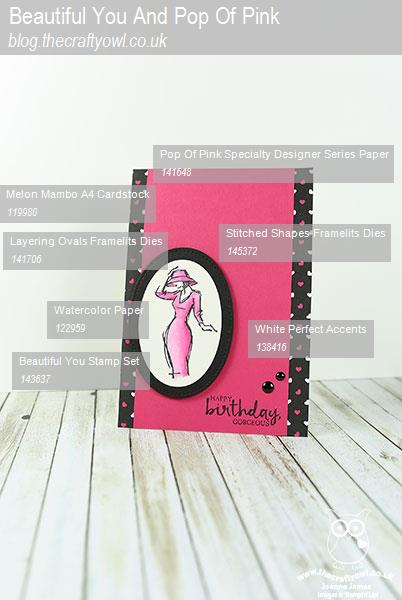
Beautiful You - I loved this set the moment I saw it! Sketched outlines of the female form and some great sentiments in fonts that combine script and print; now who wouldn't want to receive a card with the sentiment 'Happy birthday, Gorgeous'? That's guaranteed to raise a smile. Here I stamped the elegant lady in the hat in Archival Black in watercolour paper and coloured her in with Melon Mambo ink and my aquapainter. This set has so many creative possibilities, I'm really looking forward to using it in lots of other ways too.

A Pop of Pink - Having chosen pink as my 'colour', I spent some time experimenting with different layouts and pattern combinations and decided on a plain Melon Mambo central panel with a piece of Pop of Pink Specialty Designer Series Paper beneath it.

Stitched Framelits are back! - I chose to cut out my elegant lady with my Layered Oval Framelits and frame it with a simple stitched oval in mat black. Why am I teasing you with something you can't get hold of, I hear you cry? Well, fear not - as of tomorrow, 16th January, Stitched Framelits are back in stock and available to order - woohoo! These are the perfect way to add the finishing touch to a border or frame. Order yours tomorrow!

Here is the visual summary of the key products used on today's project for you to pin for easy reference:


You can see all of my Product and 'How To' summaries on my 'How To - Tips and Techniques' Pinterest board in case you've missed any. 

I'm also linking my card up with the challenge over at Stamp, Ink Paper where this week the challenge is also black, white and one colour; what are the odds?!

Before you reach for your ink and papers, check out what our amazing team has created to inspire you this week:

The Paper Players Design Team
 
 
Here's a quick recap of our challenge rules:
 
1.  Create a new paper project
2.  Upload your creation to your blog with a link back to us and provide a direct link to the post featuring your challenge submission.
3.  Please link your card to no more than four challenges, TOTAL.
4.  Have FUN! 


I look forward to seeing what you create with this week's colour palette. Enjoy the rest of your weekend as it will be over all too quickly; we are off to watch the National League basketball finals today - the tickets were one of Ben's Christmas presents. I'll be back tomorrow with another project; until then, happy stampin'!


Stampin' Up! Supplies Used: 

Table built using Product Table Builder by The Crafty Owl - Independent Stampin' Up! Demonstrator.

Petals and Paisleys Thankful Card

by Joanne James6. November 2016 09:00

It's Sunday and time for a new challenge over at The Paper Players! It's the turn of the lovely Laurie to host this week and she has a timely theme challenge for you to work with:


 Ultra clean and layered today (no surprise there then!) - I chose to showcase a wonderful sentiment and some fabulous paper on my card today - here it is:


Here's the low-down on today's card:

Petals and Paisleys - I chose to use one of the 'busy' papers from the Petals and Paisleys Specialty Designer Series Paper on my card today - a bold colour scheme with lots going on, so definitely a paper that needs to be allowed to shine on its own. 

I Am Blessed - Some lovely paisley stamps in the Paisleys and Posies stamp set, however it also contains great sentiments and this one is perfect to make a statement of thankfulness. I cropped mine with the Layered Ovals Framelits and backed with a scalloped oval, and a simple folded ribbon detail to tie the whole thing together.

A Rich Autumnal Colour Combination - There are so many wonderful colours in these papers - I focused in on Delightful Dijon, Night of Navy and the addition of Rich Razzleberry to emphasise the rich colours of the season. Feel free to save this combination if it appeals to you too:


Here is the visual summary of the key products used on today's project for you to pin for easy reference:


You can see all of my 'How To' summaries on my 'How To - Tips and Techniques' Pinterest board in case you've missed any. 

Before you reach for your ink and papers, check out what our amazing team has created to inspire you this week:

The Paper Players Design Team
 
 
Here's a quick recap of our challenge rules:
 
1.  Create a new paper project
2.  Upload your creation to your blog with a link back to us and provide a direct link to the post featuring your challenge submission.
3.  Please link your card to no more than four challenges, TOTAL.
4.  Have FUN! 


I look forward to seeing what you create with this week's theme. As you read this I will be travelling back from a few days away at our regional Stampin' Up! Onstage event in Telford, no doubt bursting with ideas for the Spring and Summer season. Don't worry - I won't be sharing on my blog here for a while, I still have so many Christmas projects to share!

Enjoy the rest of your weekend as it will be over all too quickly; I'll be back tomorrow with another project as my normal blogging schedule will resume; until then, happy stampin'!


Stampin' Up! Supplies Used:

Table built using Product Table Builder by The Crafty Owl - Independent Stampin' Up! Demonstrator.

Mini Catalogue

BROWSE THE CATALOGUE

The mini catalogue is now live! Read and download your copy here.

Shop Online

Access my online shop 24 x 7, 365 days of the year:

Current April hostess code:

VDKNV7BH

Shop Online

Join My Team

It's always a great time to join Stampin’ Up! New team members can get £130 worth of products for only £99 + free business supplies + free shipping + all the fun being a part of Stampin’ Up! Stampin' Up! has something for everyone: join my growing team and benefit from my support to enjoy Stampin' Up! however you choose.

If you're interested, call me for a chat to understand how I can help you realise your goals. Alternatively, if you have already decided to sign up and you just can't wait, please click here for the link to the online form where you can sign up and order your starter kit right away! 

Latest Kit!

Stampin Cut and Emboss

The Rock Legend Kit has all you need to make 8 cards with coordinating envelopes. Along with the new Panda Friends Kit, both are available from January 4th for just £14 each - get yours here!

2023-24 Annual Catalogue

BROWSE THE CATALOGUE

Click on the catalogue for a full list of current SU! supplies - if you would like to order any of the items featured, please drop me a line at [email protected] or give me a call on 07773 421446 - I'd be happy to help.

New Online Exclusives

There are new products available exclusively in the online store from 5 March - check them out here.

About Me

Hi I'm Joanne and live in Northampton and when I'm not looking after my husband and two beautiful children, am an avid crafter with a passion for all things Stampin' Up!

I must confess that I have never been a big rubber stamper - until I discovered Stampin' Up! that is. I love the fact that I can get such great results with co-ordinating stamps, inks, papers and punches - the possibilities are endless! Join me on my stamping journey as I share the things I love and be inspired to create amazing things yourself!

Follow Me

Monthly Newsletter

Box Builder

Click the button above to use Box Buster to create your custom box design using the Envelope Punch Board!

Kits Collection Now Available!

Stampin Cut and Emboss

The new Kits Collection from Stampin' Up! is now available!

Click here to see the current kits available and order yours online today.

I Design For


Stampin' Up Stuff

This is my personal blog and is not endorsed by Stampin’ Up! I hope you find it a plentiful source of ideas and personal inspiration but please don't copy my designs for contest submission or use for classes, publication or sale without express permission.