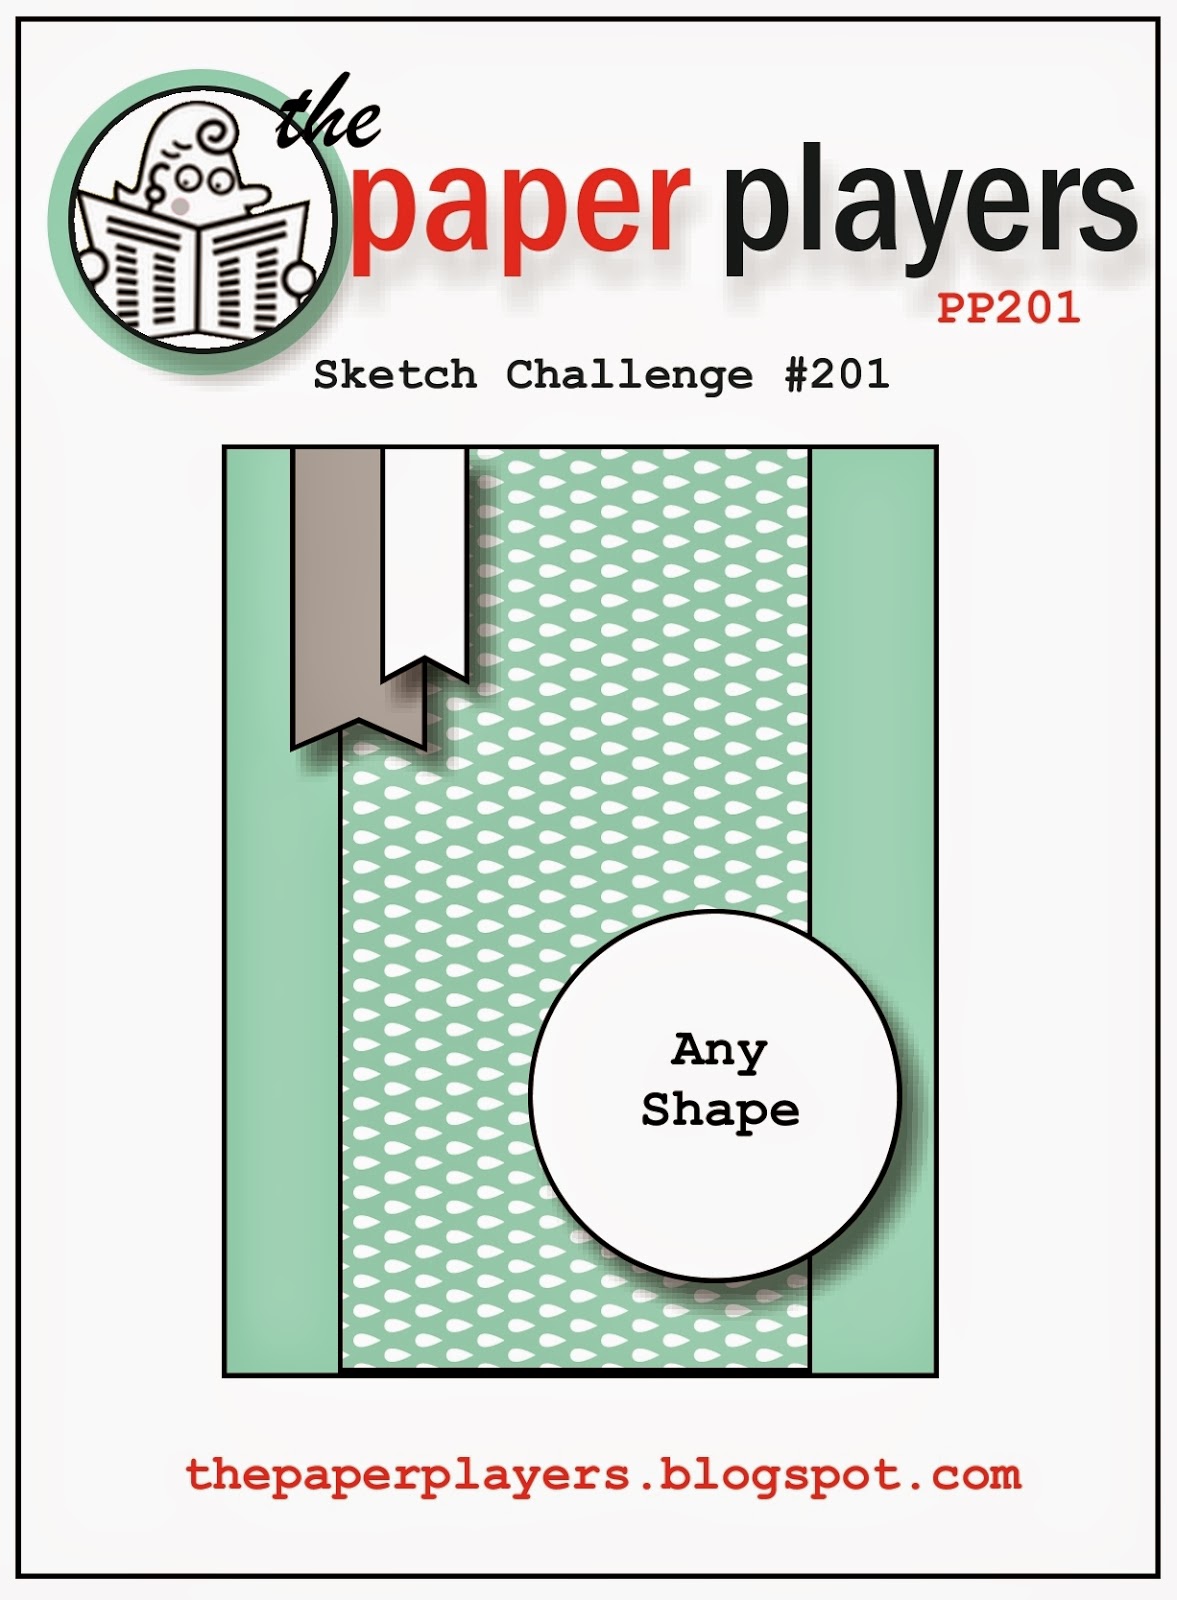
by Joanne James25. June 2014 13:00Today I was all set to share the card I made for this week’s challenge over at The Paper Players, where Nance has this great sketch for us to work with:
But before I get to my card, there is an exciting news announcement over on the Paper Players blog today involving yours truly: I have been asked to feature as one of their guest designers, starting July 6th - how great is that?!

I am excited and truly honoured that this wonderful bunch of papercrafters have asked me to join them for a three month period through to September. You can check out the details and the other guest designers that will be featuring at the same time by clicking on the link here and you will of course be able to see my weekly submissions right here on my blog in weeks to come.
Anyway - back to today's card! I love a good sketch challenge and Nance's sketch can be used in so many ways. Given that we are transitioning between catalogues, my choices for my card today were driven by the (relatively!) fewer stamps that I currently have in my collection and also a desire to use another piece of Designer Series Paper that hasn’t yet made the cut – here’s my card:
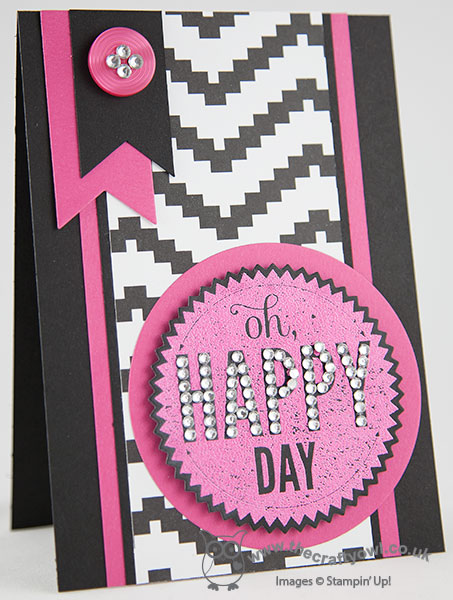
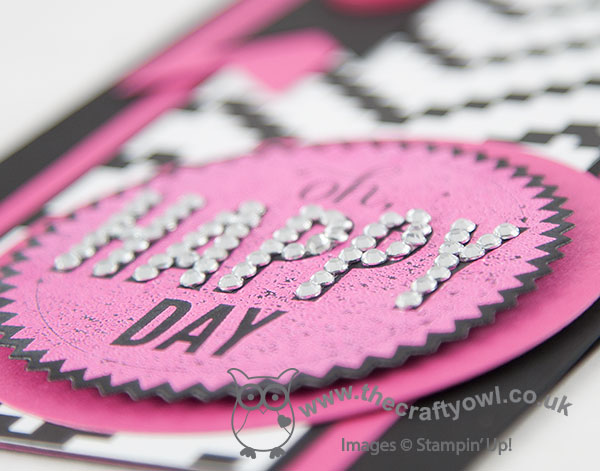
I decided to use the ‘Oh Happy Day’ stamp from the Starburst Sayings stamp set and wanted to use the bold black and white zebra-like pattern from the Kaleidescope DSP set; this layout allows for the use of a bold patterned paper without it overwhelming the rest of the card. Black and white alone was a little stark for me though – but I had the perfect antidote with a burst of Melon Mambo, a great hot pink to liven things up a bit! I used the black and white DSP for my central panel, matting this on a piece of Basic Black and then a strip of Melon Mambo, before adhering to my Basic Black card base. I stamped my sentiment focal point in Versamark on Basic Black and then heat embossed in Melon Mambo, which adds great texture and sheen, and cut out using the co-ordinating framelit. I then popped the starburst onto a Melon Mambo circle cut with my Circle Framelits using dimensionals to give added depth. I also decided this card was worthy of some serious ‘bling’ and adhered small rhinestones to each of the circles on the word ‘happy’ – this made this card so sparkly! To finish, I added two small banners cut with framelits as per the sketch, finished with a Melon Mambo button and a few extra rhinestones for good measure.
I think this card has a real ‘rock chick’ feel to it and would be great for an uber-cool teenager; I have a very discerning teenage niece that this card will be perfect for and as her birthday isn’t until October, I guess that makes me look super organised too – win, win! Or I could just send it to myself since today is indeed a happy day, given the announcement that I am going to be a Paper Players Guest Designer - yay! Decisions, decisions....
Back tomorrow with another project; until then, happy stampin’!
Stampin' Up! Supplies Used:
9deecda1-db1d-47d1-81cf-2e3b98a05aa2|0|.0|96d5b379-7e1d-4dac-a6ba-1e50db561b04
Tags: Starburst Framelits, Starburst Sayings, Kaleidoscope, Banners Framelits, Big Shot, Magnetic Platform, Shop online, Stampin' Up, Stampin' Up Card ideas, Stampin' Up Supplies, Embossing, The Paper Players, Design Team Member
Cards | Stamping
by Joanne James24. June 2014 13:00This week the peeps over at CAS(E) This Sketch and Fusion have joined forces on their challenge blogs with a great sketch and inspiration photo:
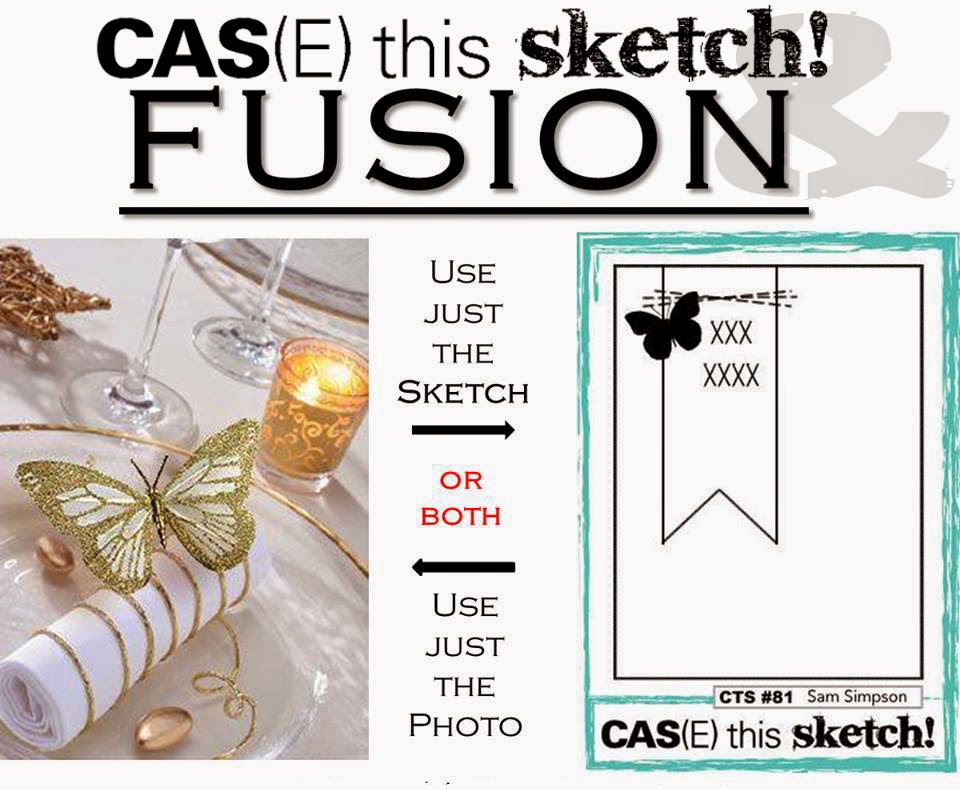
I took the inspiration for my card from both the photo and the sketch and came up with the following card:

For a largely white card, there's a lot going on here; all-white cards are also incredibly difficult to photograph well, so I hope you can see some of the more subtle elements of design. Firstly, I used a Whisper White card base and ran this through my Big Shot with the Wildflower Meadow Textured Impressions Embossing Folder to give a nice relief pattern that I thought worked well with the butterfly. I created a layered banner using my Banner Framelits, cutting one in Whisper White and another slightly longer one in gold foil to extend beyond the length of it. On the uppermost white banner, I stamped my sentiment in Versamark and heat embossed it with gold embossing powder - this sentiment is a 'sneak peek' from a new set called 'Something to Say', out next week (not long now!).
I then did something I've never done before: I glittered a butterfly! Now whilst my 9 year old daughter loves anything with glitter, I'm generally not a fan of the stuff. I love Stampin' Up!'s glimmer paper as this is a great no-shed alternative, and I've had 2 pots of glitter sitting in my drawer since before Christmas and until now unopened for fear of the ensuing mess that would be created! As my card came together, I knew that glitter was going to be the only way to go to get the look I was after and create the contrast in texture of all the gold elements. So, I was brave - out came the heat and stick powder and gold glitter, and this sparkly vellum butterfly is the result. And I love it - even though I think I will be brushing gold glitter out of my butterfly punch for some time to come. Lastly, I substituted the stitching in the sketch layout for two rows of sequins to add one last gold element to my card.
I made this card with my Mother-In-Law in mind; she is always there to help me out of a fix and last week was no exception: Rebecca came home from school the week before last with instruction to make a weasel costume for the forthcoming production of 'Wind In the Willows' - to be held this week! Not only did she need a weasel costume, this weasel required a brightly coloured waistcoat and cravat to look the part. Fortunately for me MIL came to the rescue and a few days later had managed to tailor the most amazing waistcoat and cravat I've ever seen just from bits and bobs in her sewing box. Rebecca is destined to be the best dressed weasel around at her production on Thursday (I'll post a picture of her in costume later in the week!); as for me - my Mother-In-Law's goodness does indeed make me very grateful, so Kathy this one is for you!
Back tomorrow with another project and this week's Wednesday Deals; until then, happy stampin'!
Stampin' Up! Supplies Used:
* Something To Say Stamp Set - available 1st July
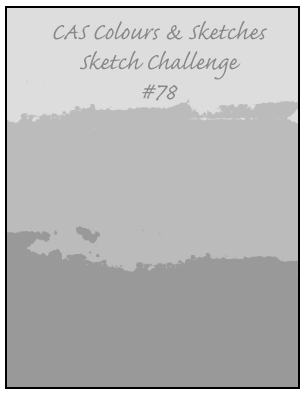
by Joanne James16. June 2014 20:56Today's creative post uses the colours for this week's Colour Me...! Challenge (although I am not linking up this week as the challenge has already closed) and I've used this week's sketch over at CAS Colours & Sketches for my layout:
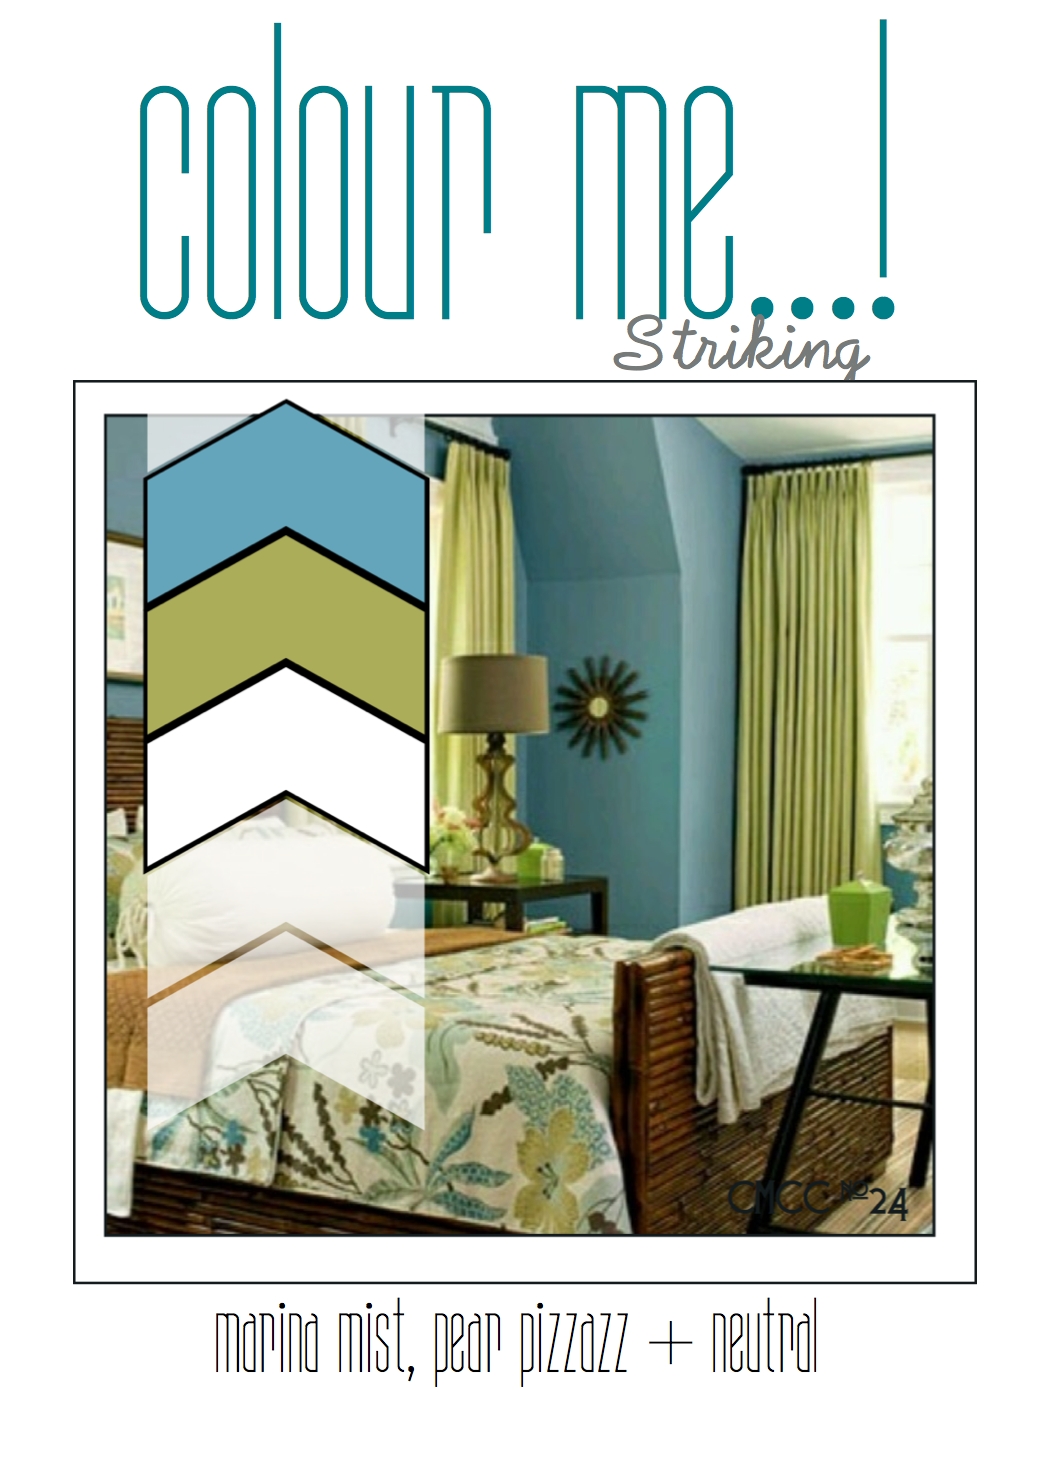
I decided to get out my 'So Very Grateful' stamp set for this card - I can't quite believe this set will be leaving us at the end of the month, I love it and don't feel I've used it anywhere near enough. This is a good time to point out that whilst there's always lots of focus on those items in the main catalogue that are retiring, we sometimes forget about the lovely stamps that are in the Spring-Summer seasonal catalogue that will also no longer be available after 30th June. If you still have items on your wishlist, you've only got a couple of weeks to find out whether they are being carried over into the new annual catalogue or whether they will be gone for good. So, here is my card:
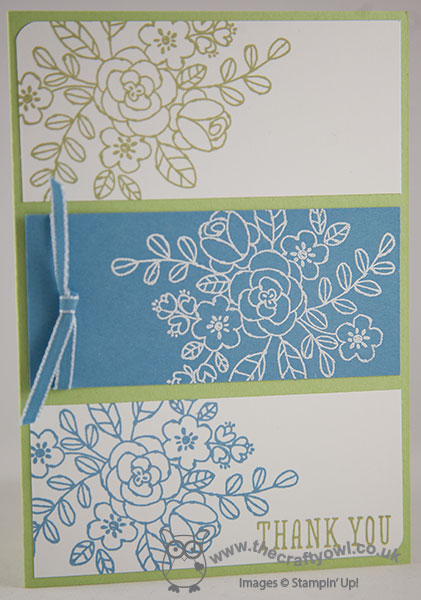
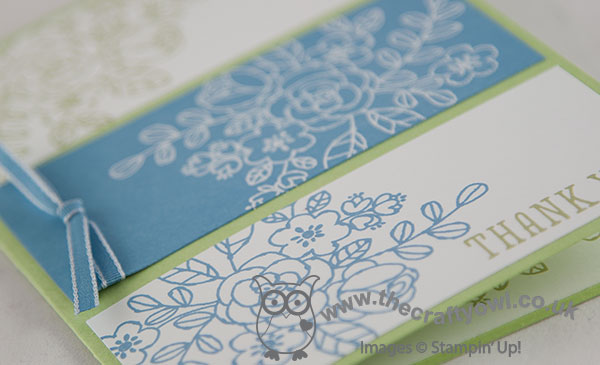
I used a base of Pear Pizzazz then decided to create three clear panels for my card and stamped the main flower image from the set in the challenge colours on white for the outer pieces, then stamped the same image in Versamark on the central panel of Marina Mist and heat embossed in white. I finished the central panel with a piece of 'vintage' Marina Mist taffeta ribbon and lastly added my sentiment to the bottom panel.
This card makes me think of the old saying 'blue and green should never be seen, unless there's a colour in between' - I have to say, I think this card looks really fresh and old saying or not, I'd have to disagree!
Back tomorrow with a sneak peek; until then, happy stampin'!
Stampin' Up! Supplies Used:
by Joanne James11. June 2014 21:17With Father's Day coming up this weekend, I thought I should share a few more suitably themed cards with you for anyone in need of last minute ideas! Today's card has both something old and something new - here's my card:
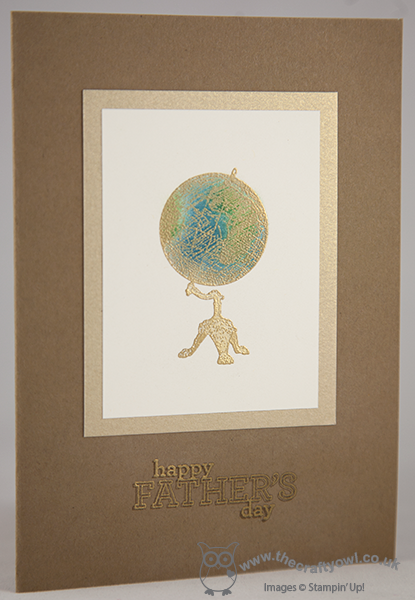
I used Soft Suede for my card base, then created a simple central panel by stamping the globe image from the new Traveler stamp set in Versamark and heat embossed in gold embossing powder. I created a mask for the globe using a piece of scrap cardstock, then carefully sponged in the colours on the globe using sponge daubers and Island Indigo, Garden Green and Encore Gold inks. Here's a close up of the central image:
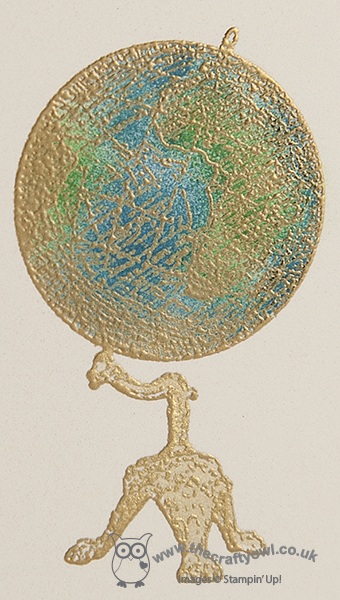
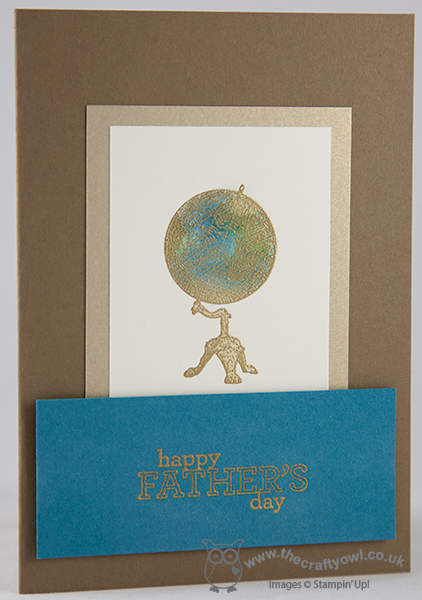
This is one of those cards that looks so impressive in real life and the colours are really vibrant against the gold. I then matted this panel on some brushed gold cardstock and finished the card by stamping the 'Happy Father's Day' sentiment from the Delightful Dozen stamp set (it's on the retiring list) and heat embossing in gold, then stamping it in Versamark again slightly offset to create a shadow and add some depth to the card. I also created a slightly altered version of the same card, this time stamping the sentiment on a piece of Island Indigo to inject a little more colour - browns have their place, but I don't believe that just because cards are for men, they shouldn't have some brighter colours too.
These cards would work equally well for a male birthday or other masculine card with a change of sentiment; or maybe even a graduation or travel-themed card. That's all from me today; back tomorrow with another card. Until then, happy stampin'!
Stampin' Up! Supplies Used:
by Joanne James22. May 2014 15:30I had a hugely productive creative day yesterday (I love days like that!) and decided to have another go at a card with the sketch layout from CAS(E) This Sketch (although I'm too late to link up to this challenge with this sketch). I am linking up with Addicted to CAS though as I have another 'over the edge' birdie and today's card features the zingy colour palette over at Color Throwdown:
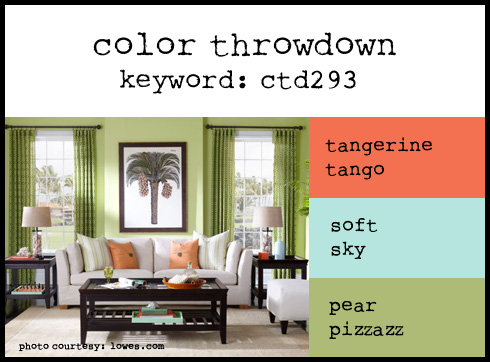
So using the color throwdown photo for inspiration, I decided to create a 'new home' card. There is only one set is the annual catalogue that features a new home welcome - the hostess set 'Sweetly Framed' - so I decided to create something using some punch art with an idea that I've had swimming around in my head for a while. Here's my card:
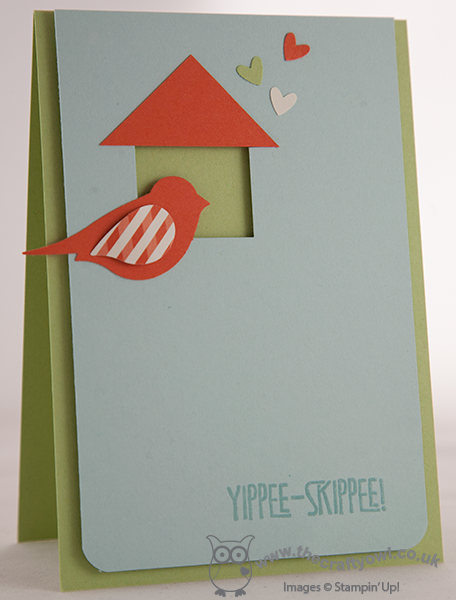
I used Pear Pizzazz for my base, and popped my Soft Sky panel up on dimensionals and created a little bird house by punching a 1" square out and topping with a Tangerine Tango triangle cut from half a square for the roof. I punched a Tangerine Tango bird using the bird punch and highlighted the bird's wing by using a scrap of Retro Fresh DSP, adhering with rolled glue dots to give some height. I added some punched co-ordinating coloured hearts punched with my owl punch. Lastly, what to use as a sentiment? I eventually decided on 'Yippee-Skippee!' from the stamp set of the same name, stamped in Versamark and heat embossed in clear powder - not quite 'Welcome to your new home', but it's exactly how I felt when I bought a new house, both times, so it seemed more than appropriate! Another very clean and simple card, created with just a few punches and a sentiment.
Back tomorrow with another project; until then, happy stampin'!
Stampin' Up! Supplies Used:
by Joanne James20. May 2014 21:20Good evening blog readers! Well, I really feel like I'm in catch-up mode this week, but I guess I shouldn't be too hard on myself - it is only Tuesday after all! Today I'm sharing a card I made for this week's sketch challenge over at Create with Connie and Mary. I kept the flower as per the sketch so I will also be linking up with The Paper Players, where this week's challenge from Ann is a clean and simple floral card and Less is More where the challenge theme is flowers:
Having played around with various floral sets, eventually I decided to dust off my 'Too Kind' set, as I haven't used it in a while and set about creating my card - here it is:

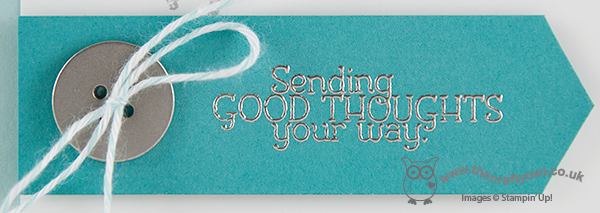
I chose an unconventional floral colour scheme, using blues and greys, but I think it works! I love the flowers in this stamp set - the two-step stamping really adds an extra dimension, which is perfect when you're trying to create a clean and simple card. A stamp-a-ma-jig makes light work of aligning the images though - this little tool is so useful! I decided to create a banner from the banner shape in the sketch and use it to highlight my sentiment which I heat embossed in pewter embossing powder, finished with a pewter button threaded with retired Pool Party baker's twine - here's a close-up:
I also added Dazzling Diamonds to my flower petals to give a little sparkle and shimmer. A really clean and simple floral card; not where I started out at all, but I really like the end result.
Back tomorrow with another project; until then, happy stampin'!
Stampin' Up! Supplies Used:
by Joanne James14. May 2014 21:40I've had a busy couple of days preparing swaps and finishing my preparations for the Stampin' Up! event at Telford on Saturday and I've still got more to do! Today I'm sharing my card for this week's challenge over at Less is More, where Chrissie and the team are looking for one layer thank you cards. I decided to try something something a little different, using my retired but never-to-be parted with Expressions Thinlits. Here is my card:
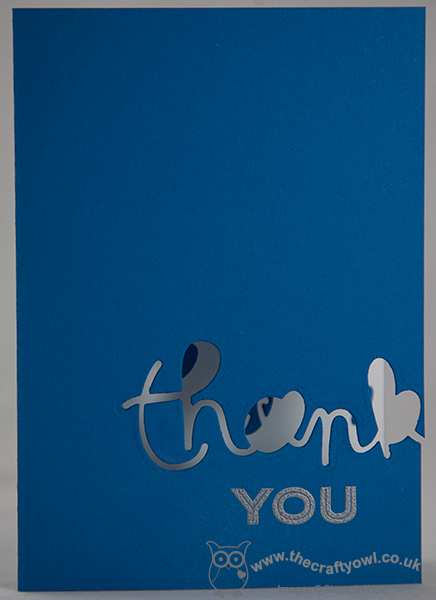
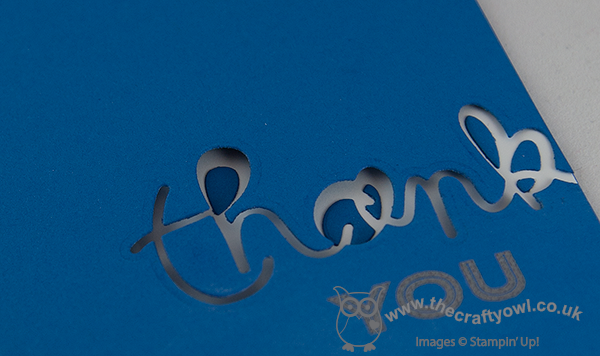
I decided to make a thank you card that would be suitable for a male, or at the very least gender neutral - so I went for a nice bright blue. Now I know the eagle-eyed amongst you are thinking - but the framelit says 'thankful', right? Well that's true - as I only wanted the 'thank' part, I positioned it over the edge of the card and cut it to the edge so that it looks as if the writing is going off the edge of the card. I adhered the cut-out pieces from the middle of the word to the inside of the card, to maintain the definition of the lettering - you can see it more clearly on the photo below:
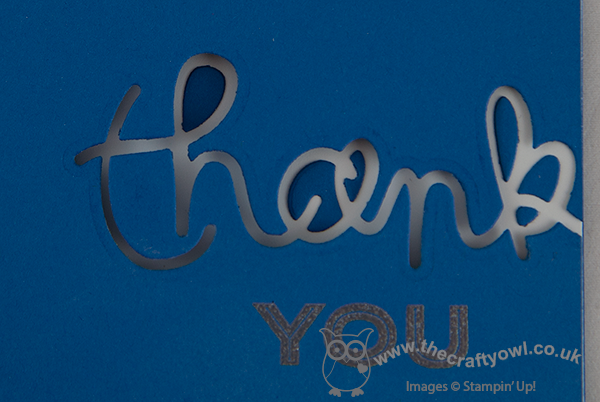
To finish my sentiment, I inked up the 'you' from the 'thank you' sentiment in the 'Simply Celebrate' set and heat embossed it with silver embossing powder. A clean and simple thank you card that's just a little bit different! I'm also linking my card up to 'Addicted to CAS', where the current challenge is appropriately 'off the edge'. Right, I'm off to get my nails done!
Back tomorrow with another project; until then, happy stampin'!
Stampin' Up! Supplies Used:
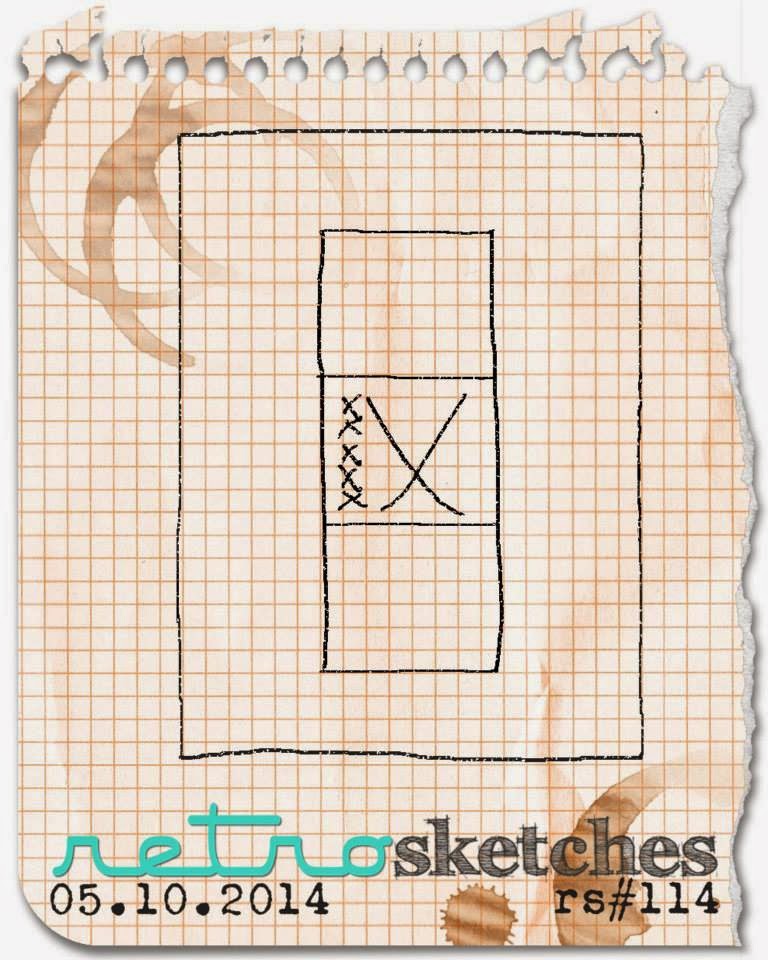
by Joanne James14. May 2014 11:00I'm having a love affair with my heat gun this week as this is my second card that features heat embossing and I've another cued up for tomorrow too! Today's card is my entry for this week's challenge over at The Paper Players where Sandy has chosen some lovely subtle spring colours to work with; I've also used this week's layout over at Retrosketches as the basis for my card:
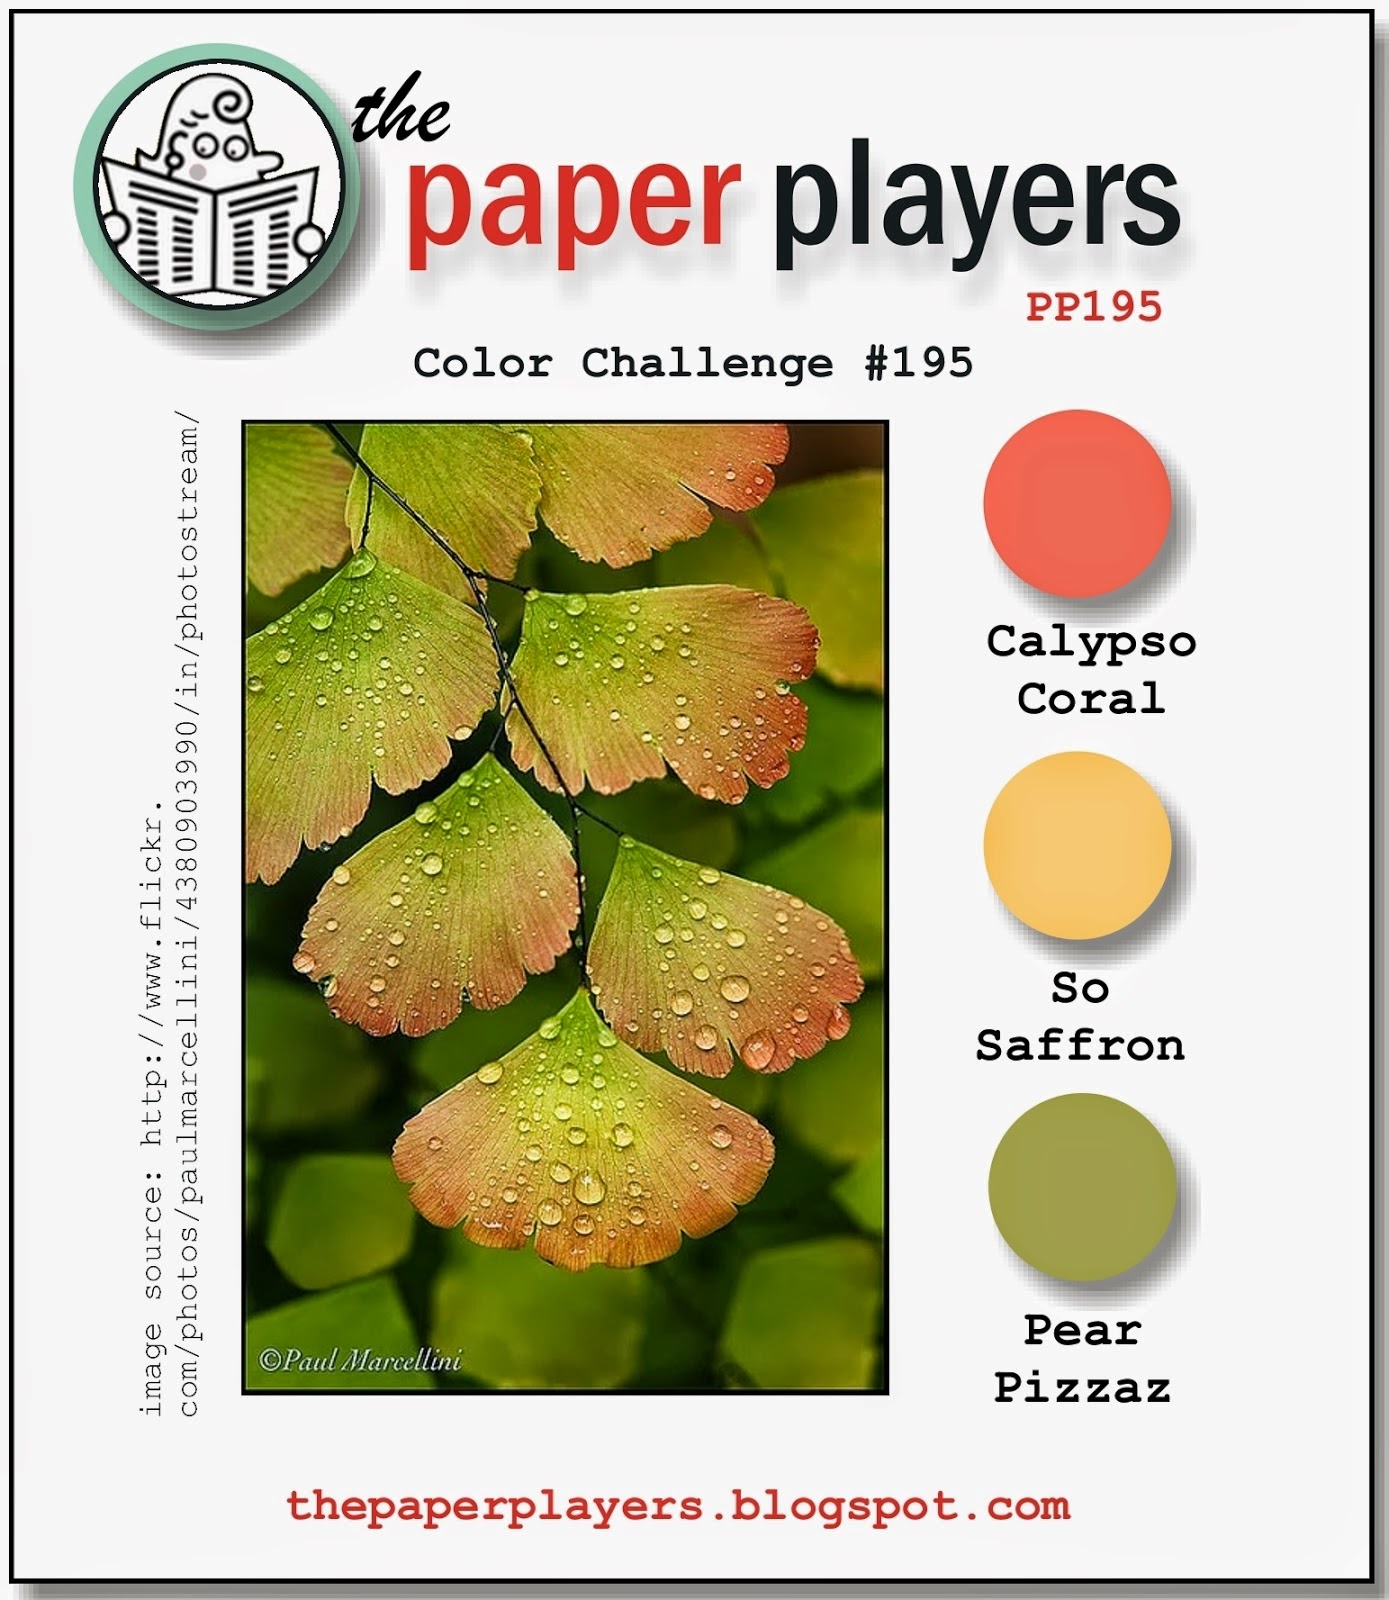
I thought that The Paper Players colours were just asking to be used on a floral card - this is what I came up with:
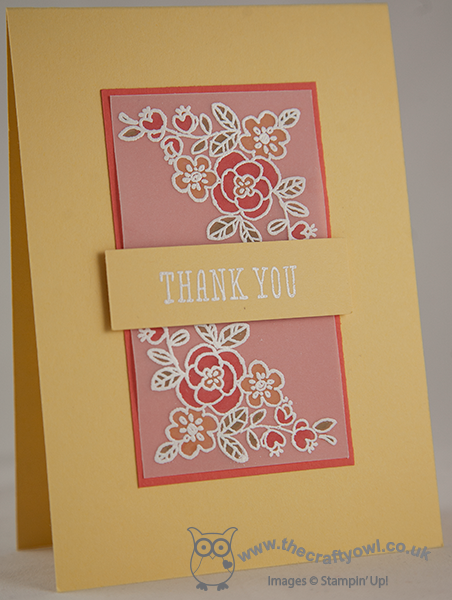
I stamped the corner flower image twice in Versamark onto my vellum panel then heat embossed in white and coloured the reverse of the images with my So Saffron, Calypso Coral and Pear Pizzazz markers. I then adhered this to a panel of Calypso Coral and heat embossed my 'thank you' sentiment in white onto a panel of So Saffron and placed this across the middle on dimensionals.
This card came together quite quickly and I love the subtle effect of the colouring behind the vellum.
That's all from me today - I have to go and get on with my swaps in readiness for Stampin' Up!'s UK regional training event in Telford on Saturday, in order to be finished in time to go and watch Rebecca's first rounders match of the season later on this afternoon!
Back tomorrow with another card; until then, happy stampin'!
Stampin' Up! Supplies Used:
by Joanne James7. May 2014 21:56It's still Wednesday (just!) and they're here: today's Wednesday Weekly Deals! This week's deals are included below - they will be available for one week only, before a new collection of deals is announced.
As always, if you want to take advantage of any of the deals on offer, you can support my business by placing your order online by clicking here or using the link to my store on the right hand side of my blog page where it says 'Shop Online' or with me in person. Don't forget to add the Hostess Code for May (you can find this under the 'Shop Online' section on the right.
Here's a summary of this week's one-week only Wednesday deals - click on each item to go to the online store to purchase:
Embossing is the name of the game this week, with some great offers on dry embossing folders and powders and a heat gun for heat embossing. Back shortly with today's creative post; until then, happy shopping!
by Joanne James28. April 2014 21:16Good evening blog readers! Today I'm just in time with a card for this week's Colour Q challenge - here is the colour palette:
Last week I was chosen as one of the ColourQ Courtiers - you can see my winning card here. I saw this week's colour palette and photo inspiration and decided to make a card using a technique that I'm teaching in my card classes this week - painting on a white watercoloured background within a heat-embossed outline (not sure if there's a more succinct title for this technique, but that's how you do it!). Here is my card:
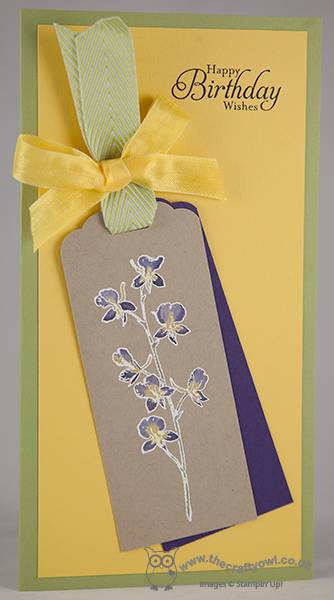
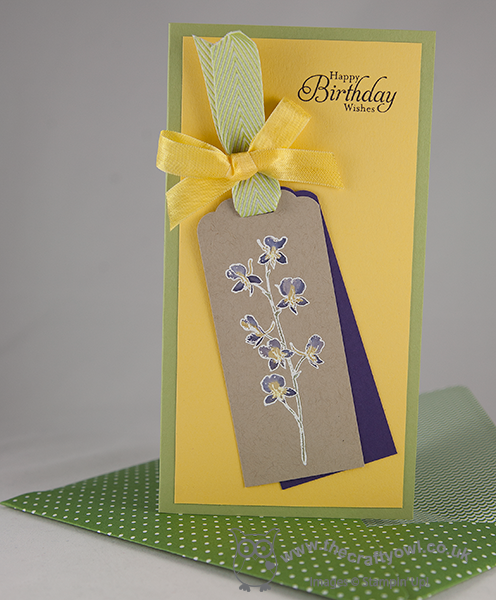
I went for a simple and bright layered background of Daffodil Delight on a Pear Pizzazz base, as I wanted the detail on my tag to take centre stage. I stamped my flower image in white kraft ink onto a piece of Crumb Cake cut with the Scallop Tag Topper Punch, then heat embossed with white embossing powder. Then, using my aquapainter, I painted the whole of the image white using the white craft ink, then when dry used my aquapainter again to over-paint with Daffodil Delight and Elegant Eggplant on the flowers, and Pear Pizzazz for the stems. I backed this tag with a second one cut out of Elegant Eggplant for another splash of colour and finished with a double ribbon bow topper and stamped a simple birthday sentiment.
The stamp that I used on my tag is from the 'Happy Watercolour' set and does require quite a long tag to fit it onto, which doesn't lend itself to a standard A6 card size. So I made a bespoke card, 200mm x 105mm, for which I then needed a bespoke envelope. And so to the exciting news that I hinted at the end of yesterday's post - I have another cool tool for you!
Following on from the huge success of Box Buster from The Crafty Owl, which enables you to make any size box using your Envelope Punch Board, I had so many requests for a similar tool to create an envelope of any size, I thought I had better get on with it - and Envelope Expert from The Crafty owl is the result! In truth I don't make that many unusually sized cards, and therefore envelopes, I didn't appreciate there was such a need to go beyond the 66 standard envelope sizes that come with the board - but having 'busted' boxes, Envelope Expert was pretty straightforward. So for everyone who asked, here it is! you can find this free to use tool at www.thecraftyowl.co.uk/envelopeexpert or simply go to www.thecraftyowl.co.uk and on the menu choose 'Tools' and 'Envelope Expert'. To see Envelope Expert in action, why not watch the short video below:
Now you can make any size card and matching envelope you like, just as easily as you can make an any size box - can you tell how much I love my Envelope Punch Board?!
Back tomorrow with another card; until then, happy stampin' - and envelope-making :-)
Stampin' Up! Supplies Used: