Beautiful Friendship Birthday Card PP536

by Joanne James11. April 2021 09:00

Today it's Sunday and time for this week's new challenge over at The Paper Players! It's the turn of the fabulous LeAnne to host this week and she has an interesting colour challenge for us to work with:
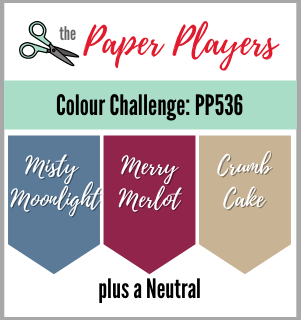
          

I used Julee's Mojo Monday sketch and another of my favourite retiring stamp sets to create some less-than-traditional florals - take a look:
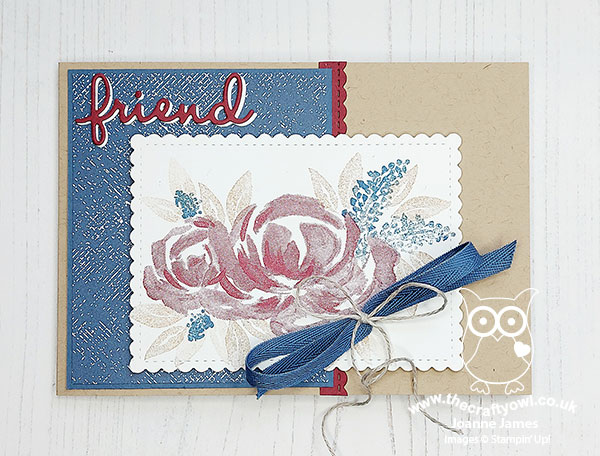
 

Here's the low-down on today's card:

Beautiful Friendship - I chose to create a cluster of florals as the centrepiece for today's card using the 'Beautiful Friendship' stamp set. I thought those large, loose-petalled roses would be perfect in Merry Merlot, with some grape hyacinths in Misty Moonlight, along with some Crumb Cake leaves. This is not only my most favourite floral stamp set in the retiring annual catalogue, it is I think one of my favourite floral stamp sets of all time (and a keeper for sure!) 

Well Written - I decided to add a diecut sentiment using the retiring Well-Written framelits to the front of my card, cutting the word 'friend' twice and offsetting it to give a shadow - you can see the detail closer in the image below:
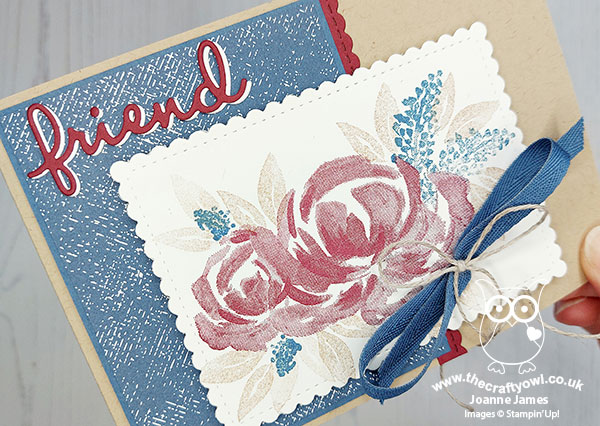
A ribbon bow tied with twine finished the front of my card.

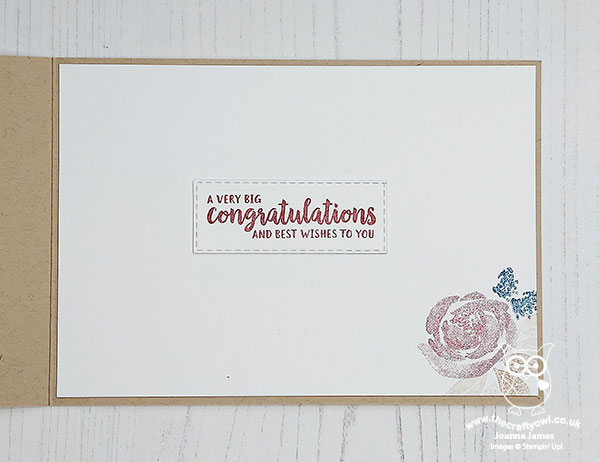
And Finally - In addition to the stitched scallop rectangle that I used on the front of my card, I stamped the greeting from the stamp set on a stitched rectangle and added it to the centre of the inside of my card, along with a stamped corner floral detail:
 

I thought I would struggle with this colour combination, but I actually really liked LeAnne's colour choices this week. I'm also linking today's card up over at Just Add Ink - my card features petals and leaves as my chosen 'two'. 

Here is the visual summary of the key products used on today's project for you to pin for easy reference:
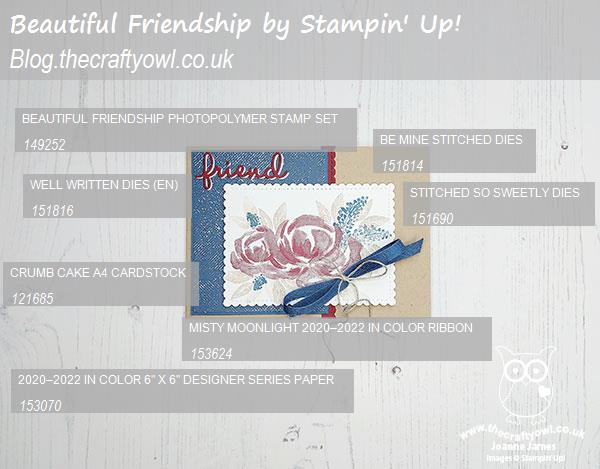
 

You can see all of my Product and 'How To' summaries on my 'How To - Tips and Techniques' Pinterest board in case you've missed any. 

Before you reach for your ink and papers, check out what our amazing team has created to inspire you this week:

Here's a quick recap of our challenge rules:
 
1.  Create a new paper project
2.  Upload your creation to your blog with a link back to us and provide a direct link to the post featuring your challenge submission.
3.  Please link your card to no more than four challenges, TOTAL.
4.  Have FUN!

You can see all of my 'How To' summaries on my 'How To - Tips and Techniques' Pinterest board in case you've missed any. 

Enjoy your day; it's been really cold here these past few days so I'm thinking today will be spent indoors with a little more Lego building and family fun. I'll be back tomorrow with another project. Until then, happy stampin'!


Stampin' Up! Supplies Used:

Table built using Product Table Builder by The Crafty Owl - Independent Stampin' Up! Demonstrator.

Bloom And Grow Masked Floral Heart TTT108

by Joanne James8. April 2021 18:00

It's Thursday and time for a new challenge over at TicTacToe! It's the turn of Team X to host this week and our fearsome team leader Felicita is our featured designer this week. This is the fun board that we are playing along with: 


I went down the middle column with Florals, Free and Any Shape Die and used the current colours over at Less Is More for another outing with my Bloom and Grow stamp set - take a look:


Here's the low-down on today's card:

Bloom And Grow - I stamped the same floral bough that I used on Tuesday's card, but this time just used the outline in Basic Grey and stamped it onto a piece of Rococco Rose ombre paper, having first masked off my heart shape with copy paper, as I wanted the flowers to edge my heart but the heat itself to remain uninked. 

A Subtles Ombre - Before adding my diecut heart or sentiment or adhering to my card base, I ran my sheet of stamped ombre paper through my Subtles embossing folder for a little added textural detail. I cannot believe this embossing folder is retiring - it's a real 'how will I ever live without you?' product for me! 

A Stitched Heart - I decided to make a feature of the gold element on my card. so went for a simple stitched heart outline die that sat in front of those masked florals, and I wove my sentiment strip under and over it. I added a trio of opal rounds for a little extra pink/gold sparkle to complete my card:


So what do you think? Another trio of items from my craft stash I will be sad to say goodbye to. Thank goodness there is a new Stampin' Up! catalogue on the way to soften the blow!

Here is the visual summary of the key products used on today's project for you to pin for easy reference:


You can see all of my Product and 'How To' summaries on my 'How To - Tips and Techniques' Pinterest board in case you've missed any. 

A tictactoe board offers so many creative possibilities - how does this week's board inspire you? Why not have a go? We would love to see you in the gallery and who knows - you might be selected for Designer's Choice and be eligible to be a guest designer on a future challenge. 

Enjoy your evening; I am about to join an online catalogue launch event for demonstrators - exciting stuff! I'll be back tomorrow with another project. Until then, happy stampin'!


Stampin' Up! Supplies Used: 

Table built using Product Table Builder by The Crafty Owl - Independent Stampin' Up! Demonstrator.
 

Delighted that this card along with my other entry earned me LIM Monthly winner for April - yay!

Forever and Always With Love VIntage Heart

by Joanne James10. February 2021 22:30

Today I'm sharing a quick card that I made at the weekend for the current challenge over at Inspired By this week where they have the most beautiful vintage linen hearts in their inspiration photo:

Despite my vast collection of patterned paper, I couldn't find anything with a ditsy floral pattern for my hearts in the same colourway as the inspiration photo, so instead I chose a retired pattern (apologies I cannot remember the name) went for a co-ordinating colour palette and built up from there - take a look:


Here's the low-down on today's card:

I used my Forever and Always dies again and paired them with the hearts from the Stitched Be Mine Dies to create my heart, with a subtle embossed top piece to mimic the linen look of the hearts in the photo:


A few additional flowers, pearls and a double linen bow all add to the vintage feel. A rather unconventional colour palette for a Valentine's card, but this card would work as well to send anyone a heartfelt message at any time, I think.

Here is the visual summary of the key current products used on today's project for you to pin for easy reference:


You can see all of my 'How To' summaries on my 'How To - Tips and Techniques' Pinterest board in case you've missed any. 

Enjoy your evening and I'll be back later in the week with another project. Until then, happy stampin'!


Stampin' Up! Supplies Used:

Table built using Product Table Builder by The Crafty Owl - Independent Stampin' Up! Demonstrator.

Gilded Autumn Thanksgiving Cajun Craze Pumpkins

by Joanne James15. November 2020 21:00


A lockdown weekend with pouring rain gave me extra crafting time today so I thought I'd squeeze in a second post with a thanksgiving card that I made for a friend of mine, that was inspired by a number of challenges:


I used Julee's fabulous-as-always Mojo Monday sketch and the Card Concept inspiration photo with its rich oranges and browns and pumpkins galore inspired me to use the gold-embossed pumpkin paper from the Gilded Autumn paper pack for my clean and layered card. I decided to pair it with one of my favourite sentiments from 'Country Home' for a Cajun Craze monochromatic card - take a look:


Here's the low-down on today's card:

My Gilded Autumn embossed paper was the starting point for today's card. I just love it! I added a stitched gold foil border and a layered pumpkin, made from one of my retired Patterned Pumpkin Dies and then with the pumpkin coloured with Cajun Craze Blends and splattered with gold shimmer paint, before adding some die cut leaves and vines:


I finished my sentiment banner with a double bow of Cajun Craze metallic ribbon and gold twine for some extra shine. So what do you think? I don't use Cajun Craze that often and there's a lot of it on this card, but I think the gold really takes things up a notch and compliments it beautifully. This almost feels like a Cinderella-esque rags to riches card, metaphorically speaking! I'm also linking this card up over at SUO Challenges where the theme is thanksgiving.

Here is the visual summary of the key products used on today's project for you to pin for easy reference:


You can see all of my 'How To' summaries on my 'How To - Tips and Techniques' Pinterest board in case you've missed any. 

Enjoy your evening and I'll be back tomorrow with another project. Until then, happy stampin'!


Stampin' Up! Supplies Used:

Table built using Product Table Builder by The Crafty Owl - Independent Stampin' Up! Demonstrator.


Let Faith Be Your Biggest Fear Meets Artistry Blooms

by Joanne James12. October 2020 07:00

It's Monday and to start the week I have a short post to share a couple of cards I made with this week's Freshly Made Sketches layout:


They are both encouragement cards, this time with the optional addition of pink, perfect for the current Time Out challenge. One of my cards also features an ombre background which is the trend over at Just Us Girls this week. Here's the first one:


And here's the second one, featuring another of the papers in the Artistry Blooms paper pack: 


Both cards feature a wonderful encouraging sentiment from the 'Ridiculously Awesome' stamp set, that is rather appropriate today as I am headed off for shoulder surgery. I am putting all my faith on my surgeon, that's for sure!

So which one is your favourite? I love them both and will be making a few more with these papers this month whilst they are on offer in the DSP sale :-)

Here is the visual summary of the key products used on today's project for you to pin for easy reference:


You can see all of my 'How To' summaries on my 'How To - Tips and Techniques' Pinterest board in case you've missed any. 

Enjoy your day and I'll be back tomorrow with another project. Until then, happy stampin'!


Stampin' Up! Supplies Used:

Table built using Product Table Builder by The Crafty Owl - Independent Stampin' Up! Demonstrator.

Flight of Fancy Anniversary Cupid PP502

by Joanne James2. August 2020 09:00

Today it's Sunday and time for this week's new challenge over at The Paper Players! It's the turn of the fabulous Laurie to host this week and she has a fun theme challenge for you to work with:

    Horizontal Sketch featuring a large upside down triangle with a smaller triangle overlapping on the left with a banner behind the triangles.

I struggled a little with today's card as I don't know anyone getting married and I just couldn't seem to get into the zone! In the end I decide to flip the Paper Craft Crew Sketch and make an anniversary card using a new stamp from the upcoming Autumn-Winter catalogue - take a look:


Here's the low-down on today's card:

This cute cupid comes from the new 'Flight of Fancy' set. The set also features a whimsical angel and a witch on a broomstick, and whilst I think this cupid may have been designed with Valentine's Day in mind, paired with this sentiment from the 'Heartfelt' stamp set and a row of Stitched Be Mine stacked diecut hearts, I think he makes a sweet anniversary card too. Simply coloured with Blends and a liberal dose of clear Wink of Stella, plus some (retired) gold Wink of Stella to highlight his curls and bow, along with a sprinkling of rhinestones, makes for quite the cherub, don't you think?


Here is the visual summary of the key products used on today's project for you to pin for easy reference:


You can see all of my Product and 'How To' summaries on my 'How To - Tips and Techniques' Pinterest board in case you've missed any. 

Before you reach for your ink and papers, check out what our amazing team has created to inspire you this week:

Here's a quick recap of our challenge rules:
 
1.  Create a new paper project
2.  Upload your creation to your blog with a link back to us and provide a direct link to the post featuring your challenge submission.
3.  Please link your card to no more than four challenges, TOTAL.
4.  Have FUN!

You can see all of my 'How To' summaries on my 'How To - Tips and Techniques' Pinterest board in case you've missed any. 

Enjoy your day; I'll be back tomorrow with another project. Until then, happy stampin'!


Stampin' Up! Supplies Used: 

Table built using Product Table Builder by The Crafty Owl - Independent Stampin' Up! Demonstrator.

XOXO Heart Shaker Card FMS420

by Joanne James3. February 2020 15:00

I had a little extra time at the weekend and managed to  squeeze in (or out!) a couple of extra cards that I've had buzzing around my head! The first one uses this week's sketch by Jen T over at Freshly Made Sketches which I adapted by using a heart shape instead of a circle to make a fun shaker card that is also inspired in colours and theme by this week's photo inspiration over at Inspired By and fits with the current Valentine's challenge at TGIF too:


My fellow Paper Player teamies the lovely LeAnne and Claire both design on the Inspired By team with Laurel Seabrook and whilst I follow these lovely ladies and the Inspired by blog, it's the first time I've managed to play along - yay! Here is my clean and graphic modern Valentine's: 


Here's the low-down on today's card:

I made the shaker window aperture using the largest of the Stitched Be Mine Dies with some retired black and white heart-patterned paper to contrast with my bright Melon Mambo background. The shaker elements are a combination of hearts from another of the dies in the same die set, along with white, black and gold sequins and a few retired Melon Mambo heart-shaped sequins. I finished my card with an 'XOXO' diecut from the retired Circle Thinlit Card Die set in sparkly gold glimmer paper.

Here is the visual summary of the key products used on today's project for you to pin for easy reference:


You can see all of my 'How To' summaries on my 'How To - Tips and Techniques' Pinterest board in case you've missed any. 

I love Jen's sketch and will definitely use this again as a circle - a super versatile layout!

Enjoy your day and I'll be back shortly with one of the cards from today's class. Until then, happy stampin'!


Stampin' Up! Supplies Used:

Table built using Product Table Builder by The Crafty Owl - Independent Stampin' Up! Demonstrator.

Rainbow Be Mine Stitched Die Stack for #GDP224

by Joanne James25. January 2020 16:00

As promised, here's the second of the cards I made for this week's challenge over at the Global Design Project inspired by Steffi Helmschrott's pretty rainbow card:


This time I used the same basic colours but decided to incorporate my rainbow in a stack of hearts diecuts from the Stitched Be Mine Dies:


This time I used the 'Love You Lots' sentiment from the 'Heartfelt' stampset for my greeting, heat embossing it in white onto Basic Black and fussy cutting it out. I stamped a few small black hearts but didn't like the shape, so covered them up with some black diecut ones (ssh - don't tell ;-)) I took another picture so that you could see the depth created by the stacked hearts:


Isn't that cool?

Here is the visual summary of the key products used on today's project for you to pin for easy reference:


You can see all of my 'How To' summaries on my 'How To - Tips and Techniques' Pinterest board in case you've missed any. 

I think I prefer this card to my earlier one - if you missed it you can see that card here. I like the fact that the more generic sentiment means this card could be used for a ton of different occasions, not just Valentine's - after all, you can only send so many Valentine's, right?! What do you think? Do you have a favourite? Leave me a comment below - I'd love to hear your thoughts!  I'll be back tomorrow with my project for the latest challenge over at The Paper Players and this week I'm the hostess. Until then, happy stampin'!


Stampin' Up! Supplies Used:

Table built using Product Table Builder by The Crafty Owl - Independent Stampin' Up! Demonstrator.

Needlepoint Elements Copper Metallic Stitched Card

by Joanne James29. May 2019 20:00

I'm later posting today - it's been a busy day! I had a class last month featuring the Needlepoint Nook Suite and made a few additional cards featuring these products whilst everything was out on my desk that I've still to share. This suite is retiring with the new catalogue so time to get to it! One of the cards I made focuses on paper piercing (not to be mistaken with paper piecing!). The dies from the Needlepoint Elements Framelits that are just perfect for this - take a look:


Here's the low-down on today's card:

Paper Piercing - No need for a paper-piercing tool and stencil for this card: The detail of the largest of the Needlepoint Elements Framelits provides easy paper-piercing detail with one roll through the Big Shot. 

A Stitch In Time - I decided to highlight some of the detail on the paper-pierced panel by adding some stitching to the design. I used some copper metallic thread and a needle from my sewing box to outline the main flower and add detail to the centre. When I started out, I had intended to stitch the whole design; the small portion I did achieve took a lot longer than I expected though, so in the end I decided to stop at the flower. I do like the effect; a project for another time, perhaps!

All About Copper - Navy, white and copper is one of my favourite metallic colour combinations. Today's card features a few different copper elements: a copper foil stitched border, copper embossed sentiment, copper metallic thread and a copper sequin to finish my flower. Most of these are carrying over, with the exception of the copper metallic thread - I will miss it!

Here is the visual summary of the key products used on today's project for you to pin for easy reference:


You can see all of my 'How To' summaries on my 'How To - Tips and Techniques' Pinterest board in case you've missed any. 

Enjoy your evening and I'll be back tomorrow with another project. Until then, happy stampin'!


Stampin' Up! Supplies Used:

Table built using Product Table Builder by The Crafty Owl - Independent Stampin' Up! Demonstrator.

Perfectly Paired Decoupage Welcome New Baby Card

by Joanne James3. May 2019 08:00

Today I'm sharing a card for the current baby theme challenge over at Inspire.Create:

 There are a couple of cute baby sets in the Spring-Summer catalogue and both are set to retire at the end of the month. I used my favourite, Perfectly Paired, to create a colourful and fun baby card - take a look:


Here's the low-down on today's card:

I've created a whole host of cards with the Perfectly Paired stamp set (check out this post here if you missed it) but they have all involved using the stamp in a single colour. This is such a fabulous stamp set to colour though and I spent a pleasant couple of hours with my Blends markers creating this card. I haven't listed them all out in the table below as I pretty much used all of them in one way or another! I stamped the image twice and coloured a few of the animals and fussy cut them and popped them up on dimensionals to create a fun decoupage detail. you can see that in this close up here:

I added a border using my favourite gingham paper and a stitched diecut edge using the Be Mine Stitched Framelits to finish my card.

Here is the visual summary of the key products used on today's project for you to pin for easy reference:


You can see all of my 'How To' summaries on my 'How To - Tips and Techniques' Pinterest board in case you've missed any. 

Enjoy your day and I'll be back tomorrow with another project. Until then, happy stampin'!


Stampin' Up! Supplies Used:

Table built using Product Table Builder by The Crafty Owl - Independent Stampin' Up! Demonstrator.

New Online Exclusives

There are new products available exclusively in the online store from 5 November - check them out here.

Latest Kits!

Stampin Cut and Emboss

The Layered Landscapes Kit and Nature's Paintings Kit are the latest kits in the online store - get yours here!

Shop Online

Access my online shop 24 x 7, 365 days of the year:

Current November hostess code:

9NKXDTTR

Shop Online

Mini Catalogue

BROWSE THE CATALOGUE

'Tis The Season - the new Stampin' Up! Mini Catalogue is here! For more details and to download your copy click here

Scrapbooking

Stampin' Up! has introduced a new range of 12x12" scrapbooking product and kit - the full range is now available to purchase online. To download a copy of the new digital Scrapbooking Catalogue click here.

2024-25 Annual Catalogue

BROWSE THE CATALOGUE

Click on the image to download your copy of the 2024-25 annual catalogue. For a full list of current SU! supplies, go to my online store. If you would like any help or advice, please drop me a line at joanne@thecraftyowl.co.uk or give me a call on 07773 421446 - I'd be happy to help.

Join My Team

It's always a great time to join Stampin’ Up! New team members can get £130 worth of products for only £99 + free business supplies + free shipping + all the fun being a part of Stampin’ Up! Stampin' Up! has something for everyone: join my growing team and benefit from my support to enjoy Stampin' Up! however you choose.

If you're interested, call me for a chat to understand how I can help you realise your goals. Alternatively, if you have already decided to sign up and you just can't wait, please click here for the link to the online form where you can sign up and order your starter kit right away! 

About Me

Hi I'm Joanne and live in Northampton and when I'm not looking after my husband and two beautiful children, am an avid crafter with a passion for all things Stampin' Up!

I must confess that I have never been a big rubber stamper - until I discovered Stampin' Up! that is. I love the fact that I can get such great results with co-ordinating stamps, inks, papers and punches - the possibilities are endless! Join me on my stamping journey as I share the things I love and be inspired to create amazing things yourself!

Follow Me

Monthly Newsletter

Box Builder

Click the button above to use Box Buster to create your custom box design using the Envelope Punch Board!

Kits Collection Now Available!

Stampin Cut and Emboss

The new Kits Collection from Stampin' Up! is now available!

Click here to see the current kits available and order yours online today.

I Design For


Stampin' Up Stuff

This is my personal blog and is not endorsed by Stampin’ Up! I hope you find it a plentiful source of ideas and personal inspiration but please don't copy my designs for contest submission or use for classes, publication or sale without express permission.