
Tree Lot Dies Summer Caravan Adventures PP599

by Joanne James10. July 2022 08:00

Today it's Sunday and time for this week's new challenge over at The Paper Players! It's the turn of the fabulous LeAnne to host this week and she has a bright and fresh colour challenge for us to work with:


I haven't had much time to play beyond my design commitments lately, but can never resist a good sketch so I decided to combine this week's trio of colours with the fabulous sketch over at Just Add Ink this week (hello ladies!). I resisted the urge to go floral and inspired by the glorious weather we are having in the UK at the moment cast my mind back to memories of childhood holidays and created a summery card with some new (free!) dies - take a look:


Here's the low-down on today's card:

Tree Lot Dies - Both the caravan and the trees on today's card were cut using the Tree Lot Dies - one of a number of products that can be yours FREE during the current Sale-A-Bration promotion. Designed to co-ordinate with the 'Trees For Sale' stamp set in the new July-December mini catalogue, a number of the dies work well on their own too - and not just for Christmas cards either. The Tree Lot Dies can be yours free with an order of £90 or more - why not buy the co-ordinating stamp set as a starting point?

Get Creative With Colour - LeAnne's colour palette this week is an interesting one; the inclusion of white alongside two colours might at first glance seem limiting, but the are lots of ways to get creative with these colours and create interest. I used a piece of Tahitian Tide in-colour designer paper as my base - this gives both pattern and shades of colour. I also used some in-colour ombre glimmer paper for the flags on my caravan and used a neat trick to create two shades of Parakeet Party for my trees: I cut both layers of my tree from parakeet Party cardstock, then coloured each base tree all over with my dark Parakeet Party Stampin' Blends marker. This gave this piece a darker finish and allowed contrast with the detailed top layer.

Texture Tricks - In addition to variation in colour, I used texture to add interest to my card design: the caravan die has lots of embossed detailing, I layered my trees, I added some subtle blended background colour to my banner before I built my scene (I used a retired Stitched Nested Label Die for the banner itself), added some stitched diecut clouds courtesy of the Give It A Whirl Dies, the glimmer paper pennant banner, a baker's twine bow and lastly a heat-embossed sentiment, from the 'Let's Set Sail' stamp set - you can see these details more closely below:

I actually wanted a sentiment from the retired 'Glamper Greetings' set that said 'Home is where you park it' but I couldn't find my stamp set anywhere in the chaos that is my craft room - it is long overdue a thorough clean-out! 'Adventure Awaits' didn't quite suite the sketch as well, but was still an appropriate sentiment for my card, which is headed to a previous team member of mine who in a few month's time is about to embrace retirement and depart on a belated gap-year in her motor home - I'm sure many adventures await her on her travels.

So what do you think? I love this fresh colour combination - do leave me a comment below with your thoughts, I'd love you to share your views.

Here is the visual summary of the key products used on today's project for you to pin for easy reference:


You can see all of my Product and 'How To' summaries on my 'How To - Tips and Techniques' Pinterest board in case you've missed any. 

Before you reach for your ink and papers, check out what our amazing team has created to inspire you this week:

Here's a quick recap of our challenge rules:
 
1.  Create a new paper project
2.  Upload your creation to your blog with a link back to us and provide a direct link to the post featuring your challenge submission.
3.  Please link your card to no more than four challenges, TOTAL.
4.  Have FUN!

Enjoy your day; I am still playing catch up, but will definitely be taking some time out this afternoon to watch the men's singles final at Wimbledon; it should be a great match and I've definitely earned it - I might even treat myself to a Pimms too; well, it would be rude not to!! I'll be back soon with another project. Until then, happy stampin'!


Stampin' Up! Supplies Used: 

Table built using Product Table Builder by The Crafty Owl - Independent Stampin' Up! Demonstrator.

CAS Christmas Scottie Christmas Card FF113

by Joanne James8. July 2022 09:00

Today I have my card for the new challenge over at Festive Friday. 


The challenge that we are celebrating this week is 'Global Tiger Day' which is on 29th July. Remember the fun thing is that at Festive Friday you do not need to actually celebrate the occasion; your goal is to simply use three or more items from the inspiration list on your project. This week I resisted the urge to use up some retired 'In The Wild' paper (which amongst other animals features tigers) and instead used frame, fur and black and broke open a new stamp set and went with a clean and simple card for Christmas - take a look:


Here's the low-down on today's card:

Is this Christmas Scottie not the cutest?! I added a Real Red stamped grid patterned background (perfect for the challenge over at Addicted to CAS this week) and a sentiment from the Christmas Scotties stamp set to the front of my card, and used my scoreboard to add a simple scored frame border to my panel. Then I used the Scottie Dog Punch (yes, there is a punch!) to punch a dog out of (retired) black glimmer paper as I wanted to give his fur some texture and added a festive red bow (cut from retired red velvet paper) and a googly eye, then popped him onto my card using dimensionals.

I think the addition of some different textures for the punched element adds lots of interest to an otherwise clean and simple card:

I added a 'furry' themed sentiment to the inside, along with a stamped Scottie for a little extra decoration, this time with a grid-stamped bow. What a dapper chap! 

I'm not a big animal lover, but this Scottie dog has totally won me over - I think he's so cute! You will be seeing lots more of him in the coming months I'm sure. 

Here is the visual summary of the key products used on today's project for you to pin for easy reference:


You can see all of my 'How To' summaries on my 'How To - Tips and Techniques' Pinterest board in case you've missed any. 

How does our board inspire you? I can’t wait to see what YOU create! For more inspiration, be sure to visit the rest of the  Festive Friday Challenge Design team:

Ann Schach
Beth McCullough
Sharon Hashimoto Burkert
Melanie Hungerford
Helen Jennings
Stephanie Lanzalotto
Melva Peters
Jaydee
Diane Evans
Joanne James

Enjoy your day; I will be aiming to catch up with the housework having been out and about on my travels in recent weeks, hopefully after a lie-in following my 1.30am alarm call to get the youngest of the James Juniors to school in time to catch his bus to the airport for his school trip to Munich. This could be a long day! I'll be back on Sunday with another project. Until then, happy stampin'!


Stampin' Up! Supplies Used:

Table built using Product Table Builder by The Crafty Owl - Independent Stampin' Up! Demonstrator.

Awash In Beauty Garden Blooms Pair PP598

by Joanne James3. July 2022 08:00

Today it's Sunday and time for this week's new challenge over at The Paper Players! It's Laurie's turn to host this week and she has a theme challenge for us to work with:


We are a green-fingered bunch in the James household, however at this time of year the only flowers are those that have a fruit or vegetable attached - strawberries, climbing beans, courgettes and tomatoes to name a few. I don't have any vegetable stamps though, but never fear - this week's challenge can include everything from greenery, houseplants flowers and everything in between! I love flowers and with so many creative options, I was spoiled for choice. I was a little short on time though, so I decided to choose a beautiful new designer paper and let it do the heavy lifting - take a look:


Here's the low-down on today's card:

The beautiful Awash In Beauty designer paper makes a card all by itself - beautiful watercoloured blooms, with no effort! I added a diecut sentiment and a few iridescent rhinestones, and my card is complete!


I liked this card so much I used another one with the other half of the paper and changed up the sentiment for one from the 'Sending Smiles' bundle:


Check out the subtle sparkle from the rhinestones - so pretty!


I ended up liking this one the best! What about you - do you have a favourite?

Here is the visual summary of the key products used on today's project for you to pin for easy reference:


You can see all of my Product and 'How To' summaries on my 'How To - Tips and Techniques' Pinterest board in case you've missed any. 

Before you reach for your ink and papers, check out what our amazing team has created to inspire you this week:

Here's a quick recap of our challenge rules:
 
1.  Create a new paper project
2.  Upload your creation to your blog with a link back to us and provide a direct link to the post featuring your challenge submission.
3.  Please link your card to no more than four challenges, TOTAL.
4.  Have FUN!

Enjoy your day; ... I'll be back tomorrow with another project. Until then, happy stampin'!


Stampin' Up! Supplies Used: 

Table built using Product Table Builder by The Crafty Owl - Independent Stampin' Up! Demonstrator.

Sending Smiles In Lovely Linen PP597

by Joanne James26. June 2022 08:00

Today it's Sunday and time for this week's new challenge over at The Paper Players! It's my turn to host this week and I have my favourite, a sketch challenge for you to work with:


I chose a sketch with layers today that can be interpreted in lots of ways. I decided to use my main panel to showcase another pattern of a new designer series paper - take a look:


Here's the low-down on today's card:

I chose a colourful, floral paper from the Lovely Linen designer paper - this linen-effect paper is so pretty. I added a banner and sentiment from my favourite 'Sending Smiles' bundle and added a couple of layered flowers diecut using the Summer Shadows Dies as an anchor for my sentiment: 

These diecut florals aren't designed to co-ordinate with the Lovely in Linen Suite, which has it's own co-ordinating stamp set and punch, but I think the shapes work quite well, don't you? A sprinkling of pearls completes my card.

Here is the visual summary of the key products used on today's project for you to pin for easy reference:


You can see all of my Product and 'How To' summaries on my 'How To - Tips and Techniques' Pinterest board in case you've missed any. 

Before you reach for your ink and papers, check out what our amazing team has created to inspire you this week:

Here's a quick recap of our challenge rules:
 
1.  Create a new paper project
2.  Upload your creation to your blog with a link back to us and provide a direct link to the post featuring your challenge submission.
3.  Please link your card to no more than four challenges, TOTAL.
4.  Have FUN!

Enjoy your day; I'll be having a quiet one at home, catching up on the things that I've missed whilst I've been out on my travels. I'm looking forward to seeing how you interpret my sketch this week! I'll be back soon with another project. Until then, happy stampin'!


Stampin' Up! Supplies Used: 

Table built using Product Table Builder by The Crafty Owl - Independent Stampin' Up! Demonstrator.


Every Chapter Friendship Card FF112

by Joanne James24. June 2022 09:00

Today I have my card for the new challenge over at Festive Friday. 


The challenge that we are celebrating this week is 'Alice In Wonderland Day' which is on 4th July. Remember the fun thing is that at Festive Friday you do not need to actually celebrate the occasion; your goal is to simply use three or more items from the inspiration list on your project. This week I used hearts, teacup and book and this is what I came up with:


Here's the low-down on today's card:

I knew I wanted to use the 'Every Chapter' stamp set for my card today (teacup and book - check!) and decided I would CASE Krista's layout over at Global Design Project #GDP348 too, so went on the hunt for some teacup-patterned paper for my background. The patterns in the Tea Boutique papers were too uniform to look right either side of my central panel, so I opted for some retired teacup paper from my stash instead. This then led me to use a similar colour palette to Krista's card too - double inspiration! 

I did a partial stamp using only the top portion of my 'Every Chapter' stamp (masking out the words on the book spine), fussy cut it out and coloured it with my Stampin' Blends before popping onto a background made using one of the stamps from the new 'Cup Of Tea' set, where I separated each sentiment with a hand-drawn heart (hearts - check!) I added another heart to my teabag tag detail and a final sentiment from 'Lovely You' to complete my card.


Here is the visual summary of the key products used on today's project for you to pin for easy reference:


You can see all of my 'How To' summaries on my 'How To - Tips and Techniques' Pinterest board in case you've missed any. 

I'm also linking today's card up over at The Alphabet Challenge where they are on 'F is for Friendship' - this card will be headed to one of mine!

How does our board inspire you? I can’t wait to see what YOU create! For more inspiration, be sure to visit the rest of the  Festive Friday Challenge Design team:

Ann Schach
Beth McCullough
Sharon Hashimoto Burkert
Melanie Hungerford
Helen Jennings
Stephanie Lanzalotto
Melva Peters
Jaydee
Diane Evans
Joanne James

Enjoy your day; I'm back on the road and off to Nottingham and on to Newcastle tomorrow. I'll be back here on Sunday with my card for the new challenge over at The Paper Players. Until then, happy stampin'!


Stampin' Up! Supplies Used:

Table built using Product Table Builder by The Crafty Owl - Independent Stampin' Up! Demonstrator.

Butterflies and Flowers Clean And Simple One Layer Birthday Card PP596

by Joanne James19. June 2022 08:00

Today it's Sunday and time for this week's new challenge over at The Paper Players! It's the turn of the fabulous Jaydee to host this week and she has a clean and simple challenge for us to work with:


I love one layer cards! had another go with a different colour combo from the palette over at Sunday Stamps (such a great colour palette!) and decided that today I would focus on creating the illusion of layers on my single layer creation using some clever diecut embossing, masking and stencilling - take a look:


Here's the low-down on today's card:

How Many Layers? - I love one layer cards as they are great for clean and simple designs. They can be as simple as a single image and a sentiment; for today's card though, I decided to create the illusion of layers. The first thing I did was use one of my Scalloped Contour Dies to partially emboss the outline of a label. I then stencilled a butterfly on the non-embossed section, then masked it off, along with a second mask to mask off the embossed area before using an alternative stencil to emboss a pattern around the remainder of the card. At this stage the card should look something like this:

When the masks are removed, the finished card front appears to have three separate layers: the butterfly uppermost, followed by the die-embossed label outline and finally the background floral-patterned layer. The photo below shows these in more detail: 


 Finally I added a sentiment to my faux-label to complete my card. I also stamped a sentiment on the inside, with some soft stencilling around the edges - I photographed the inside of the front of my card too so that you can see the partial die-embossed label outline more clearly:


By keeping my central label clear, I've tried to preserve some 'white space' on my one layer card. Along with the absence of embellishments of any kind and the one layer that is the crux of this challenge, I have managed to keep thing clean and simple too. I love these Butterflies & Flowers Layering Decorative Masks stencils and will be so sad when they retire at the end of the month. 

Here is the visual summary of the key products used on today's project for you to pin for easy reference:


You can see all of my Product and 'How To' summaries on my 'How To - Tips and Techniques' Pinterest board in case you've missed any. 

Before you reach for your ink and papers, check out what our amazing team has created to inspire you this week:

Here's a quick recap of our challenge rules:
 
1.  Create a new paper project
2.  Upload your creation to your blog with a link back to us and provide a direct link to the post featuring your challenge submission.
3.  Please link your card to no more than four challenges, TOTAL.
4.  Have FUN!

Enjoy your day; mine will be a quiet one, having been out and about for the past couple of days. I'll be back soon with another project. Until then, happy stampin'!


Stampin' Up! Supplies Used: 

Table built using Product Table Builder by The Crafty Owl - Independent Stampin' Up! Demonstrator.

He's The Man Flippin Awesome Masculine Card

by Joanne James15. June 2022 09:00

Today I'm sharing a card that uses the sketch layout over at Inspire.Create that was also inspired by the masculine theme and brown palette of browns over at The Card Concept:


This is a really simple clean and simple/layered card (well, there's not that much 'white space'!) that came together in no time thanks to the He's The Man designer series paper - take a look:


This is one of those rare, absolutely no stamping whatsoever cards that uses just three products! I simply added a strip of patterned paper to my base, layered another piece of DSP (this time cut with a Stitched Rectangle Die for a little added detail, but you could skip this step if you don't have one to hand) then used one of the diecuts from the paper pack as my focal point - flames, BBQ tools and sentiment all in one! 


This card will be one of the Father's Day cards for hubby from one of the James Juniors this coming weekend - he loves to BBQ so will definitely appreciate the punny sentiment! I did stamp a suitable greeting on the inside, but otherwise the He's The Man designer Series paper definitely did all of the heavy lifting on this one! If you'd like to see another masculine card using these papers, be sure to come back tomorrow as I have another Father's Day card to share for my TicTacToe card!

Here is the visual summary of the key products used on today's project for you to pin for easy reference:


You can see all of my 'How To' summaries on my 'How To - Tips and Techniques' Pinterest board in case you've missed any. 

Enjoy your day. We are celebrating in the James household today and the eldest of the Juniors turns 17 - although to be fair we started our celebrations earlier in the week, as tonight will be taken up with our first face-to-face parents evening since Covid for the other James Junior - we are hoping to squeeze in birthday dinner beforehand though. I'll be back tomorrow with another couple of projects. Until then, happy stampin'!


Stampin' Up! Supplies Used:

Table built using Product Table Builder by The Crafty Owl - Independent Stampin' Up! Demonstrator.

You Are Amazing Patriotic Card Of Sorts PP595

by Joanne James12. June 2022 08:00

Today it's Sunday and time for this week's new challenge over at The Paper Players! It's the turn of the fabulous Claire to host this week and she has a patriotic colour challenge for us to work with:
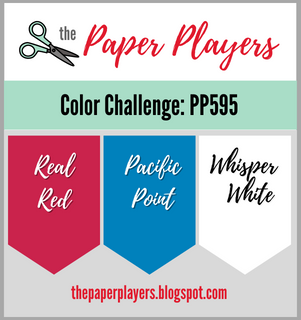
 

 I started out today's card not wanting to use anything other than Claire's trio of chosen colours, but also not wanting to create a patriotic Fourth of July card, since living in the UK we don't celebrate American Independence Day so I don't have much cause to send this kind of card. I did end up going a little rogue - take a look at my card below and you'll see what I mean:
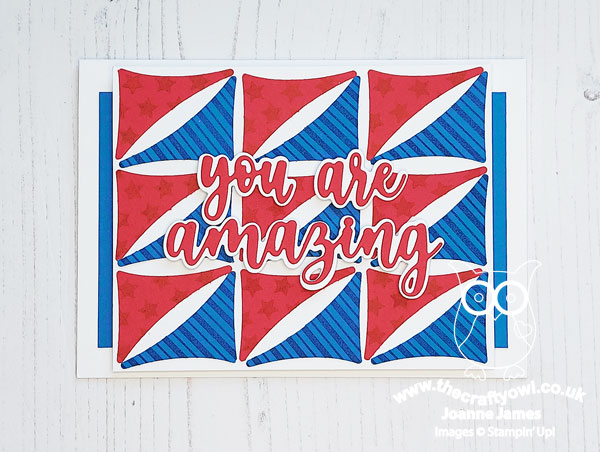
 

Here's the low-down on today's card:

All About The Background - I had seen a great Instagram post recently by the talented Melody Hyde where she used the Sailboat Builder punch to create a fun background (you can see that card here) so decided I would have a go at creating something similar. I punched a whole bunch of red, white and blue sails, then decided to create a pattern using the red and blue ones. How fun is that?!

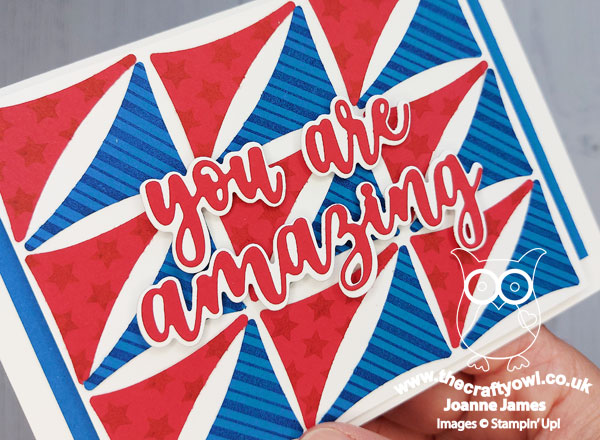
Patriotism Of Sorts - Having laid out my background, it did look a little plain so I decided to experiment with some tone-on-tone stamping. I did end up using both stars and stripes, creating my patterns using a tiny star from the 'Penguin Place' stamp set (available again 1st July) and some stripes using an old retired set called 'Your Presents'. Now before the eagle-eyed amongst you point out that my stars and stripes are the wrong way around for the American flag: I know - I stamped a whole bunch of sails, with red stars, blue stars, red stripes and blue stripes and decided this was the pattern combo I liked best - and since I wasn't setting out to create a 4th July card, that was fine. When I came to write up my post though I did have second thoughts and I did wonder if I should have gone with blue stars and red stripes, for fear that my American readers might question my patriotic allegiance or flag knowledge - but I'm hoping my explanation is sufficient to prevent me from a barrage of patriotic fury! Or even a different pattern altogether!! Of course, if you wanted to use this idea to create a stars-and-stripes 4th July card, be my guest - and do share your version with me!

Anyway, back to the card - you can see the detail of my tone-on-tone stamping below; I really like the resulting effect:
 

Amazing Thanks - I finished my card with a simple 'you are amazing' die cut sentiment using the Amazing Thanks Dies - I can use this card as a card to celebrate any kind of achievement. The sentiment also works well if you do want to use a similar layout and idea for a truly patriotic card to celebrate the achievements of those who fought for the independence of the USA from the British Empire all those years ago - you just need to switch those stars and stripes!

So what do you think? I love the way the Sailboat Builder Punch is used in such an unexpected way to create a fun background. Do you have any other punches that you use in interesting ways? Do leave me a comment below - I would love to hear your ideas!

Here is the visual summary of the key products used on today's project for you to pin for easy reference:
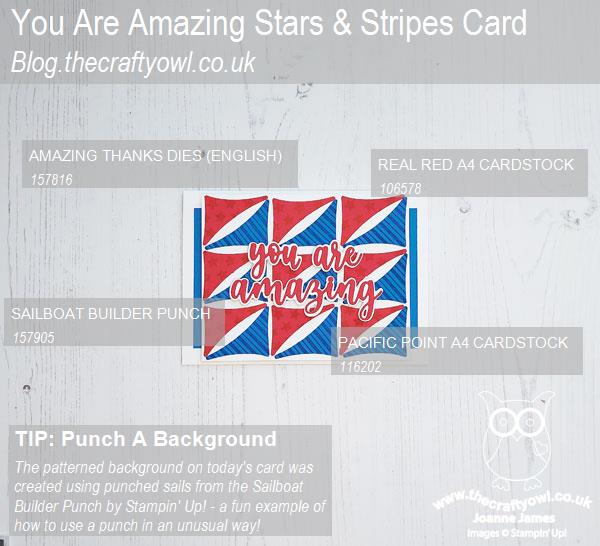
 

You can see all of my Product and 'How To' summaries on my 'How To - Tips and Techniques' Pinterest board in case you've missed any. 

Before you reach for your ink and papers, check out what our amazing team has created to inspire you this week:

Here's a quick recap of our challenge rules:
 
1.  Create a new paper project
2.  Upload your creation to your blog with a link back to us and provide a direct link to the post featuring your challenge submission.
3.  Please link your card to no more than four challenges, TOTAL.
4.  Have FUN!

Enjoy your day; we will be having some early birthday celebrations today, as the eldest of the James Juniors turns 17 this week but since it's a super busy school week, we are spreading out the celebrations and going with a 'little and often' rather than 'one and done' approach! I'll be back soon with another project. Until then, happy stampin'!


Stampin' Up! Supplies Used: 
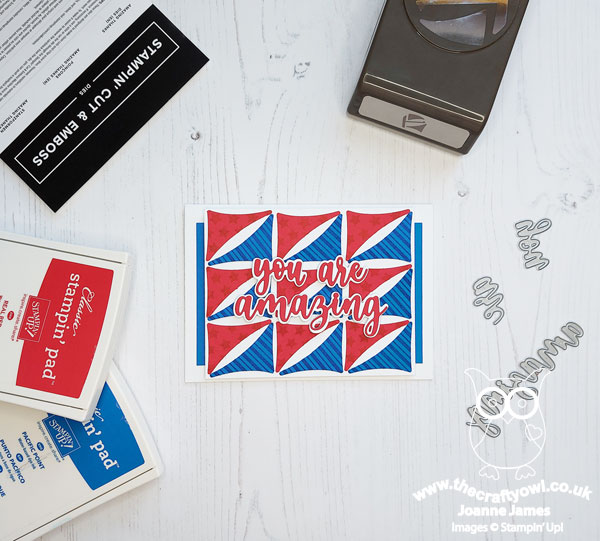
Table built using Product Table Builder by The Crafty Owl - Independent Stampin' Up! Demonstrator.

For The Record Birthday Card FF111

by Joanne James10. June 2022 09:00

Today I have my card for the new challenge over at Festive Friday. 


The challenge that we are celebrating this week is 'World Music Day' which is on June 21st. Remember the fun thing is that at Festive Friday you do not need to actually celebrate the occasion; your goal is to simply use three or more items from the inspiration list on your project. This week I totally got on board with the theme! I live in a household of music-makers and used music notes, black, white, embossing and circles and using the current layout over at Try Stamping on Tuesday this is what I came up with:


Here's the low-down on today's card:

For The Record - 'For The Record' is a great set for music lovers! The vinyl record makes for a great centrepiece for any card and the variety of sentiments mean that it can be used for lots of different occasions too. In addition to the record on the front of my card, I added a trio of brightly coloured records to both the inside and my envelope to decorate - here you can also see one of the sentiments in this set:


An Embossing Double - I have both wet and dry embossing on my card: I heat-embossed my sentiment and vinyl record for added shine to highlight the groove detail and added a dry embossed background layer of notes and sheet music using my Merry Melody Embossing folder:


The challenge over at The Alphabet Challenge Blog is 'E is for Embossing' this week so I'll be joining in with my card there too.

An Unexpected Find - Did you recognise the designer paper I used on my card today? It's actually taken from the new 'Butterfly Kisses' paper pack. The stripes in the design are diagonal, but I cut the sheet at an angle (you can see it in the photo at the bottom of the post) and then cut the lines at different heights - I thought it looked like the outputs on a sound mixing desk and it was a great way to add a pop of bright colour to my music-themed card. What do you think - does it work? I'd love to know your thoughts - please do leave me a comment below!

 I hope you like today's card - if you are considering adding the 'For The Record' stamp set to your collection, you only have until the end of the month to do so before it retires for good. The good news is that it is currently available as part of the Last Chance Promotion at 50% off for just £10.50 - bargain!

Here is the visual summary of the key products used on today's project for you to pin for easy reference:


You can see all of my 'How To' summaries on my 'How To - Tips and Techniques' Pinterest board in case you've missed any. 

How does our board inspire you? I can’t wait to see what YOU create! For more inspiration, be sure to visit the rest of the  Festive Friday Challenge Design team:

Ann Schach
Beth McCullough
Sharon Hashimoto Burkert
Melanie Hungerford
Helen Jennings
Stephanie Lanzalotto
Melva Peters
Jaydee
Diane Evans
Joanne James

Enjoy your day and I'll be back tomorrow with another project. Until then, happy stampin'!


Stampin' Up! Supplies Used:

Table built using Product Table Builder by The Crafty Owl - Independent Stampin' Up! Demonstrator.

This Birthday Piggy Birthday Card

by Joanne James5. June 2022 11:30

I had a little crafty time yesterday so today I'm sharing an extra card that uses this week's Global Design Project #GDP345 colour palette and the sketch layout over at Just Add Inktake a look:


Here's the low-down on today's card:

I thought the GDP colours would be perfect to colour one of the 'This Birthday Piggy' images so I decided to make this moped-riding porcine the focus of my colouring today and used my Stampin' Blends in each of the challenge colours to bring him to life.

The sketch layout was great to showcase some designer series paper; I decided to go with a tone-on-tone look using some of my In-Color designer paper in Starry Sky to match my cardbase - I thought the pattern co-ordinated with the confetti coming from the birthday piggy's moped - what do you think?


I finished my sentiment on the inside of my card and added another partially stamped image to decorate:


I think this is a fun image that would appeal to young and old alike. I'll be adding it to my stash of cards for young boys - I always need some of those! I'm also entering it over at SUO Challenges for my second entry into their 'kids cards' challenge.

Here is the visual summary of the key products used on today's project for you to pin for easy reference:


You can see all of my 'How To' summaries on my 'How To - Tips and Techniques' Pinterest board in case you've missed any. 

Enjoy the rest of your day and I'll be back soon with another project. Until then, happy stampin'!


Stampin' Up! Supplies Used:

Table built using Product Table Builder by The Crafty Owl - Independent Stampin' Up! Demonstrator.


Mini Catalogue

BROWSE THE CATALOGUE

The mini catalogue is now live! Read and download your copy here.

Shop Online

Access my online shop 24 x 7, 365 days of the year:

Current April hostess code:

VDKNV7BH

Shop Online

Join My Team

It's always a great time to join Stampin’ Up! New team members can get £130 worth of products for only £99 + free business supplies + free shipping + all the fun being a part of Stampin’ Up! Stampin' Up! has something for everyone: join my growing team and benefit from my support to enjoy Stampin' Up! however you choose.

If you're interested, call me for a chat to understand how I can help you realise your goals. Alternatively, if you have already decided to sign up and you just can't wait, please click here for the link to the online form where you can sign up and order your starter kit right away! 

Latest Kit!

Stampin Cut and Emboss

The Rock Legend Kit has all you need to make 8 cards with coordinating envelopes. Along with the new Panda Friends Kit, both are available from January 4th for just £14 each - get yours here!

2023-24 Annual Catalogue

BROWSE THE CATALOGUE

Click on the catalogue for a full list of current SU! supplies - if you would like to order any of the items featured, please drop me a line at [email protected] or give me a call on 07773 421446 - I'd be happy to help.

New Online Exclusives

There are new products available exclusively in the online store from 5 March - check them out here.

About Me

Hi I'm Joanne and live in Northampton and when I'm not looking after my husband and two beautiful children, am an avid crafter with a passion for all things Stampin' Up!

I must confess that I have never been a big rubber stamper - until I discovered Stampin' Up! that is. I love the fact that I can get such great results with co-ordinating stamps, inks, papers and punches - the possibilities are endless! Join me on my stamping journey as I share the things I love and be inspired to create amazing things yourself!

Follow Me

Monthly Newsletter

Box Builder

Click the button above to use Box Buster to create your custom box design using the Envelope Punch Board!

Kits Collection Now Available!

Stampin Cut and Emboss

The new Kits Collection from Stampin' Up! is now available!

Click here to see the current kits available and order yours online today.

I Design For


Stampin' Up Stuff

This is my personal blog and is not endorsed by Stampin’ Up! I hope you find it a plentiful source of ideas and personal inspiration but please don't copy my designs for contest submission or use for classes, publication or sale without express permission.