Balloons Floating Frame Birthday Cards

by Joanne James8. April 2019 11:30

Happy Monday everyone! Today I'm sharing a card using the sketch over at Freshly Made Sketches and the current colour palette at Fab Friday:


My card features a technique that is currently all the rage and I've been wanting to have a go at - the floating frame technique. This actually means I have two cards for you! Here's the first one:


And here's the second one, featuring the outer frame element:


Here's the low-down on today's card:

Floating Frames - The floating frame technique is really easy to create with a few basic tools: some 'Press and Seal' food wrap or similar, a framelit - I used my Rectangle Stitched Framelits Dies - and lots of dimensionals! You simply stamp and punch/diecut your images, lay them out, cover with Press and Seal, trim to frame size and cut out your central piece, before adhering dimensionals to the back of the diecut pieces and adhering to your chosen card base. Finally you remove the Press and Seal and your floating shapes remain in place. Jennifer McGuire has a fabulous video on this technique if you want to see one of these cards being made - you can see it here

Birthday Balloons - I've seen some fabulous examples of this technique, mostly using florals, but I was in need of some birthday cards and I thought the colours over at Fab Friday would be perfect for some bright and colourful balloons. I had so much fun making these cards I'm going to make a few more in alternative colour combos too - this is a great card design that would work well for both boys and girls, so makes a great storecupboard standby. I stamped my balloons with one of the stamps in the 'Happy Birthday Gorgeous' stamp set before punching them for added interest and I used one of the other balloon stamps in the set to decorate the envelope, as you can see below:

No need for a naked envelope here!

A Birthday Greeting - For my second card, I needed a larger greeting to sit inside my frame so my Well Written Framelits were the perfect choice. I also added an extra balloon for balance, tied with some white baker's twine. The same design could be used with other stamps and sentiments from this set too to make cards for other occasions - how many other combinations can you come up with? 

Here are the visual summaries of the key products used on today's projects for you to pin for easy reference:


You can see all of my 'How To' summaries on my 'How To - Tips and Techniques' Pinterest board in case you've missed any. 

Enjoy your day; we are having a kit clear-out in the playroom today. So far we've made an erupting volcano, an insect hut, a flying helicopter and two solar-powered motorised dinosaurs. You've got to love the Easter holidays! I'll be back tomorrow with another project. Until then, happy stampin'!


Stampin' Up! Supplies Used:

Table built using Product Table Builder by The Crafty Owl - Independent Stampin' Up! Demonstrator.


Mediterranean Moments Cafe Note Card

by Joanne James6. April 2019 21:00

I've had a busy week that's kept me away from my blog but I have managed to get lots made over the past couple of days so I should be better prepared this week! Today I'm sharing a card for the current challenge over at Just Add Ink that also uses the sketch layout at The Paper Craft Crew:

   Paper Craft Crew Sketch Challenge PCC332

I missed playing with the ladies over at Just Add Ink last week as I just didn't manage to get my card finished and blogged (one for another time!) but as soon as I saw their inspiration photo this week I knew exactly which set I was going to use. Here's my card:


Mediterranean Moments is a stamp set that I've used many times, but not recently so it was a good opportunity to dust off this favourite from the annual catalogue and get to work. The photo reminded me of the cafe scene so this formed the basis of my main focal point, stamped on white and coloured with my Stampin' Blends. I used the PPC sketch to push me to consider a different layout to any I've used previously with this set. I did some tone-on-tone stamping using one of the other stamps in the set and embossed the main panel with a brick pattern for added texture and interest, and added a few wooden leaf embellishments from my box. I added a sentiment from Itty Bitty Greetings to finish my 'just because' note card.

Here is the visual summary of the key products used on today's project for you to pin for easy reference:


You can see all of my 'How To' summaries on my 'How To - Tips and Techniques' Pinterest board in case you've missed any. 

Enjoy your evening and I'll be back tomorrow with another project. Until then, happy stampin'!


Stampin' Up! Supplies Used:

Table built using Product Table Builder by The Crafty Owl - Independent Stampin' Up! Demonstrator.

Forever Lovely Birthday Cards

by Joanne James1. April 2019 21:00

I've had my first class of the month today and today I have a couple of cards to share with you: one from my class and one that my class card was based on, both of which were inspired by the lovely Julee Tilman's current Mojo Monday sketch (turned through 90 degrees):

Here's the first card I created using the beautiful All My Love suite - take a look:


Here's the low-down on today's card:

Whilst the papers in the All My Love suite feature classic romantic colours, these papers are not just about hearts - they feature some fabulous florals too. This card features one of my personal favourites and compliments the Soft Sea Foam background beautifully. 

Along with the die cut detail of the sentiment panel, this makes for a simple yet pretty card. 

Here is the visual summary of the key products used on today's project for you to pin for easy reference:

Here is the second similar card that we made in my class, using an alternative colourway, this time with a couple of diecut flowers to compliment the patterned paper:

Here is the visual summary of the key products used on today's project for you to pin for easy reference:

You can see all of my 'How To' summaries on my 'How To - Tips and Techniques' Pinterest board in case you've missed any. 

Enjoy your evening and I'll be back tomorrow with another project. Until then, happy stampin'!


Stampin' Up! Supplies Used:

Table built using Product Table Builder by The Crafty Owl - Independent Stampin' Up! Demonstrator.

Sale-A-Bration By the Bay - Get Yours Before It's Too Late!

by Joanne James28. March 2019 21:30

Today I've just got time for a quick post to share another card made using the Sale-A-Bration stamp set 'By The Bay' that I made a while ago but haven't got around to blogging. Here's my card:


A simple scene watercoloured on shimmery white paper with inks and an aquapainter, layered with a tone-on-tone panel of Balmy Blue embossed with the Stripes embossing folder and paired with some burlap and leaves and a sentiment with stitched edge detail. Easy as that! You have only 4 more days to snap it up for free with a £45 order so if it's on your list, get your order in before the weekend. 

Here is the visual summary of the key products used on today's project for you to pin for easy reference:


You can see all of my 'How To' summaries on my 'How To - Tips and Techniques' Pinterest board in case you've missed any. 

Enjoy your evening and I'll be back tomorrow with another project. Until then, happy stampin'!


Stampin' Up! Supplies Used:

Table built using Product Table Builder by The Crafty Owl - Independent Stampin' Up! Demonstrator.

6 Days Left Of Sale-A-Bration 2019: Shop-Host-Join Whilst You Can Still Earn More!

by Joanne James26. March 2019 21:00

No post yesterday I'm afraid as my day was long and busy, from the moment the youngest James Junior got dropped off at school at the crack of dawn to go on his school trip to Paris to an evening spent helping out with a local Brownie pack followed by Girl Guides doing a spot of Mother's Day crafting. Today has seen the arrival of our German language school exchange student, but a long journey has resulted in an early night so I've time to sit and blog this evening. Today I'm sharing the most popular card from my last Sale-a-Bration class that features not one, but three of the fabulous products that can be yours free with a purchase of £45 or more:


Here's the low-down on today's card:

A Trio of Sale-A-Bration Goodness - Today's card features three of the Sale-A-Bration goodies that are still available for you to receive free with a spend of £45 - can you spot them all? The wooden butterfly from the Butterfly Elements, and a piece of Grapefruit Grove foil sheet that has been embossed with the Country Florals Dynamic Textured Impressions Embossing Folder. This card is so simple to recreate and would work in lots of alternative colours too - the ladies in my class loved it! Check out the detail of the foil embossing - it really is lovely. 

Shop, Host, Join: There's Still Time - So whether you are going to shop and spend £45 or more (you get one free item for each £45 spend, or one of the higher-value ones for a £90 spend) or host your own party (an online party - or single qualifying order if your shopping list is a long one! - are still options at this stage), you still have 5 days to do so, so get those orders in. 

Join My Team For An Extra Sweet Reward - Whether you are a hobbyist or would like to build a business of your own, there's never been a better time to invest in a Stampin' up! starter kit. Not only will you receive £170 of product of your choice for a £99 spend, if you pay an additional £26 you can receive the fabulous and super-useful craft and carry tote too. You can read more about all of the Sale-A-Bration offers in my earlier post here; if you've any further offers, or would like to chat to me and find out the details of a special incentive that I am offering for qualifying joiners this week, do get in touch - I would love you to join my team.

Here is the visual summary of the key products used on today's project for you to pin for easy reference:


You can see all of my 'How To' summaries on my 'How To - Tips and Techniques' Pinterest board in case you've missed any. 

Enjoy your evening and I'll be back tomorrow with another project. Until then, happy stampin'!


Stampin' Up! Supplies Used:

Table built using Product Table Builder by The Crafty Owl - Independent Stampin' Up! Demonstrator.

Puzzle Pieces Thinlits For Autism Awareness

by Joanne James23. March 2019 22:00

I've had a busy day today with a netball match, hockey match and a choir competition but just have time to share a quick card for this week's challenge over at Freshly Made Sketches:


The minute I saw Jacqui's sketch I knew what I was going to do with it; I love it when that happens! I decided to make a card in readiness for World Autism Awareness Day that is coming up in a couple of week's time on April 2nd:


Here's the low-down on today's card:

I used the Puzzle Pieces Thinlits to create my jigsaw using the nine elements of the image, adapting two of the outer pieces slightly to create a perfect 3 x 3 square (the thinlits cut a 4 x 4 square). I used the colours that are associated with the World Autism Awareness Day Ribbon and logo. I was curious as to the origins of the puzzle piece as a symbol for autism, so I looked it up (what did we do before Google?!) Apparently it's use goes back to 1963, when a parent and board member for the National Autistic Society in London, Gerald Gasson, created it. The board believed autistic people suffered from a 'puzzling' condition and so the use of the puzzle as a symbol was adopted for their cause. A simple heat-embossed sentiment that fitted the theme and a punched red heart, courtesy of the Dog builder Punch, complete my card.

Here is the visual summary of the key products used on today's project for you to pin for easy reference:


You can see all of my 'How To' summaries on my 'How To - Tips and Techniques' Pinterest board in case you've missed any. 

Enjoy your evening and I'll be back early tomorrow with another project for this week's new challenge over at The Paper Players. Until then, happy stampin'!


Stampin' Up! Supplies Used:

Table built using Product Table Builder by The Crafty Owl - Independent Stampin' Up! Demonstrator.

#SimpleStamping Baby Cards With Perfectly Paired

by Joanne James22. March 2019 17:00

Today I'm sharing a card for the current challenge over at CASology where there is watery theme:


I also decided to combine it with this month's #SimpleStamping challenge set by Stampin' Up!, which was to create an occasion card (new baby, wedding, sympathy) with nothing more than stamps, ink, paper and ribbon. I decided to make a card to welcome a new baby using the 'Perfectly Paired' and created both boy and girl versions. First up, I have an ultra quick and easy #SimpleStamping card - the boy version: 

Here is my second #SimpleStamping card - the girl version: 


This really took just a minute to make - I even made a video to show you how I did it! Here you go:

Easy, right? #SimpleStamping with minimal supplies to produce great results (even if I say so myself!!)

Perfectly Paired is a great set for new baby cards if you're starting out: one main image with a couple of smaller ones too and three sentiments that work for the inside and outside of your cards, tags or even a home decor piece for a new baby's nursery. You could also adapt it to form the basis of christening invitations, so lots of creative possibilities for a single stamp set.

The images can be inked in a single colour or coloured using Blends or watercolour pencils, or you can choose to highlight certain parts of the main image by masking or spotlighting specific area of the main image. Adding a simple bow in a co-ordinating ribbon colour adds a simple touch of luxury to a #SimpleStamping card.

Here's an example of the above card coloured with my combo of Pool Party Stampin' Blends to show how a little extra colour really brings the image to life, but still making it a relatively inexpensive card with only a couple of extra supplies needed:


To really get the most from my supplies, I also stamped a partial image on the front of my envelope and this sentiment on the inside of my card:

Not a naked piece of paper in sight! By keeping things simple and using a basic monochromatic colour scheme, this is a card that can be easily mass-produced with limited supplies and would work well in pretty much any colour. 

Having created my #SimpleStamping cards, I decided to create a stepped up version that is still super simple in style and design but introduces a new technique - heat embossing - for the more adventurous casual or avid crafter. I went with a neutral pale yellow base for this card (always useful to have in your stash if you need a quick baby card but don't know the gender) and this time using a white ribbon - a good choice if you've limited supplies and will go with any colour theme:


You could also add a little selective colour to these images to highlight some of the images if you have a marker of the same colour to give some tonal highlights and just pick out a few of the animals.

Here are the visual summaries of the key products used on each of today's projects for you to pin for easy reference:


You can see all of my 'How To' summaries on my 'How To - Tips and Techniques' Pinterest board in case you've missed any. 

Enjoy your day and I'll be back tomorrow with another project. Until then, happy stampin'!


Stampin' Up! Supplies Used:

Table built using Product Table Builder by The Crafty Owl - Independent Stampin' Up! Demonstrator.
 
 
Table built using Product Table Builder by The Crafty Owl - Independent Stampin' Up! Demonstrator.
 
 
Table built using Product Table Builder by The Crafty Owl - Independent Stampin' Up! Demonstrator.
 
 
Table built using Product Table Builder by The Crafty Owl - Independent Stampin' Up! Demonstrator.

Are You Ready For Christmas?!

by Joanne James20. March 2019 20:00

Good evening! I was out late last night with the lovely Jane and friends who were hosting a Stampin' Up! party so have been busy placing orders for their goodies today and getting a few other jobs done. Last night we were all about the cupcakes and Easter bunnies, however today here on the blog I'm sharing a Christmas card - yes, a Christmas card! - for this week's CAS(E) This Sketch challenge where they have an intriguing sketch:


I wrestled for ages on whether or not to tackle this sketch and how literally to interpret those sharp lines and then I had a brainwave and my Christmas card was done - take a look:


Here's the low-down on today's card:

Ready For Christmas - Are you ready for Christmas? Me - not at all, but since it was the title of the stamp set I used for the sentiment and festive baugh on today's card it seemed a fitting eye-catching blog title too! This card is mostly diecutting rather than stamping, however I stamped my pine baugh for extra detail and stamped and fussy-cut my sentiment so that it didn't obscure too much of my festive scene. I also stamped the other part of my sentiment on the inside of my card:


A Christmas Staircase - A flash of inspiration led me to consider how the lines of the sketch looked very much like a staircase, so out came my Christmas Staircase Thinlits that form the basis for today's card. I decided to use the diecut rather than the stamp because I like the fine embossed detail and delicate spindles and wanted this to be the main feature to link it back to the sketch. The decorative pine baugh and diecut bows are from the same die set.

Under The Mistletoe Wallpaper - I used a little piece of Wood Textures paper for my hardwood floor and a piece of Under The Mistletoe designer series paper for my wallpaper to keep with the festive feel. Did you know that you can purchase Christmas supplies all year round from Stampin' Up!? The annual catalogue (pages 93-103) contains a selection of stamps, dies and even papers designed for the holiday season, so there's no excuse not to be Christmas crafting all year round! 

Here is the visual summary of the key products used on today's project for you to pin for easy reference:


You can see all of my 'How To' summaries on my 'How To - Tips and Techniques' Pinterest board in case you've missed any. 

I'm putting my feet up this evening; enjoy yours too and I'll be back tomorrow with another project. Until then, happy stampin'!


Stampin' Up! Supplies Used:

Table built using Product Table Builder by The Crafty Owl - Independent Stampin' Up! Demonstrator.

A Jumping Frog For Just Add Ink

by Joanne James19. March 2019 10:00

It's Tuesday and I have another animal card for you - actually the first one that I created out of the three I've shared with you in the last few days! This is my main card for this week's challenge over at Just Add Ink where the lovely ladies are all about the letter 'J' :


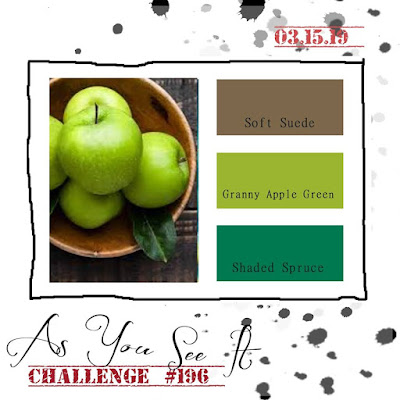
I am also using Julee's Mojo Monday sketch layout and the colours over at As You See It for my card today.

I love these letter challenges from the JAI team as they really challenge the old grey matter! When having my personal brainstorm of things beginning with J, just like a number of the DT members I immediately thought of the 'Jar of Love' stamp set and 'jigsaw' (check out Lou Kitzlemann's fabulous take on this theme via the link above). I did go with their 'joey' suggestion yesterday, but also came up with a few more of my own (journalling, joined, just because and Joanne to name but a few!) I decided to go with my favourite though, which was 'jumping' and decided it was a great opportunity for a fun interactive card using my free Sale-A-Bration stamp set 'So Hoppy Together' - take a look:


Here's the low-down on today's card:

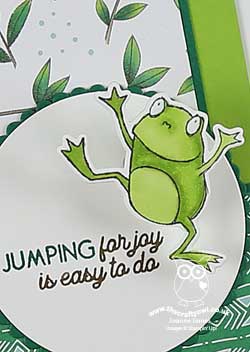
J is For Jumping - So whilst the interactive element is not immediately obvious from the flat lay of my photo, my frog is definitely jumping! I've used the frog that is actually riding a unicycle on the stamp, having selectively masked off the unicycle before stamping (I know, I could have just cut my stamp in half and lots of demo friends have, but I just couldn't bring myself to do it!!) Hop Around Framelits Dies to cut him out easily. I coloured him in Granny Apple Green Blends and then attached him to my card with a spring to give him a wobble so that he really way jumping for joy - you can see that in the short video clip below that I shared on my Facebook page today:

The spring simply attaches to the back of the frog with tape, with the other end pushed through the sentiment circle and secured in place on the reverse. Such fun!

Hop To It - I paired my frog with a piece of the Animal Expedition designer series paper that featured frogs on branches as I thought he would make the perfect friend for my jumping frog. I cut my paper carefully to make sure that my frog was both looking in the right direction and positioned in the centre of my square to compliment the overall layout. 

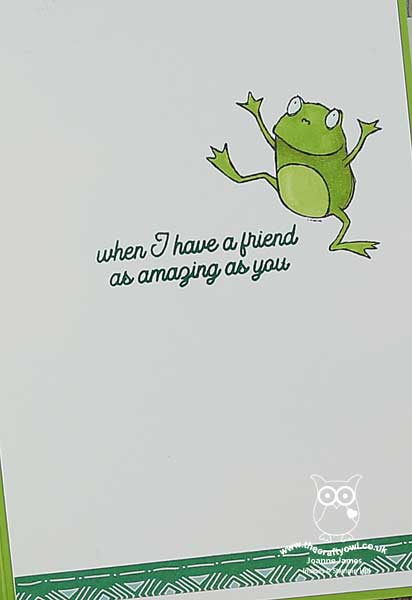
A Creative Sentiment - There are some great additional sentiments in the limited edition 'More Than Words' stamp set that is available this month that co-ordinate with the 'So happy together' frog set, including one that says "leaping for joy is easy to do" - I needed mine to say 'jumping for joy' though to truly fit with the 'J' theme, so I masked out the word 'leaping' and replaced it with 'JUMPING' which features on another stamp in this set, stamping my main sentiment in Soft Suede and my 'JUMPING' in Shaded Spruce for emphasis. The sentiment resolves with the other half on the inside of the card, which I decorated with another jumping frog:

I'm not sure whether it was my excitement at finding my 'J' solution or the fact that this card has a really simple interactive element, but this is one of those cards that is pure fun and I just couldn't wait to share with you! 

Here is the visual summary of the key products used on today's project for you to pin for easy reference:


You can see all of my 'How To' summaries on my 'How To - Tips and Techniques' Pinterest board in case you've missed any. 

Enjoy your day. I have a busy day at my desk and am out visiting the lovely Jane and her crafty friends for a Stampin' Up! party this evening, so mine will be a long but productive one! I'll be back tomorrow with another project. Until then, happy stampin'!


Stampin' Up! Supplies Used:

Table built using Product Table Builder by The Crafty Owl - Independent Stampin' Up! Demonstrator.


A Joey New Baby Welcome!

by Joanne James18. March 2019 10:00

Another Monday and a new start to the week! Today I'm sharing a card a baby card using this week's sketch over at CAS Colours and Sketches that also fits this week's challenge over at Just Add Ink:


I still had my Animal Expedition papers out on my desk from the card that I will be sharing tomorrow so decided to make a quick new baby card - take a look:


Here's the low-down on today's card:

J is For Joey - So today's card features the cute koala/kangaroo combo that I cropped from the Animal Expedition papers using my Animal friends framelits. I was reminded when I read the post over at Just Add Ink that 'joey' is another name for a young kangaroo and that this would therefore work for their challenge this week. This is a bonus entry for me though, as I thought this little joey would be perfect for my baby card today - my scheduled Just Add Ink entry is coming up tomorrow and you are definitely going to want to pop by and see where my musings over the letter 'J' took me - it was just too easy to go with the Design Team's suggestions! Another tip from me when cropping these animals from your designer series paper: crop the identical shape out of extra thick white cardstock and adhere your DSP diecut to it for a more rigid element to prevent it getting squashed in the post.

A Hidden Gem - I used one of the other dies in the Animal Friends set for the vertical 'banner' element of the sketch - an inset vine that has some leaves that are remove completely and some that are attached, allowing them to be brushed up and add a little interest to the design. I genuinely hadn't noticed this die in the set before, hence my reference to it as a 'hidden gem'; I really like it and I can see me using it on lots of cards for added subtle detail.

Subtle Texture - After diecutting the vertical vine element, I ran my layer of Blushing Bride cardstock through the Big Shot with my Subtle embossing folder for a little extra texture and interest. It is indeed subtle, but I think it makes a nice addition before adding my sentiment and diecut animal pair on top.

Here is the visual summary of the key products used on today's project for you to pin for easy reference:


You can see all of my 'How To' summaries on my 'How To - Tips and Techniques' Pinterest board in case you've missed any. 

Enjoy your day and I'll be back tomorrow with another project. Until then, happy stampin'!


Stampin' Up! Supplies Used:

Table built using Product Table Builder by The Crafty Owl - Independent Stampin' Up! Demonstrator.

Mini Catalogue

BROWSE THE CATALOGUE

The mini catalogue is now live! Read and download your copy here.

Shop Online

Access my online shop 24 x 7, 365 days of the year:

Current April hostess code:

VDKNV7BH

Shop Online

Join My Team

It's always a great time to join Stampin’ Up! New team members can get £130 worth of products for only £99 + free business supplies + free shipping + all the fun being a part of Stampin’ Up! Stampin' Up! has something for everyone: join my growing team and benefit from my support to enjoy Stampin' Up! however you choose.

If you're interested, call me for a chat to understand how I can help you realise your goals. Alternatively, if you have already decided to sign up and you just can't wait, please click here for the link to the online form where you can sign up and order your starter kit right away! 

Latest Kit!

Stampin Cut and Emboss

The Rock Legend Kit has all you need to make 8 cards with coordinating envelopes. Along with the new Panda Friends Kit, both are available from January 4th for just £14 each - get yours here!

2023-24 Annual Catalogue

BROWSE THE CATALOGUE

Click on the catalogue for a full list of current SU! supplies - if you would like to order any of the items featured, please drop me a line at [email protected] or give me a call on 07773 421446 - I'd be happy to help.

New Online Exclusives

There are new products available exclusively in the online store from 5 March - check them out here.

About Me

Hi I'm Joanne and live in Northampton and when I'm not looking after my husband and two beautiful children, am an avid crafter with a passion for all things Stampin' Up!

I must confess that I have never been a big rubber stamper - until I discovered Stampin' Up! that is. I love the fact that I can get such great results with co-ordinating stamps, inks, papers and punches - the possibilities are endless! Join me on my stamping journey as I share the things I love and be inspired to create amazing things yourself!

Follow Me

Monthly Newsletter

Box Builder

Click the button above to use Box Buster to create your custom box design using the Envelope Punch Board!

Kits Collection Now Available!

Stampin Cut and Emboss

The new Kits Collection from Stampin' Up! is now available!

Click here to see the current kits available and order yours online today.

I Design For


Stampin' Up Stuff

This is my personal blog and is not endorsed by Stampin’ Up! I hope you find it a plentiful source of ideas and personal inspiration but please don't copy my designs for contest submission or use for classes, publication or sale without express permission.