Flowering Foils Metallics Birthday Card for AYSI 222

by Joanne James27. March 2020 12:00

Today I'm sharing my design team card for our new challenge over at As you See It where for this fortnight we have a fun recipe challenge for you:


I often struggle with this kind of recipe challenge, but must confess that along with Julee's Mojo Monday sketch for my layout (sketch 3) today's card came together quite easily - take a look:


Here's the low-down on today's card:

Flowering Foils - I decided to use the Flowering Foils Specialty Designer Series Paper as the basis for today's card. This is one of the second-release items that can be yours FREE with a purchase of £45 or more during the current Sale-A-Bration promotion and has been super popular with my customers, so I was keen to show them how they could use it. I used a rose-gold hatch patterned piece along with a piece of silver foil cut using my Stitched Rectangle Framelits for two of my layers, then fussy cut one of the flowers from another sheet to form the centrepiece of my card. I backed my flower with a stitched vellum circle to preserve the shape of the sketch but not detract from the detail of the bloom itself. These papers are so, so pretty and the photographs in today's post really don't do them justice - it is so difficult to photograph foil!  

Sparkle, Sparkle - To compliment the foiled papers, I decided to add lots of sparkle and shine. I used some white ribbon with a silver metallic edge for my bow, along with some silver twine behind my flower and a sprinkling of champagne rhinestone jewels and clear epoxy droplets for extra sparkle. I even added a silver (retired) tassle - then had to stop myself before I went really overboard!! 

Label Me Bold - Whilst this card would make a lovely wedding card, I have no need for one so decided instead that it would work equally well as a special birthday card. I inked up my 'Label Me Bold' stamp set for the first time to add a simple silver heat-embossed sentiment to my card. You can see that better on the photo below:


This sentiment stamp set was one of the first I bought from the new seasonal catalogue as I've been wanting a set like this for ages, but this is the first time I've inked it up. I love the clean, block font which is perfect to cut through the detail on a card like this.

So what do you think? Do you love these Flowering Foils as much as me?

Here is the visual summary of the key products used on today's project for you to pin for easy reference:


You can see all of my 'How To' summaries on my 'How To - Tips and Techniques' Pinterest board in case you've missed any. 

Before you put your creative thinking caps on, why not check out the blogs of the other As You See It team members:

Amy Jasper

Heather Cooper

Jan Clothier

Jane Knudsen

LeAnne Pugliese

Here's a summary of our challenge rules:

  • Create any card, scrapbooking page, 3D project or packaging project that fits the challenge.
  • Please include the challenge graphic and link back to the challenge in your blog post. Turn off word verification so we can leave you lots of lovely comments. Make sure you link the post not the whole blog to the Linky. Use #AYSIXXX when uploading to a public gallery.
  • If you’re unsure about ‘the rules’, check the details under the Challenge Guidelines tab on the As You See It Challenge homepage.

We look forward to seeing your creations in the AYSI gallery.

Enjoy your day and I'll be back tomorrow with another project. Until then, happy stampin'!


Stampin' Up! Supplies Used:

Table built using Product Table Builder by The Crafty Owl - Independent Stampin' Up! Demonstrator.

Little Kindness Elephant For TTT 56

by Joanne James19. March 2020 11:00

Apologies for my blog-free days so far this week; as I'm sure is the same for you, things have been anything but normal this past couple of weeks and I seem to have been pulled every which way and not once in the direction of my craft room. Far from being excited at the prospect of no school until September, both of the James Juniors are finding that an unwelcome concept and combined with the enforced closure of all of their sporting activities, they have needed much encouragement to find an upside to the current state we find ourselves in. I'm sure we will work it all out; meanwhile it's Thursday and time for a new challenge over at TicTacToe! It's the turn of Team X to host this week and the lovely LeAnne is our featured designer this week. This is the fun board that we are playing along with: 


I went down the middle with Blue-Umbrella-Designer Paper but my card also works for the diagonal Yellow-Umbrella-Bow. I used the current Fab Friday sketch for my layout (although I inadvertently centred my squares - I was distracted by the gingham!) along with an 'oldie but goodie' stamp set from the annual catalogue - take a look:


Here's the low-down on today's card:

Little Elephant - When I was considering what to work with today, I pulled out both the 'Under My Umbrella' set and the 'Little Elephant' stamp set as both feature umbrellas. I made a card with each, but preferred this one - such a long time since I've used this set! - and I don't think I've ever used the little umbrella before, so this was a good opportunity. I did a little masking on the front to make it look as if the elephant was holding the umbrella over the bluebird and also stamped the larger elephant with some hearts on the inside too:

In Stitches - I used both a stitched square for my main image and a stitched rectangle for my heat embossed sentiment panel for a little subtle extra detail. I wouldn't be without my Stitched Shapes Framelits and love that extra something they add to a shape.

Raindrops Keep Falling On My Head - I decided to add a few raindrops from the 'Under My Umbrella' set above the umbrella to add to my little scene and some white twine tied in a bow completes my card. 

A sweet and cheery little card with all that yellow and a sentiment that seems so appropriate given the unprecedented times we find ourselves in at the moment. I encourage you to show someone a little kindness today, because yes, it is a big thing and for some can make all the difference.

Here is the visual summary of the key products used on today's project for you to pin for easy reference:


You can see all of my Product and 'How To' summaries on my 'How To - Tips and Techniques' Pinterest board in case you've missed any. 

A tictactoe board offers so many creative possibilities - how does this week's board inspire you? Why not have a go? We would love to see you in the gallery and who knows - you might be selected for Designer's Choice and be eligible to be a guest designer on a future challenge. 

Enjoy your day; I am hoping to regain my creative mojo and spend some time crafting once I've tackled my ironing pile, since it will be all too soon before I am home-schooling the James Juniors from next week, when I suspect my crafting time might be further squeezed. I'll definitely be back tomorrow with another project - I might even share my alternative umbrella project! Until then, happy stampin'!


Stampin' Up! Supplies Used: 

Table built using Product Table Builder by The Crafty Owl - Independent Stampin' Up! Demonstrator.

A Neutral Home Decor Note

by Joanne James27. February 2020 09:00

Today I'm sharing a card that was inspired by the current challenge over at Fusion:

    RRCB 129

I love the sketch but was also unusually (for me) inspired by the photo and all those neutrals as well this week. It's also a great opportunity to link up with the gals over at Retro Rubber too as their theme is 'anything goes' and I am giving an old stamp set some love - take a look at what I came up with:


Here's the low-down on today's card:

I used a whole bunch of retired product on today's card; I still had these neutral 'Go Wild' designer papers left out on my desk from my card yesterday, and thought they would make a great background for my shelf of knick-knacks. I used two contrasting papers with the same design and split the mats to compliment each one. I like the contrast, but it does give this card something of a 'magic eye' effect I think! I used my retired 'Bookcase Builder' stamp set for my shelf with a mixture of various bits and pieces (this set dates back to the Spring 2017 seasonal catalogue), keeping in with the neutral colour scheme. I decided to leave off a sentiment as my cardfront was busy enough and I will probably use this card as a notecard to write a letter in, so it is ok without. 

Here is the visual summary of the key products used on today's project for you to pin for easy reference:


You can see all of my 'How To' summaries on my 'How To - Tips and Techniques' Pinterest board in case you've missed any. 

Enjoy your day and I'll be back tomorrow with another project for this week's new challenge over at As You See It. Until then, happy stampin'!


Current Stampin' Up! Supplies Used:

Table built using Product Table Builder by The Crafty Owl - Independent Stampin' Up! Demonstrator.

Life Is Short - Buy The Shoes for PP475

by Joanne James26. January 2020 10:00

Today it's Sunday and time for this week's new challenge over at The Paper Players! It's my turn to host this week and I have my favourite, a sketch challenge, for you to work with:


My sketch involves an element of repeating pattern, which can be any shape you like. Whilst I used my stitched circles as a background for my pattern repeat, today's card is all about the shoes - and some rather special shoes at that! Take a look:


Here's the low-down on today's card:

Words To Live By - I love the sentiments in the 'Dressed to Impress' stamp set but my favourite is without doubt this one - I mean, has there ever been a truer word spoken?! I am one of those people who love shoes; I don't own as many pairs now as I once did and I've never owned a pair of floral high heels, but I would love to - so I would love to receive a birthday card like this! I used the florals in the stamp set to decorate the inside too, with a birthday sentiment from the Peaceful Moments stamp set:


Best Dressed Shoes - This is one of those cards that looks pretty simple, but took a long time to execute! I stamped twelve shoes onto Whisper White cardstock and used my All Dressed Up Dies to cut them out, then added some colour to the Petal Pink and Mint Macaron Stampin' Blends to the inside contours of the shoes for a little contrast. Then I stamped twelve shoes (plus two for the envelope) onto a selection of the Best Dressed Designer Series papers, choosing a selection of the small floral patterns and making sure that the shoes were stamped in a similar orientation so that the designs would co-ordinate and the shoes would look like pairs, then I fussy cut the outsides of the shoes and paper-pieced them onto the white backgrounds. Time consuming yes, but I love the finished effect!

Pick of The Pastels - I decided to mount each of my pairs of shoes on a stitched circle and used a selection of pastels inspired by the Best Dressed DSP (although I used Pool Party Instead of Mint Macaron as the latter was too dark). My sentiment was stamped in Blackberry Bliss on a shortened Stitched Rectangle to complete my card.

Here is the visual summary of the key products used on today's project for you to pin for easy reference:


You can see all of my Product and 'How To' summaries on my 'How To - Tips and Techniques' Pinterest board in case you've missed any. 

Before you reach for your ink and papers, check out what our amazing team has created to inspire you this week:

Here's a quick recap of our challenge rules:
 
1.  Create a new paper project
2.  Upload your creation to your blog with a link back to us and provide a direct link to the post featuring your challenge submission.
3.  Please link your card to no more than four challenges, TOTAL.
4.  Have FUN!

I'm looking forward to visiting your blogs this week and taking a look at your interpretation of this week's sketch.

Enjoy your day; we did all our sport Friday and yesterday, so today it's a quiet day with homework, ironing and maybe a movie. Enjoy the rest of your weekends and I'll be back tomorrow with another project. Until then, happy stampin'!


Stampin' Up! Supplies Used: 

Table built using Product Table Builder by The Crafty Owl - Independent Stampin' Up! Demonstrator.

A Pair of Tropical Chic Floating Frame Cards JAI480

by Joanne James29. October 2019 19:00

We are still on half term here so I have been spending time with the James Juniors this week and am resting my shoulder so have not managed much in the way of crafting. I have a quick post for you today to share a card for the current challenge over at Just Add Ink:

The ladies are asking us to 'just add a technique' so I decided to have another go at a Floating Frame Card - or rather, pair of floating frame cards. Here's the first one with contains the inside of the frame:


And here's the second one with the outer floating frame:

Here's the low-down on today's cards:

The floating frame technique is really easy to create with a few basic tools: some 'Press and Seal' food wrap or similar, a framelit - I used my Tropical Chic stamps and co-ordinating dies and Rectangle Stitched Framelits Dies - and lots of dimensionals! You simply stamp and punch/diecut your images, lay them out, cover with Press and Seal, trim to frame size and cut out your central piece, before adhering dimensionals to the back of the diecut pieces and adhering to your chosen card base. Finally you remove the Press and Seal and your floating shapes remain in place.  

Add a sentiment and you're done! These cards are quite time-consuming, but they are fun. I'm thinking I might have to have another go with some other supplies to create a festive version  - watch this space!

Here are the visual summaries of the key products used on today's projects for you to pin for easy reference:


You can see all of my 'How To' summaries on my 'How To - Tips and Techniques' Pinterest board in case you've missed any. 

Enjoy your evening and I'll be back tomorrow with another project. Until then, happy stampin'!


Stampin' Up! Supplies Used:

Table built using Product Table Builder by The Crafty Owl - Independent Stampin' Up! Demonstrator.

We'll Walrus Be Friends Friendship Card

by Joanne James30. September 2019 07:00

Happy Monday everyone! I am starting the week with a card for the current challenge over at Festive Friday that is also my second using this week's Freshly Made Sketches sketch: 


I chose friendship, blue and orange as my 3 items from the Festive Friday inspo list and made this sweet card using one of my favourite sets in the annual catalogue, 'We'll Walrus Be Friends':

I stamped my main image on a Whisper White stitched oval, popping my goldfish up on dimensionals, and coloured it with my Blends and a liberal dose of clear Wink of Stella on the iceberg. I popped this onto a base embossed with the High Seas embossing folder. Both the iceberg sparkle and embossed waves are difficult to see on my photo, but they add so much to this card in real life. I love this card - I am going to send it to one of the James Juniors in their school bag one day when they need a little cheering up!

Here is the visual summary of the key products used on today's project for you to pin for easy reference:

You can see all of my 'How To' summaries on my 'How To - Tips and Techniques' Pinterest board in case you've missed any. 

Enjoy your day and I'll be back tomorrow with another project. Until then, happy stampin'!


Stampin' Up! Supplies Used:

Table built using Product Table Builder by The Crafty Owl - Independent Stampin' Up! Demonstrator.

Knot Good Giraffe Get Well Soon Card for AYSI210

by Joanne James27. September 2019 13:00

I've been a busy bee this week with not much opportunity for blogging, but never fear! Today I'm sharing my design team card for our new challenge over at As you See It where it's time for a recipe challenge:


I went around the houses on this one for a while before I managed to come up with an idea that incorporated each of the elements, however I got there eventually with the help of the troubled giraffe from the 'Back On Your Feet' set - take a look:


Here's the low-down on today's card:

Back On Your Feet - I decided to feature the knotty giraffe from the 'Back On Your Feet' set on my card today. Perfect for a get well card, or even someone who's having a rough time of it, this comical giraffe and punny sentiment is sure to raise a smile. A simple stamp and colour with my Stampin' Blends and he was complete. The one thing that I was struggling to incorporate on this week's card was a diecut then I had a lightbulb moment (yes, sometimes it does happen!!) I used one of the dies from the Animal Friends Thinlits to create a giraffe-patterned background to tie in with my tag. Sorted!  

A Delightful Tag - I used the new Delightful Tag Topper Punch to create the tag that features my giraffe today. My trusty Scalloped Tag Topper Punch is one of my most-used punches - great for gift wrapping, customer bag tags and cards alike. Don't worry, this punch hasn't been replaced - I just added to it with another, slightly more fancy-topped one. If you don't have a tag punch, you should really consider investing in one - they will make creating your Christmas tags super quick and easy.

And The Rest Makes Three - Some stamped and punched leaves, Crumb Cake Nature's Twine and my punny sentiment (one the inside of my card it says "Hope things get better soon.") cropped with a rectangle stitched shape finish off this week's recipe board - and my card!

Here is the visual summary of the key products used on today's project for you to pin for easy reference:


You can see all of my 'How To' summaries on my 'How To - Tips and Techniques' Pinterest board in case you've missed any. 

I do love giraffes and learned lots about them when I visited South Africa on safari many years ago. Did you know you can tell whether they are a girl or a boy by the amount of hair on the end of their horns? Females usually still have hair, whereas males' horns are usually bare from wrestling with each other for the affections of said females. I wonder if this is also the reason for premature balding in males?! 

On that quizzical note I look forward to seeing what you make with this week's recipe challenge when I visit your blogs. Enjoy your day and I'll be back tomorrow with another project. Until then, happy stampin'!


Stampin' Up! Supplies Used:

Table built using Product Table Builder by The Crafty Owl - Independent Stampin' Up! Demonstrator.

Seasonal Leaves And Autumn Plaid For PP458

by Joanne James8. September 2019 09:00

Today it's Sunday and time for this week's new challenge over at The Paper Players! It's the turn of the fabulous Ann to host this week and she has a rather seasonal colour challenge for you to work with:


It has turned unseasonably cold here in the UK this week and the falling temperatures, combined with Ann's warm colour palette immediately turned my thoughts to Autumn leaves and warm and cozy check blankets, both of which inspired my card today - take a look:


Here's the low-down on today's card:

Autumn Plaid - I chose Crumb Cake as my neutral of choice (I didn't count the Very Vanilla since I took white or vanilla as a given!) and used it as the base to create a cosy strip of plaid to tie together the main colours on my card. I used the plaid stamp from the new 'Tiny Keepsakes' stamp set for my plaid; I could have used the 'Buffalo Check' background stamp but the plaid stamp in the 'Tiny keepsakes' set has a smaller check that worked better for my design. I stamped it in Merry Merlot, then added plaid lines with my Cajun Craze and Pretty Peacock Stampin' Write markers.

Seasonal Skeletal Leaves - For the focal decoration of my card, I cut three skeleton leaves using the Seasonal Layers Framelits in each of the main challenge colours, and tucked them in loosely behind my sentiment and swirl of burlap on a stitched rectangle of Very Vanilla. This die set is another perennial favourite of mine and I'm so glad it stayed in the annual catalogue this year - these framelits, along with the co-ordinating 'Colourful Seasons' stamp set, has served me well and I have used both many times, for all sorts of projects. 

Harvest Thanks - I took one of my favourite sentiments for this type of card, from the'Painted Harvest' stamp set, stamped it in Merry Merlot onto Very Vanilla and added this to a banner cut using the Lakeside Framelits, along with a couple of Pretty Peacock faceted dots to anchor it to my finished card.

Here is the visual summary of the key products used on today's project for you to pin for easy reference:


You can see all of my Product and 'How To' summaries on my 'How To - Tips and Techniques' Pinterest board in case you've missed any. 

Before you reach for your ink and papers, check out what our amazing team has created to inspire you this week:

Here's a quick recap of our challenge rules:
 
1.  Create a new paper project
2.  Upload your creation to your blog with a link back to us and provide a direct link to the post featuring your challenge submission.
3.  Please link your card to no more than four challenges, TOTAL.
4.  Have FUN!

You can see all of my 'How To' summaries on my 'How To - Tips and Techniques' Pinterest board in case you've missed any. 

Enjoy your day; I have no big plans today and am looking forward to continuing to enjoy my birthday weekend! I'll be back tomorrow with another project. Until then, happy stampin'!


Stampin' Up! Supplies Used: 

Table built using Product Table Builder by The Crafty Owl - Independent Stampin' Up! Demonstrator.

Silhouette Scenes Brother Birthday Card PP454

by Joanne James11. August 2019 09:00


Today it's Sunday and time for this week's new challenge over at The Paper Players! It's the turn of the lovely Jaydee to host this week and she has an interesting colour challenge for you to work with:
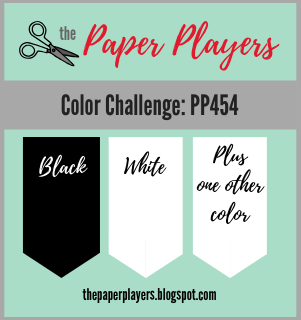
    

I had an idea of I wanted to do with this week's colour palette and the sketch from TGIF Challenges was just what I needed to turn my idea into a reality (although I made my base horizontal rather than vertical and used an extra-large card base) - take a look:
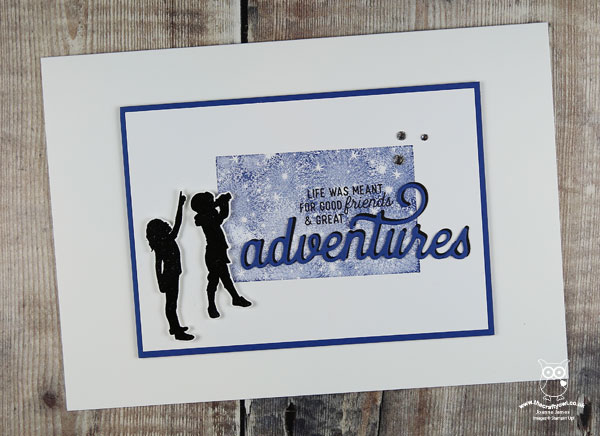
 

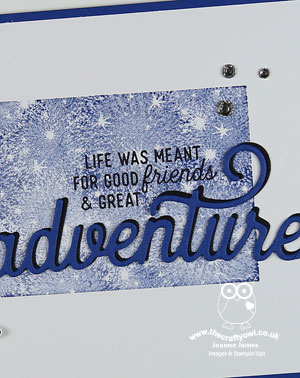
Today is a special day in the James household: the youngest of the James Juniors celebrates his 12th birthday. I'm not sure where those years have gone, but I did need as a result need a couple of special birthday cards to celebrate. Today's card is the card I made for Ben from Rebecca and features Blueberry Bushel as my featured additional colour. Here's the low-down on today's card:

When Is An Adventure Not An Adventure? - The two figures on today's card from the Silhouette Scenes stamp set so remind me of Ben and Rebecca. I can honestly say they truly are each others best friends and always have been. Even as they approach their teens, they still enjoy each others company more than anyone else's - and I love that about them! So it seemed only right to feature them together on my card. I could have stamped the sentiment 'as is', however I wanted to feature the 'adventure' diecut to tie in with the sketch - but I needed it in the plural. Luckily for me, the Sweet Silhouettes dies also incude the word 'inspire' - so I diecut this too, snipped away the letter 's' and paper-pieced it seamlessly to my 'adventure'. Clever, right? :-) I diecut both twice, once in Blueberry Bushel and again in Basic Black and offset this one behind; this allows the diecut to stand out from the background a little better.

A Starry Sky - Since I only had one colour to pair with my black and white, a sponged or brayered sky wasn't really an option. The starry stamp in the 'Bokeh Dots' set came to the rescue; the distinktive nature of this stamp meant that even with one colour, there would be enough variation to create interest. 

Sisterly Love - Lastly, not content with my tinkering of sentiments, I did the same on the inside. Do you recognise this sentiment from an existing stamp set? I'll give you a clue - it's in the 'A Wish For Everything' stamp set, but it doesn't look quite like this:
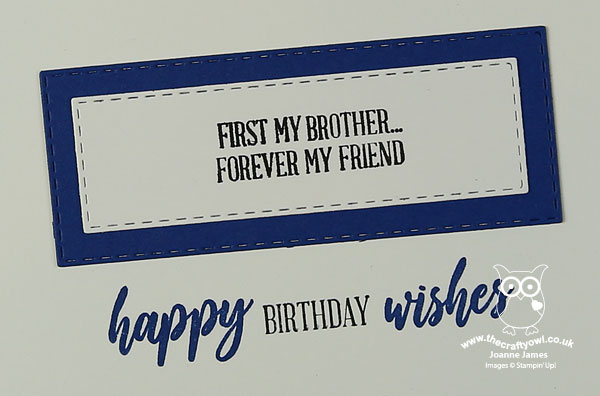
 

Did you spot it? I took the stamp that reads 'First my Mother...forever my friend' and masked out the 'Mo' of Mother and replaced it with the 'Br' from another stamp in this set that reads 'Hope this new year is filled with promises of many bright tomorrow's':


It took a little while to ink and mask with my Stampin' Write marker, but I'm really pleased with the result. Do you look for opportunities to create your own customised sentiments out of your stamp collection when you don't have the perfect fit? Do share any that you've created - I'd love to know what other combinations there are.

Here is the visual summary of the key products used on today's project for you to pin for easy reference:
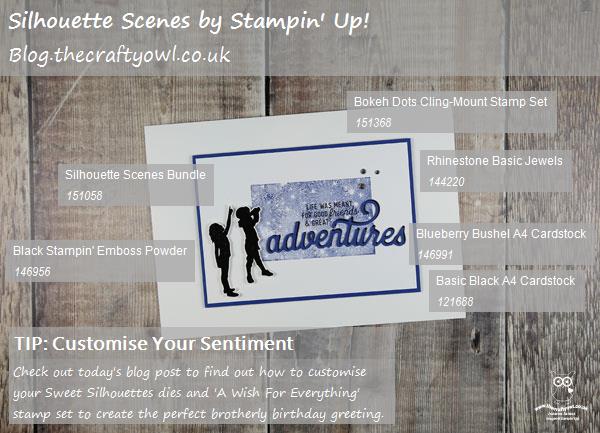
 

You can see all of my Product and 'How To' summaries on my 'How To - Tips and Techniques' Pinterest board in case you've missed any. 

Before you reach for your ink and papers, check out what our amazing team has created to inspire you this week:

Here's a quick recap of our challenge rules:
 
1.  Create a new paper project
2.  Upload your creation to your blog with a link back to us and provide a direct link to the post featuring your challenge submission.
3.  Please link your card to no more than four challenges, TOTAL.
4.  Have FUN!

You can see all of my 'How To' summaries on my 'How To - Tips and Techniques' Pinterest board in case you've missed any. 

Enjoy your day; we will be celebrating with cake, an escape room outing and a best friend sleepover - wish me luck! I have my monthly technique class tomorrow but I'll be back tomorrow with another project. Until then, happy stampin'!


Stampin' Up! Supplies Used: 

Table built using Product Table Builder by The Crafty Owl - Independent Stampin' Up! Demonstrator.

Over The Moon In My Favourite Purple Wellies

by Joanne James1. July 2019 10:00

This is already my second post of the day today as it's 1st July and there is lots going on, including the return of bonus days and a fabulous joining offer - you can read about both of these in my earlier post here. For today's creative post I'm sharing my card for this week's challenges over at As You See It and Just Add Ink that also fits the current challenge over at Time Out, which is a new-to-me challenge that I thought I would play along with too (I don't think it's a CAS challenge although a lot of the DT samples and gallery cards are and for once my card is a little less CAS than usual so I hope it fits the bill!):


So I'm not fully finished with my run on Bird Ballad projects, but I did get out another new stamp set that I just couldn't resist called 'Over The Moon' when I grabbed a little crafty time and couldn't resist making some fun cards with it - these comical cows are just adorable - take a look:


Here's the low-down on today's card:

How Now Brown Cow - So I think I am in love with these fun animals! I mean, three comical cows and a bunch of punny sentiments in the 'Over The Moon' stamp set - what's not to love?! I decided to colour mine today with Stampin' Blends, but stamped my outline in stamped-off Sahara Sand so it has an almost no-line look, which I think works nicely with my sweet brown cow. I repeated the same image on my envelope and inside my card too. My choice of browns to compliment the purple was brought about by my desire to use some of that fabby linen-look in-colour scallop edged ribbon and I like the finished look.

Daisy Delights - I continued my browns with a piece of tone-on-tone stamped Crumb Cake for my background, that I stamped randomly with one of the daisy stamps from the Daisy Lane stamp set, which I thought tied in with the flower my cow - let's call her Daisy! - is holding. I like the added detail without detracting from the main image. 

The Colour Purple - This whole card started with the colour purple; apart from navy, it is definitely the colour that features most highly in my wardrobe and is without doubt my most favourite colour to wear. I chose to use the new in-colour Purple Posy as the purple on my card today as it gave me the opportunity to break out new Blends, cardstock, in-colour DSP (love that gingham!) and co-ordinating ribbon and sequins too. My choice of the welly-wearing cow was also no accident, as I am even the proud owner of some beautiful purple wellington boots that the James Juniors gifted me for Christmas a few years ago. I couldn't find a photo of me wearing them, so took this quick snap of them next to a couple of my patio pots - check these out:

Aren't they just the best?! They are more Highland Heather than Purple Posy, however I didn't have as many embellishment options for that colour! There is something about gardening or trudging through the snow in purple wellies that is ever so cheery.

Here is the visual summary of the key products used on today's project for you to pin for easy reference:


You can see all of my 'How To' summaries on my 'How To - Tips and Techniques' Pinterest board in case you've missed any. 

Enjoy your day and I'll be back tomorrow with another project - I am organised this week as it's going to be a busy one! Until then, happy stampin'!


Stampin' Up! Supplies Used:

Table built using Product Table Builder by The Crafty Owl - Independent Stampin' Up! Demonstrator.

Mini Catalogue

BROWSE THE CATALOGUE

The mini catalogue is now live! Read and download your copy here.

Shop Online

Access my online shop 24 x 7, 365 days of the year:

Current April hostess code:

VDKNV7BH

Shop Online

Join My Team

It's always a great time to join Stampin’ Up! New team members can get £130 worth of products for only £99 + free business supplies + free shipping + all the fun being a part of Stampin’ Up! Stampin' Up! has something for everyone: join my growing team and benefit from my support to enjoy Stampin' Up! however you choose.

If you're interested, call me for a chat to understand how I can help you realise your goals. Alternatively, if you have already decided to sign up and you just can't wait, please click here for the link to the online form where you can sign up and order your starter kit right away! 

Latest Kit!

Stampin Cut and Emboss

The Rock Legend Kit has all you need to make 8 cards with coordinating envelopes. Along with the new Panda Friends Kit, both are available from January 4th for just £14 each - get yours here!

2023-24 Annual Catalogue

BROWSE THE CATALOGUE

Click on the catalogue for a full list of current SU! supplies - if you would like to order any of the items featured, please drop me a line at [email protected] or give me a call on 07773 421446 - I'd be happy to help.

New Online Exclusives

There are new products available exclusively in the online store from 5 March - check them out here.

About Me

Hi I'm Joanne and live in Northampton and when I'm not looking after my husband and two beautiful children, am an avid crafter with a passion for all things Stampin' Up!

I must confess that I have never been a big rubber stamper - until I discovered Stampin' Up! that is. I love the fact that I can get such great results with co-ordinating stamps, inks, papers and punches - the possibilities are endless! Join me on my stamping journey as I share the things I love and be inspired to create amazing things yourself!

Follow Me

Monthly Newsletter

Box Builder

Click the button above to use Box Buster to create your custom box design using the Envelope Punch Board!

Kits Collection Now Available!

Stampin Cut and Emboss

The new Kits Collection from Stampin' Up! is now available!

Click here to see the current kits available and order yours online today.

I Design For


Stampin' Up Stuff

This is my personal blog and is not endorsed by Stampin’ Up! I hope you find it a plentiful source of ideas and personal inspiration but please don't copy my designs for contest submission or use for classes, publication or sale without express permission.