From Our House To Yours In Shades of Blue For AYSI 212

by Joanne James25. October 2019 13:00

Today I'm sharing my design team card for our new challenge over at As you See It where it's time for the dreaded speed-stamping challenge:


 For a card in under 10 minutes I had to keep things fairly clean and simple so armed with the sketch over at CAS Colours and Sketches this is what I came up with:


 Here's the low-down on today's card:

Shades of Blue - I chose Balmy Blue, Blueberry Bushel and Night of Navy as the trio of blues I wanted to feature on my card. I stamped each house in all three colours and added some balmy blue snowflakes to suggest the oval shape of the sketch. 

From Our House To Yours - I love these little houses in the 'From Our House To Yours' set and because they come in separate pieces they are easy to stamp in different colours. They're photopolymer too so they are super easy to line up. 

Speedy Stamping - The stamping on my card took just minutes - it was super quick and easy! I did spend a little extra time creating my diecut edge and adding my teeny tiny snowflake sequins; even with my Take Your Pick tool these were more fiddly than everything else put together! My card ended up taking 9 minutes 24 seconds total - which is still super quick for me!

Here is the visual summary of the key products used on today's project for you to pin for easy reference:

You can see all of my 'How To' summaries on my 'How To - Tips and Techniques' Pinterest board in case you've missed any. 

Do check out the As you See It gallery to see what the rest of the team have created in shades of blue - and see who was the fastest this week.

Enjoy your day; I'm off to the hospital today, hopefully to sort out my pesky frozen shoulder that's been troubling me the last few months. All being well I'll be back tomorrow with another project. Until then, happy stampin'!


Stampin' Up! Supplies Used:

Table built using Product Table Builder by The Crafty Owl - Independent Stampin' Up! Demonstrator.

Brightly Gleaming Foil Elements CAS Bauble Christmas Card

by Joanne James21. September 2019 21:15

I am a bad blogger! I've had such a busy week that I have managed very little to either create or blog. So a quick share from me with another all-out copper clean and simple metallic, inspired by last week's Paper Players challenge that uses this week's CAS(E) This Sketch layout:


I created another super clean and simple Christmas card, this time featuring a couple of Brightly Gleaming Foil Elements baubles and a heat embossed sentiment from the 'Perfectly Plaid' stamp set - take a look:


My card is a simple extra thick Whisper White card base, a layer of copper foil cut with the Rectangle Stitched Framelits, then my copper heat-embossed sentiment on a panel of Whisper White with two foil element baubles hanging from some retired copper metallic thread - definitely clean and simple!

Here is the visual summary of the key products used on today's project for you to pin for easy reference:

 to follow

You can see all of my Product and 'How To' summaries on my 'How To - Tips and Techniques' Pinterest board in case you've missed any. 

Enjoy your evening; I'll be back tomorrow with this week's card for The Paper Players. Until then, happy stampin'!


Stampin' Up! Supplies Used: 

Table built using Product Table Builder by The Crafty Owl - Independent Stampin' Up! Demonstrator.

Clean and Simple Copper Metallic Christmas Tree for PP459

by Joanne James15. September 2019 09:00

Today it's Sunday and time for this week's new challenge over at The Paper Players! It's the turn of the fabulous Anne Marie to host this week and she has a fun clean and simple challenge for you to work with:


I couldn't resist going all-out copper for my metallic and created a super clean and simple Christmas card featuring a heat embossed tree from the 'Perfectly Plaid' stamp set - take a look:


Since it is clean and simple week, it's worth a reminder of what we at The Paper Players mean by Clean and Simple:

  • Minimal layers and embellishments
  • Plenty of open space, aka "white" space
  • Simple and uncluttered
My card is a simple extra thick Whisper White card base, a layer of copper foil cut with the Rectangle Stitched Framelits, then my copper heat-embossed Christmas tree on a panel of Whisper White with the addition of a simple single copper star embellishment - I didn't even add a sentiment to the front of my card. Just 3 layers with a single image and embellishment and a ton of white space - definitely clean and simple!

Here is the visual summary of the key products used on today's project for you to pin for easy reference:


You can see all of my Product and 'How To' summaries on my 'How To - Tips and Techniques' Pinterest board in case you've missed any. I loved this CAS challenge; I created another card for this theme too which I will hopefully share with you later in the week!

Before you reach for your ink and papers, check out what our amazing team has created to inspire you this week:

Here's a quick recap of our challenge rules:
 
1.  Create a new paper project
2.  Upload your creation to your blog with a link back to us and provide a direct link to the post featuring your challenge submission.
3.  Please link your card to no more than four challenges, TOTAL.
4.  Have FUN!

You can see all of my 'How To' summaries on my 'How To - Tips and Techniques' Pinterest board in case you've missed any. 

Enjoy your day; we are hoping to make the most of what is turning out to be a pleasantly warm weekend with possibly the last BBQ of the year, along with homework and more cooking of our gluts of home-grown produce. I'll be back tomorrow with another project. Until then, happy stampin'!


Stampin' Up! Supplies Used: 

Table built using Product Table Builder by The Crafty Owl - Independent Stampin' Up! Demonstrator.

Bloom and Grow Clean and Simple One Layer Birthday Card

by Joanne James29. August 2019 14:00

Today I'm sharing a card for the current challenge over at Fusion where both the sketch and inspiration photo got my creative juices flowing this week, so much so that I made two cards! Today I'm sharing a clean and simple one layer card inspired by the photo that is also perfect for the current challenge over at Addicted to CAS and I will be back with a stepped up card that uses the sketch too tomorrow.


My card also fits the bill over at SUO Challenges and this month's Stampin' Up! #SimpleStamping challenge since it is a simple combination of stamps, ink and paper to make a birthday card - take a look:


This card really was super simple to make: I positioned my sentiment and stamped it in Memento Black ink onto extra thick whisper white cardstock, then took one of the boughs of flowers from the 'Bloom and Grow' stamp set and stamped it both above and below if along the fold of the card, stamping off the edge to add interest. I coloured them with my Stampin' Blends and added a graduated aqua border to make the flowers stand out and mimic the colour of the inspiration photo.

Here is the visual summary of the key products used on today's project for you to pin for easy reference:


You can see all of my 'How To' summaries on my 'How To - Tips and Techniques' Pinterest board in case you've missed any. 

Enjoy your day and I'll be back tomorrow with another project. Until then, happy stampin'!


Stampin' Up! Supplies Used:

Table built using Product Table Builder by The Crafty Owl - Independent Stampin' Up! Demonstrator.

Happy Birthday Grandpa #SimpleStamping With On To Adventure PP451

by Joanne James21. July 2019 09:00

Today it's Sunday and time for this week's new challenge over at The Paper Players! It's the turn of the fabulous Ann to host this week and she has a CAS challenge for you to work with:


Remember: this is clean and simple week. What do we mean by 'clean and simple' ? Create a card that has:

  • Minimal layers and embellishments
  • Plenty of open space, also known as 'white space'
  • Is simple and uncluttered

There were lots of great options to choose from this week and in the end I decided to use this week's CAS(E) This Sketch layout and the fun golfer in the new 'On To Adventure' set - take a look:


Here's the low-down on today's card:

On To Adventure - As soon as I saw this set in the catalogue, I knew I would have to have it! My Dad is a keen golfer and so I knew this image would give me a lot of mileage. Many of the sentiments in this set are along the theme of retirement (which is also good for me, as I didn't have any retirement sets up to this point) but the images can easily be combined with other sentiments to be used in tons of different ways. I stamped my golfer above my hole-in-one sentiment then brayered in some Granny Apple Green grass to ground him before colouring him with my Stampin' Blends.

In Color Argyle - This card would look fine as a one layer card, however the sketch calls for some vertical stripes and since this month's #SimpleStamping challenge from stamping up is to use stamps, ink and paper along with some designer series paper on your card, I decided that this argyle pattern in the new DSP stack would work perfectly with my golfer - my Dad certainly has many golf sweaters with this pattern!

A Ribbon of Birthdays -  It's my Dad's birthday next month so I thought this would make a perfect 'Happy Birthday Grandpa' card from one of the James Juniors. With this in mind, I overlaid a 'ribbon' of happy birthday sentiments, courtesy of the 'Itty Bitty Birthdays' set and stamped repeatedly on a narrow strip of white cardstock, along my DSP border.

Here is the visual summary of the key products used on today's project for you to pin for easy reference:


You can see all of my Product and 'How To' summaries on my 'How To - Tips and Techniques' Pinterest board in case you've missed any. 

Before you reach for your ink and papers, check out what our amazing team has created to inspire you this week:

Here's a quick recap of our challenge rules:
 
1.  Create a new paper project
2.  Upload your creation to your blog with a link back to us and provide a direct link to the post featuring your challenge submission.
3.  Please link your card to no more than four challenges, TOTAL.
4.  Have FUN!

You can see all of my 'How To' summaries on my 'How To - Tips and Techniques' Pinterest board in case you've missed any. 

Enjoy your day; we are on a belated spring-clean at home so will be spending a little time doing some more sorting out today. We have a movie to watch and hopefully I'll squeeze in a little crafty time too. I'll be back tomorrow with another project. Until then, happy stampin'!


Stampin' Up! Supplies Used:

Table built using Product Table Builder by The Crafty Owl - Independent Stampin' Up! Demonstrator.

Out of Africa Wild About You Animal Print Card

by Joanne James29. April 2019 19:15

Just a quick creative post from me today following on from my earlier share about the 'Everything Is Rosy' limited edition product medley that is coming later in the week (you can read all about that here if you missed it). I'm sharing a quick card that I made at the weekend that was initially inspired by last week's CASology challenge theme of 'Africa' (now closed but you can check out their amazing gallery here) that inspired me to use up some of my epic stash of retired designer series papers with this rather intriguing sketch from the CAS Colours and Sketches team:


So here is my card: 


A selection of 'Go Wild' retired animal print papers, inset beneath a trio of apertures cut using my rectangle stitched framelits dies and a sentiment from the retiring 'A Little Wild' stamp set - that's all there is to it! It definitely felt good to use up some of those retired papers too.

I'm also linking up my clean and simple card with the team over at Addicted To CAS where their current theme is 'contrast' and I think my varied animal skin-inspired prints are definitely that!


Here is the visual summary of the key products used on today's project for you to pin for easy reference:

You can see all of my 'How To' summaries on my 'How To - Tips and Techniques' Pinterest board in case you've missed any. 

I'll be back tomorrow with another project and compared to today's you might need sunglasses for it - bright is the word! Until then, happy stampin'!


Stampin' Up! Supplies Used:

Table built using Product Table Builder by The Crafty Owl - Independent Stampin' Up! Demonstrator.

Paper-Pieced Graceful Garden CAS Card

by Joanne James24. April 2019 21:00

I'm not sure how Monday turned into Wednesday, but sometimes that's just how it goes! So a quick share today with my second paper-pieced card that I originally made for our challenge over at The Paper Players this week: clean an simple paper piecing. I am totally 'on the fence' about this card - it didn't look as good as it did in my mind, so I ended up making another one for the challenge, but thought I'd share with you as I'd love to hear what you think. So here is my card:

This card used the retiring Graceful Garden stamp set and features a rose that I more often have coloured rather than paper-pieced, but I wondered what it would look like in some rose-patterned paper. I used one of the beautiful pink rose designs from the Petal Promenade pack for the flower and some Floral Romance paper for the stem. A little background stamped detail, a few artisan pearls and a sentiment finish my card. So what do you think - does it work? I really would welcome your thoughts on this one!

Here is the visual summary of the key products used on today's project for you to pin for easy reference:

You can see all of my 'How To' summaries on my 'How To - Tips and Techniques' Pinterest board in case you've missed any. 

Enjoy your evening and I'll hopefully be back tomorrow with another project. Until then, happy stampin'!


Stampin' Up! Supplies Used:

Table built using Product Table Builder by The Crafty Owl - Independent Stampin' Up! Demonstrator.

Navy and Blue #SimpleStamping Vibrant Vases for Less Is More #388

by Joanne James14. February 2019 08:00

Happy Valentine's Day everyone! No hearts here today! The ladies over at Less Is More are celebrating the challenge's 8th birthday (wowsers!) and riding high on the delight at having been chosen as last month's LIM winner (you can see that card here if you missed it) I am blogging my entry for the current challenge which is a colour one:


 Navy and yellow is a classic colour combination for me so I went for something bright and CAS that is all about #SimpleStamping to really let the colours shine - take a look:


Here's the low-down on today's card:

Just Take Two - Whilst I deliberated for ages on how I was going to use these two colours, the card I settled on will take you no time at all to recreate: just two ink pads, some yellow and white cardstock and a punch. You can add a yellow pearl before the sentiment if you really want to go all out!!

Vibrant Vases - My card features the Vibrant Vases stamp set, with each of the elements stamped in Night of Navy with the exception of the flower petals, which were stamped in Daffodil Delight. I stamped the vase on a spare piece of whisper white cardstock and punched it out using the Vases Builder Punch but you could make it even simpler by stamping the vase directly onto the cardfront and dispense with the punch altogether, although I like this added detail. I popped my cardfront up onto a Daffodil Delight cardbase for an added pop of yellow.

Don't Forget the Inside - I also stamped the inside with a sentiment and a one layer vase and flower combo. You don't need any other supplies for this and given how quick the front is to create, you can easily afford a minute more to add this final finishing detail.


Another great example of #SimpleStamping at its best! Again, this would work in lots of other colourways too. A card that could be made with no more than 5 products - 6 if you include the punch, which if you buy along with the stamp set in a bundle you can save 10%.

Here is the visual summary of the key products used on today's project for you to pin for easy reference:


You can see all of my 'How To' summaries on my 'How To - Tips and Techniques' Pinterest board in case you've missed any. 

Enjoy your day and I'll be back tomorrow with another project. Until then, happy stampin'!


Stampin' Up! Supplies Used:

Table built using Product Table Builder by The Crafty Owl - Independent Stampin' Up! Demonstrator.

#SimpleStamping With Beautiful You

by Joanne James12. February 2019 07:00

Today I'm sharing a card for the current challenges over at As You See It and Just Add Ink:


I also decided to combine it with this month's #SimpleStamping challenge set by Stampin' Up!, which was to create a birthday card with nothing more than stamps, ink, paper and a piece of DSP. So first up, here's my #SimpleStamping card: 


This really took just a minute to make - I even made a video to show you how I did it, and I haven't made one of those in ages! Here you go:

Beautiful You is a great set if you're starting out: 3 main images and a good variety of sentiments that work for birthdays, congratulations, a pick-me-up and more besides, this is a set that offers lots of creative possibilities. The images can be inked or coloured using Blends or watercolour pencils, or you can make your choice of DSP go further by paper-piecing the dress and accessories on each of the images.

My card for for As You See It and Just Add Ink was where I started out, pairing back to make my #SimpleStamping card, but I'm showing it as the second card in my post because it's a great example of how once you've mastered the art of a basic card, a few simple accessories and a little fussy cutting can easily step things up if you want to get more adventurous:

The addition of some striped ribbon and a few irridescent sequins, along with fussy cutting the main image and popping it up on dimensionals, adds a further layer of sophistication to this otherwise clean and simple birthday card. To really get the most from my supplies, I also stamped and coloured my envelope and the inside of my card:


Not a naked piece of paper in sight! By keeping things simple and using a basic monochromatic colour scheme, this is a card that can be easily mass-produced with limited supplies and would work well in pretty much any colour. 

Here is the visual summary of the key products used on today's project for you to pin for easy reference:

You can see all of my 'How To' summaries on my 'How To - Tips and Techniques' Pinterest board in case you've missed any. 

Enjoy your day and I'll be back tomorrow with another project. Until then, happy stampin'!


Stampin' Up! Supplies Used:

Table built using Product Table Builder by The Crafty Owl - Independent Stampin' Up! Demonstrator.

By The Bay Clean and Simple Inlaid Frame Card

by Joanne James18. January 2019 09:00

Yay - it's Friday, bring on the weekend! Today I'm sharing a card for the current challenge over at Less is More where I haven't played for a while:

I had a short window for a spot of crafting yesterday and thought I'd whip up another clean and simple card using a couple of new products that fits perfectly with their theme this week - take a look:


Here's the low-down on today's card:

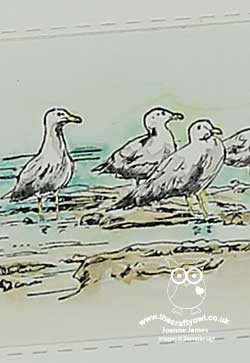
By The Bay - The seagulls paddling on the shoreline that feature on today's card are reminiscent of the ones that featured in the much loved and now retired Wetlands set (anyone else remember that set?) albeit with a little more definition, and they are one of three line-drawn images that feature with three sentiments in 'By The Bay', one of the stamp sets that can be yours free with a purchase of £45 or more during Sale-A-Bration. Perfect for colouring the images are large enough to stand alone but also not so big that they take a long time to colour. I really like this set and you can be sure I will be using it more before the promotion is over. 

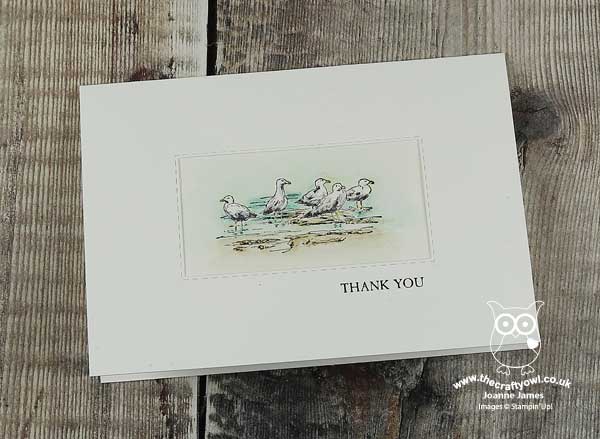
Another Way To Frame - To frame my image, I used a new favourite of mine, the Rectangle Stitched Framelits Dies, but this time to cute an aperture frame into my cardfront. I then adhered my watercoloured image behind this. I like the subtle added detail that this gives to a clean and simple card, without adding overt layers. 

Ways With Watercolour - I feel like I've been watercolouring a lot on my cards lately; I don't consider myself to be by any means an expert at watercolouring, but I think that's why I'm enjoying it so much; on watercolour paper, it's easy to build up colour without needing to be too precise in terms of the overall effect. It would take ages if I was to attempt to properly draw and paint the image to achieve omething like this, so I'm grateful that stamps, ink and an aquapainter enable me to produce something this good in a fraction of the time! I used a combination of blues, greys and sandy neutrals to colour my image.

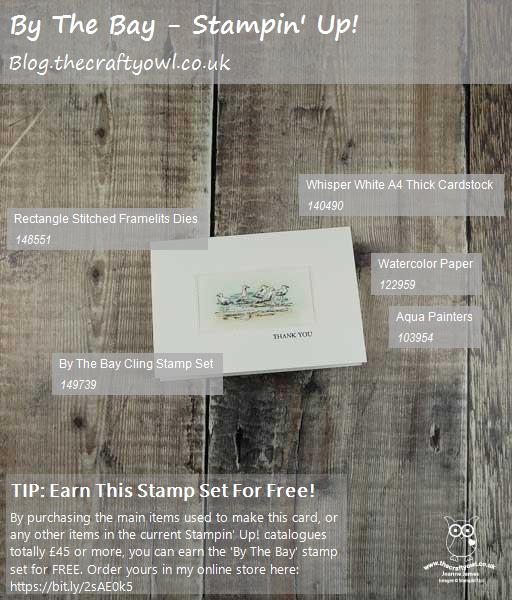
If you like today's clean and simple card, by purchasing the key items used below, you can earn the By The Bay stamp set for free - perfect for creating your own watercoloured masterpieces.

Here is the visual summary of the key products used on today's project for you to pin for easy reference:

You can see all of my 'How To' summaries on my 'How To - Tips and Techniques' Pinterest board in case you've missed any. 

Enjoy your day - I have a monster basket of ironing to wade through but I'm hoping if I focus I might squeeze in a little stamping time before my afternoon school run, so I'm on a mission! I'll be back tomorrow with another project. Until then, happy stampin'!


Stampin' Up! Supplies Used:

Table built using Product Table Builder by The Crafty Owl - Independent Stampin' Up! Demonstrator.

2025-26 Annual Catalogue

BROWSE THE CATALOGUE

Click on the image to download your copy of the 2025-26 annual catalogue. For a full list of current SU! supplies, go to my online store. If you would like any help or advice, please drop me a line at joanne@thecraftyowl.co.uk or give me a call on 07773 421446 - I'd be happy to help.

Shop Online

Access my online shop 24 x 7, 365 days of the year:

Shop Online

Join My Team

It's always a great time to join Stampin’ Up! Between 6-31 May, new team members can get £170 worth of products for only £99 + free business supplies + free shipping + all the fun being a part of Stampin’ Up! That's an extra £40 of product - FREE! Stampin' Up! has something for everyone: join my growing team and benefit from my support to enjoy Stampin' Up! however you choose.

If you're interested, call me for a chat to understand how I can help you realise your goals. Alternatively, if you have already decided to sign up and you just can't wait, please click here for the link to the online form where you can sign up and order your starter kit right away! 

Latest Kits!

Stampin Cut and Emboss

The Sending A Smile Kit and The Beautiful Blues Kit are the latest kit additions to the online store - get yours here!

New Online Exclusives

There are new products available exclusively in the online store from 6 May - check them out here.

About Me

Hi I'm Joanne and live in Northampton and when I'm not looking after my husband and two beautiful children, am an avid crafter with a passion for all things Stampin' Up!

I must confess that I have never been a big rubber stamper - until I discovered Stampin' Up! that is. I love the fact that I can get such great results with co-ordinating stamps, inks, papers and punches - the possibilities are endless! Join me on my stamping journey as I share the things I love and be inspired to create amazing things yourself!

Follow Me

Monthly Newsletter

Box Builder

Click the button above to use Box Buster to create your custom box design using the Envelope Punch Board!

Kits Collection Now Available!

Stampin Cut and Emboss

The new Kits Collection from Stampin' Up! is now available!

Click here to see the current kits available and order yours online today.

I Design For


Stampin' Up Stuff

This is my personal blog and is not endorsed by Stampin’ Up! Stampin' Up! is a registered trademark of Stampin' up! Inc. I hope you find my blog a plentiful source of ideas and personal inspiration but please don't copy my designs for contest submission or use for classes, publication or sale without express permission.