Stampin' Up! Coram Cards For Keeps Charity Auction

by Joanne James26. April 2014 21:06

I've been busy preparing for next week's classes today; I'll share those cards with you later next week, however today thought I would share something a little different. If any of you are followers of Stampin' Up! UK's Facebook page, you will probably already be aware of Stampin' Up!'s 'Cards For Keeps' charitable auction that is due to take place on Ebay in May. For those of you that aren't, Stampin' Up! have joined forces with Coram, the oldest UK children's charity, to celebrate its 275 year anniversary by inviting a wide range of stars from sport, stage, screen, music and art to create a unique card using Stampin' Up! supplies.

Stampin' Up! demonstrators have also been invited to submit a card for a pre-auction competition; the winning card will also be entered into the 'Cards for Keeps' auction, alongside those of the participating celebrities. In trying to decide on a design for my contest submission, I did a little research about Coram. Through services such as adoption and creative therapies, Coram helps some of the UK’s most vulnerable children to feel safe and loved and have access to the education and opportunities in life all children need. I read several inspirational stories about the work they do and the difference they make to the lives of so many young people, they really are a charity worthy of our support.

So without further ado, let me share the card I designed;for me, this card sums up everything that Coram stands for:

My colour scheme of Pumpkin Pie, Cherry Cobbler and Whisper White was inspired by Coram's logo and corporate colours. I decided to make a square card with a strong focal point - the 'you make the world a better place' stamp from the Starburst Sayings set. For me, this stamp sums up the work of Coram so well - they make the world a better place for thousands of children each and every year. l brought in lots of detail to my card with layers and textures: I stamped the image in Versamark and heat embossed in Cherry Cobbler embossing powder, cutting out the 'World' banner and popping it up on a couple of dimensionals for extra emphasis. I then matted my starburst on white and Cherry Cobbler circles, followed by a final starburst of Pumpkin Pie. I cut my banner using the Banner Framelits and a piece of Cherry Cobbler Cored'inations cardstock. The base of the card is Pumpkin Pie, with Cherry Cobbler and Whisper White mats and a central panel of Polka Dots DSP in Pumpkin Pie. A Cherry Cobbler seam binding double bow tied with white baker's twine and a Pumpkin pie button finish my card.

The inside had a little treatment too, before I added my personalised message:

If you would like to see some of the celebrity cards that have been created for the 'Cards For Keeps' online auction, check them out here on the Cards For Keeps Pinterest board. There are sure to be some sought-after auction lots, with celebrities from Benedict Cumberbatch to Liza Tarbuck, and Axel Scheffler to Twiggy.

I'll let you know if my autographed version is lucky enough to join them, but for now I'm off to work out which ones I'm going to bid on - so far my favourite is Jo Brand and the Jelly Babies (yes, for real!)

Back tomorrow with another project; until then, happy stampin'!


Stampin' Up! Supplies Used:

Table built using Product Table Builder by The Crafty Owl - Independent Stampin' Up! Demonstrator.


Smile Says The Mouse!

by Joanne James17. April 2014 10:00

As promised, today I have the second of the cards I made for this week's sketch over at CAS(E) This Sketch - I saw this layout and couldn't resist another interpretation. This time I also combined it with the colour challenge over at Dynamic Duos:

This card is altogether more fun than yesterday's - take a look and you'll see what I mean:

I had the idea that if the squares were circles, the little mouse from the 'Life in the Forest' stamp set could play 'peek a boo' as if he was in a block of Swiss cheese (something of a graphic interpretation, given that the circles are identically sized and placed, but hopefully you can see what I mean!) I stamped the mice onto Whisper White and simply punched out with my 1" circle punch so that only parts of them were showing, and I mounted these onto circles of Wisteria Wonder only slightly larger that I cut with my Circle Framelits. I coloured the mice with my Wisteria Wonder and So Saffron inks and a blender pen and finished the card with the sentiment 'smile' - well, I didn't have one that says 'chuckle', which is what I was doing as I coloured these little fellas so this was the next best thing :-)

I hope you like my fun take-two on the sketch; back tomorrow with my entry for this week's Paper Players challenge (and yes, it was a challenge indeed!) Until then, I'm off to the theatre with Ben this morning whilst Rebecca is on a swimming course and my dear husband is having to monitor the bathroom fitter who is replacing a floor tile that has been booked to do the job for some 14 months - hopefully today is (finally) the day!

Until then, happy stampin'!


Stampin' Up! Supplies Used:

Table built using Product Table Builder by The Crafty Owl - Independent Stampin' Up! Demonstrator.


Happy Mother's Day

by Joanne James29. March 2014 23:07

I had a busy day in London yesterday so despite my best efforts to get ahead of myself I still didn't manage to blog yesterday and having had a class and put in my last Sale-A-Bration order I'm almost running out of time today, so before I do here is my intended share for yesterday, one of the Mother's Day cards I made in a couple of different colourways that I couldn't share before the day itself. Here it is in the predominantly pink colourway:

The card is similar to one I saw on Julie Kettlewell's blog here - I made a 5 1/2" x 5 1/2" square gatefold card and created an overlapping framed circle that I cut with my Circles Framelits and created a wreath of tiny stamped and punched flowers around the central bold 'Happy Mother's Day sentiment. I also made this card is an aqua colourway here using Coastal Cabana for the base:

The hardwood background stamp makes such a great background for the focal point and some flower stamping inside and on the envelopes along with a few rhinestones just finishes off the card perfectly.

My Mother's Day was rather unconventional and was only spent with one of my offspring, which felt slightly strange, but Rebecca and I had a great day in London (she was so excited that she got to have her picture taken in front of Big Ben!) and the bonus is we get to have another Mother's Day next Sunday altogether to make up for it!

Back tomorrow with another project; until then, happy stampin'!


Stampin' Up! Supplies Used:

Table built using Product Table Builder by The Crafty Owl - Independent Stampin' Up! Demonstrator.


Mum You're The Best!

by Joanne James27. March 2014 22:12

It's all go in the office of The Crafty Owl - I've been busy finishing my last Mother's Day cards today and I've recorded two video tutorials, along with all of the other things mothers do in a day. I won't bore you with that list, but I'm sure lots of you are reading this thinking "I know what you mean!" :-) Anyway, today I have a Mother's Day card to share with you, which I made using this week's sketch over at The Paper Players. This is Sandy's sketch:

I loved the layered circles on this sketch and it allowed me to get out on paper an idea I've had floating around in my head for a while (love it when that happens!) So here is my card:

I used Coastal Cabana for my base, then cut out a 'window' using my Word Bubble framelits through to the stamped sentiment "You're the best!" on the inside, used my largest circle for my bespoke 'Mum' sentiment where I used two circles cut with my Circles framelits to create an inset so that I have a border without an extra layer here. I then added an ‘xoxo’ cut out with my Circle Card thinlit set, attached with rolled glue dots, and lastly my final layer with the ‘love ya’ word bubble, stamped, cut and mounted with dimensionals for height. The cut-out on the front gives a glimpse of what’s inside – here’s the close-up:

Now I know this is not such a typical Mother's Day card: not traditional colours, no flowers in sight. It's quite clean and graphic in nature, but I really like it! I think it’s a great card for a Mum who likes something a little different; I for one would be thrilled to receive this card (hint, hint James Juniors!)


That’s me for today; come back tomorrow to see my entry for this week’s Less is More challenge. Until then, happy stampin’!


Stampin’ Up! Supplies Used:
 

Table built using Product Table Builder by The Crafty Owl - Independent Stampin' Up! Demonstrator.

Hello You - You Could Be Next!

by Joanne James21. March 2014 20:48

There are 10 days left until the end of Sale-A-Bration. Lots of you have taken advantage of the extra hostess benefits on offer to host a party or received one or more of the great free gifts on offer with every £45 spend. Today I thought I would take the opportunity to remind you of the benefits of joining Stampin' Up! as a demonstrator during Sale-A-Bration:

  • The starter kit will be £99 and includes products of your choice up to the value of £150 - this is a whopping £51 of extra product!
  • You will also receive a business supplies pack including annual and seasonal catalogues, order forms, etc.
  • You will receive a 20% discount on every order you place
  • You will also receive a 30% discount on the first order you place over £150 within the first 30 days of sign up
  • You will receive 2 free months of Demonstrator Web Services
  • If you reach £225 sales within the first quarter (ending 30th June 2014), you will maintain your demonstrator status until 30th September. If you don't, your demonstrator status will lapse, but without penalty; you have no obligation to purchase anything other than your starter kit if you don't want to.
  • If you join my growing team, you will get to benefit from my knowledge, help and support in addition to that of one of the UK's most successful teams of demonstrators and the considerable resources provided by Stampin' Up itself. You will receive your own team welcome pack from me, along with your own complimentary copy of my demonstrator software Product Table Builder worth £35 

Here's part of the welcome pack I sent to one of the lovely ladies who joined my team recently, designed to co-ordinate with a card I made for the Mojo Monday challenge recently (you can read more about how I made the card here):

In addition she also received a handbook and other items that will be useful as she grows her Stampin' Up! business. Whether you want to feed your own crafting habit by having access to discounted craft supplies, or would like to earn a little (or a lot!) extra income and run your own business, I am here to support you in any way I can.

You have just 10 days to take advantage of the enhanced Sale-A-Bration sign up offer: contact me on 07773 421446 or [email protected] if you would like to know more or alternatively sign up here today!

Back tomorrow with another project; until then, happy stampin'!


Stampin' Up! Supplies used:

Table built using Product Table Builder by The Crafty Owl - Independent Stampin' Up! Demonstrator.


Undefined Take 1: In The Swim

by Joanne James16. March 2014 20:52

Good evening lovely readers! No blog post from me yesterday as I had a rare 'night off': James Juniors had a sleepover at Grannies' house and I was treated to a night at the movies (we saw 'Non Stop' with Liam Neeson - great action movie!) To make up for it, I have a whole set of cards to share with you today: my very first set of Undefined hand-carved stamps.

If you're a Facebook follower of The Crafty Owl, you may have seen today's thread that has been about what would you carve with yours followed by some guesses as to what I carved with mine. The Undefined Carving Kit is a great set with everything you need to cut and mount four stamps. This first set I carved was for Rebecca, who given her passion for swimming had a clear idea of what she wanted her stamps to feature - water, in a big way. So after much sketching and carving, this is what we came up with:
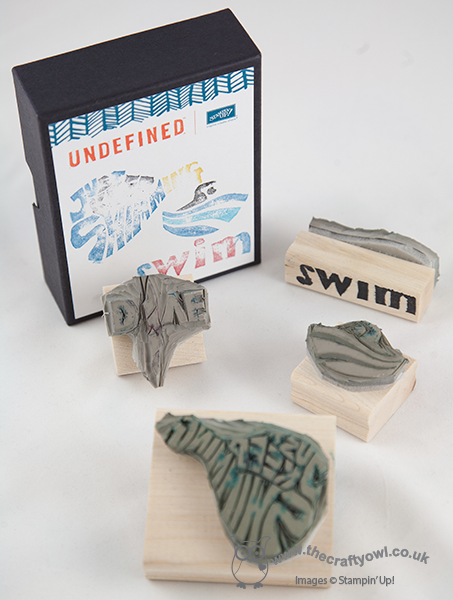
All of our stamps had something to do with swimming - the stamps themselves don't look that interesting, so I made a simple card to showcase each of the designs to give you a better idea of what they look like. So here's the first one, an abstract swimmer:
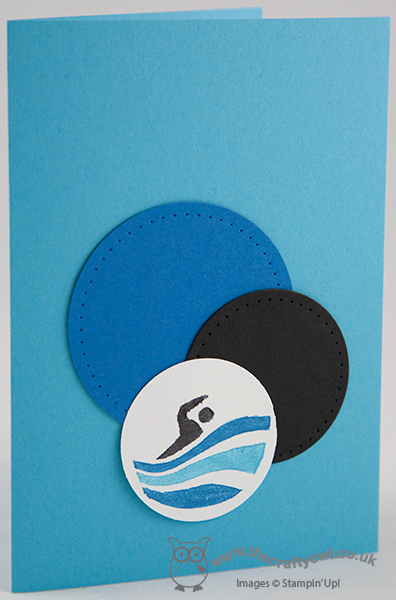
I simply mounted him with some paper pierced circles on a watery blue background. Here's a close up of the carved stamped image:
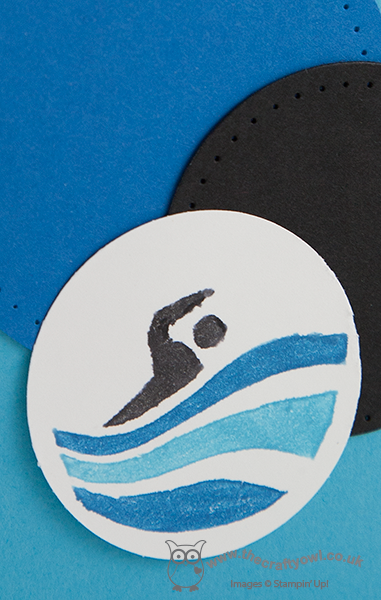
 

You can tell it's a hand carved stamp as it's nowhere near as sharp as a traditional SU! stamp, but then it's great fun to be able to create something unique that you carved yourself. Here is the second stamp - this time, a diver: 
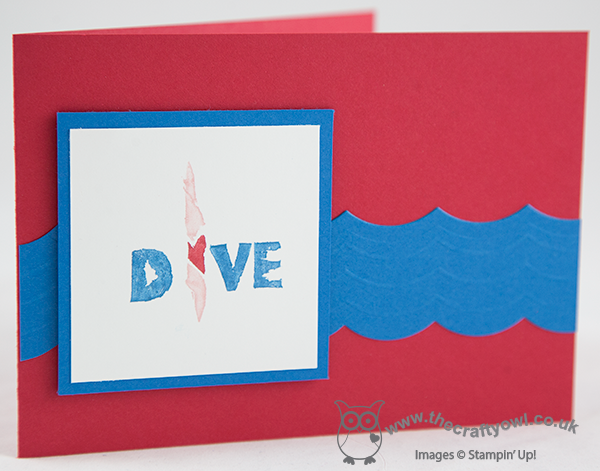
 I used my Borders scoring plate and Large Scallop Edgelit to create my waves in the background. The next one was actually the first stamp I carved and it shows - take a tip from me, if you're carving words, which is quite tough, don't start with a curved letter such as 'S' - in hindsight I needed a little more practice before I started this one!
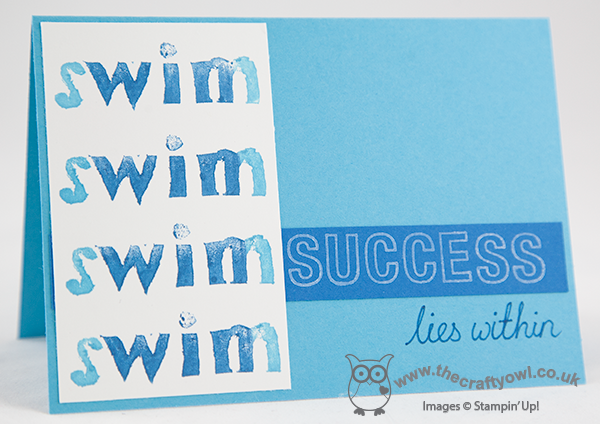
 I love the message of this card though - it was something I read on the internet as an inspirational quotation and I thought it was really apt; sometimes it's as much about the motivation and belief that you can achieve, as it is the winning itself. Our last stamp was a fun one - do you recognise this famous fish cameo? 
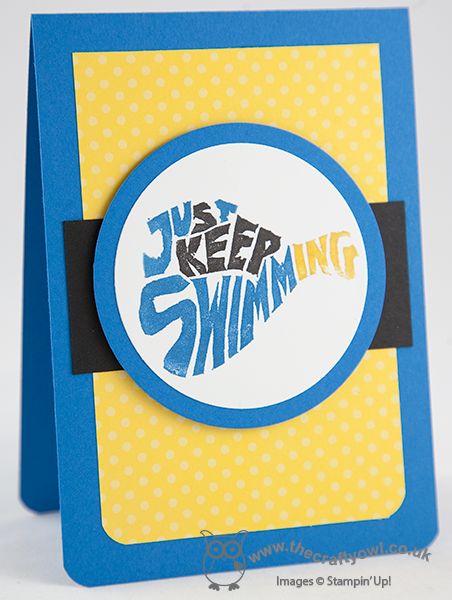
This is my take on Dory from the Disney movie 'Finding Nemo', a definite James family favourite and whilst it might look complicated, as the last of my stamps to carve I had had a little practice by this point, so think it turned out quite well.

I hope you like my first foray into the world of 'Undefined' - it really was fun and Rebecca LOVES her stamps, which is the main thing! I will have more to share with you another time as I still have Ben's set and mine to carve. if you would like more 'Undefined' inspiration, check out Stampin' Up!'s Undefined Pinterest page, where you will see lots of amazing creations!

Back tomorrow with another project; until then, happy stampin'!


Stampin' Up! Supplies Used:

Table built using Product Table Builder by The Crafty Owl - Independent Stampin' Up! Demonstrator.


Hello You Mojo Monday 335

by Joanne James8. March 2014 20:54

Today's card is one I designed for this week's Mojo Monday sketch challenge, where I was attracted by the layout and the 'frame' element that is central to the sketch:

Here is my take on the sketch:

My card is a riot of graphic patterns and colour, using the Kaleidoscope Designer Series Paper as the inspiration for my colour scheme. I added a layer of texture with a Bermuda Bay panel that I dry-embossed with my Chevron Textured Impressions Embossing Folder, then layering the various elements in contrasting papers and finishing with a banner of Crushed Curry that I stamped with Versamark and heat embossed in black embossing powder to give it a lovely sheen. Cutting my frame was easy with the aid of my square framelits - this is one of those times when they are invaluable. I popped my chevron punched pieces on dimensionals, using them to draw the eye to my button 'You' (this is a partial stamp of the 'You & Me' stamp in the Perfect Pennants set).

I'm not one for mix-and-match of patterns as a rule, but sometimes it's ok to step outside of your comfort zone. I hope you're all enjoying your weekend; the weather has been much warmer and brighter here in the UK today - we managed to get some time outside in the garden today, which made a nice change.

Back tomorrow with another project; until then, happy stampin'!


Stampin' Up! Supplies Used:

Table built using Product Table Builder by The Crafty Owl - Independent Stampin' Up! Demonstrator.


Petal Parade Thank You

by Joanne James6. March 2014 22:41

Firstly, I would like to say thank you to everyone who left comments on my blog and Facebook pages in the last couple of days about my new Box Buster from The Crafty Owl tool - I'm so glad that you are all finding this tool useful. Please feel free to share with anyone and everyone you know who likes box making and has an Envelope Punch Board; it takes all the guesswork out of box making! I have another Box Buster video tutorial for you tomorrow, but meanwhile I want to share my card for this week's challenge over at The Paper Players, where Ann's theme challenge this week is to make a 'Thankful for Spring' thank you card. I decided to combine the challenge with the one over at the Fusion Card Challenge, where I used the colours in the photo and the unusual sketch layout as the inspiration for my card:

I've invested in a few new sets of flower stamps lately, so was a little spoilt for choice, but decided that the lovely Sale-A-Bration Petal Parade stamp set would work perfectly with the sketch layout. Lots of my customers have chosen this item as their free Sale-A-Bration gift so I'm keen to share ideas with them on how to use it. Here's my card:

I chose a base od Summer Starfruit, then added a Whisper White layer that I had stamped with the Petal Parade flowers. I then added a top layer in Pool Party with a circle cut using my Circle Framelits to reveal the flowers beneath. I added my simple 'thanks' sentiment to the white layer beneath the curved edge of the top layer and added the Petal Parade border stamp for definition. To finish, I added some of the Summer Starfruit Sale-A-Bration baker's twine, first punching some little notches out of the Pool Party layer with the point of my mosaic punch to ensure the twine sits flat and evenly across the front of my card.

I hope you like my card; check out the links above to see what the respective design teams have created for these challenges for some great inspiration and ideas. Back tomorrow with another Box Buster video tutorial; until then, happy stampin'!


Stampin' Up! Supplies Used:

Table built using Product Table Builder by The Crafty Owl - Independent Stampin' Up! Demonstrator.


Awesome Boy's Card!

by Joanne James21. February 2014 21:01

So here is my second card of the day, just in time for this week's challenge over at Less is More where the theme this week is 'masculine cards'. I decided to use the 'Cool Kid' stamp set for my card; when I saw this stamp set I just had to have it - my children always get so excited if they have been chosen as the class 'cool kid' for the day at school. So here is my card:

I chose to use the Brights colour combination of Real Red, Tempting Turquoise and Tangerine Tango for my card - all colours my son would love! - and having stamped the dog in orange, I coloured in his scarf and boots with my Stampin' Write markers. I used the blue to outline both my circle and sentiment panel, then picked up the orange with a thin strip cut from a piece of cardstock embossed with the new Arrows Textured Impressions Embossing Folder. I inked up the sentiment using my markers too, so that I could have multi-coloured lettering - I love the effect that this give on this card.

I used this week's sketch over at Create with Connie and Mary for my layout.

Back soon with another card; until then, happy stampin'!


Stampin' Up! Supplies Used:

Table built using Product Table Builder by The Crafty Owl - Independent Stampin' Up! Demonstrator.


Tags: , , , , , , , ,

Cards | Stamping

You Make Me Happy Rainbow

by Joanne James6. February 2014 12:18

A bright and cheery post for you today! The weather here in the UK has been less than favourable in recent weeks, with torrential rain, winds and severe flooding in some areas. Whilst I'm not a fan of this time of year myself, I feel thankful that we haven't been impacted by the weather as much as some people. Whilst I know today's card won't fix the country's weather problems, if you're in a part of the country that's struggling I hope at least it raises a smile. The theme over at 'Less is More' this week is 'rainbows' and that's where I took the inspiration from for today's card:

This is certainly a 'less is more' card for me; I created a rainbow using a selection of Brights cardstock using my circles framelits, and stamped my 'See ya later' sale-a-bration stamp onto a cloud that I actually cut out freehand using my Word Bubble framelits as a guide (I needed my cloud to be larger than the framelit size to accommodate the sentiment). I wanted my rainbow to 'disappear' into the cloud so made my rainbow extend beyond a semi-circle.

I think this card has a real feel-good factor about it - rainbows have that effect on you, don't you think? If you'd like more multi-coloured inspiration, pop on over to Less is More and take a look at the other entries - it's also their 3rd birthday this week, so happy birthday wishes to Chrissie, Jen and Mandi and congratulations on such an inspiring blog.

I'm off on a Thai cookery course tonight - I've done a couple of these themed cookery evenings before and they're such fun. Lots of cooking in the kitchen, then you get to sit down and eat the delicious output, without having to do the washing up!!


Back tomorrow with another project; until then, happy stampin'!


Stampin' Up! Supplies Used:

Table built using Stampin' Up! Product Table Builder from The Crafty Owl.


Mini Catalogue

BROWSE THE CATALOGUE

The mini catalogue is now live! Read and download your copy here.

Shop Online

Access my online shop 24 x 7, 365 days of the year:

Current March hostess code:

S9F2XJJW

Shop Online

Join My Team

It's always a great time to join Stampin’ Up! New team members can get £130 worth of products for only £99 + free business supplies + free shipping + all the fun being a part of Stampin’ Up! Stampin' Up! has something for everyone: join my growing team and benefit from my support to enjoy Stampin' Up! however you choose.

If you're interested, call me for a chat to understand how I can help you realise your goals. Alternatively, if you have already decided to sign up and you just can't wait, please click here for the link to the online form where you can sign up and order your starter kit right away! 

Latest Kit!

Stampin Cut and Emboss

The Rock Legend Kit has all you need to make 8 cards with coordinating envelopes. Along with the new Panda Friends Kit, both are available from January 4th for just £14 each - get yours here!

2023-24 Annual Catalogue

BROWSE THE CATALOGUE

Click on the catalogue for a full list of current SU! supplies - if you would like to order any of the items featured, please drop me a line at [email protected] or give me a call on 07773 421446 - I'd be happy to help.

New Online Exclusives

There will be new products available exclusively in the online store from 5 March - check them out here.

About Me

Hi I'm Joanne and live in Northampton and when I'm not looking after my husband and two beautiful children, am an avid crafter with a passion for all things Stampin' Up!

I must confess that I have never been a big rubber stamper - until I discovered Stampin' Up! that is. I love the fact that I can get such great results with co-ordinating stamps, inks, papers and punches - the possibilities are endless! Join me on my stamping journey as I share the things I love and be inspired to create amazing things yourself!

Follow Me

Monthly Newsletter

Box Builder

Click the button above to use Box Buster to create your custom box design using the Envelope Punch Board!

Kits Collection Now Available!

Stampin Cut and Emboss

The new Kits Collection from Stampin' Up! is now available!

Click here to see the current kits available and order yours online today.

I Design For


Stampin' Up Stuff

This is my personal blog and is not endorsed by Stampin’ Up! I hope you find it a plentiful source of ideas and personal inspiration but please don't copy my designs for contest submission or use for classes, publication or sale without express permission.