Botanical Builders Purple Flowers Birthday Card

by Joanne James30. January 2016 08:50

It's Sunday and time for a new challenge over at The Paper PlayersThis week it is the turn of the sweet Jaydee to host and she has a tic-tac-toe for you to play along with:


When I was considering which squares to use to create my card, I noticed that none of the other girls on the team had used purple. This is one of my favourite colours, so I decided to use this as my starting point. I was also drawn to the black and white striped background and central focal image of Connie Collins' card for 'Case The Designer' over at The Global Design Project, so wanted to combine the two. I settled on the top row - flowers, bling, purple - for my card today:

My background paper is from the 'Go Wild' paper stack - these papers are not just great for animal prints! I used a trio of purples for my flowers, die cut using the Botanical Builder Framelits Dies, and I used them to frame my birthday sentiment from the Tin of Cards stamp set - I just love the fonts in this set. My 'bling' is in the form of a liberal dose of Wink of Stella on my main flower and a scattering of rhinestones across my card. 

Before you reach for your ink and papers, check out what our amazing team has created to inspire you this week:

The Paper Players Design Team
 
 
Here's a quick recap of our challenge rules:
 
1.  Create a new paper project
2.  Upload your creation to your blog with a link back to us and provide a direct link to the post featuring your challenge submission.
3.  Please link your card to no more than four challenges, TOTAL.
4.  Have FUN! 


I look forward to seeing what you create with this week's tic-tac-toe challenge - so many creative possibilities! Rebecca is playing in a hockey tournament today so I shall be wrapped up warm with a mug of tea in hand as I watch and hoping for a little craft time this afternoon. Enjoy your Sunday however you are spending it!

Back tomorrow with another project; until then, happy stampin'!


Stampin' Up! Supplies Used: 

Table built using Product Table Builder by The Crafty Owl - Independent Stampin' Up! Demonstrator.

May The Magic Of The Season Fill Your Heart and Home

by Joanne James19. December 2015 21:30

Good evening lovely blog readers! Christmas preparations are full steam ahead here in the James household and now that the Juniors have broken up from school for the holidays I'm sure there will be even less crafting time than usual; so tough when there is a huge big box of pre-order Spring-Summer seasonal goodies sitting in the corner of my office! Luckily for you I still have some Christmas cards and projects that I haven't shared with you. So today I'm sharing one of the cards from my all day Christmas stamp-a-stack back in September - this one features the Home for Christmas DSP and one of the stamps from the Cozy Christmas set and was a favourite for the ladies who attended:

The Pacific Point really makes the colours on this card pop and the addition of the gold corded trim and the red glimmer paper poinsettia cut out using the framelit from the Delicate Ornament Thinlit Dies set adds a lovely touch of sparkle to this card. If you are in need of some last minute Christmas cards, you could knock a few of these out in no time. This sentiment is one of my absolute favourites - it says everything that is good about the holidays for me.

That's all from me tonight; The Paper Players team and I are taking a couple of weeks break over the Christmas period but fear not - I will be back tomorrow with another festive project that I think you'll like. Until then, happy stampin'!


Stampin' Up! Supplies Used:

Table built using Product Table Builder by The Crafty Owl - Independent Stampin' Up! Demonstrator.


Tags: , , , , , ,

Cards | Stamping

Christmas Cuties and Home For Christmas

by Joanne James4. November 2015 10:23

Happy Wednesday everyone! This is my second post today - click here if you would like to see this week's Weekly Deals post. For today's creative project, I have another Christmas card to share with you featuring another of the adorable characters from the Christmas Cuties stamp set and this week's sketch over at Retrosketches:

I also paired my Christmas Cuties with one of my under-used papers with the Home for Christmas designer series paper pack - take a look:

I stamped my image in Archival Black onto Extra Thick Whisper White and coloured it with my inks and aquapainter, then stamped the snow stamp around it in Pool Party. I mounted my stamped image panel onto a piece of Real Red that I had cut out with my scalloped circle framelit, the largest one in the Circles Framelits set. Behind this I used my piece of patterned paper, matted onto Mossy Meadow and a card base of Pool Party. I cut out my sentiment with my retired Word Bubble framelits and popped it up on dimensionals for a little lift.

This is one of those super cute cards that is very satisfying to produce - all that theraputic colouring! I'm happy to have found a layout that makes the most of that lovely background paper too. 

That's all from me today; back tomorrow with my card for this week's new challenge over at Create With Connie and Mary. Until then, happy stampin'!


Stampin' Up! Supplies Used:

Table built using Product Table Builder by The Crafty Owl - Independent Stampin' Up! Demonstrator.


Holly Jolly Christmas Greetings Christmas Cards - Two Ways

by Joanne James31. October 2015 22:29

A late post from me today - too much trick-or-treat fun earlier on this evening! Anyway without further ado, today I made a couple of cards using the sketch from Mojo Monday this week, the second of which is also for this week's challenge over at Merry Monday:


Both my cards feature papers from the Season of Cheer designer series paper, along with the Christmas Greetings Thinlits with the Holly Jolly Greetings stamp set - one of the great bundle offers in the current seasonal catalogue. Here's the first card I made in traditional festive colours with the holly paper:

I went with a simple base layer of Real Red, then for the panel layered the holly paper with some Mossy Meadow and added a banner of red glimmer paper before adding my layered circles featuring my sentiment, a combination of stamped elements from the 'Holly Jolly Greetings' stamp set and a glimmer die cut using the Christmas Greetings Thinlits. I really liked this card, so decided to make a second one with a slightly different sentiment combination from the same sets, this time featuring the Christmas lights paper from the same DSP pack and a slightly less traditional colour scheme. Here it is:

I just love the glimmer paper on both of these cards; I'm not a fan of loose glitter, but glimmer paper is the best! So which one do you prefer - traditional or contemporary colour scheme? They are both great, although I think I'm veering towards the holly - I'm a sucker for red and green at Christmas time! I'd love to hear your thoughts - do leave me a comment below.

Back tomorrow with this week's new challenge over at The Paper Players; until then, happy stampin'!


Stampin' Up! Supplies Used:

Table built using Product Table Builder by The Crafty Owl - Independent Stampin' Up! Demonstrator.


Christmas Cutie Elf in The Snow

by Joanne James12. October 2015 09:00

As promised on Sunday, here's the other card I made using this week's colour combination over at The Paper Players:

It's another card using the Christmas Cuties stamp set, featuring the happy little elf:

I used extra thick Whisper White for my card base, with a mat of Real Red and another piece of Whisper White embossed with the Softly Falling Embossing Folder. I added a couple of circles in Real Red and Cucumber Crush, then added a large Whisper White circle stamped with the elf image in Archival Black and then coloured in using my aqua painter and Real Red and Cucumber Crush inks, with a little Crushed Curry for his hair and jingle bells and a touch of Pink Pirouette for his face and hands. To finish I added a trio of white sequins from the Metallics Sequin Assortment to the circle.

The new extra thick Whisper White is just lovely and a joy to watercolour on - especially if you use the Archival Black ink for your stamped outline; this prevents bleeding or running of ink as you paint. 

I've had a busy day today with the second of this month's technique classes. We created some fabulous cards using the Embellished Ornaments set and Delicate Ornaments Thinlits Dies which I will share with you in due course. If you like these colours, be sure to link up your creations with us over at The Paper Players - we would love to see them!

Back tomorrow with another project; until then, happy stampin'!


Stampin' Up! Supplies Used:

Table built using Product Table Builder by The Crafty Owl - Independent Stampin' Up! Demonstrator.


Christmas Cuties Jingle Bell Elf

by Joanne James11. October 2015 10:00

Good morning everyone! Thank you to everyone who joined in my Halloween theme challenge over at The Paper Players last week - the gallery entries were fantastic! This week it is the turn of my fellow Brit turned American, the lovely Jaydee, to host, and she has a great colour challenge for you to play along with:

Once I'd got past wanting to make a set of traffic lights with these colours, I settled on another card using the Christmas Cuties stamp set, this time featuring the happy little elf:


I used Cucumber Crush for my card base - this is such a great bright green colour for Christmas! - and created a panel of red detail below my image, where I embossed a piece of Real Red cardstock with the Stylish Stripes embossing folder and edged it with a band of the red striped pattern from the Holiday Homes Fancy Foil Designer Vellum. Lastly, I tied my panel with a piece of Real Red striped ribbon, tied with a little jingle bell from my 'bits and bobs' drawer, just like the ones on the elf's outfit. To finish, I added a Very Vanilla circle stamped with the elf image in Archival Black and then coloured in using my aqua painter and Real Red and Cucumber Crush inks, with a little Crushed Curry for his hair and jingle bells and a touch of Pink Pirouette for his face and hands.  

I love the cute little images in this set - such fun! I made another card using the same colours and a Whisper White base panel for my alternate design, which I'll share later in the week.

Before you reach for your ink and papers, check out what our amazing team has created to inspire you this week:

The Paper Players Design Team
Anne Marie Hile - on leave
 
 
Here's a quick recap of our challenge rules:
 
1.  Create a new paper project
2.  Upload your creation to your blog with a link back to us and provide a direct link to the post featuring your challenge submission.
3.  Please link your card to no more than three challenges, TOTAL.
4.  Have FUN! 


I look forward to seeing how you interpret our colour palette this week. I'm off for a morning of basketball and we still have some homework to do; we spent a chunk of yesterday visiting senior schools - can't believe in 12 months time the eldest of my James juniors will be heading off to senior school - eek! Hoping to then get some time to craft this afternoon; that would be nice!

Back tomorrow with another project; until then, happy stampin'!


Stampin' Up! Supplies Used:

Table built using Product Table Builder by The Crafty Owl - Independent Stampin' Up! Demonstrator.


Punch Art Guitar Cards

by Joanne James10. October 2015 09:00

I have a couple of fun punch art cards to share with you today (to make up for no post yesterday)! I was all ready to link up with the ladies at SUO Challenges but it would appear that our clocks are not coinciding this week - never mind! Check them out if you're a punch art fan as that's their theme this week. Both of these were made for my lovely husband, who celebrated his birthday this week. You will notice there is something of a common theme to my cards - here's the first one:


My husband has recently taken up learning to play the guitar; I think living in a household with three pianists and a singer, he was feeling somewhat left out! So I decided for my card to go with a simple black and white combo, using my circle framelits for the holes and my word window punch and decorative label punches for the fretboard and strings. The strings themselves are made using the new silver corded trim - perfect for my six-string - and I added an actual re guitar pick 'borrowed' from my husband's collection to add a pop of red to my card.

My second card was made from my children and includes both a punched star and a rather clever guitar made with ... the owl punch! Take a look:

I used some retired music print paper for my background and the same 'Rock Star' greeting from the 'Be The Star' stamp set, this time stamped in Pacific Point on Very Vanilla then punched out with my star punch. I also added the word 'DAD' cut with my little Letter Thinlits for further personalisation. A silver glimmer star then formed the background to highlight my punch art guitar: an owl punch body (minus the feet!) in Pacific Point, a small punched circle and a piece of Smoky Slate wound in thin silver thread for the strings with a couple of the owl hearts attached to the end for the keys that tighten the strings. Not a bad replica of the blue electric guitar he is practising on - thank heavens for headphones that plug in to his amplifier, so we are not all having to witness his Eric Clapton impressions until he is more polished!!

Back later with some exciting news for you, so watch this space; meanwhile, happy stampin'!


Stampin' Up! Supplies Used:

to follow.

Soon It Will Be Christmas Tree Card

by Joanne James29. September 2015 21:48

I've a super-quick post today to share another of my stamp-a-stack cards featuring the lovely Home for Christmas designer series paper and stamp from the 'Cup of Cheer' stamp set - take a look:

This is a layout I've used before, with a very similar card here that explains in more detail the items used - I just changed up the paper and colours so that I can use some of the lovely Christmas tree paper - this paper makes me think of Christmas day and opening all of the lovely present beneath the Christmas tree.

If you are as in love with this season's new designer series papers as I am, you may want to consider joining my paper share; I am currently doing my second round of paper and accessory shares from the seasonal catalogue - you can find all the details along with links to order in the original blog post here

I also have another stamp-a-stack Christmas card class planned for 10th November; if you would like to come along and make your Christmas cards ready for posting then you would be more than welcome - email or call me to book your place!

Back tomorrow with another project and this week's Weekly Deals. Until then, happy stampin!


Stampin' Up! Supplies Used:

Table built using Product Table Builder by The Crafty Owl - Independent Stampin' Up! Demonstrator.


Making Spirits Bright Sleigh Ride Edgelits Christmas Card

by Joanne James18. August 2015 08:00

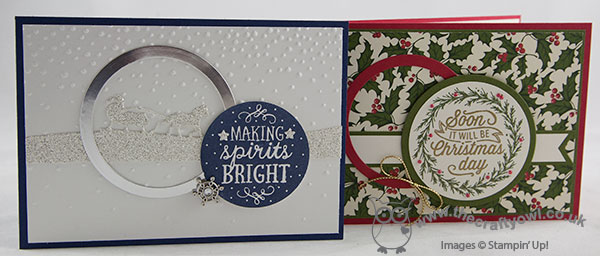
Today I'm sharing the second card I made this week using the sketch over at Mojo Monday. You can see the other card here and as I mentioned in my original blog post, I didn't enter this one which was the first one I created as when I went to upload and perused the gallery there was another card that was very similar - you can see the card in question, designed by Lisa Pretto, here. That hasn't happened to me before when entering a challenge, but what can I say other than great creative minds think alike! Here is my card using probably my most favourite product from the new seasonal catalogue, the Sleigh Ride Edgelits:

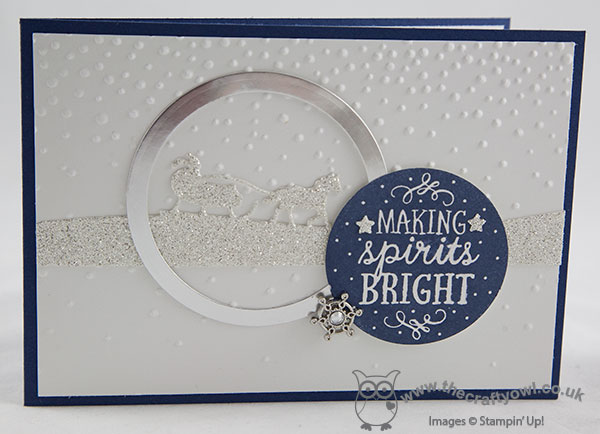
Oh there is so much I love about this card! It uses probably my favourite festive colour combo - navy, white and silver - but check out the fab new products that are coming your way on September 1st:

The Sleigh Ride Edgelits - these come as a set of three, featuring a sleigh, houses and trees, and co-ordinate with a stamp stamp called 'Jingle all the Way'. These can be used in so many ways to create beautiful cards; in fact I have another card for you tomorrow using one of the other Edgelits in the set and the co-ordinating stamp set, so stay tuned!

Making Spirits Bright - this is from a versatile set called 'Among The Branches'. I used the spooky Halloween stamp from this set on my LIM card last week (see it here) and it also includes an Autumn set, along with lots of fun embellishments that co-ordinate with the new Woodland TIEF. I love a set that transcends the seasons and this is definitely that kind of set.

Softly Falling Textured Impressions Embossing Folder - there are some great new embossing folders in the new seasonal catalogue, but I think the Softly Falling TIEF will be my favourite; proper falling snow adding a delightful delicate texture to cards.

Winter Wonderland Embellishments - Did you spot the cute little snowflake embellishment? Big enough to add some sparkle (sometimes foil and glimmer paper is just not enough!) yet small enough to not add too much bulk, these adorable little embellishments come in a pot of 20 - plenty for all your festive card making, but wouldn't look out of place on something less festive either.

I hope you like today's card; quite different to my earlier interpretation of this sketch and very 'me'. Which one do you prefer? Do let me know in the comments section below - I love hearing what you think!

Right, I'm back to squeeze in some more work before the James Juniors return exhilerated from this morning's basketball camp exertions. Back tomorrow with another festive sneak-peek and news of this week's Wednesday Deals - don't miss it! Until then, happy stampin'!


Stampin' Up! Supplies Used:

* Sleigh Ride Edgelits - available September 1st

* Among The Branches - available September 1st

* Softly Falling TIEF - available September 1st

* Winter Wonderland Snowflake Embellishments -  available September 1st

Table built using Product Table Builder by The Crafty Owl - Independent Stampin' Up! Demonstrator.


Silhouettes and Script Meets Farmer's Market Anniversary Card

by Joanne James11. July 2015 18:04

I've been busy creating today and just have time for a quick post before I head out this evening for dinner with friends. Today's card uses this week's sketch over at Mojo Monday and showcases some of the the new Farmer's Market DSP so is perfect for linking up with SUO Challenges too where the theme is 'designer papers':

Here is my card - check out how perfectly these two paper designs from the Farmer's Market range co-ordinate with each other:

I used Old Olive for my base with a mat of Hello Honey - a colour I'm not overly fond of it has to be said, yet I think it takes on a lovely hue next to the greens on this card. The pear paper design is definitely the one on show here, yet the gingham across the bottom adds interest without overwhelming. I used a piece of Mossy Meadow for my diagonal, tied with some retired satin ribbon in the same colour then for my focal point I stamped the pear from the 'Silhouettes and Script' hostess set onto Whisper white, inking up with my sponge daubers to give the lovely shading effect then fussy cut one side and cut to other with my circle framelits. To finish I added a 'Congrats' from the same set in black and popped up on dimensionals. I just love the blended colouring on the pear - I'm going to have to do this with the other stamps in the set too!! What a fun alternative take for a wedding or anniversary card!

That's all from me today; I need to go and wash my hair and get ready for my night out! Back tomorrow with a new challenge over at The Paper Players. Until then, happy stampin'!


Stampin' Up! Supplies Used:

Table built using Product Table Builder by The Crafty Owl - Independent Stampin' Up! Demonstrator.


Mini Catalogue

BROWSE THE CATALOGUE

The mini catalogue is now live! Read and download your copy here.

Shop Online

Access my online shop 24 x 7, 365 days of the year:

Current March hostess code:

S9F2XJJW

Shop Online

Join My Team

It's always a great time to join Stampin’ Up! New team members can get £130 worth of products for only £99 + free business supplies + free shipping + all the fun being a part of Stampin’ Up! Stampin' Up! has something for everyone: join my growing team and benefit from my support to enjoy Stampin' Up! however you choose.

If you're interested, call me for a chat to understand how I can help you realise your goals. Alternatively, if you have already decided to sign up and you just can't wait, please click here for the link to the online form where you can sign up and order your starter kit right away! 

Latest Kit!

Stampin Cut and Emboss

The Rock Legend Kit has all you need to make 8 cards with coordinating envelopes. Along with the new Panda Friends Kit, both are available from January 4th for just £14 each - get yours here!

2023-24 Annual Catalogue

BROWSE THE CATALOGUE

Click on the catalogue for a full list of current SU! supplies - if you would like to order any of the items featured, please drop me a line at [email protected] or give me a call on 07773 421446 - I'd be happy to help.

New Online Exclusives

There will be new products available exclusively in the online store from 5 March - check them out here.

About Me

Hi I'm Joanne and live in Northampton and when I'm not looking after my husband and two beautiful children, am an avid crafter with a passion for all things Stampin' Up!

I must confess that I have never been a big rubber stamper - until I discovered Stampin' Up! that is. I love the fact that I can get such great results with co-ordinating stamps, inks, papers and punches - the possibilities are endless! Join me on my stamping journey as I share the things I love and be inspired to create amazing things yourself!

Follow Me

Monthly Newsletter

Box Builder

Click the button above to use Box Buster to create your custom box design using the Envelope Punch Board!

Kits Collection Now Available!

Stampin Cut and Emboss

The new Kits Collection from Stampin' Up! is now available!

Click here to see the current kits available and order yours online today.

I Design For


Stampin' Up Stuff

This is my personal blog and is not endorsed by Stampin’ Up! I hope you find it a plentiful source of ideas and personal inspiration but please don't copy my designs for contest submission or use for classes, publication or sale without express permission.