Snow Day ... Without The Snowman!

by Joanne James7. November 2013 20:31

As promised, today's creative post features another of this month's class cards and also uses the Snow Day stamp set that I featured earlier in the week, but this time there's not a snowman in sight! Take a look at the card to see what I mean:

I cased the idea for this card from one made by Monica Gale (you can see her original card here), although mine looks quite different to hers I think with a much richer colour palette. The 'warm wishes' sentiment becomes a garland here, with the accessory pieces from this stamp set hanging from it; the only other thing that's needed is a fireplace!

I also did a reverse-coloured version of this card, with a seam binding ribbon bow:

Which one do you prefer? I'm favouring the clean lines of the first one, but like the second one too. Either way, it's always nice to be able to use one stamp set in a variety of different ways and I think this stamp set is more versatile than you might think at first glance. I have a few other ideas up my sleeve too, so check back for future posts on other ways you can use this fun set.

I have a jam-packed couple of days ahead, starting with the excitement tomorrow of a night out to hear Billy Joel in concert. I've always wanted to hear him sing live, so I'm very much looking forward to it. Before I go though, I will be back with the last of the Digital Scrapbooking Days 50% off offers and another creative post; until tomorrow, happy stampin'!


Stampin' Up! Supplies Used:


Tags: , , , , , ,

Cards | Classes | Stamping

Snow Day One Layer Card

by Joanne James5. November 2013 22:19

A quick creative post from me today - this is one of the cards we are making in this week's card classes, a one layer card using the Snow Day stamp set:

I love this cute snowman set and there are so many ways you can stamp him, but he's really great for a one layer card which is handy if you need to produce lots of cards in one go. Despite the fact that he's a snowman, I avoided using white on this card; my chosen colour combination was inspired by a recent challenge over at Create with Connie and Mary and I like the effect of the Soft Sky on Very Vanilla, with a little Smoky Slate and Raspberry Ripple for impact.

Check back next time for another card using this stamp set, that looks completely different. Until then, happy stampin'!


Stampin' Up! Supplies Used:

Tags: , , , , , , ,

Cards | Classes | Stamping

Colour Me Christmas Santa Thinlit Card MM#81

by Joanne James3. November 2013 16:36

So, as promised, a creative post at last today! I've been busy this weekend preparing for next week's Christmas card classes, so I have lots to share with you this week, including a couple of videos. Today's card is another made with the circle thinlits card and I'm just in time to link up with this week's Merry Monday Challenge over at Always Playing With Paper, where this week's challenge is to make a Christmas card featuring Santa:

My very first thinlit card was using the 'Best of Christmas' santa, but today I thought I would go for something a little different and so am using the cute santa from the 'Colour Me Christmas' stamp set. Here's my card:


I used a bright red and white colour scheme and coloured my santa with my Stampin' Write markers to give a bold finish. I then cut out my stamped image using the scalloped circle framelit from the thinlit set, which I layered on an offset red scalloped circle for interest. I also used the mini-chevron framelit to create a border edge to my card and finished with a button and some ribbon, and added some Dazzling Diamonds to the trim on santa's hat and coat with the aid of my two-way glue pen just to give a little added sparkle. Well, it is a Christmas card after all!

I hope you like my card; do pop over to the Merry Monday page and see what the designers and other participants have come up with on this theme. Back tomorrow with a card and video for you, as well as a quick post with the digital deal of the day. I also have my first Christmas card class of the week tomorrow, which I'm very much looking forward to and a trip to the cash & carry in readiness for our school bonfire and fireworks display next weekend: a packed day in store, but with the children back at school tomorrow following their half-term break that will be one less thing to think about! Until tomorrow, happy stampin'!


Stampin' Up Supplies Used:


New Tag It Box Bundle Offers: 20% Off!

by Joanne James30. October 2013 20:36

Good evening to you blog readers! I'm having a catch up this evening, since in addition to it being MDS Weekly Download Day I have another two fantastic offers to share with you this week. The first of this week's new offers is perfect for personalised packaging with minimum fuss and maximum convenience and impact:

There are 2 separate bundles available:

Bundle 1 - Holiday Tag It Extra Large Box Bundle at £16.95, comprising:

  • a Stamp A Tag Kit
  • 3 Extra Large Gift Boxes
  • a 9.1m roll of Cherry Cobbler 1" (2.5cm) Stitched Grosgrain Ribbon


Bundle 2 - Holiday Tag It Decorative Box Bundle at £17.95, comprising:

  • a Stamp A Tag Kit
  • 6 Decorative Window Gift Boxes
  • a 9.1m roll of Cherry Cobbler 1" Stitched Grosgrain Ribbon

Both of these bundles represent a 20% saving on the individual prices, so now there's no excuse for every parcel to be packaged with the hand-finished touch. This offer is valid until 30th November, so if you would like to order either click on either of the above pictures to go straight to my online store or contact me to add to a local order today!

Back shortly with an MDS Offers post; until then, happy stampin!

Tags: , , , , , , ,

Boxes | Promotions | Stamping

Mosaic Bauble Thinlit Card and Punch Tip Video

by Joanne James26. October 2013 22:16

We have had a lovely day today; we've stayed indoors out of the howling winds and had some family over for Sunday lunch. It's been lovely to spend time with my brother- and sister-in-law, nephew and niece, as we don't do it nearly often enough with the busy lives we all lead.

As promised, I have another Thinlit card for you today, this time with a Mosaic Madness bauble design - take a look:

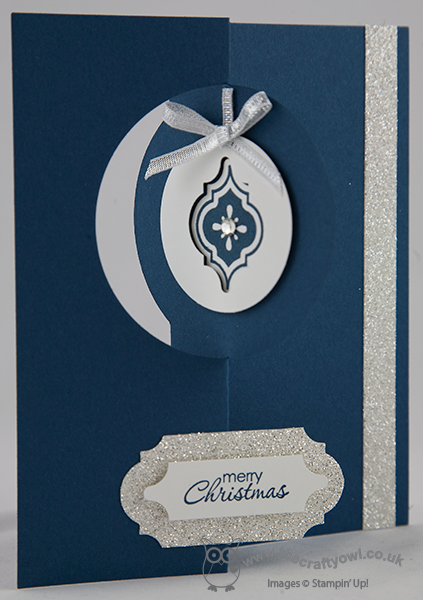
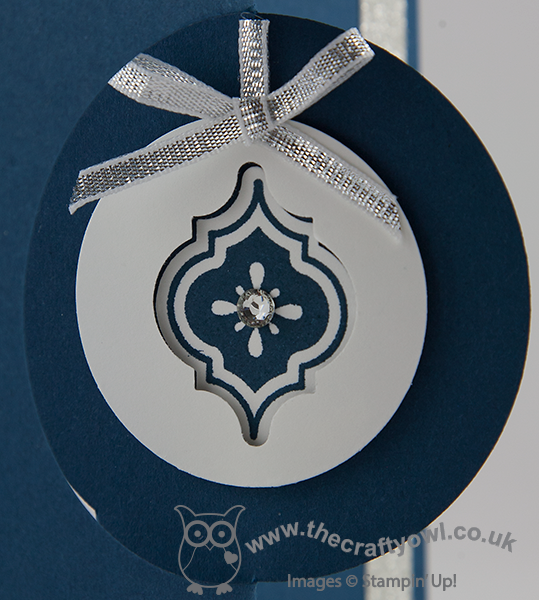
I created a simple 'layered' bauble using a circle punch and the mosaic punch, then layering by raising the outer circle on dimensionals and creating a ribbon hanger. Here's a close-up of my bauble:

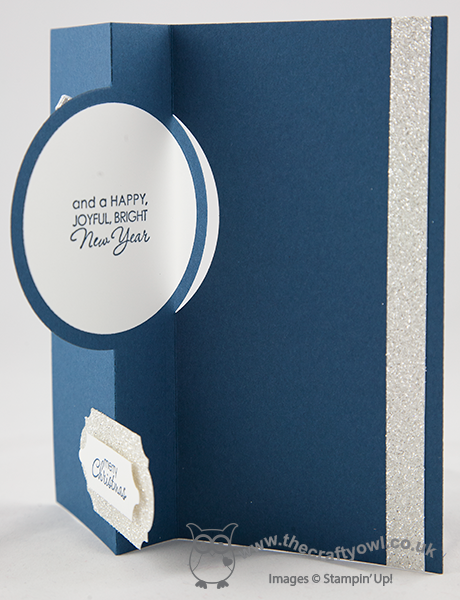
For a greeting on this card, I used a pair of sentiments from the 'Petite Pairs' stamp set, stamping one half on a layered label on the front of the card and the other half on the reverse of the flipped circle:

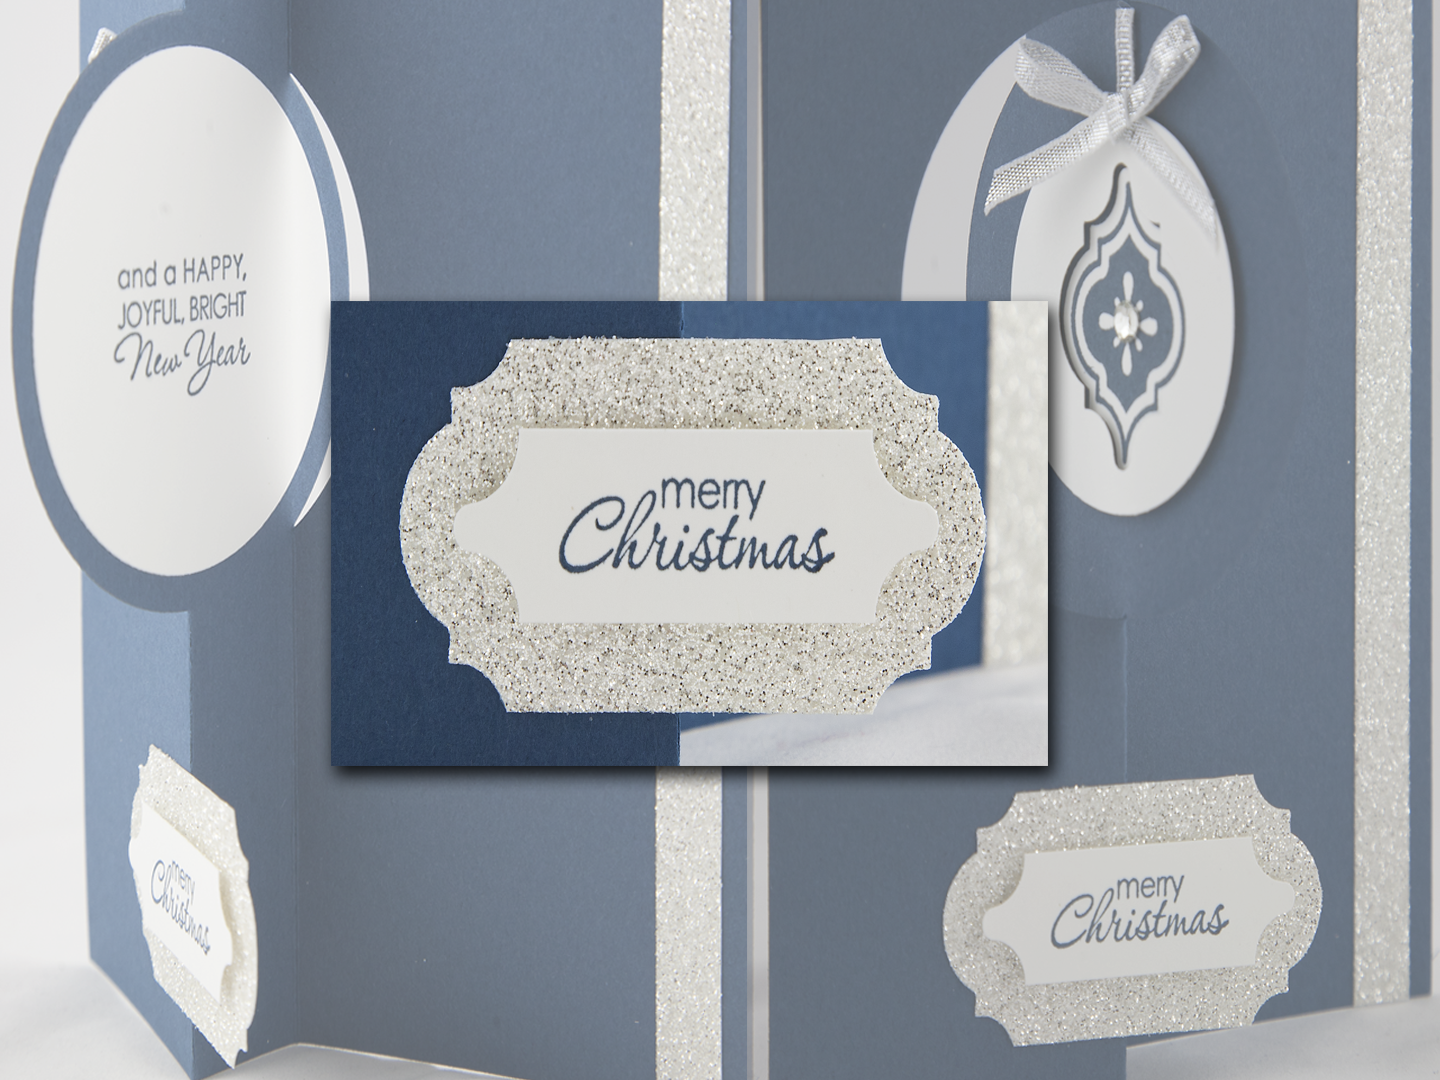
Lastly, are you wondering what punches I used for my raised sentiment label on the front of my card? Here's a closer look:

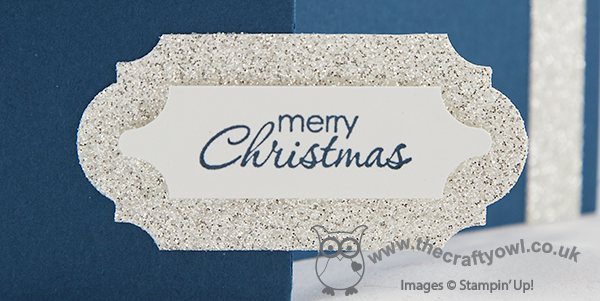
No, it's not a new label punch or two, I actually used my Mosaic Punch to create them! I'm all for making your tools work harder for you and this punch is great for creating labels as well as straight forward mosaic shapes. I shot a short video to show you how to make these labels; I actually made it a while ago, but didn't make a card to go with it, so haven't shared it until now. This also explains why the stamped pieces I used in the video are not the actual ones you see on today's card. If you're feeling confused, just watch the video - it will all make sense! Here's the link:

Just to recap on the measurements in the video: I recommend the narrow label is a maximum of 1.5cm in width, and the wider label 3.0cm in width. Either label can be of any length. I hope you found the video tutorial useful.

Lastly, don't forget, you have only until 11pm tomorrow night to order any of the 25 stamp sets that are 25% off - for details on the stamps on offer, click here.

Back tomorrow with another project; until then, happy stampin'!


Stampin' Up! Supplies Used:

Best of Christmas Santa Thinlit Card

by Joanne James25. October 2013 19:45

Apologies for the lack of blog posts for the last couple of days: Hubby has had a few days off so with him and the children, I've rather had my hands full! Yesterday however I had a largely child-free day as the James juniors were at Grandma's so, whilst the kiddies were away it was definitely an excuse to play and catch up on some crafting! Today I'm going to share my first Thinlits card with you, featuring the jolly Santa stamp from the 'Best of Christmas' anniversary set:

 I kept the card design quite simple as I wanted the detail on the santa stamp to take centre stage. I coloured him with markers and a blender pen, adding a little Dazzling Details to the fur on his hat for a little sparkle. Here's a close up: 

I then cut him out using the scalloped circle framelit that is one of the pieces that comes with circle thinlit set and adhered him to the card base. A little DSP on the back panel just finishes the card off.

So what do you think? These cards are so easy to make - they take just minutes to cut and roll and have lots of fun extra pieces in addition to the card body. I have another thinlit card to show you tomorrow, with a little video too, so I hope you'll pop back then and take a look. Already prepared as we have family coming for dinner tomorrow, so there will be little time for crafting. Hope to see you tomorrow; until then, happy stampin'!


Stampin' Up! Supplies Used:

Tags: , , , , , , , ,

Cards | Stamping

Merry Monday - Deck The Halls

by Jason James22. October 2013 21:30

I'm having a fun week at home with the James juniors this week, but it isn't leaving much time for crafting! Once we've finished our holiday homework we should be able to do some crafting together, which will be nice; I have a few Halloween things planned which I should be able to share with you in due course.

This week's Merry Monday Challenge is #80 'Use Music or a Carol Inspired Card' and having seen the great inspiration cards, I was keen to have a go. Here's my card:

I made a simple card where I cut out a circle using my Circle Framelits to reveal the 'deck the halls' stamp on the inside of the card. I decorated simply with some punched holly tied with baker's twine. I finished the punch berries with some Crystal Effects to add a nice shine (it looks much nicer in real life!) and scored the centre of my card panel using my Simply Scored borders plate to add some texture and interest to the Baked Brown Sugar card front. A simple card, yet I have this urge to break into song: Deck the halls with boughs of holly, fa la la la la, la la la la! I love Christmas time.

With all of yesterday's news, I didn't get round to sharing the link to this week's new digital downloads, so here it is:

October 22, 2013

There are some fun autumn pocket cards and some recipe layouts, along with a variety of different Christmas stamps to take a look at. The free trial for MDS is still available to download, so if you haven't already why not take a look - it will open up a whole new avenue of crafting to you.

Back tomorrow with another card; until then, happy stampin'!


Stampin' Up Supplies Used:


Christmas Banners A Plenty!

by Joanne James20. October 2013 20:51

Well, today has been a fun day with a Christmas Build a Banner project class this morning. Following many laughs and giggles and a fair number of inky fingers, the lovely ladies attending my class each made a festive banner using a variety of papers and embellishments and the Build a Banner set. So there are lots of photos in this post! First of all, here is my finished banner that served as their inspiration:

My colours are Bermuda Bay and Coastal Cabana, with rosettes made from some of the lovely Winter Frost DSP and Smoky Slate chevron ribbon and finished with Coastal Cabana bows. Here's some close-ups of the rosettes - the grey one:

And here's one of the Pool Party ones:

Here's a close up of one of the bows, so easy to put together using the new Bow Bigz Die:

And lastly one showing some of the added glimmer on the flag itself:

Here are two of the ladies' lovely finished banners. Firstly, Kathy's, also in the grey/blue colourway:


And this one is Julie's, in the red-green colourway with champagne glimmer accents:


Aren't they just beautiful? I didn't manage to get photos of the other two, but I can assure you they were just as lovely. We are all feeling a little more ready for Christmas now, with one more thing ticked off our Christmas home décor list. The Build A Banner kits are great and come highly recommended; at £17.95 for the full kit including stencils and just £8.95 for the basic set, they are great value. Rebecca has put first dibs on the remaining 9 pieces in my banner kit for a name banner for her bedroom (pictures will no doubt follow in due course!). I can see me having to buy another one so that Ben can have one too ...

If you live in or around Northampton and would like a current class schedule

Back tomorrow with another project; until then, happy stampin'!


Stampin' Up Supplies Used:

 Build a Banner Simply Created KitBuild A Banner Refill KitDesigner Rosette Bigz XL DieGift Bow Bigz L DieWinter Frost Specialty Designer Series PaperFestive Flurry Framelits DiesSmoky Slate 3/4 Chevron Ribbon


Silver Glimmer Paper - by Stampin' Up!Season Of Style Designer Series Paper Cherry Cobbler 1 Grosgrain Stitched Edge Ribbon


Festive Flurry Merry Monday Challenge

by Joanne James18. October 2013 21:06

I know, you're probably thinking 'Merry Monday? It's only Friday!' I'm not wishing away my weekend, far from it. Rather today's card is another Christmas card made with the challenge over at Always Playing with Paper in mind. The challenge was to use blues, grey/silver and white and snowflakes:

I've been wanting to use a sketch layout I saw over at the Paper Pal Arts site a little while ago; here's the card I made:

I used Pool Party for the base of my card and layered with Island Indigo and Smoky Slate and some of the Winter Frost DSP for the top layer. My design is anchored with a lovely Festive Flurry layered snowflake , which is stamped Whisper White on Pool Party cardstock for the first layer, Island Indigo on Whisper White for the second layer and then Metallic Silver on Whisper White for the top layer, finished with a single Island Indigo candy dot - I love these! Here's a close up of the snowflake, with the shimmery metallic silver finish (that is very difficult to photograph!):

This photo shows the build of layers of the snowflake - this set is so good for this and the framelits make cutting out so easy:

I finished the inside by stamping this verse from the Christmas Messages set:

As of today the James Juniors are on half term for two weeks. We have lots of homework to do, but I am relieved to be having a break from some of the challenges and routine of school life and looking forward to having fun with some pre-Christmas activities of our own. I'm also looking forward to another of my special project classes this weekend; I have a group of lovely ladies coming to make Christmas banners using the Build a Banner kit. Check out my Facebook page tomorrow if you would like a 'sneak peak'; otherwise I will be sharing the completed banners next week.

Back tomorrow with another project; until then, happy stampin'!


Stampin' Up Supplies Used:

 Big Shot Die-Cut Machine - by Stampin' Up!Festive Flurry Clear-Mount BundleMagnetic PlatformChristmas Messages Clear-mount Stamp SetWinter Frost Designer Series Paper Stack

Island Indigo Classic Stampin' PadWhisper White Craft Stampin' Pad - by Stampin' Up!Silver Metallic Encore PadRegals Candy Dots


Have Yourself a Merry Christmas - Spots

by Joanne James12. October 2013 20:27

It's the weekend and today I have the last of the cards from this week's class to share with you. This time another Merry Little Christmas, but with spots instead of stripes:


This time I used two of the stamps in the Merry Little Christmas set, and stamped the 'Merry' part of the main stamp again in Gumball Green and cut out with paper snips into a little banner to add some dimension. I also embossed the background piece of Cherry Cobbler with the Stylish Stripes embossing folder to add texture. Another simple yet effective design.

All the ladies at this month's classes were very pleased with their makes and we are already looking forward to next month when we will be adding to our Christmas card collection. If you would like to join us, please contact me for more details.

Back tomorrow with a birthday card; until then, happy stampin'!


Stampin' Up Supplies Used:

 Stylish Stripes Textured Impressions Embossing FolderBig Shot Die-Cut Machine - by Stampin' Up!Season Of Style Designer Series Paper StackGumball Green Classic Stampin' PadStamp-A-Ma-Jig - by Stampin' Up!

Cherry Cobbler Classic Stampin' Pad

Mini Catalogue

BROWSE THE CATALOGUE

The mini catalogue is now live! Read and download your copy here.

Shop Online

Access my online shop 24 x 7, 365 days of the year:

Current April hostess code:

VDKNV7BH

Shop Online

Join My Team

It's always a great time to join Stampin’ Up! New team members can get £130 worth of products for only £99 + free business supplies + free shipping + all the fun being a part of Stampin’ Up! Stampin' Up! has something for everyone: join my growing team and benefit from my support to enjoy Stampin' Up! however you choose.

If you're interested, call me for a chat to understand how I can help you realise your goals. Alternatively, if you have already decided to sign up and you just can't wait, please click here for the link to the online form where you can sign up and order your starter kit right away! 

Latest Kit!

Stampin Cut and Emboss

The Rock Legend Kit has all you need to make 8 cards with coordinating envelopes. Along with the new Panda Friends Kit, both are available from January 4th for just £14 each - get yours here!

2023-24 Annual Catalogue

BROWSE THE CATALOGUE

Click on the catalogue for a full list of current SU! supplies - if you would like to order any of the items featured, please drop me a line at [email protected] or give me a call on 07773 421446 - I'd be happy to help.

New Online Exclusives

There are new products available exclusively in the online store from 5 March - check them out here.

About Me

Hi I'm Joanne and live in Northampton and when I'm not looking after my husband and two beautiful children, am an avid crafter with a passion for all things Stampin' Up!

I must confess that I have never been a big rubber stamper - until I discovered Stampin' Up! that is. I love the fact that I can get such great results with co-ordinating stamps, inks, papers and punches - the possibilities are endless! Join me on my stamping journey as I share the things I love and be inspired to create amazing things yourself!

Follow Me

Monthly Newsletter

Box Builder

Click the button above to use Box Buster to create your custom box design using the Envelope Punch Board!

Kits Collection Now Available!

Stampin Cut and Emboss

The new Kits Collection from Stampin' Up! is now available!

Click here to see the current kits available and order yours online today.

I Design For


Stampin' Up Stuff

This is my personal blog and is not endorsed by Stampin’ Up! I hope you find it a plentiful source of ideas and personal inspiration but please don't copy my designs for contest submission or use for classes, publication or sale without express permission.