Falling in Love Anniversary Card

by Joanne James7. February 2017 21:01

Another busy day today with a class this morning, a quick lunch with friends and school runs and piano lessons amongst other things! Today I'm sharing a card that I made for the current challenge over at As You See It. This is one of my favourite challenges (I love the sketches this team come up with) and having had a few problems at the back end of last year, I am delighted they are now back on fighting form with their challenge in full swing. I missed the first challenge of the year but was determined to play along with this one. Here is the current AYSI sketch:

This sketch is a great opportunity to use a stamped panel or to showcase a piece of designer series paper. I went with the latter and needed an anniversary card - here's what I came up with:


Here's the low-down on today's card:

Falling In Love - I used a piece of Falling in Love paper for the panel on my card. A marriage of romance and shabby chic (the catalogue byline, not mine) these pretty patterns featuring ditsy florals, lace and bokeh patterns have an ethereal and dreamy quality. I paired mine with Very Vanilla and Tip Top Taupe cardstock; interestingly this isn't one of the feature colours in the suite (the neutral is Sahara Sand) but I think the slightly stronger brown works well.

Falling For You - My sentiment comes from one of the two stamp sets in this product suite, Falling For You. It includes some beautiful paired sayings, including this one that I stamped on the inside of my card to go with my outer anniversary wishes:


Ribbons and Lace - I wanted to keep my card flat and post-friendly, so chose to embellish it simply with a flat bow in the Very Vanilla 1/4" satin ribbon and a couple of the lace doilies. The new doilies have a very pretty pattern and are also printed Very Vanilla on one side and white on the other, so quite versatile.

Here is the visual summary of the key products used on today's project for you to pin for easy reference:


You can see all of my 'How To' summaries on my 'How To - Tips and Techniques' Pinterest board in case you've missed any. 

Enjoy your day and I'll be back tomorrow with another project. Until then, happy stampin'!


Stampin' Up! Supplies Used:

Table built using Product Table Builder by The Crafty Owl - Independent Stampin' Up! Demonstrator.

A Gift Of Love Quilt-Inspired Valentine's Card

by Joanne James5. February 2017 09:00

It's Sunday and time for this week's new challenge over at The Paper Players! It's the turn of my sweet friend Claire to host this week and she has a timely theme challenge for us to work with:


I've been sharing lots of Valentine's-themed cards with you in recent weeks, almost all of which have featured the Sealed With Love bundle and Sending Love Designer Series Paper. For today though I wanted to go back to some products in the annual catalogue that would make a Valentine's card but are not designed specifically with that in mind. I had a few bits and pieces out on my desk, then when I saw this week's inspiration photo over at Fusion I knew exactly where I was headed - I even used the sketch layout too (turned through 90 degrees). Here's what I came up with:


Here's the low-down on today's card:

A Quilt Of Love - I drew inspiration from a number of elements of the Fusion photo for my card: the border of pink flowers (courtesy of the Jar of Love stamp set), the cream textured panel (created with the Happy Heart Textured Impressions Embossing Folder) and the red flower-entwined heart as a focal point. My colour scheme also came directly from the photo - here it is if it's one you would like to save to use too:


Have A Heart - I die cut the heart from the Sunshine Wishes Thinlits set and embellished this with flowers from the Jar of Love set and leaves from Swirly Bird too. 

A Gift Of A Sentiment - The sentiment on my pale pink banner comes from the exclusive hostess set 'A Gift of Love'. I love the soft script of the sentiments in this set and think this one is such a lovely way to let someone know how much they mean to you. 

I think this is a pretty Valentine's card that makes a softer alternative to the bright red and white colour schemes of my previous cards. I'm also linking up with the team over at SUO Challenges where they are also celebrating Valentine's this week.

Here is the visual summary of the key products used on today's project for you to pin for easy reference:


You can see all of my Product and 'How To' summaries on my 'How To - Tips and Techniques' Pinterest board in case you've missed any. 

Before you reach for your ink and papers, check out what our amazing team has created to inspire you this week:

The Paper Players Design Team
 
 
Here's a quick recap of our challenge rules:
 
1.  Create a new paper project
2.  Upload your creation to your blog with a link back to us and provide a direct link to the post featuring your challenge submission.
3.  Please link your card to no more than four challenges, TOTAL.
4.  Have FUN! 


I look forward to seeing what you create with our fun theme this week. Enjoy the rest of your weekend as it will be over all too quickly; we have a morning of sport and one of the James Juniors has a trampolining birthday party to attend this afternoon. I'll be back tomorrow with another project; until then, happy stampin'!


Stampin' Up! Supplies Used: 

Table built using Product Table Builder by The Crafty Owl - Independent Stampin' Up! Demonstrator.

Sending Love Hearts, Hearts And More Hearts!

by Joanne James29. January 2017 09:00

It's Sunday and time for this week's new challenge over at The Paper Players! I am your hostess this week and I have a sketch for you to work with:


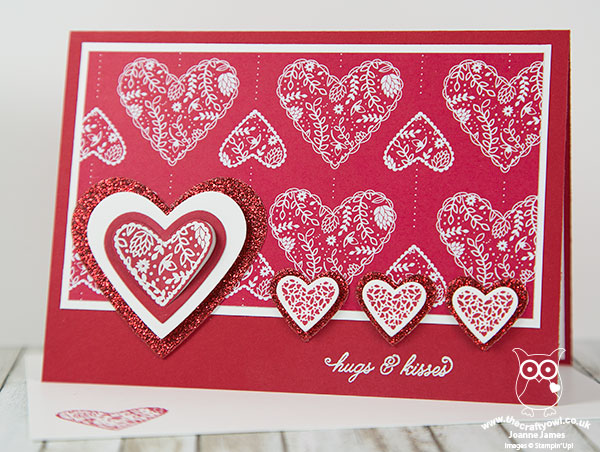
When I came up with my sketch I had an idea about what I was going to do with it, yet when I came to make my card ended up going in a completely different direction -go figure! I'm still loving those patterns in the Sending Love Designer Series Paper Pack and just had to feature another one on my card today  - take a look:


Here's the low-down on today's card:

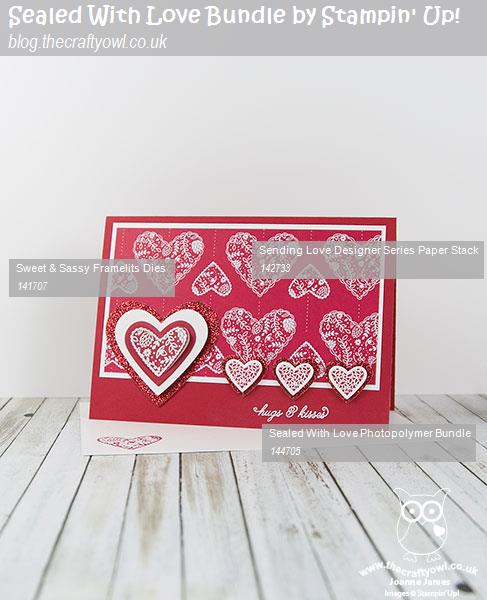
Sending Love - My sketch allowed me the opportunity to showcase another of these gorgeous red and white patterns in the Sending Love stack; the large panel is perfect for a bigger pattern, so I decided to go with the white hearts on a red background. This was the starting point for my card, my mat, base and embellishments followed from there. 

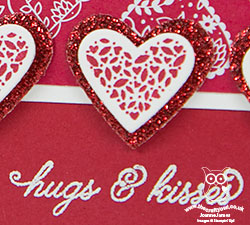
This Card Is All Heart - I decided to replicate the heart pattern in my embellishment shapes and represented each of the diamonds in my sketch with a layered heart. Having heat-embossed the white stamped heart onto red and layered this onto white to echo my mat border, I felt it still needed a little something; I decided to add in an additional background heart in red glimmer paper and bingo! I backed my tiny hearts with a red glimmer one too; all cut with the Sweet & Sassy framelit dies.

Hugs And Kisses - I heat embossed my sentiment in white directly onto my card base. I love the delicate scripted font and it was perfect for the recipient of this card; my daughter has a love of all things sparkly so with the addition of the glimmer paper this has to be her valentine's card. I paired my 'hugs and kisses' with an 'I love you' on the inside - and finished with the flourish that is also featured in this set.

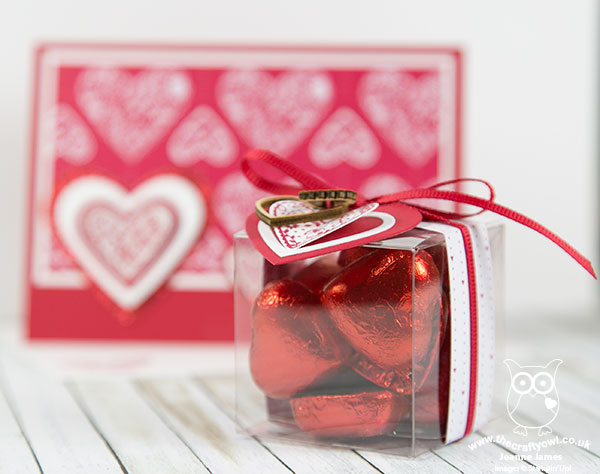
I've a second little project for you today - I can't give Miss Rebecca a Valentine's card without a chocolate treat , so here's a little something that took me just minutes to put together:


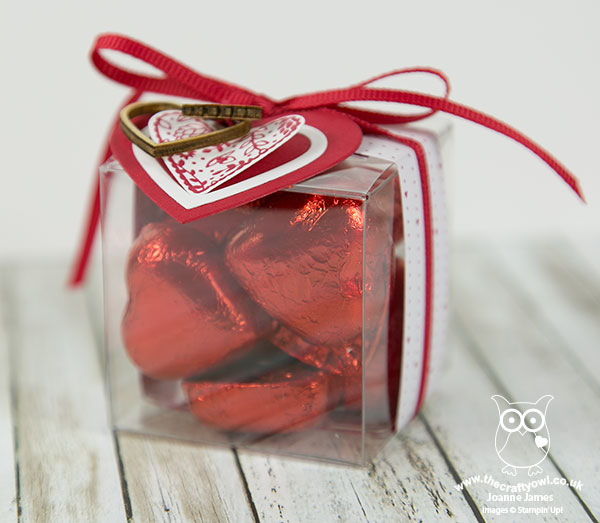
I took one of our clear boxes, filled it with chocolate hearts and added a belly band, some Sending Love red ribbon and a tag with some sweet Sending Love heart embellishments. I love that with just a few basic supplies I can turn a few chocolates into something special that I know my daughter will love. 

Here is the visual summary of the key products used on today's project for you to pin for easy reference:


You can see all of my Product and 'How To' summaries on my 'How To - Tips and Techniques' Pinterest board in case you've missed any. 

Before you reach for your ink and papers, check out what our amazing team has created to inspire you:

The Paper Players Design Team
 
These ladies have created some amazing cards to wow you with this week and have interpreted my sketch in a ton of different ways.
 
Here's a quick recap of our challenge rules:
 
1.  Create a new paper project
2.  Upload your creation to your blog with a link back to us and provide a direct link to the post featuring your challenge submission.
3.  Please link your card to no more than four challenges, TOTAL.
4.  Have FUN! 


I look forward to seeing what you create with my sketch this week. Enjoy the rest of your weekend as it will be over all too quickly; we have our usual morning of sport but have an unexpected free afternoon; both of the James Juniors have had sports fixture cancellations this weekend, so we will be able to enjoy some unexpected additional family time together - I'm looking forward to it already! I'll be back tomorrow with another project; until then, happy stampin'!


Stampin' Up! Supplies Used: 

Table built using Product Table Builder by The Crafty Owl - Independent Stampin' Up! Demonstrator.

Love and Embossing Folders!

by Joanne James10. February 2016 21:00

I've had a busy day today with a couple of meetings and a long task list, but many jobs ticked off so very productive! I even managed to fit in a quick spot of crafting this evening so rustled up this fun card for this week's sketch over at As you See It:

AYSIChallenge122     SIP Challenge 34 - Love 800   

Whilst I started out with the sketch (as is often my way!), I also have a few more linkups, as I used the Color Throwdown colours too for my card, the technique that is being featured over at Happy Little Stampers and my card fits with the theme over at Stamps, Ink, Paper. It's not often that this happens, but all of these came together neatly for today's card which is definitely destined for a Valentine - take a look:

I created some simple layering using Pink Pirouette, Rich Razzleberry and Gold foil cardstock to frame my central panel, which I created by inking the solid heart side of my Happy Heart embossing folder and using it to stamp the pattern onto a piece of Shimmery White cardstock. I tried a few different versions, some that I spritzed with water and some without, and this one which was stamped on 'dry' was my favourite. To finish I added a melon Mambo punched heart and my diecut 'love' sentiment from the retired Expressions thinlits - retired it may be, but I will never part with mine, I just love those diecut words and this one was perfect for today's card. 

This is one of those cards that was really fun to make - a little time getting well and truly inky can bring such pleasure! I just love the effect from the inked embossing folder too - I think it makes an unusual background and is a great way to get further mileage out of your embossing folders. In real life this card has a wonderful lustre and sparkle too - difficult to see in the photograph though, so you'll just have to take my word for it!

That's all from me today; back bright and early tomorrow with this week's new challenge over at Create With Connie and Mary. Until then, happy stampin'!


Stampin' Up! Supplies Used:

Table built using Product Table Builder by The Crafty Owl - Independent Stampin' Up! Demonstrator.


'I Love You This Much' Bear Hugs Double Slider Card

by Joanne James4. February 2016 08:05

Today it's time for a new challenge over at Create With Connie and Mary and this week we have a colour combination for you:


These three colours feature in the Love Blossoms Designer Series Paper Stack which made it an obvious choice to feature on my card today, but I also wanted to have a go at a fun card using the 'Bear Hugs' stamp set. The saying in this set 'I love you this much' was just asking for a bear with growing arms; it was on my 'to do' list when I saw this great example by Kirsteen Gill and knew that a double-slider card was the way forward. The mechanism in my card is the same as Kirsteen's, however I altered my measurements and dimensions to fit a standard A6 14.9cm x 10.5cm metric card. Here's my finished card:

A simple enough layout, using a base of Blushing Bride and a piece of Blushing Bride heart-patterned paper from the Love Blossoms pack too. I used the Rose Red for my border, sentiment and stamped heart but the real fun element of this card is what happens to my Crumb Cake bear when the little tab is pulled on the side of the card:

His arms expand to show just how much he loves you - isn't that just the cutest?!! Interactive cards are such fun, whatever the occasion - my daughter loved this one! 

Do visit the other Design Team members to see what they did with this week's colours; there's lots of inspiration over on their blogs too!

Enjoy your day and I'll be back tomorrow with another project; until then, happy stampin'!


Stampin' Up! Supplies Used: 

  • Bear Hugs Clear-Mount Bundle
  • Love Blossoms Designer Series Paper Stack
  • Crumb Cake A4 Cardstock
  • Early Espresso Classic Stampin' Pad
  • Rose Red Classic Stampin' Pad
  • Rose Red A4 Cardstock
  • Blushing Bride A4 Cardstock
  • Whisper White A4 Cardstock
  • Big Shot
  • Word Window Punch

Love You Hearts Border Card

by Joanne James3. February 2016 18:00

I had a great day of classes yesterday, with my second 'Love Blossoms' technique class of the month and my Project Life memory keeping class - lots of fun layouts of babies, toddlers, wartime Cairo and sightseeing in New York to name a few! I so enjoy my Project Life class and feel privileged to have my ladies share and document their precious memories with me. 

Today I'm sharing a Valentine's card that uses this week sketch over at As you See It that also fits the colour palette over at Can You Case It: black, reds and white or neutrals. I was also inspired by the photo of the ombre repeated heart biscuits over at The Card Concept to create my 'Clean and Layered' card today:

AYSIChallenge121  CYCI#105

I decided on some layered heart borders for the striped/border elements of my card using a trio of reds and a sentiment stamp I don't use very often - take a look:


A trio of Watermelon Wonder, Real Red and Cherry Cobbler panels, layered so that the alternating colours show through, and the hearts that I punched out using my Hearts border punch I randomly adhered, spilling from the sentiment, taken from the 'Friendly Wishes'  stamp set. A Basic Black mat for definition and a double bow of black and white baker's twine finish my card. Hearts and reds - what more do you need for the perfect Valentine?

That's all from me today; back tomorrow with a card for this week's new challenge over at Create With Connie and Mary. Until then, happy stampin'!


Stampin' Up! Supplies Used:

Table built using Product Table Builder by The Crafty Owl - Independent Stampin' Up! Demonstrator.


Love Blossoms Bloomin' Heart Shadow Box Frame Card

by Joanne James1. February 2016 21:11

Happy Monday everyone! Today I have a rather special card to share. I made another shadow box frame card using the same tutorial by the lovely Amanda Bates at The Craft Spa as the card I shared previously here  - she is without a doubt the queen of fancy folds in my book! The beautiful Bloomin' Heart thinlit was asking to be made into the centrepiece of a shadow box card I thought. So here's mine:

I made my base out of Whisper White with the heart cut out of Rose Red and embellished with Blushing Bride Glimmer Paper flowers and pearls and decorated my frame with a piece of Love Blossoms designer series paper. The square that I cut out of the centre was used to decorate the box that acts as the 'envelope' for the card:

I think this makes a great 'wow' card for a special birthday, Valentine, wedding, anniversary - and the boxed card can even be sent through the post as a large letter, although I must admit I think I'll be hand delivering mine!

That's all from me today; back tomorrow with another project. Until then, happy stampin'!


Stampin' Up! Supplies Used: 

Table built using Product Table Builder by The Crafty Owl - Independent Stampin' Up! Demonstrator.

Love At First Sight

by Joanne James30. January 2016 20:00

I hope you are all enjoying your weekends. So far mine has been spent doing laundry, assisting the James Juniors with their homework (Ted Hughes poetry and an art project today!) and preparing for my technique classes next week. I did find time to finish a card that I started yesterday though: another Valentine's card, using this week's sketch over at Freshly Made Sketches and the top line of the tic-tac-toe board over at Stamps, Ink, Paper and fitting with the 'love' theme over at Paper Craft Crew too.

   SIP Tic Tac Toe 32 800    Love Theme Challenge 179 for the Paper Craft Crew.

In order to fit in my large sentiment, I went with an unusual 8 1/4" x 5 1/2" sized card - take a look:

I stamped the 'l v e' from the 'Larger Than Life Alphabet and Numbers' stamp set in Versamark and heat embossed them in black, then substituted the 'o' from my 'love' sentiment with the heart from the 'First Sight' set, which I stamped in Real Red on Real Red cardstock, then overstamped again in Versamark and heat embossed with clear embossing powder for additional shine. I used a piece of Everyday Chic designer series paper for my border panel and finished off my sentiment inside the card with one of the 'Hello You' thinlits and an outline stamped red heart:


I even created a custom envelope with some Real Red envelope paper and the help of my trusty Envelope Expert tool, which I also decorated with a stamped red heart.

I love the layers of this card and the letters shine beautifully; I think this may be one of my favourite Valentine's cards that I've ever made. Today's blog title comes from the combination of one of the stamp sets I've used today and the sentiment and it got me thinking - I remember meeting my now husband for the first time and thinking even then he would be the man I would one day marry; I do believe there is such a thing as love at first sight - do you? Do leave me a comment below today's post - I would love to know what you think.  

That's all from me today; back tomorrow with a new card for this week's challenge over at The Paper Players. Until then, happy stampin'!


Stampin' Up! Supplies Used: 

Table built using Product Table Builder by The Crafty Owl - Independent Stampin' Up! Demonstrator.

Love You Tilted CAS Card

by Joanne James29. January 2016 22:40

Happy Friday everyone! Firstly, I must say a big 'thank you' to everyone who came by to see yesterday's Mrs Potts and Chip card - I have received many wonderful comments on this card both here on my blog and wherever I've shared it, so thank you all so much! Whereas yesterday's card was a little more involved, today's card is almost as CAS as it get! I managed to snatch a quick 10 minutes at my desk this evening so made this Valentine's card for a few challenges:

SIP Tic Tac Toe 32 800      

I went with the top link of the tic-tac-toe board over at Stamp Ink Paper and red/punch or die cut/heart and also used the tilted sketch over at CAS Colours & Sketches to add a little more red to my sketch, which is the theme over at Addicted to CAS. Here's my card:

A Real Red base, a twisted panel of white and a simple sentiment; I used the heart-shaped 'steam' die from the Cups & Kettle Framelits Dies for my heart, which I cut out of red foil for a little dimension and shine. So clean, so simple - and I love it!

That's all from me today; back tomorrow with another project. Until then, happy stampin'!


Stampin' Up! Supplies Used:

Table built using Product Table Builder by The Crafty Owl - Independent Stampin' Up! Demonstrator.


Love Blossoms With The Bloomin' Heart Thinlit Die

by Joanne James2. January 2016 08:00

Today I have another 'sneak peek' card for you, featuring some beautiful new designer series paper and a most beautiful die. I used the sketch over at Freshly Made Sketches for the layout for today's card:

   SIP Challenge 28 - No Christmas 800

I'm also linking up with the team over at Stamps Ink Paper who are asking for anything so long as it's not Christmas! The 'Love Blossoms' suite on the new Spring-Summer catalogue includes a stamp set, papers, thinlit die, pink glimmer paper and an accessory kit and my card today uses each of the first three:

The thinlit die looks great in a single colour with or without the flowers highlighted, but for my card today I chose to cut out my heart in Garden Green, adding additional flowers in Rose Red and Blushing Bride that I cut with the other thinlits in the set and also paper-piecing some flowers into the negative spaces of the die. I highlighted the hearts in pink and added some tiny pearls to break up the green further. 

You can see the detail of the subtle layering and finish on the close-ups below: 

The die itself is so intricate, yet with another new tool available with the new catalogue, the Big Shot Die Brush, it is really easy to separate into its various parts - just look at the detail on the flowers themselves:

The sentiment is from the 'Bloomin' Love' set and the banner cut out with the co-ordinating framelit from the 'Large Numbers' framelits dies, also available in the new catalogue.

Whilst the Love Blossoms set and in particular the Bloomin' Heart thinlit die makes for beautiful Valentine's Day cards, it is versatile enough to be used for anniversaries, weddings, birthdays or even Mother's Day too. I paired my outer sentiment with one from another set, 'First Sight', on the inside of my card to make a very fitting tribute to a Mum - take a look:

A beautiful sentiment for the prettiest of cards!

That's all from me today; I'll be back tomorrow with my card for this week's challenge over at The Paper Players. I am the hostess for our first challenge of the new year, so do pop back to see what I've chosen as the challenge this week. Until then, I have a few jobs to do today and we are back to the pool for our first swimming following the Christmas break. I'm almost envious that it's only the James Juniors getting in the water; I could do with losing a few post-Christmas pounds and this seems like it could be a good place to start! Happy stampin'!


Stampin' Up! Supplies Used:

Available 5th January:

140818 Bloom' Love Stamp Set and Bloomin' Hearts Thinlits Dies Bundle

140548 Love Blossoms Designer Series Paper Stack

140685 First Sight (clear mount) 

140603 Big Shot Die Brush

Table built using Product Table Builder by The Crafty Owl - Independent Stampin' Up! Demonstrator.


Mini Catalogue

BROWSE THE CATALOGUE

The mini catalogue is now live! Read and download your copy here.

Shop Online

Access my online shop 24 x 7, 365 days of the year:

Current April hostess code:

VDKNV7BH

Shop Online

Join My Team

It's always a great time to join Stampin’ Up! New team members can get £130 worth of products for only £99 + free business supplies + free shipping + all the fun being a part of Stampin’ Up! Stampin' Up! has something for everyone: join my growing team and benefit from my support to enjoy Stampin' Up! however you choose.

If you're interested, call me for a chat to understand how I can help you realise your goals. Alternatively, if you have already decided to sign up and you just can't wait, please click here for the link to the online form where you can sign up and order your starter kit right away! 

Latest Kit!

Stampin Cut and Emboss

The Rock Legend Kit has all you need to make 8 cards with coordinating envelopes. Along with the new Panda Friends Kit, both are available from January 4th for just £14 each - get yours here!

2023-24 Annual Catalogue

BROWSE THE CATALOGUE

Click on the catalogue for a full list of current SU! supplies - if you would like to order any of the items featured, please drop me a line at [email protected] or give me a call on 07773 421446 - I'd be happy to help.

New Online Exclusives

There are new products available exclusively in the online store from 5 March - check them out here.

About Me

Hi I'm Joanne and live in Northampton and when I'm not looking after my husband and two beautiful children, am an avid crafter with a passion for all things Stampin' Up!

I must confess that I have never been a big rubber stamper - until I discovered Stampin' Up! that is. I love the fact that I can get such great results with co-ordinating stamps, inks, papers and punches - the possibilities are endless! Join me on my stamping journey as I share the things I love and be inspired to create amazing things yourself!

Follow Me

Monthly Newsletter

Box Builder

Click the button above to use Box Buster to create your custom box design using the Envelope Punch Board!

Kits Collection Now Available!

Stampin Cut and Emboss

The new Kits Collection from Stampin' Up! is now available!

Click here to see the current kits available and order yours online today.

I Design For


Stampin' Up Stuff

This is my personal blog and is not endorsed by Stampin’ Up! I hope you find it a plentiful source of ideas and personal inspiration but please don't copy my designs for contest submission or use for classes, publication or sale without express permission.