Beautiful Bouquet Goes Bananas For Customer Thank You Cards

by Joanne James28. May 2018 21:30

Happy Memorial Day to all my US readers! Today has been a Bank Holiday here in the UK too and despite the severe flash flooding of yesterday evening (I haven't sen rain like it!!), today the sun managed to come out again and this afternoon was warm once more, so I've been otherwise occupied today. I've just time for a quick share of some humorous 3"x3" customer thank you cards that I made recently using up some of my Tutti-Frutti designer series papers and a punny sentiment from Beautiful Bouquet:

I wasn't sure how I was going to use that banana patterned paper then suddenly thought of this sentiment from Beautiful Bouquet and thought  - well, why not?! I'm not sure I would thank someone with a bunch of bananas as opposed to a bunch of flowers, but it made me giggle - maybe I'll have to give it a try! 

Here's a selection of my cards together:


They all fit perfectly into a 3"x3" envelope and are just the right size for adding to the bagged orders for my face-to-face customers.

Here is the visual summary of the key products used on today's project for you to pin for easy reference:


You can see all of my 'How To' summaries on my 'How To - Tips and Techniques' Pinterest board in case you've missed any. 

I'll be back tomorrow with another project. Until then, happy stampin'!


Stampin' Up! Supplies Used:

Table built using Product Table Builder by The Crafty Owl - Independent Stampin' Up! Demonstrator.

Sunburst Sayings and Thinlits Shine It's Your Day

by Joanne James6. March 2016 09:00

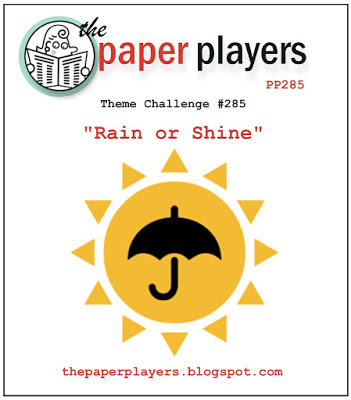
Firstly, happy Mothering Sunday to all UK mothers reading this - today is most certainly our day! It's also Sunday and time for a new challenge over at The Paper Players! It's the turn of the talented Sandy to host our challenge this week and she has a great theme for you to play along with:
    PPA-290-Mar03

I was all set to make a rainy day card for today's challenge but I couldn't get the idea in my head to work on paper - so some other time for that card! Instead I decided to use my Sunburst Thinlits and create a bright sunshine card which came together much more like my vision:
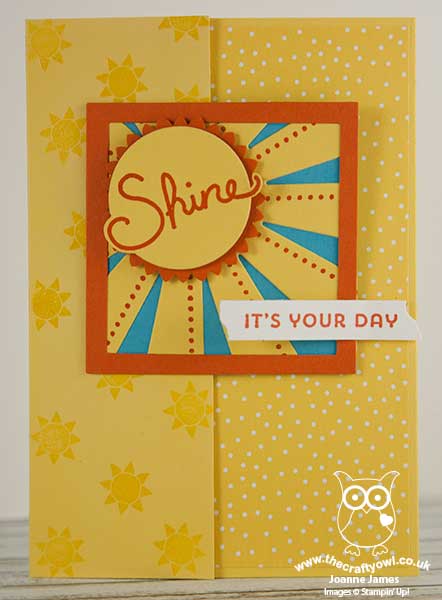
 

I used this week's sketch over at Pals Paper Arts for my layout and created a fun fold card, where the second part of my sentiment acted as a clasp to hold the left-hand panel closed. I used a panel of Daffodil Delight spotted Schoolhouse Designer Series Paper on the right-hand panel and on the left I stamped some sunshines in Versamark and heat embossed them with clear embossing powder. This sunshine is from one of the early limited edition Sale-A-Bration sets, 'Hello' and the good news is that availability of this stamp set has been extended while stocks last. You've still time to snap it up, but you'd better be quick!

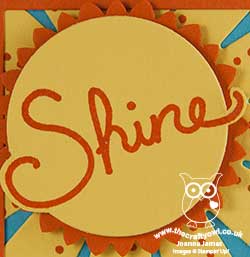
For my main square, I used a background of Tempting Turquoise to which I added a Daffodil Delight sunburst, edged with Tangelo Twist. For my sunshine centre, I stamped 'Shine' from the 'Sunburst Sayings' stamp set onto some Daffodil Delight cardstock and fussy cut the outer elements of the sentiment before cutting the remainder with a circle framelit, which allowed my sentiment to overhang. I backed this circle with a mat cut from a 1 3/4" scalloped circle punch, that I punched once then rotated and punched again to create the starburst effect - this is a neat little trick and perfect for this kind of design. It's also a great way to get a second shape from one punch. I then framed the whole square with a Tangelo Twist frame cut using my square framelits. The second part of my sentiment was cut with the washi tape thinlit from the Mini Treat Bag Thinlits set and I adhered this with a dimensional to the right so that it could serve to hold the fold shut. I just love the bright sunshine colours of today's card and the layering of all the elements within the focal square - this will certainly brighten someone's day. The 'Sunburst Sayings' stamp set and Sunburst Thinlit die are another of the great 'bundle and save' offers in the current seasonal catalogue, giving you a saving of 15% when you purchase them together - bonus!

Here's today's visual summary for easy reference:
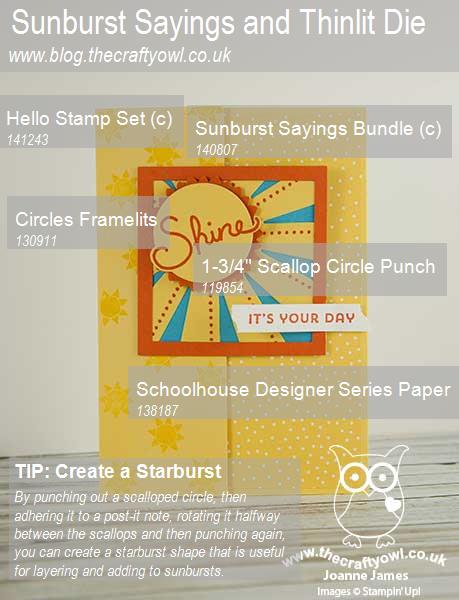
 

Thank you to everyone who has left me a sweet comment or feedback on these new graphics, which have been very well received; they make great Pins too!

Before you reach for your ink and papers, check out what our amazing team has created to inspire you this week:

The Paper Players Design Team
 
 
Here's a quick recap of our challenge rules:
 
1.  Create a new paper project
2.  Upload your creation to your blog with a link back to us and provide a direct link to the post featuring your challenge submission.
3.  Please link your card to no more than four challenges, TOTAL.
4.  Have FUN! 

I look forward to seeing what you create with our theme this week. We are off to basketball this morning with time for a special Mother's Day lunch before venturing out to a birthday party this afternoon. Not quite the restful Mother's Day I had in mind, but life goes on today as always and as my family frequently tell me "Every day is Mother's Day in the James Household!". I have been treated to cards, flowers and gifts today so I am feeling perhaps a little more loved than usual :-) 

I hope you all have an enjoyable Mothering Sunday, whether you are celebrating or are focused on other things today. Back tomorrow with another project; until then, happy stampin'!


Stampin' Up! Supplies Used:

Table built using Product Table Builder by The Crafty Owl - Independent Stampin' Up! Demonstrator.

Thanks A Bunch Sprinkles Of Life Flap Fold Card

by Joanne James29. August 2015 09:00

Good morning everyone - yay, it's the weekend! Today I'm sharing one of the cards from my last technique class using the Sprinkles of Life stamp set:

This is an example of a Flap Fold Card - Julie Davidson has a great tutorial which you can find on Splitcoast Stampers here. The 'how to' on this card is fairly straightforward to see from the pictures, but if you have any questions then leave me a comment below and I will happily provide more detail. This was our easy 'warm up' card for a class that also featured a couple of other fun folds, along with the great 'Sprinkles Of Life' set - this year's Stampin' Up! stamp set that fundraises for the Ronald McDonald House Charities charity. Here's a photo of the inside so that you can see how the fold works: 

My next technique classes are on the 7th and 8th of September and will feature the new 'Reason For The Season' stamp set and co-ordinating Festive Flower Builder Punch. The class will cost £26 per person and this will include your own stamp set to take home. Alternatively, you can also purchase the co-ordinating punch at the time of class booking and pay £30 - this will mean your class will cost a mere 25 pence. if that's not great value, I don't know what is! All class reservations need to be made by tomorrow Sunday 31st August, so if you haven't already reserved a place and would like to join me, contact me by email at joanne@thecraftyowl.co.uk to reserve your place. 

I'm off on a boat trip today into the Wash along the north Norfolk coast in the hope we can spot some native seals; wish me luck!

Back tomorrow with another project; until then, happy stampin'!

Tags: , , , , , , ,

Cards | Stamping

Save More With Wednesday Deals and More Bargains Added To The Clearance Rack!

by Joanne James1. July 2015 09:00

Weekly Deals

It's Wednesday and you know what that means: a new collection of Wednesday Weekly Deals! This week's deals are even sweeter though - there are more offers, with increased reductions of up to 30% on Weekly Deals this month, although there are allocated quantities at the increased offer price; once they're gone, the price will revert to RRP, so don't delay in ordering if there is something on your wish list. As always, a new collection of deals will be announced next Wednesday.

If you want to take advantage of any of the deals on offer, you can support my business by placing your order online by clicking here or using the link to my store on the right hand side of my blog page where it says 'Shop Online' or with me in person. Don't forget to add the new Hostess Code for July UPCSWX2C if your order is under £150 and be sure to make sure that you don't check the 'no contact' box if you'd like to be kept updated with the progress of you order and receive a little thank you in the post from me. 

Here's a summary of this week's one-week only Wednesday deals - click on each item to go to the online store to purchase:

Table built using Product Table Builder by The Crafty Owl - Independent Stampin' Up! Demonstrator.

Lots of great offers on there - those leaf framelits are a bargain and some great cardstock packs to match your DSP. Check out the in-colour washi tape and gorgeous Lost Lagoon cotton ribbon too. As if that wasn't enough, the Clearance Rack has updated today too with some great bargains to be had with 60% or more off. Check it out here.

Clearance Rack

Back shortly with today's creative post; meanwhile, happy shopping!

Bohemian Petite Cafe Gift Bag

by Joanne James6. June 2015 21:51

Just time to squeeze in a quick post from me today to share a really quick and easy packaging idea using the Stampin' Up! Petite Cafe gift bags and some lovely new product from the 2015-16 Stampin' Up! Annual Catalogue:

Isn't the little shopping trolley so cute?! This was a gift to me from my wonderful upline Monica recently and I wanted to share the lovely bag with you. It is decorated with the new Bohemian DSP and a stamped scallop circle with one of the stamps from the new 'Friendly Wishes' stamp set. The banners were punched in seconds using the new Triple Banner Punch and the bag was finished off with some Venetian Crochet Trim and Metallic Gold Baker's Twine. What was inside? Well, that would be telling...but it was yummy!

With packaging so quick and easy to recreate there really is no excuse not to add the handmade touch to your sweet treats!

Back tomorrow with a special project for the new challenge over at The Paper Players where I am the hostess this week. Come back then - I guarantee you won't want to miss it! Until then, happy stampin'! 


Stampin' Up! Supplies Used:

Table built using Product Table Builder by The Crafty Owl - Independent Stampin' Up! Demonstrator.


Light 'Em Up Birthday Bash Birthday Card

by Joanne James14. May 2015 08:05

It's Thursday and time for a new challenge over at Create With Connie And Mary and this week we have a sketch challenge for you - my favourite!


This is a great card for using up scraps of DSP so I set to work with my Birthday Bash Speciality DSP and Birthday Bash Stamp set to create today's card:

I let the DSP drive the colour scheme for my card so used a Crushed Curry base with a panel of Night Of Navy down the left hand side, which I then overlaid with four co-ordinating rectangles of patterned paper. I then added a piece of Night of Navy seam binding ribbon to cover the join and for my focal point stamped the candles from the 'light 'em up' stamp in the Birthday Bash set in navy on Whisper White, having masked off the words first. I coloured this with my Calypso Coral, Bermuda Bay and Crushed Curry Stampin' Write markers and layered this circle onto another of Night of Navy and two scalloped circles, one each in Bermuda Bay and Calypso Coral. I also punched the candle flames out of Tangerine Tango using my owl builder punch - a small touch, but looks so much better than navy ones! To finish, I stamped the sentiment, this time masking off the candles, in navy in the right hand corner.

I made this card with the ladies in my Stamp-A-Stack class last week and they loved it, so I hope you like it too. Don't forget if 'Birthday Bash' is on your wishlist, it will be retiring on 2nd June so don't leave it too late to place your order. 

That's all from me today - I look forward to seeing your takes on this week's sketch in the gallery. 

Back tomorrow with another project; until then, happy stampin'!


Stampin' Up! Supplies Used:

  • Birthday Bash Specialty Designer Series Paper
  • Balloon Bash Photopolymer Stamp Set
  • Night Of Navy Classic Stampin' Pad
  • Night Of Navy A4 Card Stock
  • Card Stock A4 Crushed Curry
  • Calypso Coral A4 Card Stock
  • Card Stock A4 Bermuda Bay
  • Card Stock A4 Tangerine Tango
  • Night Of Navy 1/2" Seam Binding Ribbon
  • Whisper White A4 Card Stock
  • 2-3/8 Inch Scallop Circle Punch
  • 2" Circle Punch
  • Big Shot Die-Cut Machine
  • Circles Collection Framelits Dies
  • Big Shot Magnetic Platform
  • Owl Builder Punch


Flowerpot Thanks For The Paper Players

by Joanne James22. March 2015 10:00

It's Sunday and time for a new challenge over at The Paper Players. There were some great CAS florals last week and this week we have my favourite kind of challenge. My good friend and talented team member LeAnne has a great sketch challenge for us:

I decided this sketch would be great for a DSP showcase, so today I have a very bright and colourful card to share with you:

I covered my entire card front with a piece of one of the 'busy' patterns from the Flowerpot DSP pack then used a piece of vellum to tone down the pattern so that my 'thanks' die cut in Night of Navy would still stand out against the pattern. I wrapped a piece of Tangerine Tango around the vellum in a bow before adhering it to my card base, using glue dots where they are covered by other elements so that they don't show through. I added the second part of my sentiment from the 'Crazy About You' stamp set and layered over my banner trio, punched out of colours I had picked up from the pattern using my banner punch. Lastly, I finished with a bold orange flower finished with a candy dot.

This card has such a clash of bright and bold colours and yet I think they work with the sketch beautifully. There are some great cards from the Design Team this week, all of whom have interpreted the sketch in interesting ways. Do pop by their blogs and take a look:

The Paper Players Design Team
 
Here's a quick recap of our challenge rules:
 
1.  Create a new paper project
2.  Upload your creation to your blog with a link back to us and provide a direct link to the post featuring your challenge submission.
3.  Please link your card to no more than three challenges, TOTAL.
4.  Have FUN! 

I look forward to seeing your takes on this week's sketch in our gallery this week. 

No lie in for me as I am off for an early morning of hockey as today is tournament day and then hopefully home again to dinner cooked by the men in our house - this is becoming something of a habit! Back tomorrow with another project; until then, happy stampin'!


Stampin' Up! Supplies Used:

Table built using Product Table Builder by The Crafty Owl - Independent Stampin' Up! Demonstrator.


You're My Lobster Valentine's Card

by Joanne James2. February 2015 11:18

Happy Monday everyone! I have a desk-based week this week and I'm looking forward to getting a headstart on preparation for my next set of classes and getting some projects prepared, following the flurry of classes and parties last week. Today's card is one I made with my Valentine in mind - very masculine and not a heart in sight! - but with a sentiment that I just know will strike a chord - take a look:

Now if you are of a similar age to me (forty-something - I'm saying no more!!) you may well have lived through the era of the American sitcom 'Friends'. My husband and I have watched every episode more times than I can count and still laugh occasionally at the things we say or do that are inspired from this classic television series. One of my favourite episodes is the one where amidst the ongoing drama of the on-off relationship between Ross and Rachel, Phoebe announces that they will get back together again because just like lobsters, who are known to fall in love and stay together for life, Rachel is Ross's lobster. After some drama, it takes a viewing of Rachel and Monica's old prom video tape for Rachel to realise that she does indeed want to be with Ross and Phoebe triumphantly declares "He's her lobster!" I've made lots of cards featuring both the crab and lobster from the Sea Street set and I couldn't pass up the opportunity for a play on words with this one. I chose a simple layout featuring some of the co-ordinating Maritime DSP and used a simple font in Word for my bespoke sentiment. Whilst there's not a heart in sight, mu husband for one will appreciate the romantic gesture of this card!

If you too are nostalgic for some classic TV - or just want to know what the heck I'm rambling on about today! - here is that clip in all it's glory:

On that happy note, I will love you and leave you until tomorrow, when I will be back with another project. Until then, happy stampin'!


Stampin' Up! Supplies Used:

Table built using Product Table Builder by The Crafty Owl - Independent Stampin' Up! Demonstrator.


Crazy About ... The Hello You Thinlits!

by Joanne James11. January 2015 07:00

It's Sunday and time for this week's challenge over at The Paper Players, where today Anne has a great colour challenge for us:


I also used the current sketch over at The Deconstructed Sketch as the basis for the layout of my card. So for my card today I've had the first opportunity to play with one of my most favourite products from the new Spring-Summer catalogue: the new 'Hello You' thinlits. I loved the Expressions thinlits we had previously and I still use mine and would never part with them, so I was delighted to see a whole new set of word thinlits in the new catalogue, and the fabulous 'Crazy About You' stamp set that co-ordinates with them. The number of sentiment possibilities are endless! Anyway, using Anne's colour choice today, this is what I came up with:

I went with a square card and lots of layers. The layers are Sahara Sand and Lost Lagoon, with the Sahara Sand DSP from the 'Moonlight' DSP paper stack. I die cut the word 'hello' from my central Sahara Sand square, then inlaid this with another 'Hello' diecut in Crisp Cantaloupe, allowing the Lost Lagoon from the layer below to show through into the negative space. I finished my sentiment with a 'you' stamped in Lost Lagoon on a banner of Whisper White, that I tucked under my Crisp Cantaloupe stamped flower. I diecut some leaves and a centre for my flower from Lost Lagoon cardstock using my Flower Frenzy Bigz Die, then finished it with a white button threaded with Crisp Cantaloupe thick baker's twine. I love how the 'Hello You' thinlit dies can be used in so many ways. Just look at the detail on this close-up:

I hope you like this card and are as crazy about the new thinlits dies as I am. Watch this space for lots more ideas from me!

We are back to hockey and rugby following the Christmas break today; no rest for the parents of sporty ones, it seems! At least dinner is prepared and will be in the slow cooker waiting for us on our return. Before you reach for your ink pads, do visit the other design team members to see what interesting ideas they've had this week:

The Paper Players Design Team

I look forward to seeing your projects in the gallery this week. Back tomorrow with another project; until then, happy stampin'!


Stampin' Up! Supplies Used:

Table built using Product Table Builder by The Crafty Owl - Independent Stampin' Up! Demonstrator.


Hello Best Year Ever Card - Well Let's Hope So!

by Joanne James3. January 2015 21:02

I finally feel like I'm nearing the end of our Christmas celebrations today: we have enjoyed our annual visit to the pantomime with friends (and Granny!) and as much as I love the holiday season, I'm looking forward to taking our decorations down, which is I think a job for tomorrow. Today I'm sharing a card I made for Julee's sketch this week over at Mojo Monday:


It is 'tall and skinny' week so I made my card to the dimensions 3.5" x 5.5" and since I'm having a complete run on 'Best Year Ever' Sale-A-Bration designer series paper, I just had to use it again on my card today:

I used the large polka dot embossing folder on my card base, then having first paper-pierced the edges of my strip of Crushed Curry, created a belly band to wrap around the front of my card to which I attached my focal point - the hello stamp from the '#hello' stamp set, stamped in Calypso Coral on Whisper White and mounted on two offset scalloped circles.

To finish, I even made a bespoke envelope to match my tall and skinny card, also using the Best Year Ever paper - so easy with the help of my Envelope Expert Tool, this makes any bespoke envelope size a breeze.

Back tomorrow with my first card of the year for The Paper Players, this time as a permanent member of the design team too - woohoo! We have a great challenge for you to start the year, so do come back and find out all about it tomorrow. Until then, happy stampin'!


Stampin' Up! Supplies Used:

*Best Year Ever Designer Series Paper - available 6th January - 31st March 2015 Sale-A-Bration.

Table built using Product Table Builder by The Crafty Owl - Independent Stampin' Up! Demonstrator.


New Online Exclusives

There are new products available exclusively in the online store from 5 November - check them out here.

Latest Kits!

Stampin Cut and Emboss

The Layered Landscapes Kit and Nature's Paintings Kit are the latest kits in the online store - get yours here!

Shop Online

Access my online shop 24 x 7, 365 days of the year:

Current November hostess code:

9NKXDTTR

Shop Online

Mini Catalogue

BROWSE THE CATALOGUE

'Tis The Season - the new Stampin' Up! Mini Catalogue is here! For more details and to download your copy click here

Scrapbooking

Stampin' Up! has introduced a new range of 12x12" scrapbooking product and kit - the full range is now available to purchase online. To download a copy of the new digital Scrapbooking Catalogue click here.

2024-25 Annual Catalogue

BROWSE THE CATALOGUE

Click on the image to download your copy of the 2024-25 annual catalogue. For a full list of current SU! supplies, go to my online store. If you would like any help or advice, please drop me a line at joanne@thecraftyowl.co.uk or give me a call on 07773 421446 - I'd be happy to help.

Join My Team

It's always a great time to join Stampin’ Up! New team members can get £130 worth of products for only £99 + free business supplies + free shipping + all the fun being a part of Stampin’ Up! Stampin' Up! has something for everyone: join my growing team and benefit from my support to enjoy Stampin' Up! however you choose.

If you're interested, call me for a chat to understand how I can help you realise your goals. Alternatively, if you have already decided to sign up and you just can't wait, please click here for the link to the online form where you can sign up and order your starter kit right away! 

About Me

Hi I'm Joanne and live in Northampton and when I'm not looking after my husband and two beautiful children, am an avid crafter with a passion for all things Stampin' Up!

I must confess that I have never been a big rubber stamper - until I discovered Stampin' Up! that is. I love the fact that I can get such great results with co-ordinating stamps, inks, papers and punches - the possibilities are endless! Join me on my stamping journey as I share the things I love and be inspired to create amazing things yourself!

Follow Me

Monthly Newsletter

Box Builder

Click the button above to use Box Buster to create your custom box design using the Envelope Punch Board!

Kits Collection Now Available!

Stampin Cut and Emboss

The new Kits Collection from Stampin' Up! is now available!

Click here to see the current kits available and order yours online today.

I Design For


Stampin' Up Stuff

This is my personal blog and is not endorsed by Stampin’ Up! I hope you find it a plentiful source of ideas and personal inspiration but please don't copy my designs for contest submission or use for classes, publication or sale without express permission.