Vintage Santa Christmas Card

by Joanne James14. April 2020 20:57

The team over at Just Add Ink are celebrating their 500th challenge this week - way to go ladies! - so I had to sneak in with a quick card to celebrate! The challenge is to use a die cut word:

I was having a clear out of my craft room last week and found some old non-SU Christmas papers that I had kept because I loved the vintage santa. I decided he would be the perfect background for one of my favourite Christmas word die sets, Merry Christmas - take a look:


I went for a longer, narrower card and added a gold foil 'Christmas' diecut and stamped the rest of my sentiment around it and that was it - super quick and easy and another one for the pile!

Here is the visual summary of the key products used on today's project for you to pin for easy reference:


You can see all of my 'How To' summaries on my 'How To - Tips and Techniques' Pinterest board in case you've missed any. 

Congratulations to the Just Add Ink team; I love to play along with your challenges and very much hope you last for another 500!

Enjoy your evening; I'll be back tomorrow with another project. Until then, happy stampin'!


Stampin' Up! Supplies Used:

Table built using Product Table Builder by The Crafty Owl - Independent Stampin' Up! Demonstrator.

Beautiful Boughs Meets Rooted in Nature for a Woodland Christmas PP466

by Joanne James3. November 2019 09:00

Today it's Sunday and time for this week's new challenge over at The Paper Players! It's the turn of the fabulous Anne Marie to host this week and she has a fun theme challenge for you to work with:


I had a few ideas for Ann Marie's 'woodsy' theme today and decided to really go all-out to incorporate as many wood-themed elements into my card as possible. I decided to continue with another Christmas card to add to my collection and ended up creating something a little different (for me!) - take a look:


Here's the low-down on today's card:

Knock on Wood - My card has lots of elements that tie in to the wood theme: some woodland background dry embossing, a panel of retired Wood Textures DSP, the tree trunk stamp from Rooted in Nature (stamped in Crumb Cake and then sponged with Early Espresso around the edge), as well as some greenery and a couple of pine cones that could easily be spotted on a walk through the woods.

Texture, Texture - There are lots of layers and textural elements on today's card too: in addition to the dry embossing, I added shimmery white embossing paste to my greenery for  textured snow and the glimmer paper and twine bow also adds contrast. I originally started out using Jen's sketch over at Freshly Made Sketches (you can see that sketch here), but ended up adding so many layers and bits and pieces I rather lost my usual 'clean' look. Whilst I love the finished result, I will need to go back to the drawing board if I'm to put in an FMS entry this week!

Woodland Sparkle - All that wood made for a rather neutral card, with only the greens adding colour to the mix of browns. I decided to add a silver glimmer 'merry' diecut for some festive sparkle, along with some frosted epoxy droplet 'berries' and a silver and linen twine bow. I really like the finished effect.

Here is the visual summary of the key products used on today's project for you to pin for easy reference:


You can see all of my Product and 'How To' summaries on my 'How To - Tips and Techniques' Pinterest board in case you've missed any. 

I'm also linking up today's card to the Festive Friday Challenge (my card features silver, wood, texture, circles and green from the inspo list) and the challenge over at Paper Craft Crew where I went across the middle of the board: embossing paste/rustic/gone wild and the top left-bottom right diagonal: found in the forest/rustic/sponging)

Before you reach for your ink and papers, check out what our amazing team has created to inspire you this week:

Here's a quick recap of our challenge rules:
 
1.  Create a new paper project
2.  Upload your creation to your blog with a link back to us and provide a direct link to the post featuring your challenge submission.
3.  Please link your card to no more than four challenges, TOTAL.
4.  Have FUN!

Enjoy your day; we are enjoying the last day of the half-term holiday before returning the school tomorrow. We have some hockey planned and a trip to the farm shop, along with preparations for my classes this week. I'll be back tomorrow with another project. Until then, happy stampin'!


Stampin' Up! Supplies Used: 

Table built using Product Table Builder by The Crafty Owl - Independent Stampin' Up! Demonstrator.

CAS Perfectly Plaid Merry Christmas Card

by Joanne James25. October 2019 14:00

This is my second post for today - you can see my earlier As You See It challenge post here. I had a little extra time yesterday and managed to make another card, this time for the current challenge over at Addicted to CAS where the challenge is to use plaid on your card:

I had some piece of leftover paper having wrapped some gift boxes for the lovely ladies on my retreat last weekend so decided to use one of them for a quick clean and simple Christmas card - take a look:


 Whilst this card looks like it has a few steps, it really did take me next to no time to make: I always have some white cardbases cut, the plaid and thin strip of red cardstock were leftovers from other projects, as was the gold foil 'Christmas' - I had a few of these in the die case that I had cut previously, complete with self-adhesive backing. So all that was left to do was cut the paper to size, glue the pieces together and stamp the 'merry' and the holly and add a trio of red rhinestone berries. I even had time to use one of my favourite sentiments from the same 'Merry Christmas To All' stamp set on the inside of my card: 


So simple and a great way to use up some of those leftover bits and pieces too!

Here is the visual summary of the key products used on today's project for you to pin for easy reference:


You can see all of my 'How To' summaries on my 'How To - Tips and Techniques' Pinterest board in case you've missed any. 

Enjoy your day and I'll be back tomorrow with another project. Until then, happy stampin'!


Stampin' Up! Supplies Used:

Table built using Product Table Builder by The Crafty Owl - Independent Stampin' Up! Demonstrator.

An Ornamental Glittery Christmas Card JAI466

by Joanne James24. July 2019 06:00

Today I'm nice and early with my post as I am out with the James Juniors for a day of watersports with a view to keeping cool in the heatwave we are experiencing here in the UK, which is a good thing as it means I just have time to squeeze in my entry for the challenge at Just Add Ink this week, where I just couldn't resist that photo inspiration, that also works for the Christmas in July theme over at TGIF Challenges:


I went with a clean, white base so that my glittery baubles and sentiment could really shine - take a look:


Here's the low-down on today's card:

I'm afraid I have used some retired bits and pieces on my card today (Pretty Pines Thinlits, Detailed Baubles Thinlits, Red Glimmer Paper, black and white DSP) because there was no other way to capture the elements of inspiration from those lovely festive lanterns, but the fabulous Merry Christmas Dies carried over to the annual catalogue and so will be seeing lots of action this season too and are available if you would like to get your hands on a set.

I am trying to use up a little of my retired stash to create some cards for my box and it feels good to mix in a little old with the new every now and again. Have any of you started Christmas crafting in earnest yet? Do leave me a comment below or even feel free to share your creations here on my Facebook page - I would love to see them!

Here is the visual summary of the key products used on today's project for you to pin for easy reference:

You can see all of my 'How To' summaries on my 'How To - Tips and Techniques' Pinterest board in case you've missed any. 

Enjoy your day and I'll be back tomorrow with another project. Until then, happy stampin'!


Stampin' Up! Supplies Used:

Table built using Product Table Builder by The Crafty Owl - Independent Stampin' Up! Demonstrator.

Happiness Blooms birthday Card for PP434

by Joanne James24. March 2019 09:00

Today it's Sunday and time for this week's new challenge over at The Paper Players! It's my turn to host this week and I have my favourite challenge, a sketch, for you to work with:


I chose something with layers and whilst the uppermost layer with the sentiment on is arrow-shaped, any horizontal shape would work in this space. I actually have a couple of cards to share with you today. Firstly the card I actually made for today's challenge using my favourite papers for the Spring-Summer catalogue - take a look:


Here's the low-down on today's card:

A Well Written Tag - I made the top layer of my card into a tag using my Scalloped Tag Topper Punch and used it as the focal point for my main greeting cut using the Well Written Framelits, finished with a tiny bit of stamping that I punched out and shortened with my Classic Label Punch. I added a few flowers from the same set, finished with some Bitty Blooms punched leaves and some navy enamel dot centres.

Happiness Blooms - The gorgeous bold and bright florals of the Happiness Blooms Designer Series Paper set the tone and colour scheme for my card today. I resisted the urge to use my favourite navy pattern in this set and instead chose the gorgeous Calypso Coral/Night Of Navy/Call Me Clover/ Whisper White combo, with a contrasting striped design for my second layer of pattern. I finished off the inside of my card and envelope with another sentiment from the 'Well Said' stamp set and some stamped flowers using 'Bloom by Bloom'. Such a colourful and cheerful card - very me! 

My Original Inspiration - I actually designed this sketch before Christmas and used it for a card in one of my monthly technique classes. I realised during an exchange of messages with my fellow PP teamie the lovely Claire that I hadn't actually blogged that card, and whilst the papers that I used (Festive Farmhouse) are no longer available, the Merry Christmas Thinlits Dies and Merry Christmas To All stamp set are on carryover from the Autumn-Winter catalogue and still available, so I thought I would share with you too so that you can see how it looks with an alternative product set:


So two for one today! Which one do you prefer? I'd love you to leave a comment below.

Here is the visual summary of the key products used on today's project for you to pin for easy reference:


And for the Christmas version:

You can see all of my Product and 'How To' summaries on my 'How To - Tips and Techniques' Pinterest board in case you've missed any. 

Before you reach for your ink and papers, check out what our amazing team has created to inspire you this week:

Here's a quick recap of our challenge rules:
 
1.  Create a new paper project
2.  Upload your creation to your blog with a link back to us and provide a direct link to the post featuring your challenge submission.
3.  Please link your card to no more than four challenges, TOTAL.
4.  Have FUN!

You can see all of my 'How To' summaries on my 'How To - Tips and Techniques' Pinterest board in case you've missed any. 

I'm looking forward to visiting your blogs to see what you make of my sketch this week. Enjoy your day; I will be packing up the youngest of the James Juniors in readiness for a week-long school trip tomorrow and preparing for the imminent arrival of a German exchange student who is visiting to spend time improving her English language skills with the other one! I'll be back tomorrow with another project. Until then, happy stampin'!


Stampin' Up! Supplies Used:

Table built using Product Table Builder by The Crafty Owl - Independent Stampin' Up! Demonstrator.
 
 
Table built using Product Table Builder by The Crafty Owl - Independent Stampin' Up! Demonstrator.

Merry Christmas To All Joyous Noel Christmas Card Trio

by Joanne James22. November 2018 21:00


I've been busy decorating so just have time for a quick post today. I'm sharing a card that I made for the current Inspire.Create Challenge where they are looking for projects featuring the following colour palette:

My simple card uses one of my absolute favourite festive papers from the Joyous Noel Suite:

I liked it so much I created two more cards with the same basic design but featuring some of the other gorgeous papers in this paper pack:


Each one also features a different colour of glimmer paper behind it too. Here's the final one with the copper background glimmer:


 These papers really are so beautiful, it's a shame they are now sold out. The simple design would work with any other papers though and the Merry Christmas To All stamps and framelits bundle is still available, which is great news. Here's a shot of all 3 cards together:

Here is the visual summary of the key products used on today's project for you to pin for easy reference:


You can see all of my 'How To' summaries on my 'How To - Tips and Techniques' Pinterest board in case you've missed any. 

Don't forget tomorrow marks the start of the first of the Stampin' Up' Online Extravaganza 48 hour sales - read all about it in yesterday's post here.

Enjoy your day and I'll be back tomorrow with another project. Until then, happy stampin'!


Stampin' Up! Supplies Used:

Table built using Product Table Builder by The Crafty Owl - Independent Stampin' Up! Demonstrator.

Detailed Deer Craft Retreat Pillow Gift and Christmas Card

by Joanne James20. November 2018 19:00

I've been busy decorating today so I'm a little later with my post again. Hopefully it's worth the wait though: I'm sharing another of the pillow gifts that the lucky ladies received on my Creative Escapes Craft Retreat a few weeks ago, and a co-ordinating card that I made to go with it since I decided I liked the box design so much! Firstly, here is the pillow gift box:


I liked the box so much when I got home I made another one and decided to make a card using same design to co-ordinate with it:


Here's the low-down on today's projects:

Luscious Layers - There's so much I love about this card! My most favourite thing is the layering of the diecuts to create the focal point. I used a Stitched Label, the jumping deer from the Detailed Deer Thinlits and a 'merry' in copper foil from the Merry Christmas Thinlits dies. Gorgeous, even if I say so myself!

And More Joyous Noel - The paper I used that inspired my centrepiece is from the gorgeous copper-foiled Joyous Noel paper pack. This paper is now sold out across the globe, so I hope you already have a stash as it's my favourite this season and I still have projects using it to share with you.  

Merry Christmas In Many Ways - The Merry Christmas To All bundle allows you to create many different festive sentiment combinations for the holiday season with a combination of stamps and dies. I used two different combinations for my card and box to give you a flavour of the flexibility it offers. the diecuts are quite large and perfect if a statement sentiment is the order of the day. 

I'm linking my card up with the current challenges over at Just Add Ink where they are looking for big bold sentiments and Fusion where the sketch inspired the layout for today's Christmas card (I flipped it and used the mirror image).


Here is the visual summary of the key products used on today's project for you to pin for easy reference:


You can see all of my 'How To' summaries on my 'How To - Tips and Techniques' Pinterest board in case you've missed any. 

Finally here is a photograph of both of my projects together:

Enjoy your evening and I'll be back tomorrow with another project. Until then, happy stampin'!


Stampin' Up! Supplies Used:

Table built using Product Table Builder by The Crafty Owl - Independent Stampin' Up! Demonstrator.

Christmas Wishes From A Skating Spirited Snowman

by Joanne James30. August 2018 08:00

Before I get into my creative post today, I just wanted to remind you that we are nearing the end of the month so you have just two more days to take advantage of this month's offers: a free bonus coupon for every £45 spend, redeemable against next month's purchases, and also the limited time Blended Seasons bundle and the second colour assortment pack of watercolor pencils. You can read more about both of these offers here and here.

Check out this post with details on my Creative Escapes Luxury Weekend Retreats too - you have until the end of the week to take advantage of my Bank Holiday booking offer for my next weekend in October!

A day off yesterday as we had a family day out at the Black Country Museum (a fun visit if you're in the UK and never been - lots of fun interactive history) and I needed to give the first episode of the Great British Bake Off my undivided attention yesterday evening (more on that later!) but I'm back with you today and I'm sharing a card using this week's CAS(E) This Sketch and the current bright colour palette over at Inspire.Create for a fun Christmas card:
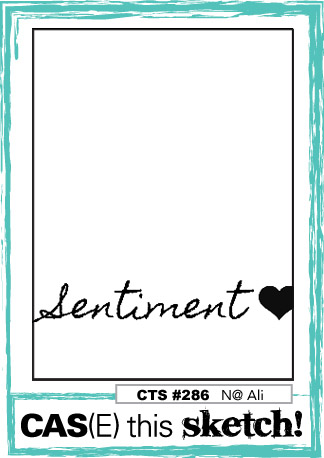
      

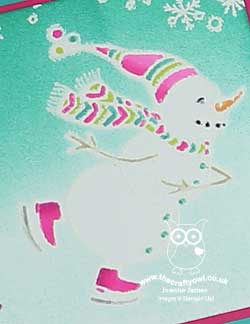
This another of those great sketches that can be used in lots of different ways with the sentiment diecuts that I love - although I did need to rotate my card base through 90 degrees and go 'long and thin' to fit everything in! Take a look:


Here's the low-down on today's card:

Merry Christmas Thinlits - Today is the turn of the 'Christmas' thinlit to feature, stamped with a 'merry' for good measure; these dies are going to get a full work out this season, I think they are just great! I love that with the co-ordinating bundled stamp set, there are so many sentiment combinations you can make; this is absolutely a 'go-to' set for me this Christmas.

Spirited Snowman - I liked the 'object' at the end of the sentiment on the sketch and thought the little skating snowman from the new Spirited Snowmen set would fit perfectly and look as if he was almost skating the sentiment into the ice. I decided to heat emboss the snowman and an array of snowflakes from the same set across the top of my card, so that the white elements, i.e. the snow, would be white against my sponged background. I must confess whilst this looks great in white in real life, especially with the sparkle of the Wink of Stella on the snowman, the snowman loses some of his definition in white when photographed. In hindsight silver might have been a better choice - or maybe a little added definition to the body of the snowman with my Blends; something to play around with on version 2!

Unconventional Brights For Christmas - You could have looked at the Inspire.Create colour challenge colours this week and be forgiven for thinking that a Christmas card would not come immediately to mind with these bright colours; I actually thought they would be perfect for a sponge-brayered sky and his bright woollen scarf and hat combo. Once I'd stamped the snowman onto my cardfront, I stamped him again onto a post-it note and cut it out to create a mask so that I could brayer my Bermuda Bay sky, whilst keeping my snowman white. I then coloured the rest of my Snowman with my Blends/Blendabilities/Stampin' Write Markers. I did stick to the colour palette along with a smidge of black and grey neutrals, save one exception - I used orange for the snowman's carrot nose. I'm not sure any other colour would do so I hope I'll be forgiven this departure! Lastly, I painted my snowman liberally with Clear Wink of Stella; difficult to see on the photo, but so pretty in real life.

Here is the visual summary of the key products used on today's project for you to pin for easy reference:
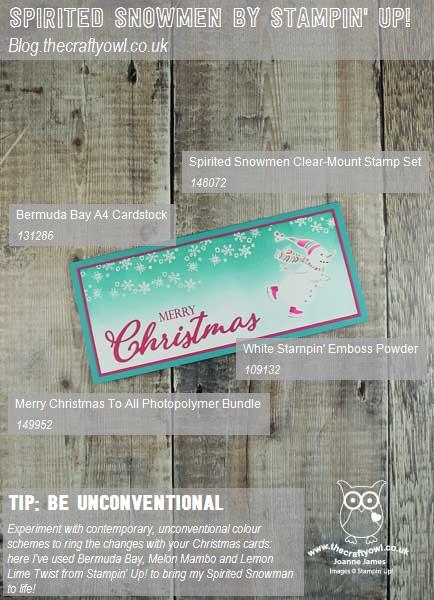
 

You can see all of my 'How To' summaries on my 'How To - Tips and Techniques' Pinterest board in case you've missed any. 

So what do you think - do these unconventional brights work on today's Christmas card? Do leave me a comment below - I would love to hear your thoughts.

Enjoy the rest of your day; the James Juniors are currently in the kitchen baking homemade wagon wheel biscuits, having been inspired by the technical challenge on last night's Great British Bake Off - I'll let you know tomorrow how they turned out when I'll be back with another project! Until then, happy stampin'!

I typed this post up last night but am finally going live this morning - I will share the wagon wheels tomorrow! 

Stampin' Up! Supplies Used:

Table built using Product Table Builder by The Crafty Owl - Independent Stampin' Up! Demonstrator.

Two Way Embossed Square Seasonal Wreath Christmas Card

by Joanne James20. August 2018 07:00

Happy Monday everyone! It's a new week and I've a few things ready to share with you this week, including a card today for a couple of challenges that is choc-full of sneak peeks:

   Paper Craft Crew Sketch Challenge 303! Play along with the latest challenge by visiting www.papercraftcrew.com #stampinup #papercraftcrew #papercrafts #stamping #sunnygirlscraps #crafting #crafts #craft #creative #creativity #create #sketchchallenge #colorchallenge #inspirationalchallenge #tictactoechallenge

Yes, it's still summer and I'm crafting for Christmas again, but having received my pre-order of goodies from the forthcoming Stampin' Up! Autumn-Winter Seasonal catalogue, I couldn't resist getting stuck in. Take a look:


 Here's the low-down on today's card:

An Embossed Seasonal Wreath - I loved the idea of the challenge over at Just Add Ink this week, which is to choose 2 different types of embossing on your card. It gave me the perfect opportunity to use a new-to-me embossing folder that is actually to be found in the annual catalogue, so available right away! The Seasonal Wreath TIEF attracted my attention as soon as I saw it; great for non-seasonal projects too, this wreath makes a great centrepiece on a card and I can see it being a staple of my Christmas crafting stash. It results in a subtle embossed finish (a little difficult to see the detail on my photo, but I can assure you it's there and it's gorgeous!) The wreath fits on a standard A6 card, but here I decided to make a 6" x 6" square one.

A Merry Christmas - For my second type of embossing, I went with the partial heat embossing of my Merry Merlot diecuts courtesy of the new Merry Christmas Thinlits - LOVE these! I simply sponged the lower portion of the diecut letters with Versamark and heat embossed with copper embossing powder. I took my colour combo for today's project from one of the new designer series paper packs - Joyous Noel - that features in the new catalogue. Whilst it doesn't feature on my card, the combination of Tranquil Tide, Merry Merlot and copper are inspired from these beautiful papers.

The Extra Details - There are a couple of additional 'sneak peeks' on today's card: the copper glimmer paper, the gorgeous Merry Merlot and Copper Reversible Ribbon and the sentiment on the inside of my card, courtesy of the Merry Christmas To All stamp set:


Are you keen to get your hands on some of these new products too? You will have to wait until 5th September to order them, but if you aren't already a customer of mine, don't already have a Stampin' Up! demonstrator and would like a copy of the new catalogue, then just get in touch with me by email with your address details or call me to reserve your copy.

Lastly, the sketch over at Paper Craft Crew inspired the layout for today's card; definitely one I'll use again.

Here is the visual summary of the key products used on today's project for you to pin for easy reference:


You can see all of my 'How To' summaries on my 'How To - Tips and Techniques' Pinterest board in case you've missed any. 

Enjoy your day and I'll be back tomorrow with another, slightly less festive, project. Until then, happy stampin'!


Stampin' Up! Supplies Used:

Table built using Product Table Builder by The Crafty Owl - Independent Stampin' Up! Demonstrator.

New Online Exclusives

There are new products available exclusively in the online store from 5 November - check them out here.

Latest Kits!

Stampin Cut and Emboss

The Layered Landscapes Kit and Nature's Paintings Kit are the latest kits in the online store - get yours here!

Shop Online

Access my online shop 24 x 7, 365 days of the year:

Current November hostess code:

9NKXDTTR

Shop Online

Mini Catalogue

BROWSE THE CATALOGUE

'Tis The Season - the new Stampin' Up! Mini Catalogue is here! For more details and to download your copy click here

Scrapbooking

Stampin' Up! has introduced a new range of 12x12" scrapbooking product and kit - the full range is now available to purchase online. To download a copy of the new digital Scrapbooking Catalogue click here.

2024-25 Annual Catalogue

BROWSE THE CATALOGUE

Click on the image to download your copy of the 2024-25 annual catalogue. For a full list of current SU! supplies, go to my online store. If you would like any help or advice, please drop me a line at joanne@thecraftyowl.co.uk or give me a call on 07773 421446 - I'd be happy to help.

Join My Team

It's always a great time to join Stampin’ Up! New team members can get £130 worth of products for only £99 + free business supplies + free shipping + all the fun being a part of Stampin’ Up! Stampin' Up! has something for everyone: join my growing team and benefit from my support to enjoy Stampin' Up! however you choose.

If you're interested, call me for a chat to understand how I can help you realise your goals. Alternatively, if you have already decided to sign up and you just can't wait, please click here for the link to the online form where you can sign up and order your starter kit right away! 

About Me

Hi I'm Joanne and live in Northampton and when I'm not looking after my husband and two beautiful children, am an avid crafter with a passion for all things Stampin' Up!

I must confess that I have never been a big rubber stamper - until I discovered Stampin' Up! that is. I love the fact that I can get such great results with co-ordinating stamps, inks, papers and punches - the possibilities are endless! Join me on my stamping journey as I share the things I love and be inspired to create amazing things yourself!

Follow Me

Monthly Newsletter

Box Builder

Click the button above to use Box Buster to create your custom box design using the Envelope Punch Board!

Kits Collection Now Available!

Stampin Cut and Emboss

The new Kits Collection from Stampin' Up! is now available!

Click here to see the current kits available and order yours online today.

I Design For


Stampin' Up Stuff

This is my personal blog and is not endorsed by Stampin’ Up! I hope you find it a plentiful source of ideas and personal inspiration but please don't copy my designs for contest submission or use for classes, publication or sale without express permission.