Heartfelt Wishes in Shades of Green

by Joanne James15. March 2021 14:00

Happy Monday everyone - another Monday, another week! This week includes St Patrick's Day, so there are naturally lots of challenges that feature either the colour green, the theme of luck, shamrocks and generally all things Irish around at the moment! So today I'm sharing a card inspired by a few of them:


I was inspired by the sketch and photo over at Inspired By this week, and the lovely ladies over at Just Add Ink are asked us to create with shades of green. At The Card Concept the theme is the 'Luck of the Irish'. Whilst I don't know anyone who celebrates St Patrick's Day card and would appreciate a card, it's always a good opportunity to create a good luck card or something in green - such a soothing colour. I decided to make a clean and simple card that has a play on the word 'luck' that is perfect to send to a friend - take a look:


Here's the low-down on today's card:

Shades of Green - I masked off my Basic White cardstock panel and used my chosen shades of green - Soft Sea Foam, Granny Apple Green, Call Me Clover and Shaded Spruce - with my blending brushes to create a trio of columns of blended ombre greens, deepening in colour towards my sentiment and lucky clover/shamrock at the base. There is something so calming about shades of green used in such a simple way I think - don't you agree? 

Heartfelt Wishes - The sentiment I used on my card today comes from the 'Heartfelt' stamp set and is the perfect play on the word 'luck' to show appreciation for someone's friendship and seemed to fit the theme perfectly, with a card that I could actually send to someone! 

Pierced Blooms Lucky Clover - I created my shamrock or lucky four-leaf clover from a five-petal floral die from the Pierced Blooms Dies. I simply snipped away part of one of the petals to leave me with 4 leaves and a stem:


I finished my clover with a gold faceted gem to add an extra detail to my focal embellishment (from my collection rather than the pot at the end of the rainbow I hasten to add!)


Here is the visual summary of the key products used on today's project for you to pin for easy reference:


You can see all of my 'How To' summaries on my 'How To - Tips and Techniques' Pinterest board in case you've missed any. 

Enjoy your day; I have just received a '911' from one of the James Juniors imploring me to bring a snack at school pickup - clearly lunch was lacking today and I think my growing 13 year old son has hollow legs at the moment! Whatever did we do before Whats App??! So off to sort before I head out on the school run! I'll be back tomorrow with my card for this week's new challenge over at CAS Colours & Sketches. Until then, happy stampin'!


Stampin' Up! Supplies Used:

Table built using Product Table Builder by The Crafty Owl - Independent Stampin' Up! Demonstrator.


From My Heart Valentine's Card for PP476

by Joanne James2. February 2020 10:00

Today it's Sunday and time for this week's new challenge over at The Paper Players! It's the turn of my sweet friend Claire to host this week and she has a timely theme challenge for you to work with:
             

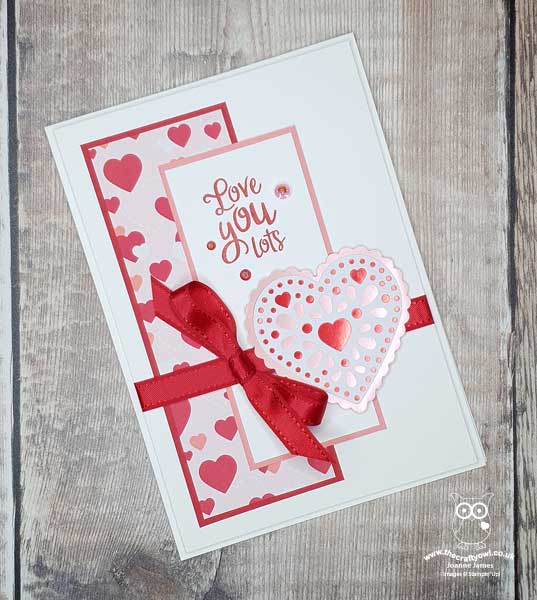
It's the first Sunday in February and the month of Valentine's so love is definitely in the air! I combined our challenge this week with the colour palette over at Global Design Project and Julee's Mojo Monday sketch and am linking up with Just Us Girls where they are looking for bows. All of these elements came together for my love-filled card - take a look:
 

Here's the low-down on today's card:

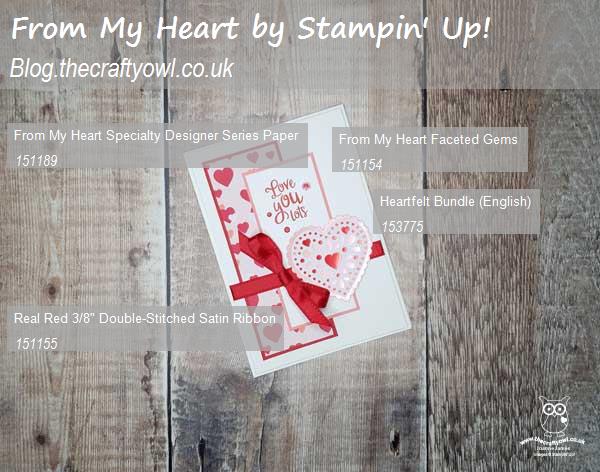
From My Heart - My card today features three of the patterns in the From The Heart specialty designer series paper. With playful patterns featuring red and pink foil accents on some designs, these papers are perfect for Valentine's Day cards and packaging. I used a pink and red random heart design for my largest panel and layered two of the foiled heart designs for the uppermost layer and focal point of my card. Check out the foil effect - so pretty:
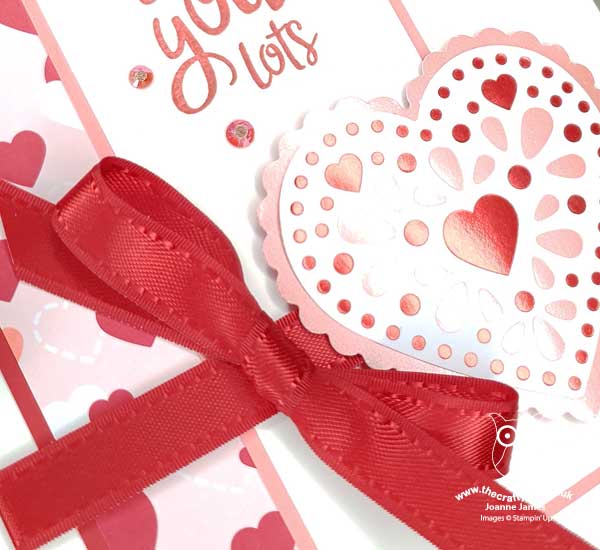
 

Two Hearts Are Better Than One - I loved the layering of Julee's sketch and decided it would be a great way to showcase my favourite foiled heart pattern in the paper pack. I layered it on a pink heart from another of the designs, both of which I punched out using the punches in the Heart Punch pack: one has straight edges and the other scalloped and they nest together beautifully. I love it when you can punch shapes out of paper this easily - it makes card making a breeze! 

Add A Bow - I finished my card with a fancy glossy red satin ribbon bow. The foil detailing and the faceted gems make this card something special and a luxurious bow seemed like the perfect way to complete my card.

Here is the visual summary of the key products used on today's project for you to pin for easy reference:
 

You can see all of my Product and 'How To' summaries on my 'How To - Tips and Techniques' Pinterest board in case you've missed any. 

Before you reach for your ink and papers, check out what our amazing team has created to inspire you this week:

Here's a quick recap of our challenge rules:
 
1.  Create a new paper project
2.  Upload your creation to your blog with a link back to us and provide a direct link to the post featuring your challenge submission.
3.  Please link your card to no more than four challenges, TOTAL.
4.  Have FUN!

Enjoy your day; I will be crafting and getting ready for my technique class tomorrow and might even sneak in a movie this afternoon. To my fellow PP teamies and anyone else stateside who is watching the Super Bowl and hosting or attending a Super Bowl party - enjoy!

I'll be back tomorrow with another project. Until then, happy stampin'!


Stampin' Up! Supplies Used: 

Table built using Product Table Builder by The Crafty Owl - Independent Stampin' Up! Demonstrator.

Rainbow Be Mine Stitched Die Stack for #GDP224

by Joanne James25. January 2020 16:00

As promised, here's the second of the cards I made for this week's challenge over at the Global Design Project inspired by Steffi Helmschrott's pretty rainbow card:


This time I used the same basic colours but decided to incorporate my rainbow in a stack of hearts diecuts from the Stitched Be Mine Dies:


This time I used the 'Love You Lots' sentiment from the 'Heartfelt' stampset for my greeting, heat embossing it in white onto Basic Black and fussy cutting it out. I stamped a few small black hearts but didn't like the shape, so covered them up with some black diecut ones (ssh - don't tell ;-)) I took another picture so that you could see the depth created by the stacked hearts:


Isn't that cool?

Here is the visual summary of the key products used on today's project for you to pin for easy reference:


You can see all of my 'How To' summaries on my 'How To - Tips and Techniques' Pinterest board in case you've missed any. 

I think I prefer this card to my earlier one - if you missed it you can see that card here. I like the fact that the more generic sentiment means this card could be used for a ton of different occasions, not just Valentine's - after all, you can only send so many Valentine's, right?! What do you think? Do you have a favourite? Leave me a comment below - I'd love to hear your thoughts!  I'll be back tomorrow with my project for the latest challenge over at The Paper Players and this week I'm the hostess. Until then, happy stampin'!


Stampin' Up! Supplies Used:

Table built using Product Table Builder by The Crafty Owl - Independent Stampin' Up! Demonstrator.

Heartfelt Rainbow Valentines for #GDP224 and #FF0051

by Joanne James25. January 2020 10:00

Hello blog friends! Did you miss me? This has been a great week for crafting, but not so for blogging I'm afraid. I had an unscheduled service outage that meant my Wednesday and Thursday posts didn't happen unfortunately. We are though back online and today I'm sharing one of the cards I made for this week's challenge over at the Global Design Project that is also perfect for the current challenge over at Festive Friday:


I found myself inspired by Steffi's rainbow card this week over at GDP and armed with hearts, arrows and red (and some glitter sparkle from the rhinestones) from the Festive Friday inspo list, I created this rather unconventional Valentine's Day card:


Here's the low-down on today's card:

I stayed true to the layout and rainbow colours of Steffi's card with my arrows and neutral card base, but decided to feature a bold heart-shaped Valentine sentiment. also from the 'Heartfelt' stampset, that I heat-embossed in black onto Whisper White and punched out using the co-ordinating heart punch. I added a sprinkling of black hearts that I centred with some retired epoxy hearts to echo the rainbow theme. I took another picture so that you could see the lovely shine on the heart:


Here is the visual summary of the key products used on today's project for you to pin for easy reference:


You can see all of my 'How To' summaries on my 'How To - Tips and Techniques' Pinterest board in case you've missed any. 

Rebecca took one look at this card and declared it should be her Valentine - high praise indeed and clearly demonstrating she is past the 'pink and girly' phase!

Enjoy your day; we have a hockey league match this afternoon then are off to the theatre to see JB Priestley's 'An Inspector Calls'. I remember studying this play for GCSE English some 30+ years ago, so imagine my surprise to find it's still on the syllabus - clearly an 'oldie but goodie' from an examination perspective! If I can find the time I might be back later with another GDP entry, otherwise I'll double-up tomorrow; either way and I'll be back tomorrow with another project for the latest challenge over at The Paper Players. Until then, happy stampin'!


Stampin' Up! Supplies Used:

Table built using Product Table Builder by The Crafty Owl - Independent Stampin' Up! Demonstrator.

Tags: , , , , , , ,

Cards | Shop Online | Shop Stampin' Up! Online | Stamping

Current Promotions

Stampin Cut and Emboss

Save up to 30% off on all your favourite kits from 1 to 31 October! 

Click here to see the current kits available and order yours online today.

Join My Team

It's always a great time to join Stampin’ Up! During October you can get even more in your starter kit! New team members can get £160 worth of products for only £99 + free business supplies + free shipping + all the fun being a part of Stampin’ Up! Stampin' Up! has something for everyone: join my growing team and benefit from my support to enjoy Stampin' Up! however you choose.

If you're interested, call me for a chat to understand how I can help you realise your goals. Alternatively, if you have already decided to sign up and you just can't wait, please click here for the link to the online form where you can sign up and order your starter kit right away! 

Shop Online

Access my online shop 24 x 7, 365 days of the year:

Current October hostess code:

9NKXDTTR

Shop Online

Scrapbooking

Stampin' Up! has introduced a new range of 12x12" scrapbooking product and kit - the full range is now available to purchase online. To download a copy of the new digital Scrapbooking Catalogue click here.

Mini Catalogue

BROWSE THE CATALOGUE

'Tis The Season - the new Stampin' Up! Mini Catalogue is here! For more details and to download your copy click here

2024-25 Annual Catalogue

BROWSE THE CATALOGUE

Click on the image to download your copy of the 2024-25 annual catalogue. For a full list of current SU! supplies, go to my online store. If you would like any help or advice, please drop me a line at joanne@thecraftyowl.co.uk or give me a call on 07773 421446 - I'd be happy to help.

Latest Kits!

Stampin Cut and Emboss

The Christmas Ornaments Kit and Card Keeper Kit are the latest kits in the online store - get yours here!

New Online Exclusives

There are new products available exclusively in the online store from 5 November - check them out here.

About Me

Hi I'm Joanne and live in Northampton and when I'm not looking after my husband and two beautiful children, am an avid crafter with a passion for all things Stampin' Up!

I must confess that I have never been a big rubber stamper - until I discovered Stampin' Up! that is. I love the fact that I can get such great results with co-ordinating stamps, inks, papers and punches - the possibilities are endless! Join me on my stamping journey as I share the things I love and be inspired to create amazing things yourself!

Follow Me

Monthly Newsletter

Box Builder

Click the button above to use Box Buster to create your custom box design using the Envelope Punch Board!

Kits Collection Now Available!

Stampin Cut and Emboss

The new Kits Collection from Stampin' Up! is now available!

Click here to see the current kits available and order yours online today.

I Design For


Stampin' Up Stuff

This is my personal blog and is not endorsed by Stampin’ Up! I hope you find it a plentiful source of ideas and personal inspiration but please don't copy my designs for contest submission or use for classes, publication or sale without express permission.