Santa's Workshop Card and Envelope Punch Board Gift Voucher Holder

by Joanne James29. October 2018 07:00

I so enjoyed making my cards for this week's challenge over at The Paper Players that I shared with you yesterday, that I just had to make more with those fabulous little elves. As such today I'm sharing another card that I made using products from the Santa's Workshop Suite, along with a gift voucher holder made using the Envelope Punch Board. Both of these use the current sketch over at Freshly Made Sketches as the basis for my layout:


First up is my card - full of busy elves! Take a look:


Here's the low-down on today's card:

More Santa's Workshop - I'm loving this elf patterned paper and whilst it's busy, it seemed the perfect background to accompany my sweet elf and his accompanying pile of Christmas presents. I love how the sentiment is in two halves and carries over neatly to the inside of my card:


Stitched Shapes and Layered Ovals - With all those elves, I wanted to keep the rest of my card fairly simple, so used a large stitched oval to create some additional white space around my sentiment, layered on a scallop-edged oval in Poppy Parade for definition. Whilst I don't often use ovals, preferring circles or squares generally, sometimes an oval is the shape that works best for balance. One thing I do use lots though are my Stitched Shapes Framelits - these are on my Top 5 Framelits Of All Time list (I must publish that list one of these days!) - a must have for adding subtle detail to your frames.

Envelope Punch Board Gift Card Holder - having made my card, I still had a couple of elves with flocked hats left that I had diecut from the Santa's Workshop DSP and decided that I would use the same basic layout but in a landscape orientation to get a headstart on my Christmas Gift Voucher holders. I created a simple wallet using my trusty Envelope Punch Board to create the closure; this is similar to ones I've created previously, only I decided to 'go large' this time and create a wallet large enough to hold £10 notes - I have growing nieces and nephews and these days, only cash will do so I am finding I need to come up with ever more creative ways to gift it! This wallet measures 6" x 6" square and again uses the sketch for the front layout (the stamp I used is from last year's retired Merry Little Labels set):


The wallet opens to reveal a sliding pocket insert, where the money sits in the pocket flap which opens to reveal Christmas wishes and with enough space above to include a personalised message: 


I love this style of wallet and make them often. If you would like the dimensions, then just leave a comment below - I'm thinking this might be worth another blog post in itself! 

This wallet would also be great to fill with Stampin' Up! gift vouchers for a crafty friend or even to treat yourself - if you would like to order Stampin' Up! gift vouchers for Christmas and receive them beautifully packaged in a wallet like this, then do get in touch and place your order.

Here is the visual summary of the key products used on today's project for you to pin for easy reference:


You can see all of my 'How To' summaries on my 'How To - Tips and Techniques' Pinterest board in case you've missed any. 

Enjoy your day and I'll be back tomorrow with another project. Until then, happy stampin'!


Stampin' Up! Supplies Used:

Table built using Product Table Builder by The Crafty Owl - Independent Stampin' Up! Demonstrator.

Nerf Party Ideas For The Stampin' Creative Blog Hop

by Joanne James30. June 2018 06:00

It's Saturday and today I have a special post for you since I, along with the talented Kayla Macaulay, am a guest with the lovely ladies over on the Stampin' Creative Design Team Blog Hop:

You may have just arrived from the colourful Pip Todman over at Queen Pip Cards or alternatively this may be your first stop. Either way, welcome and be sure to continue to the next stop along the hop by clicking on the next name in the list below for more creative ideas. This month the theme is 'party central' and there are lots of ideas and inspiration for parties for many different occasions throughout the hop. 

When I started thinking about what I was going to create today, I immediately jumped to my collection of new catalogue products wondering which new set to use. But in actual fact, I ended up using one of the most long-standing staple items in my crafting arsenal for the majority of my makes today: my Layering Circles Framelits. The next party that I need to plan will be that of the youngest of the James Juniors and whilst we've had lots of debate about what form it will take, one thing is for sure - no party that centres around 11 year old boys is complete without some form of Nerf battle these days, so I decided to get ahead and take the opportunity to start making with this in mind. 

First up is a birthday card that I actually made for a friend of his who is celebrating his birthday today: I used the currently popular 'impossible card' fancy fold and along with some partial diecutting to create a Nerf target for the popped-up section. These cards are really not at all tricky to make, despite their name! You simply score across the horizontal and then make a single cut at the centre of one panel at right angles to this (I made mine at 3"), followed by two cuts wherever you like on the facing panel (mine are at (1 5/8" in from each edge) and then fold each half in opposite directions, leaving a gap front and back and creating the central pop-up. I kept the colour scheme really simple, using the new in-colours Blueberry Bushel and Grapefruit Grove, both of which are a perfect match for Nerf guns and foam bullets, and having layered my diecut target circles added a sight and a bullet popped up on dimensionals for a fun touch. Some in-colour Blueberry Bushel patterned paper and a sentiment courtesy of the Perennial Birthday stamp set finish my card.

This 'impossible card' fold is a fun way to add dimension and interest to a card whilst still enabling it to be folded flat for mailing. My card is an irregular size, since the size of the base was determined by the diameter of the outer target circle. The card measures 5 1/4" x 6" when flat, so requires a bespoke envelope which I created using my trusty Envelope Punch Board with the help of my Envelope Expert tool. 
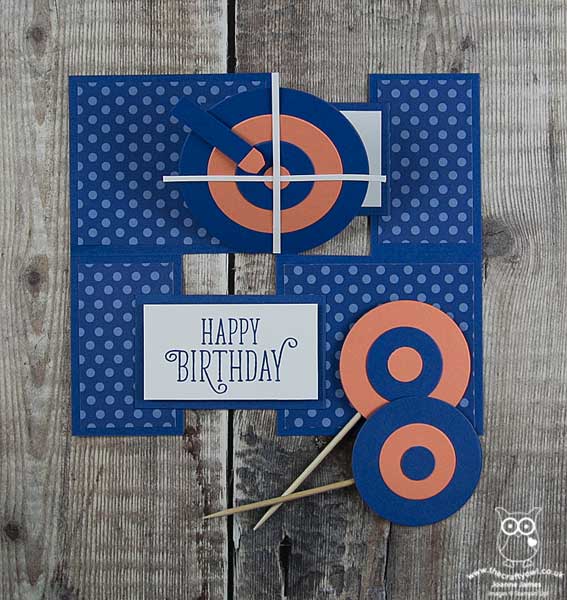
 

 The other targets you can see in the forefront of my card are some cake toppers I made. I am currently in the middle of a kitchen renovation and have only a microwave and the BBQ for cooking, so there was no opportunity to bake any cakes to put them in but I'm sure you get the idea!

I also created a fun party favour using Stampin' Up!'s Mini Pizza Boxes. I'm so glad these made it into the annual catalogue, they really are so useful for dressing up for all kinds of things. I brayed my box with Bluberry Bushel ink then created a belly band with another target on top and a thank you tag. Can you guess what is inside?
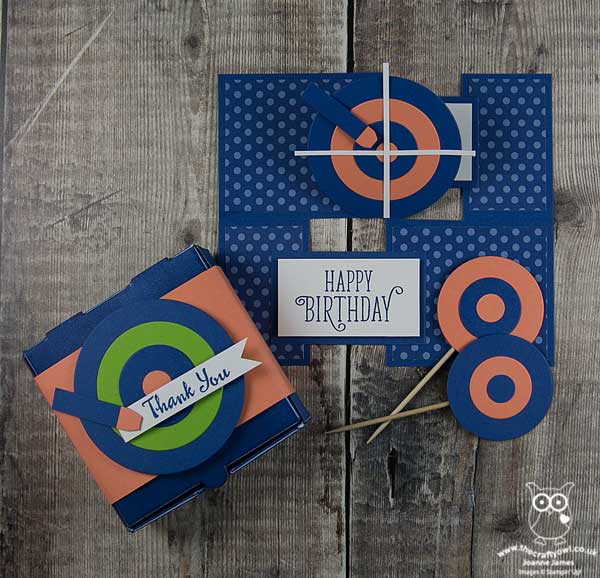
 

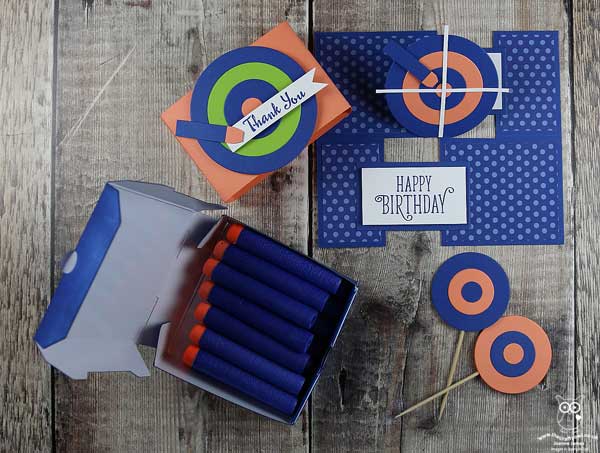
Yes, more foam Nerf bullets! The Mini Pizza Boxes are the perfect size to house 14 bullets and since the children seem to use hundreds of these when they are playing in their Nerf battles, I figured a few more each wouldn't go amiss!
 

 Lastly for today I also created a set of freestanding spinning Nerf targets, based on this one I saw over at Frugal Fun 4 Boys. If you click on the link you can follow the instructions to make your own - I simply used a collection of layered circles, adding in some Whisper White and Granny Apple Green for more colour variety. This is great for indoor or outdoor use, so I'm sure will be added to the toybox supplies. This is my tester in action, declaring it to be too easy - I think he needs to move further away so that it's more of a challenge!
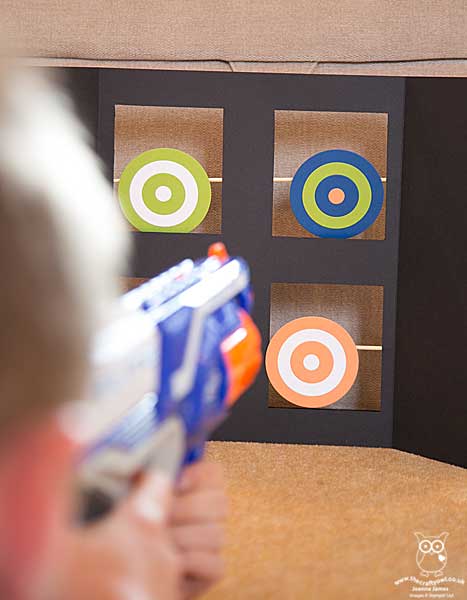
 

I hope you liked my collection of fun party ideas, that in fact require very little in the way of supplies to make. I have another Nerf-themed birthday card to share, which is the one I have made for Ben's birthday, but will save that for another time!

Here is the visual summary of the key products used on today's project for you to pin for easy reference:
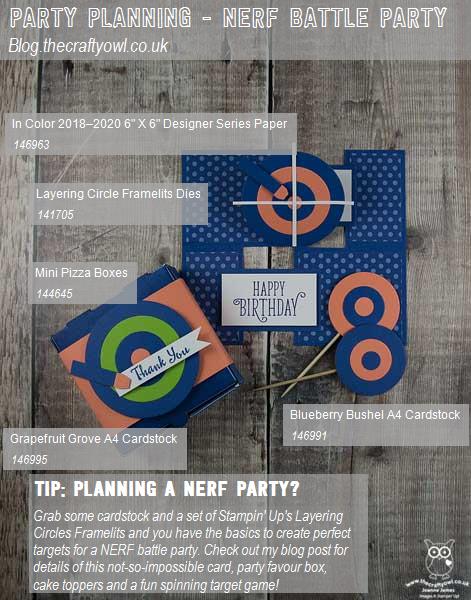
 

You can see all of my Product and 'How To' summaries on my 'How To - Tips and Techniques' Pinterest board in case you've missed any. 

For now, why not continue the blog hop for more creative party ideas? Do check out them rest of the Stampin’ Creative team to see what celebrations they have been preparing for. To carry on with the hop click on the names in the list below:


Enjoy the rest of your day. Mine will be a busy one, with a Family Fun Day, birthday party and sleepover (thankfully not at my house!) and the final performance of The Sound of Music for my eldest singing superstar - can't wait. I'll be back tomorrow with this week's post over at The Paper Players where the celebrations continue as we are celebrating our 400th birthday! We have a very special challenge for you as a result with lots of prizes to give away too so do pop back then - you are not going to want to miss it. Until then, happy stampin'!


Stampin' Up! Supplies Used: 

Table built using Product Table Builder by The Crafty Owl - Independent Stampin' Up! Demonstrator.

Just Add Color Card and Tea Bag Holder For The Paper Players PP392

by Joanne James6. May 2018 09:00

It's Sunday and time for this week's new challenge over at The Paper Players! It's the turn of our fearsome leader, the fabulous Nance, to host this week and she has a rather pretty theme challenge for you to work with:


This challenge was made for me as I am a dedicated tea drinker! Coffee not so much, but I can drink as many as 10 cups of tea a day on average - definitely my drink of choice! I don't have much current product with a tea theme though, so wondered how I was going to tackle Nance's challenge this week, when I remembered the colouring paper in the current catalogue and voila - both my card and an accompanying little tea-related gift were created! First up, my card:


Here's the low-down on today's card:

Just Add Color - One of the patterns in the Just Add Color Specialty Designer Series Paper pack is a sheet covered in all kinds of tea cups and teapots, so I cut a strip from the top of a sheet of paper, grabbed my Stampin' Blends and got to work. I went for a longer, thinner card this week and allowed the DSP pattern to dictate the dimensions for my card base.

Get Blending - Given that some of the teacups contain succulents rather than tea, this week's colour palette over at The Color Throwdown was perfect for my project. I used my Calypso Coral, Old Olive and Crumb Cake Blends, with the top portion coloured in Ivory. This paper is both very thick and matt, so alcohol markers do not blend quite as well as they do on Whisper White. This is particularly noticable on the larger areas such as the table and wall behind the teaset, however I quite like the effect - it gives an almost chalk effect, like rough plaster, so certainly works on my card.

Anyone For Tea? - Having completed my card, I was left with an offcut of DSP with a teapot and teacup. Rather than put this in my scrap box never to be seen again, I decided to use it up so coloured it and made a little tea bag holder containing a few wrapped tea bags that I could gift with my card. I also added a sentiment from the retired set 'Have A Cuppa', mounted on a punched scallop circle - here it is:


I cut my tea bag holder larger than was actually needed to accommodate the tea bags, as I didn't want to cut down the DSP; I just made my wrap and tea bag envelope holders, made with the Envelope Punch Board, slightly larger too. This is what it looks like on the inside - I used some Whole Lot of Lovely designer series paper for my little tea bag envelope pockets:


Did you spot the little tea pot trinket embellishment too? This is retired but it's at times like this I'm so glad I hoard these bits and pieces, as it finished off my package a treat :-) I love this fun set - I think I might send it to my Mum, as she is a keen tea drinker too.

Here is the visual summary of the key products used on today's project for you to pin for easy reference:


You can see all of my Product and 'How To' summaries on my 'How To - Tips and Techniques' Pinterest board in case you've missed any. 

Before you reach for your ink and papers, check out what our amazing team has created to inspire you this week:

Here's a quick recap of our challenge rules:
 
1.  Create a new paper project
2.  Upload your creation to your blog with a link back to us and provide a direct link to the post featuring your challenge submission.
3.  Please link your card to no more than four challenges, TOTAL.
4.  Have FUN!

I can't wait to see how you interpret this week's theme and look forward to visiting your blogs this week! Enjoy the rest of your weekend - we have a 3 day weekend here in the UK as it's a national Bank Holiday on Monday and for once the weather is glorious, so I will definitely be outside making the most of it. I'll be back tomorrow with another project; until then, happy stampin'!


Stampin' Up! Supplies Used: 

Table built using Product Table Builder by The Crafty Owl - Independent Stampin' Up! Demonstrator.

Envelope Punch Board Daisy Easter Basket

by Joanne James28. March 2018 17:30

It's the week before Easter already and so today I'm sharing a couple of really simple 3D projects that I made with a group of wonderful ladies last month that are perfect for holding Easter treats and also fit with the challenge over at Global Design Project this week:

The first one is an super easy Easter basket made with one of my most favourite tools EVER, the Envelope Punch Board  - take a look:


I love the Envelope Punch Board - my Envelope Expert and Box Buster tools are testament to that! - but it's great for lots more fun projects besides. Here I made my basket out of one of the Delightful Daisy DSP papers, decorated with some stamped and punched daisies and some faceted gems - a rather grown-up Easter basket, if you will, given the absence of bunnies! These little baskets are so easy to make and will hold a small full size egg or a collection of smaller ones. Here are the instructions in case you would like to make one too: 

  • Take a sheet of paper measuring 6” x 6”
  • Punch and score using your Envelope Punch Board at 1 ½” on all four sides
  • Turn over the sheet and repeat the step above on the reverse
  • Cut the flaps on each side to the first score line
  • Fold flaps either inside or outside to create your side panel and decorate with daisies or your chosen embellishment
  • Trim centre ends if desired (as I've done here) or adhere to the outside of the basket
  • Cut handle 15cm x 1.5cm and attach to sides

You can see more of these baskets in lots of other colours over on my Facebook page here, including some pictures of the ladies crafting 'in action'.

We also made some of the smaller egg carrier baskets, again using a piece of 6" x 6" paper and the Envelope Punch Board, this time using some of the Petal Garden DSP and some of the lovely free Sale-A-Bration Calypso Coral Shimmer Ribbon (only 4 more days to get your hands on this!) and a sweet Easter tag:


Instructions for this basket are as follows:

  • Take a sheet of paper measuring 6” x 6”
  • Punch and score using your Envelope Punch Board at 1¾” and 4” on the first side then use the score lines and guide to punch and score the remaining sides
  • Use a 3/4" circle punch to create the handles on the inner pieces and bring these up on the inside, adhering your flaps on the outside of these 

I'm mindful the instructions are not the easiest to follow without a video - watch this space and I'll see if I can make a quick one later! 

I had such a fun evening with my hostess Jane and her family and friends making these projects, and, having placed their orders, enabling Jane to earn rewards and free product, further boosted by the current Sale-A-Bration promotion. Whilst Sale-A-Bration is coming to an end in 4 days time, I am still taking party bookings into April, May and beyond, so if you would like a fun evening in with friends, crafting fun projects and earning some free Stampin' Up! product into the bargain, do get in touch.

Here are the visual summaries of the key products used on today's projects for you to pin for easy reference:

You can see all of my 'How To' summaries on my 'How To - Tips and Techniques' Pinterest board in case you've missed any. 

Enjoy the rest of your day and I'll be back tomorrow with another project. Until then, happy stampin'!


Stampin' Up! Supplies Used:

Table built using Product Table Builder by The Crafty Owl - Independent Stampin' Up! Demonstrator.
 
 
Table built using Product Table Builder by The Crafty Owl - Independent Stampin' Up! Demonstrator.

Tags: , , , , , , ,

3D Projects | Boxes | Envelope Punch Board

Sealed With Love Lidded Notelet Box Using The Envelope Punch Board

by Joanne James6. February 2017 20:00

Happy Monday everyone! I've had a busy day today with the first of this month's classes. I'll share some of those projects later in the week, but for today I wanted to share a simple little lidded box that I made with my Envelope Punch Board to hold some cute little Valentine's love notes. Now I didn't do the best job of photographing this one - the lid edges get a little lost against the background:


Here's the box with one of the little notelets inside:


Here's the low-down on today's project:

Sending Love Notes - Way back at Onstage last November we made three little notelets using the Sealed with Love Bundle. I modified mine slightly, cutting down the panels of Sending Love patterned paper and adding each one to a 3 1/2" Whisper White card base. I designed a few more using the other stamps in the set and made a bunch of co-ordinating envelopes and decided to make a little box to keep them all in. 

Love My Envelope Punch Board - Not only did I use my Envelope Punch Board to make my designer series paper envelopes (each made to fit a card of 3 1/2" square and requiring a 6" square piece of paper) but I also used my Box Buster tool to help me design a 4" square lidded box to hold them in. I love making lidded boxes usign the EPB rather than a scoreboard, as it makes them much more sturdy and rigid. It's really easy to do - you just need to make your lid 1/8" larger than your base for a snug fit.

Ribbon and Hearts - I continued the red and white theme of my project by adding a triple loop of Sending Love Ribbon with a double bow to adorn my sassy red Valentine-embossed heart to complete my box embellishment.

Here is the visual summary of the key products used on today's project for you to pin for easy reference:


You can see all of my 'How To' summaries on my 'How To - Tips and Techniques' Pinterest board in case you've missed any. 

I will be using these little notes to hide in my children's school bags and pencil cases this month; they love to find a surprise note when they least expect it; I might even slip in a little chocolate treat too. I'm also linking up with the team over at SUO Challenges again where they are also celebrating Valentine's this week.

I'll be back tomorrow with another project. Until then, happy stampin'!


Stampin' Up! Supplies Used:

Table built using Product Table Builder by The Crafty Owl - Independent Stampin' Up! Demonstrator.

Four Leaf Clover Pansy Punch Good Luck Card

by Joanne James7. March 2016 14:57

Yay it's Monday - where did that weekend go?! A hectic Mother's Day yesterday and today I'm back to it - with a card using this week's sketch over at Freshly Made Sketches:


In addition to Rita's great sketch, I was also inspired by the photo images for the current challenges over at The Card Concept and Fusion, where luck, green and shamrocks are also the order of the day. I know a few young people about to sit their GCSEs and am in need of a few good luck cards, so these challenges gave me the perfect opportunity to make an appropriately-themed card:

I decided to contrast the bright Cucumber Crush green with kraft for my card today and made a feature of a few different elements to pull together my 'clean and layered' card:

Shine On Specialty Designer Series Paper - Great for boxes and bags, this sturdy kraft paper also adds a bright pop of colour to cards, especially when bordered with some Cucumber Crush cardstock to really make it stand out.

Larger Than Life Alphabet and Numbers - These letters and numbers really are larger than life and are great for a statement sentiment as I've done here with the word 'luck'. Alphabet sets are useful for so many different types of projects and since they cost a little more than the average stamp set, Sale-A-Bration is a great time to invest in one and get a free gift into the bargain!

Pansy Punch Four Leaf Clover/Shamrock - Everyone knows that the four leaf clovers are the ones that are supposed to bring you luck. No punch for that? No problem - you can use your five-petal Pansy Punch to create a four leaf clover with ease! Just cut away part of one of the petals to create a stem as in the photo below:

It's that easy! Inspired by The Card Concept photo, I stamped some spots using the spot stamp in the 'Celebrate Today' stamp set stamped in Versamark and heat embossed in clear to add pattern and shine to my lucky clover and tie it in with the rest of my card.

Envelope Punch Board - I altered the dimensions of the sketch and went for a more horizontal rather than vertical card to accommodate my sentiment. As such it gave me a finished card size of 6" x 6 3/4" - not a standard size. A sheet of 2015-17 In Color Envelope Paper in Cucumber Crush, my Envelope Punch Board and my handy Envelope Expert tool made light work of a solution though, and with a few clicks of the mouse and punches and scores and I had a beautifully co-ordinated envelope too - job done!

Here's today's visual summary for easy reference of the key supplies needed to make this card and today's top tip:


That's all from me today; I'll be back tomorrow with another project. Until then, happy stampin'!


Stampin' Up! Supplies Used:

Table built using Product Table Builder by The Crafty Owl - Independent Stampin' Up! Demonstrator.


New Wednesday Weekly Deals Are Here!

by Joanne James18. February 2016 10:00

A day late as I was out all day and evening yesterday - here are this week's new Wednesday Weekly Deals! These offers are valid for one week only. As always, a new collection of deals will be announced next Wednesday.

If you want to take advantage of any of the deals on offer, you can support my business by placing your order online by clicking here or using the link to my store on the right hand side of my blog page where it says 'Shop Online' or with me in person. Don't forget to add the new Hostess Code for February UYGWGF4W if your order is under £150 and be sure to make sure that you don't check the 'no contact' box if you'd like to be kept updated with the progress of you order and receive a little thank you in the post from me. 

Here's a summary of this week's one-week only Wednesday deals - click on each item to go to the online store to purchase:

Table built using Product Table Builder by The Crafty Owl - Independent Stampin' Up! Demonstrator.

Some great offers on this week - the cute Bear Hugs framelits, as used by my good self to create the little Valentine's table favours at the weekend that I shared over on my Facebook page (you can see them here if you missed them - do give my page a 'like' if you'd like to keep up to date with all the fun over there too!) Very useful Tags and Labels framelits dies, along with the Petite Petals stamp set, as voted for by one of my customers last week as 'the best stamp set EVER!' (hello Jane!) and the product that always gets my vote for the top spot: The Envelope Punch Board. When used in conjunction with my Envelope Expert and Box Buster tools, a tool that offers limitless possibilities. Always a bargain in my view even at its full price of £18, but at £13.50 it's an absolute steal!!! If you haven't got one, what on earth are you waiting for???!!!

Don't forget that for every £45 you spend you are entitled to a free Sale-A-Bration item too - and this week there are three new ones added to the range too. In case you missed it, you can find full details here

Back later with today's creative project; until then, happy shopping!

Love At First Sight

by Joanne James30. January 2016 20:00

I hope you are all enjoying your weekends. So far mine has been spent doing laundry, assisting the James Juniors with their homework (Ted Hughes poetry and an art project today!) and preparing for my technique classes next week. I did find time to finish a card that I started yesterday though: another Valentine's card, using this week's sketch over at Freshly Made Sketches and the top line of the tic-tac-toe board over at Stamps, Ink, Paper and fitting with the 'love' theme over at Paper Craft Crew too.

   SIP Tic Tac Toe 32 800    Love Theme Challenge 179 for the Paper Craft Crew.

In order to fit in my large sentiment, I went with an unusual 8 1/4" x 5 1/2" sized card - take a look:

I stamped the 'l v e' from the 'Larger Than Life Alphabet and Numbers' stamp set in Versamark and heat embossed them in black, then substituted the 'o' from my 'love' sentiment with the heart from the 'First Sight' set, which I stamped in Real Red on Real Red cardstock, then overstamped again in Versamark and heat embossed with clear embossing powder for additional shine. I used a piece of Everyday Chic designer series paper for my border panel and finished off my sentiment inside the card with one of the 'Hello You' thinlits and an outline stamped red heart:


I even created a custom envelope with some Real Red envelope paper and the help of my trusty Envelope Expert tool, which I also decorated with a stamped red heart.

I love the layers of this card and the letters shine beautifully; I think this may be one of my favourite Valentine's cards that I've ever made. Today's blog title comes from the combination of one of the stamp sets I've used today and the sentiment and it got me thinking - I remember meeting my now husband for the first time and thinking even then he would be the man I would one day marry; I do believe there is such a thing as love at first sight - do you? Do leave me a comment below today's post - I would love to know what you think.  

That's all from me today; back tomorrow with a new card for this week's challenge over at The Paper Players. Until then, happy stampin'!


Stampin' Up! Supplies Used: 

Table built using Product Table Builder by The Crafty Owl - Independent Stampin' Up! Demonstrator.

'Love You Sew' Envelope Punch Board Cotton Reel Card

by Joanne James29. December 2015 22:56

Good evening lovely readers! Have you missed me? I took a week off to celebrate Christmas with my family and friends. Whilst I had plenty of projects to share, my blogging opportunities have been few and far between. I hope you all enjoyed a lovely Christmas and are still making the most of the festivities. Today has seen me back in my craft room though and the first real opportunity to create with my new Spring-Summer catalogue goodies, so I now have lots of sneak peeks to share with you in advance of the catalogue launch next week!

The first is a sweet little project using the new hostess set 'Love You Sew' and showcasing some of the fabby new baker's twine that is in the new catalogue - take a look: 

I made a fun little cotton reel card from a Stampin' Up! notelet using my Envelope Punch Board and stamped it with the cross-stitch hearts and sentiment from 'I love you sew' and wound a long length of the gorgeous new two-tone baker's twine (available in a combo pack with a roll of Basic Black/Mint Macaron twine too), finished with a Melon Mambo Brights button and a bow. An epoxy pink heart embellishment and a decorated envelope finish my card.

I often make these little cotton reel cards to share ribbon and twine samples with customers as it's such a nice way to present it - the addition of a sentiment makes this into a fun card! I'm linking today's card up with the lovely ladies over at 'Less is More' where the theme this week is 'Homespun'; I think my cotton reel works! 

If you like this set, it will be available exclusively to all customers who either place a single order or who have combined party sales of £150 or more. There are some great incentives to host a party during Stampin' Up!'s Sale-A-Bration event that also begins next week on 5th January when the new catalogue launches; more information on this to follow, but if you would like to book a party please contact me now to get a date in the diary. This is such a lovely set for crafters with lots of humorous sayings, you will definitely want to add it to your collection. 

Back tomorrow with another 'sneak peek' project; until then, happy stampin'!


Stampin' Up! Supplies Used:

Hostess set - 140640 Love You Sew - available 5th January

140555 Baker's Twine Combo Pack - available 5th January

Table built using Product Table Builder by The Crafty Owl - Independent Stampin' Up! Demonstrator.


Howl-o-Ween Treat Matchbox Style Halloween Pop Up Card

by Joanne James4. October 2015 10:00

Did you have fun celebrating World Card Day yesterday? I sent the afternoon crafting, but making home decor rather than cards as Rebecca had a friend round and we spent a couple of hours putting together our Witching Decor Project kits. It did rather put me in the mood for today's new challenge over at The Paper Players! This week it's my turn to host again and since it's the first Sunday in October I have a fun theme challenge for you:


Yes that's right - it's Halloween! I took the opportunity to have some fun with my Howl-o-ween Treat Stamp set and the co-ordinating Boo To You framelits and created something that's been on my general 'to do' list for ages - a matchbox style pop up card. Lots of photos today - here's my card from the outside:


My outer box sleeve is made from Tangelo Twist cardstock decorated with the fun ghost patterned paper from the Happy haunting DSP set - I've been wanting to use this pattern for ages! - and a tag punched with the Ornate Tag Topper punch attached with some Tangelo Twist satin ribbon available on the Clearance Rack currently while stocks last!) My tag is decorated with some bats courtesy of the Project Life Seasonal Snapshot 2015 set and the Trick or Treat sentiment from the Howl-o-Ween treat set. The question is though, which will it be - trick or treat? Let's take a look inside the box:


 I made the drawer tray using Basic Black cardstock and my trusty Envelope Punch Board, and lined it with more Happy Haunting DSP. I used my framelits to cut a 'Boo!' out of black glimmer paper - so perfect for Halloween projects - and stamped a bright green owl, complete with pumpkin basket and spider hanging down from a piece of black baker's twine. Here's another view - oh and I backed my owl with a partial spider web doily too: 


I made my box quite large so that I could accommodate both my pop up owl and greeting and a little something behind. If you look closely in the photo above you can just catch a glimpse of what it is - it also determined the colour of my owl. Can you see what it is? How about a brightly coloured spider to scare your nearest and dearest:

This time more trick than treat (although I've a feeling there are plenty of little ones out there who may think otherwise, given the potential for the odd practical joke or two!), however you could always include a bar of chocolate instead. I hope you like my fun Halloween card - I think the bright orange spider is my favourite!

Before you reach for your ink and papers, check out what our amazing team has created to inspire you this week:

The Paper Players Design Team
Anne Marie Hile - on leave
 
 
Here's a quick recap of our challenge rules:
 
1.  Create a new paper project
2.  Upload your creation to your blog with a link back to us and provide a direct link to the post featuring your challenge submission.
3.  Please link your card to no more than three challenges, TOTAL.
4.  Have FUN! 


I look forward to seeing your Halloween-themed cards this week. I'm off for a morning of basketball and then home for birthday lunch - today it's my husband who's celebrating; I'll share his birthday cards with you later this week.

Back tomorrow with another project; until then, happy stampin'!


Stampin' Up! Supplies Used:

Table built using Product Table Builder by The Crafty Owl - Independent Stampin' Up! Demonstrator.


Sale-A-Bration 2025

It's time for Sale-A-Bration 2025! Shop, host and earn benefits between 7 January - 28 February. Download your copy of the Sale-A-Bration brochure here!

Mini Catalogue

BROWSE THE CATALOGUE

New Year, new products - the new Stampin' Up! Mini Catalogue is here! For more details and to download your copy click here

Shop Online

Access my online shop 24 x 7, 365 days of the year:

Current January hostess code:

M7ZT6XFK

Shop Online

Join My Team

And when you join during Sale-A-Bration, new team members can build your starter kit by choosing £130 worth of products for only £99 + free business supplies + free shipping and either TWO Stampin' Write marker sets and the exclusive Handmade Designs stamp set OR an additional £30 in FREE products. Stampin' Up! has something for everyone: join my growing team and benefit from my support to enjoy Stampin' Up! however you choose.

If you're interested, call me for a chat to understand how I can help you realise your goals. Alternatively, if you have already decided to sign up and you just can't wait, please click here for the link to the online form where you can sign up and order your starter kit right away! 

Scrapbooking

Stampin' Up! has introduced a new range of 12x12" scrapbooking product and kit - the full range is now available to purchase online. To download a copy of the new digital Scrapbooking Catalogue click here.

Latest Kits!

Stampin Cut and Emboss

The Birthday Bash Kit is just one of the latest kits in the online store - get yours here!

2024-25 Annual Catalogue

BROWSE THE CATALOGUE

Click on the image to download your copy of the 2024-25 annual catalogue. For a full list of current SU! supplies, go to my online store. If you would like any help or advice, please drop me a line at joanne@thecraftyowl.co.uk or give me a call on 07773 421446 - I'd be happy to help.

New Online Exclusives

There are new products available exclusively in the online store from 7 January - check them out here.

About Me

Hi I'm Joanne and live in Northampton and when I'm not looking after my husband and two beautiful children, am an avid crafter with a passion for all things Stampin' Up!

I must confess that I have never been a big rubber stamper - until I discovered Stampin' Up! that is. I love the fact that I can get such great results with co-ordinating stamps, inks, papers and punches - the possibilities are endless! Join me on my stamping journey as I share the things I love and be inspired to create amazing things yourself!

Follow Me

Monthly Newsletter

Box Builder

Click the button above to use Box Buster to create your custom box design using the Envelope Punch Board!

Kits Collection Now Available!

Stampin Cut and Emboss

The new Kits Collection from Stampin' Up! is now available!

Click here to see the current kits available and order yours online today.

I Design For


Stampin' Up Stuff

This is my personal blog and is not endorsed by Stampin’ Up! I hope you find it a plentiful source of ideas and personal inspiration but please don't copy my designs for contest submission or use for classes, publication or sale without express permission.

DSP Special Release

Check out 3 popular designer series paper designs in fresh new colourways! Available exclusively in the online store from 3 December - check them out here