Just My Type Key To My Heart Valentine Card

by Joanne James14. February 2024 21:00

Happy Valentine's lovely readers! It seems only right that I should share a Valentine's card today; actually I made this card to send to the DH to celebrate our wedding anniversary, which is next week, but it would work for either. I made my card with a couple of challenges in mind:


Inkspirational have a word prompt of 'heart' and the theme over at Inspire.Create is 'All About Love'. I went for a relatively clean and simple card with lots of fun details that focuses on the sentiment - take a look:


Here's the low-down on today's card:

The sentiment comes from the 'Just My Type' stamp set and I found a tiny vintage key trinket in my embellishment stash that I thought paired with it perfectly. A Bee Builder Punch heart and a selection of designer paper snippets, diecuts and gems complete my card:


Pretty yet not overly feminine - I really like the finished result and hope that the Hubby will too. 

Here is the visual summary of the key products used on today's project for you to pin for easy reference:


You can see all of my 'How To' summaries on my 'How To - Tips and Techniques' Pinterest board in case you've missed any. 

I have enjoyed a pleasant Valentine's dinner with the youngest of the James Juniors, catching up on the events of the day, the highlight of which was a hockey 2nd XI win, which is always worth celebrating! I'll be back on Friday with another project. Until then, happy stampin'!


Stampin' Up! Supplies Used:

Table built using Product Table Builder by The Crafty Owl - Independent Stampin' Up! Demonstrator.

Storybook Gnomes Blue Christmas

by Joanne James10. February 2024 06:00

Today I have a nice early post for you as I'm guesting with the lovely team over at 52 Christmas Card Throwdown this week! I won their December sketch challenge with this card so was delighted to be invited by Andreja to join them as a guest. This week it's colour week and they are inviting us to make cards using a blue and white colour combination:


For my card I used the current layout over at Atlantic Hearts Sketch Challenge and grabbed some retired Storybook Gnomes designer series paper and set to work. Take a look at what I came up with:


 Here's the low-down on today's card:

My card started with that vertical panel of blue and white patterned paper - so pretty! I added a simple Balmy Blue banner then a sentiment from the retired stamp set 'Hug In A Mug' and a gnome that I diecut from another sheet of paper using my Gnomes Dies:


 I added a little extra detail on the inside - a sentiment from 'Gnome For The Holidays' and a partial toadstool house: 


Lots of little touches of blue for another Christmas card to add to my stash!  Thank you to the team over at 52 Christmas Card Throwdown for having me as their guest this week and for keeping me making Christmas cards throughout the year!

Enjoy your day and I'll be back tomorrow with another project. Until then, happy stampin'!


B is For Birthday In Shades of Blue for AYSI 234

by Joanne James11. September 2020 12:00

Today I'm sharing my design team card for our new challenge over at As you See It where it's time for a recipe challenge:


I feel like I need to start off with an apology for the sheer amount of different stamp sets and general bits and pieces that I've used on today's card! The truth is, I pulled out everything I had that fitted the recipe ... then used most of it on my card! Take a look:


Here's the low-down on today's card:

Blue Birthday Wishes - I couldn't resist the colours over at Global Design Project #GDP257 this week - they were my favourite colour duo that I used for the last AYSI Challenge, with the addition of Misty Moonlight, so I decided to use them on my card for this challenge, but this time to create a card that was anything but Christmas, even though it does use some seasonal product. I used the sketch at Paper Craft Crew for my layout, where the oval was perfect for showcasing a birthday 'B' from the Monogram Messages set. 

Butterfly Gala Beauty - I originally intended to use the little butterfly in the Monogram Messages set for my butterfly, but it was too small. Instead I went for a layered butterfly from 'Butterfly Gala', with one punched in Balmy Blue Glimmer Paper for a sparkly base and then another stamped in Misty Moonlight and clear embossed on vellum, with the detail coloured with Highland Heather Blends and embellished with a Balmy Blue Gilded Gem - so pretty:


Recipe Check and An Inside Finish - So that has birthday sentiment and butterfly covered, along with both diecut (stitched shapes oval) and punch. The circles were courtesy of the bokeh dots from another butterfly stamp set, 'Beauty Abounds'; I stamped them tone-on-tone in Highland Heather on my card base, and carefully went over each one with my clear Wink of Stella pen for extra sparkle. For my DSP I used a strip of Balmy Blue/Highland Heather watercoloured paper from the Snowflake Splendor pack, and overlaid it with some polka dot tulle ribbon (more circles!). That was my recipe complete - and as if I didn't have enough out on my desk already, I added a sentiment from yet another stamp set, 'So Sentimental', for my inside greeting:


A twine bow and some blue gilded gems as well, I really went to town with this card - you can only imagine the state of my desk when it came to clear up time!!

Here is the visual summary of the key products used on today's project for you to pin for easy reference:


You can see all of my 'How To' summaries on my 'How To - Tips and Techniques' Pinterest board in case you've missed any. 

 A pretty result though that show the versatility of these colours I think too. An interesting challenge for me too - I've decided I don't use butterflies much on my cards these days, so I really need to try and use them more often!

Here's a summary of our challenge rules:

  • Create any card, scrapbooking page, 3D project or packaging   project that fits the challenge.
  • Please include the challenge graphic and link back to the challenge in your blog post. Turn off word verification so we can leave you lots of lovely comments. Make sure you link the post not the whole blog to the Linky. Use #AYSIXXX when uploading to a public gallery.
  • If you’re unsure about ‘the rules’, check the details under the Challenge Guidelines tab on the As You See It Challenge homepage.

We look forward to seeing your creations in the AYSI gallery.

Enjoy your day and I'll be back tomorrow with another project. Until then, happy stampin'!


Stampin' Up! Supplies Used:

Table built using Product Table Builder by The Crafty Owl - Independent Stampin' Up! Demonstrator.

Botanical Bliss Anniversary Cards

by Joanne James18. May 2019 09:00

Hurrah for the weekend! Today I'm sharing a couple of cards I made using the current sketch over at Fab Friday that are also perfect for the celebrations over at AsYouSeeIt where it's all about the twos as they celebrate their 200th challenge - woohoo!:


I needed an anniversary card so decided to make something using my Botanical Tags Thinlits as one of them features a pair of birds - take a look:


Here's the low-down on today's card:

Botanical Tags - I bought this bundle because I fell in love with the detail on these tags, but I think this is the first time I've used them properly on a card and the detail is so pretty. I decided to go with a dark colour and back it with a handcut tag using a scrap of Wood Textures DSP left over from another project. I think this tag works well for a wedding or anniversary card - they could be love birds, right? 

Layers and Textures - My card feels quite busy for me: tags, twine, banners, an embossed background and a stitched rectangle sentiment and foliage branch - that's a lot going on in one place! Aside from the diecut tag, the shapes are all quite simple and my patterned papers are used in quite small quantities so as not to overwhelm and I quite like the effect.  

Take Two In Green - I liked my first card so much, I decided to create another one in a green Mint Macaron/Tranquil Tide colourway. I switched out the embossed background from Subtle to Layered Leaves which adds a little more detail, and the back piece of DSP comes from the Tranquil Textures DSP as opposed to Share What You Love, and I added a flower embellishment to my slightly larger sentiment piece, but otherwise the cards are the same:

The colour scheme for the first card was inspired by the piece of floral DSP I used for my banner, but I quite partial to greens, particularly in home decor. What do you think - which one do you prefer? 

Here is the visual summary of the key products used on today's project for you to pin for easy reference:


You can see all of my 'How To' summaries on my 'How To - Tips and Techniques' Pinterest board in case you've missed any. 

Enjoy your day and I'll be back tomorrow with another project. Until then, happy stampin'!


Stampin' Up! Supplies Used:

Table built using Product Table Builder by The Crafty Owl - Independent Stampin' Up! Demonstrator.

Brightly Lit Christmas 3 Ways From Simple To Stepped Up - Part 1

by Joanne James11. December 2017 22:09

It's a little while since I shared a 'one stamp set, three ways' post with you showing you three cards using one suite and how to use the products within that suite to create cards that range from simple to stepped up. Today is the first of two posts that will do just that - this time featuring the Christmas Around The World Suite and the Brightly Lit Christmas Bundle that you can find on pages 28-29 of the 2017 Autumn-Winter seasonal Stampin' Up! catalogue that I used in a class a couple of months ago.

The Brightly Lit Christmas stamp set has a fun collection of festive banners that co-ordinate with a basic lamppost design and when paired with the co-ordinating Christmas Lamppost Thinlits Dies can be used to make the most ornate and detailed 3D traditional lamppost designs. The set is great for quick and easy and more complex cards with a real 'wow' factor.  

Clean and Simple - Quick And Easy - If you're short on time or new to crafting, this set is great for a simple card like this one:


All you need to do is take a sheet of Extra Thick Whisper White for your card base and mat layer, stamp your lamppost and hanging banner directly onto the card front and sponge a little yellow ink for lamp light, use the wreath bauble stamp to add some snowflakes (stamp in Versamark and add Dazzling Diamonds glitter) and a red ribbon bow and your card is done. Festive red and the subtle sparkling snowflakes help this simple card to have a big impact.

Step It Up - If you have a bit more time and are feeling more adventurous, using a few extra tools and embellishments will allow you to 'step up' your card and create something with a little more depth and detail, whilst still relatively easy to make:


My second card follows the same basic layout as the first, still using just the stamps from the Brightly Lit Christmas set, however this time I've stamped only the top portion of the lamppost and masked off the lower portion and used the Carols of Christmas stamp set and co-ordinating Card Front Builder Dies to cut out some festive poinsettia flowers to adorn the lamppost, centred with some gold enamel shapes, added a couple of twists of red and gold ribbon behind and a couple of background banners using the Triple Banner Punch, one of which is a contemporary tartan to add a bold splash of colour. 

My third card is a real 'wow' - but you'll have to come back for Part 2 for that one!

Here are the visual summaries of the key products used on today's projects for you to pin for easy reference:

Card 1:


Card 2:


You can see all of my 'How To' summaries on my 'How To - Tips and Techniques' Pinterest board in case you've missed any. 

I'll be back soon with the third card in this set, which is my absolute favourite. Until then, happy stampin'!


Stampin' Up! Supplies Used:

Card 1:

Table built using Product Table Builder by The Crafty Owl - Independent Stampin' Up! Demonstrator.


Card 2:

Table built using Product Table Builder by The Crafty Owl - Independent Stampin' Up! Demonstrator.

Pick Your Potion Halloween Card and Test Tube Treat Duo PP366

by Joanne James15. October 2017 09:00

It's Sunday and time for this week's new challenge over at The Paper Players! It's the turn of the queen of diecuts, the talented Laurie, to host this week and she has a timely clean and simple challenge for us to work with:
    Square Sketch PCC Challenge 263   

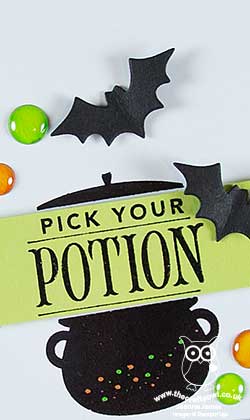
I haven't bought any new Halloween sets this year or any of the Spooky Night Designer Series Paper, so I had to get creative with existing (and a few retired) supplies coupled with a few stamps from some multi-occasion sets. I used the sketch over at Paper Craft Crew and the colours at Stamp Ink Paper and managed to create not one but two spooky Halloween-themed projects for you. The first one is my card - take a look:
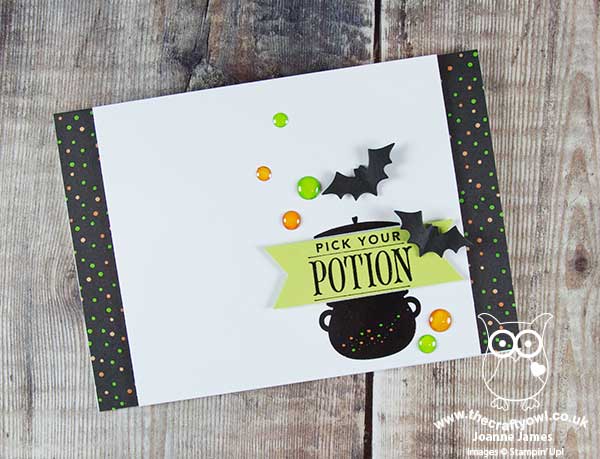
 

Here's the low-down on today's card:

Festive Phrases - I focused both of my projects today around the 'pick your potion' stamp in the Festive Phrases stamp set. I actually bought this set for the elf (who can resist him?!) however the other three stamps in this set will also get plenty of use for other festive occasions. It's difficult to se on my card, but having stamped the cauldron in black, I heat embossed it with clear embossing powder for a lovely added shine.

Add Colour - I used a couple of alcohol-based markers - one of my Pumpkin Pie Blendabilities and a! lime green Sharpie - to add colour to my project: I coloured the white dots green on my retired Halloween paper border, I coloured in the dots on the cauldron and then my favourite part on this card - I coloured a few White Perfect Accents with each colour and added them around my cauldron to look like potion bubbles. I love the shine that they have! I also stamped my sentiment again onto a piece of Lemon-Lime Twist cardstock and cut it with my banner punch add another pop of colour and finally a couple of diecut bats using the retired Halloween Scenes framelits for just the right amount of spooky!

Pick Your Potion - I decided that this card needed an accompanying treat that would fit with the 'pick your potion' theme, so whipped up a little test tube holder using a piece of cardstock and my Scalloped Tag Topper Punch to hold a pair of test tubes (love these!), one filled with a green potion and the other with an orange one. The Scalloped Tag Topper Punch was the perfect width and all I needed to do was punch a couple of 3/4" circle holes into the folded-over piece to slot my colourful potions into - here's my treat holder and card together:
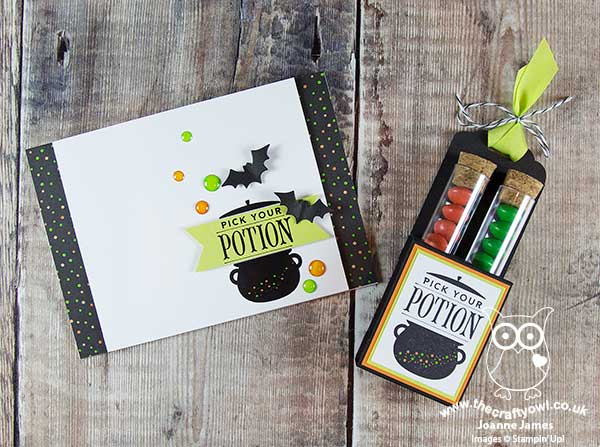
 

I just love this pair of cute projects and they really didn't take long at all to put together; I'm definitely going to make a whole bunch of these in different colours ready for trick-or-treat time!

Here is the visual summary of the key products used on today's project for you to pin for easy reference:
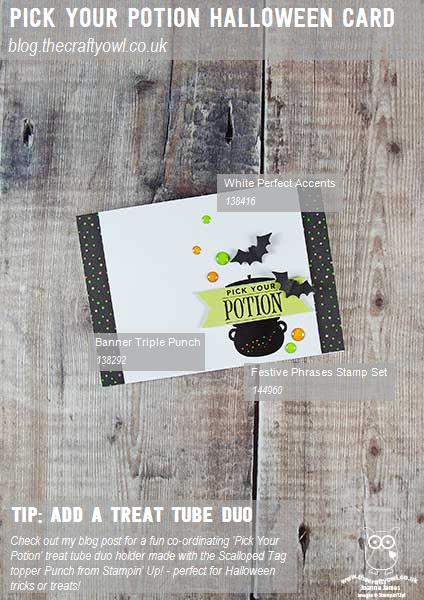
 

You can see all of my Product and 'How To' summaries on my 'How To - Tips and Techniques' Pinterest board in case you've missed any. 

Before you reach for your ink and papers, check out what our amazing team has created to inspire you this week:

The Paper Players Design Team
 
 
Here's a quick recap of our challenge rules:
 
1.  Create a new paper project
2.  Upload your creation to your blog with a link back to us and provide a direct link to the post featuring your challenge submission.
3.  Please link your card to no more than four challenges, TOTAL.
4.  Have FUN!  

I look forward to seeing your clean and simple creations in the gallery this week. Enjoy the rest of your weekend as it will be over all too quickly; we have been having unseasonably warm weather here in the UK these last couple of days - a good ten degrees warmer than usual. I'm sure it won't last so since we have a reasonably sport-free day, I'm hoping to get out and spend some time in the garden before the autumn chill returns. I'll be back tomorrow with another project; until then, happy stampin'!


Stampin' Up! Supplies Used: 

Table built using Product Table Builder by The Crafty Owl - Independent Stampin' Up! Demonstrator.

Spooky Fun Halloween Notelets

by Joanne James27. October 2016 08:05

Today it's time for a new challenge over at Create With Connie and Mary and this week we have a colour combination for you:


It would be fair to say I struggled big time with these colours this week! I couldn't get away from the idea of Halloween, yet making them work was definitely a challenge! I ended up making two cards and I must confess I'm not completely happy with either of them! That said, I'm sharing my notelets with you anyway - here's the first one:


And here's the second one:


Both use a combination of the challenge colours and the Spooky Fun stamp set and co-ordinating Halloween Scenes Edgelits Dies. The second one also includes a sentiment from the 'Suite Seasons' stamp set and a background created with the spots stamp in the 'Perpetual Calendar' set, along with a sentiment banner on each. Each would be quick and easy to create, although first time around they took me longer than I would have liked!

Here is the visual summary of the key products used on today's project for you to pin for easy reference:

You can see all of my 'How To' summaries on my 'How To - Tips and Techniques' Pinterest board in case you've missed any. 

Do visit the other Design Team members to see what they did with this week's colours; there's lots of inspiration over on their blogs too!

Enjoy your day - we are off to Brick Live to play Lego all day, a James family passion! Hope you enjoy your day too and I'll be back tomorrow with another project. Until then, happy stampin'!


Stampin' Up! Supplies Used:

Table built using Product Table Builder by The Crafty Owl - Independent Stampin' Up! Demonstrator.

Christmas Cuties Angel Banner Card

by Joanne James8. October 2015 08:05

Today it's time for a new challenge over at Create With Connie and Mary and this week we have a great colour challenge for you:


Now I must confess that if your're thinking this card looks familiar, it's because I cased the layout from the current seasonal catalogue. Here's my Christmas Cutie angel card: 

I used Lost Lagoon for my base, which I stamped the dots in Versamark and heat embossed in silver. I coloured a piece of the Color Me Irresistible Speciality Designer Series Paper in Lost Lagoon and layered this on a piece of silver foil, then built up my layered banners in Silver Glimmer, Perfect Plum and a silver metallic foil doily before adding my final banner of watercolour paper, onto which I stamped my angel and coloured using inks and my aquapainter. A few rhinestones, some silver glitter for my halo and silver corded trim finish my card.

There is something quite theraputic about colouring with an aquapainter; this card inspired me to colour in a few more cards too which I'll share with you in due course. 

Do visit the other Design Team members to see how they used this week's challenge colours; there's lots of inspiration over on their blogs too!

Enjoy your day and I'll be back tomorrow with another project; until then, happy stampin'!


Stampin' Up! Supplies Used:

  • Christmas Cuties Wood-Mount Stamp Set
  • Color Me Irresistible Specialty Designer Series Paper
  • Banner Triple Punch
  • Ornate Tag Topper Punch
  • Metallic Foil Doilies
  • Silver Glimmer Paper
  • Watercolor Paper
  • Heat Tool (Uk)
  • Embossing Buddy
  • Versamark Pad
  • Silver Stampin' Emboss Powder
  • Silver Foil Sheets
  • Silver Cording Trim
  • Basic Black Archival Stampin’ Pad
  • Perfect Plum Classic Stampin' Pad
  • Perfect Plum A4 Cardstock
  • Pink Pirouette Classic Stampin' Pad
  • Tip Top Taupe Classic Stampin' Pad
  • Lost Lagoon Classic Stampin' Pad
  • Lost Lagoon A4 Cardstock


2015 Stampin' Up! Catalogue Sneak Peak - Endless Birthday Wishes

by Joanne James16. May 2015 18:00

Today I've been at a Stampin' Up! UK regional training event in Telford. These events are both exhilarating and exhausting at the same time! It's a great opportunity to get together with team members, other SU! demos and the Stampin' Up! UK and European Home Office teams, to see lots of new and exciting product and swap work with others as a means of creative inspiration. I love creating swaps for this type of event although they can be time-consuming and always seem to create something rather too elaborate for mass production, hence no post yesterday and a late one today. I made a card for this week's challenges over at The Paper Craft Crew and Colour Me! and then based my swap on this as it features a stamp that is new to us here in the UK so is an annual catalogue 'sneak peek', although if you are a USA reader this set will be familiar to you as it has been available as a photopolymer set for some time: Endless Birthday Wishes.


So here is my original challenge card:  

I stamped the sprinkles stamp on my base of Melon Mambo and used the challenge colours to create my own custom happy birthday DSP which I used for the right hand panel - thank heavens for photopolymer stamps, they made lining up a doddle! I then stamped the cake in Memento Black on Whisper White and coloured with my retired Blendabilities, before mounting on a starburst cut with the retiring Starburst framelits - still available and a bargain at only £11.48 for the set! I added a few sequins for sparkle and to tie in my gold button, and then added a strip with a few DSP banners and the second part of my sentiment (the stamp has these words side by side, so I stamped it in two separate goes, so that the words sat on top of each other and fitted my banner better). 

I liked this card so much I created a (only slightly!) simpler version as my swap for the Stampin' Up! regional event. Here it is in the same colours:

The background and DSP panel was the same, however to save on colouring I stamped the cake in a single colour and mounted on a combination of a 2" circle, 2 3/8" scallped circle and 2 1/2" circle instead and I left off the button and twine. I also created it in three other colour combinations, but totally forgot to take photos of the whole pile when finished! I do however have this 'work in progress' shot of the chaos on my office desk last week:

Well, organised chaos! Here are the other colour combinations: Tangerine Tango and Tempting Turquoise (top left), Calypso Coral and Bermuda Bay (bottom left) and Wisteria Wonder and Elegant Eggplant (bottom right).

Thanks to everyone who swapped with me - I have some lovely samples that I'm looking forward to sharing with my customers. Also, before I go here's another quick photo of some of my downline and team members who I was lucky enough to spend the day with:

Even the camera-shy Samantha doesn't look to cross to have been snapped in this one :-) Love you ladies!

I'm looking forward to sharing lots more of the new and fun things that we got to see and create with at our training in the coming weeks; only a couple more weeks until the new 2015 Stampin' Up! annual catalogue launches!

Back tomorrow with another project; until then, happy stampin'!


Stampin' Up! Supplies Used (challenge card):

Table built using Product Table Builder by The Crafty Owl - Independent Stampin' Up! Demonstrator.


Stampin' Up! Supplies Used (swap card):

Table built using Product Table Builder by The Crafty Owl - Independent Stampin' Up! Demonstrator.


Artisan Embellishment Watercoloured Roses Card

by Joanne James20. April 2015 11:27

Well it's a lovely sunny spring day here in the UK today - what a lovely start to the week! As promised, I have another watercolour for you today - this time using the colours over at Colour Me...! and this week's Paper Craft Crew sketch:


Isn't that a pretty colour palette? I thought these colours were perfect for a soft and pretty, rather feminine card and perfect for some watercoloured roses - take a look:

I used Pistachio Pudding for my base and front, with a layer of Blushing Bride in between, then watercoloured a circle of watercolour paper with a blend of all three colours and my aquapainter, using one of the diecuts from the Artisan Embellishments kit as a stencil. The flower outlines aren't perfect yet I like this - I think it adds to the overall effect. I finished with a pierced border, a Blushing Bride rose cut from the trim that is also included in the kit, a thick baker's twine bow and a flag in rose red and a couple of banners, one of which I stamped with the 'love' from the 'Hello Life' stamp set - a perfect fit and it just so happened to be out on my desk from another project. 

If you would like to recreate this card, don't forget the Artisan Embellishment kit is on offer this week as one our Wednesday Weekly Deals - you can pick one up for just £6.71 and there are lots more bits and pieces in there too, including some rather lovely Blackberry Bliss velvet trim!

I'll be back tomorrow with lots of exciting news - tomorrow is the day that the Stampin' Up! retiring list launches - all of the products that will not be carrying over to the new annual catalogue, including the 2013-15 in-colours will be announced. Many of these products will then be available at a discounted price, only whilst stocks last. So do pop back then to check it out! 

Until then - happy stampin'!


Stampin' Up! Supplies Used:

Table built using Product Table Builder by The Crafty Owl - Independent Stampin' Up! Demonstrator.


Tags: , , , , , , ,

Cards

New Online Exclusives

There are new products available exclusively in the online store from 5 November - check them out here.

Latest Kits!

Stampin Cut and Emboss

The Layered Landscapes Kit and Nature's Paintings Kit are the latest kits in the online store - get yours here!

Shop Online

Access my online shop 24 x 7, 365 days of the year:

Current November hostess code:

9NKXDTTR

Shop Online

Mini Catalogue

BROWSE THE CATALOGUE

'Tis The Season - the new Stampin' Up! Mini Catalogue is here! For more details and to download your copy click here

Scrapbooking

Stampin' Up! has introduced a new range of 12x12" scrapbooking product and kit - the full range is now available to purchase online. To download a copy of the new digital Scrapbooking Catalogue click here.

2024-25 Annual Catalogue

BROWSE THE CATALOGUE

Click on the image to download your copy of the 2024-25 annual catalogue. For a full list of current SU! supplies, go to my online store. If you would like any help or advice, please drop me a line at joanne@thecraftyowl.co.uk or give me a call on 07773 421446 - I'd be happy to help.

Join My Team

It's always a great time to join Stampin’ Up! New team members can get £130 worth of products for only £99 + free business supplies + free shipping + all the fun being a part of Stampin’ Up! Stampin' Up! has something for everyone: join my growing team and benefit from my support to enjoy Stampin' Up! however you choose.

If you're interested, call me for a chat to understand how I can help you realise your goals. Alternatively, if you have already decided to sign up and you just can't wait, please click here for the link to the online form where you can sign up and order your starter kit right away! 

About Me

Hi I'm Joanne and live in Northampton and when I'm not looking after my husband and two beautiful children, am an avid crafter with a passion for all things Stampin' Up!

I must confess that I have never been a big rubber stamper - until I discovered Stampin' Up! that is. I love the fact that I can get such great results with co-ordinating stamps, inks, papers and punches - the possibilities are endless! Join me on my stamping journey as I share the things I love and be inspired to create amazing things yourself!

Follow Me

Monthly Newsletter

Box Builder

Click the button above to use Box Buster to create your custom box design using the Envelope Punch Board!

Kits Collection Now Available!

Stampin Cut and Emboss

The new Kits Collection from Stampin' Up! is now available!

Click here to see the current kits available and order yours online today.

I Design For


Stampin' Up Stuff

This is my personal blog and is not endorsed by Stampin’ Up! I hope you find it a plentiful source of ideas and personal inspiration but please don't copy my designs for contest submission or use for classes, publication or sale without express permission.