Perfectly Penciled Amazing You

by Joanne James26. April 2023 11:37

Today I'm sharing a card for the current Color Hues challenge:

Purple is one of my favourite colours so I knew I wanted to play along. I decided on some more colouring with my Stampin' Blends using up a little more retiring paper - take a look:


Here's the low-down on today's card:

The Perfectly Penciled papers are great for colouring with your Stampin' Blends markers - I made this card last week where I 'reverse coloured' the same pattern - you can see that card here if you missed it. This time I coloured the actual flowers in shades of purple and green and included a larger vertical panel, accenting with a diecut sentiment in black and white again using the Amazing Thanks Dies and pairing with a stamped 'YOU' from the 'Art Gallery' stamp set.


This paper and those fabulous Amazing Thanks Dies are all retiring at the end of this month - add them to your shopping basket via the links below whilst you still can!

Here is the visual summary of the key products used on today's project for you to pin for easy reference:


You can see all of my 'How To' summaries on my 'How To - Tips and Techniques' Pinterest board in case you've missed any. 

Enjoy your day and I'll be back tomorrow with another project. Until then, happy stampin'!


Stampin' Up! Supplies Used:

Table built using Product Table Builder by The Crafty Owl - Independent Stampin' Up! Demonstrator.

You Are Amazing Slimline Birthday Card

by Joanne James19. April 2023 19:00

I've a late post today but as promised I'm sharing a card that uses the same layout as yesterday's, this time using a trio of colours from the current Sunday Stamps palette:


I chose the two pinks and Starry Sky as my co-ordinating dark blue for a bright slimline birthday card - take a look:


Here's the low-down on today's card:

The card has a few more layers than yesterday and is all about the colour! I used the fabulous large floral die as my focal point then overlaid with the other diecut sentiment in the Amazing Thanks set, having combined this with a stamped sentiment from the Art Gallery set for a colourful birthday card:

This card is still easy to pull together and impactful with the hot pink! I thought this card might work with the addition of a sparkly diecut number as I have lots of friends and family celebrating milestone birthdays in the next few months. I need a card for an 18th birthday, so consulted with the James Juniors for their thoughts and was told in no uncertain terms that this was a card more suitable to older (much older!!) ladies! Oh well - clearly I might be the mother of two teenagers, but what do I know?! Back to the drawing board on that one!

Here is the visual summary of the key products used on today's project for you to pin for easy reference:


You can see all of my 'How To' summaries on my 'How To - Tips and Techniques' Pinterest board in case you've missed any. 

Enjoy your evening and I'll be back tomorrow with another project. Until then, happy stampin'!


Stampin' Up! Supplies Used:

Table built using Product Table Builder by The Crafty Owl - Independent Stampin' Up! Demonstrator.

Art Gallery Graffiti Art Thank You Card TTT 204

by Joanne James13. April 2023 16:00

It's Thursday and time for a new challenge over at TicTacToe! It's the turn of Team X to host this week and I am the featured designer this week. This is the fun board that we are playing along with: 


I went across the bottom with floral, embossing and stitching and took the opportunity to work with the current Color Hues palette of peach and kraft and decided to try out a fun technique that I saw on Instagram recently - take a look:


Here's the low-down on today's card:

Graffiti Art - I saw a reel on Instagram recently by the New Zealand demonstrator, Jacque Williams, where she created a fun graffiti art-style card and I really wanted to give it a go! It's actually not that tricky to do: you choose your background wall colour (I used Crumb Cake) then ink one side of your Bricks and Mortar embossing folder before inserting your card and running it through your Big Shot machine. This gives you your inked 'cement' lines and the base onto which you then stamp the rest of your design. Simple! This embossing folder is great for this technique and makes a great background too. I can't believe it's retiring - if you don't have one, I'd seriously consider adding to your collection whilst you still can!

Floral Art Gallery - I chose to add some bold florals for my wall art, using the large bloom from the Art Gallery stamp set, with a Pale Papaya base and top layer of Calypso Coral for some pretty peachy florals, and I stamped the stems in a neutral brown. I also added some splatters in Crumb Cake randomly across my wall to add to the artsy feel.

Art Gallery is another stamp set I haven't used in ages but is leaving us with the current outgoing annual catalogue. I'll be keeping mine though - these florals are a no-brainer and the simple block sentiments are so useful with all kinds of cards, not to mention the large diecut sentiment in the set too. Pale Papaya is leaving too - so get yours now whilst you still can!

Tailormade Tag - I finished my card with some Crumb Cake baker's twine and a tiny tailor made tag with a simple thank you sentiment. I am sending this card to a dear customer of mine who loves a messy card - mixed media and grunge are totally her thing, so I know she will appreciate my attempt at getting even close to her signature style!!

Here is the visual summary of the key products used on today's project for you to pin for easy reference:


You can see all of my Product and 'How To' summaries on my 'How To - Tips and Techniques' Pinterest board in case you've missed any. 

A tictactoe board offers so many creative possibilities - how does this week's board inspire you? Why not have a go? We would love to see you in the gallery and who knows - you might be selected for Designer's Choice and be eligible to be a guest designer on a future challenge. You should definitely check out the design team's cards this week too - they are amazing!

Enjoy your day; I'm hoping to get a few cards made today in between errands and laundry. I'm hopeful to be able to use the washing line today, as right now it's a lovely bright and breezy day. Not sure I'll be still in luck by the time the washing machine cycle has finished - we are experiencing proper April showers here in the UK at the moment. The constant to and fro the washing line is definitely keeping me fit though! I'll be back tomorrow with another project. Until then, happy stampin'!


Stampin' Up! Supplies Used: 

Table built using Product Table Builder by The Crafty Owl - Independent Stampin' Up! Demonstrator.

Sunshine Prints You Are Amazing Card

by Joanne James23. January 2023 09:00

Happy Monday everyone! Today I'm sharing another card using Jacquie's layout over at Freshly Made Sketches, this time paired with the palette over at Color Throwdown:


I thought Jacquie's layout was perfect to showcase a beautiful piece of designer series paper and I had just the sheet - take a look:


Here's the low-down on today's card:

Do you ever buy a pack of paper that you just don't want to cut into? This particular design in the Sun Prints pack was one of those for me! The botanical prints are so delicate and the cyanotype style of the papers gives them a beautiful soft and organic feel. I carefully chose a corner of my sheet and cut it to fit my centre panel, using a piece without a print for my mat layer and diecut sentiment. The Color Throwdown palette immediately made me think of the SunPrints papers, as grey is also a colour that features in this pack, albeit not on the sheet I wanted to use. The banner across the front of the sketch was a great way to incorporate the grey and add a touch of contrast though so both elements fitted together perfectly: 


That paper is so beautiful - sometimes you have to just #loveitchopit! 

Here is the visual summary of the key products used on today's project for you to pin for easy reference:


You can see all of my 'How To' summaries on my 'How To - Tips and Techniques' Pinterest board in case you've missed any. 

Enjoy your day. Mine will be filled with household chores, but needs must! I'll be back tomorrow with another project. Until then, happy stampin'!


Stampin' Up! Supplies Used:

Table built using Product Table Builder by The Crafty Owl - Independent Stampin' Up! Demonstrator.

Natures Harvest Echinacea and Meadow Dies Watercolour Print for PP612

by Joanne James9. October 2022 08:00

Today it's Sunday and time for this week's new challenge over at The Paper Players! It's the turn of the fabulous Laurie to host this week and she has an interesting colour challenge for us to work with:


I say interesting because Laurie's colours immediately made me think of Halloween, but since I rarely send Halloween cards and I don't have much in the way of current Halloween product, I was determined to use these colours on anything but a Halloween card! So much so, I started creating and ended up with not one but two cards to share with you today - and neither remotely anything to do with October 31st! Here's the first one using Amy's layout over at Freshly Made Sketches this week - take a look:


Here's the low-down on my first card:

Staying faithful to Amy's sketch, I added a band of Brights designer series paper to my Gorgeous Grape card base and decided to create a nature-inspired watercolour as my focal point. I stamped the echinacea from the 'Nature's Harvest' stamp set in Stazon onto watercolour paper, then loosley watercoloured my image using the challenge colours and my aquapainters. Once I'd painted my image, I added some speckles by flicking my black Stampin' Blends marker across the image before cutting out with the largest circle in my Stylish Shapes Dies:


I added a white-on-black sentiment from 'Art Gallery' to complete my card. I liked this card so much, I thought I'd use one of the dies in the co-ordinating set to try out a watercolour print technique that I'd seen on Pinterest. My first attempt was a hot mess, but taking my learns and a different die from the Meadow Dies set I had a second attempt and like this one much better! Here's the card in question:


Have you ever tried the watercolour print technique using diecuts? It's actually quite straightforward: diecut your flower from watercolour paper and colour with Stampin' Write markers. Once coloured, place the flower onto a blank piece of watercolour paper and lightly spritz with water. The water 'spreads' the ink from the diecut one the blank piece - you can also 'stamp' this piece with the wet, coloured flower (but I didn't do that here). Allow both pieces to dry then add to your card; I cut a frame out of my spritzed piece and then added my diecut flower offset from the relief image on the frame. I added some clear faceted gems and a sentiment from the 'Charming Sentiments' stamp set that, when paired with the words 'faith over fear' stamped on the inside were the perfect words of encouragement needed for a card to send to a friend battling breast cancer right now:


What do you think? I quite like the effect and will definitely be trying this with other dies in other colours. I am also linking my second card up over at Time Out since the sentiment is perfect for their theme this week.

Here are the visual summary of the key products used on today's projects for you to pin for easy reference:


You can see all of my Product and 'How To' summaries on my 'How To - Tips and Techniques' Pinterest board in case you've missed any. 

So what do these colours say to you - Halloween, or something else completely? Before you reach for your ink and papers, check out what our amazing team has created to inspire you this week:

Here's a quick recap of our challenge rules:
 
1.  Create a new paper project
2.  Upload your creation to your blog with a link back to us and provide a direct link to the post featuring your challenge submission.
3.  Please link your card to no more than four challenges, TOTAL.
4.  Have FUN!

Enjoy your day; I'll be back on Tuesday with another project. Until then, happy stampin'!


Stampin' Up! Supplies Used: 

Table built using Product Table Builder by The Crafty Owl - Independent Stampin' Up! Demonstrator.

Wonderful World Split Card Textures Birthday Card

by Joanne James18. August 2022 08:00

Today I'm sharing a card that I made a few weeks ago but haven't had time to type up until now, featuring more of the lovely Wonderful World designer series paper that can be yours free with a £90 order during the current Sale-A-Bration promotion - take a look:


Here's the low-down on today's card:

Sale-A-Brate with a Wonderful World - I had fussy-cut a whole bunch of flowers from the Wonderful World paper and decided to CASE a card shared by one of Stampin' Up!'s current artisans, the talented Berdien Weideveld, that she posted a while ago on Instagram. I simply layered them along the diagonal, with a mix of white, yellow and pink flowers and an additional piece of the yellow striped DSP on the base layer.

Split Card Textures - the diagonal for the flowers is taken from the line of the Split Card Texture Die - these come as a set of two standalond dies and are great for adding detail and texture to a cardfront. 

Finishing Touches - I added some pearls, small diecut flowers and diecut leaves to my fussy cut flowers to add interest:


Lastly, a simple heat-embossed sentiment from hte 'Art Gallery' stamp set completes my card. It took a while to cut out all the flowers, but I must say I love the finished effect!

Here is the visual summary of the key products used on today's project for you to pin for easy reference:


You can see all of my 'How To' summaries on my 'How To - Tips and Techniques' Pinterest board in case you've missed any. 

I'm writing this post in advance of my vacation so I hope as you are reading it that the Wonderful World papers are still available; if not, I hope you already snapped them up whilst supplies lasted and you are still excited to use them!

Enjoy your day and I'll be back tomorrow with another project. Until then, happy stampin'!


Stampin' Up! Supplies Used:

Table built using Product Table Builder by The Crafty Owl - Independent Stampin' Up! Demonstrator.

Awash In Beauty Garden Blooms Pair PP598

by Joanne James3. July 2022 08:00

Today it's Sunday and time for this week's new challenge over at The Paper Players! It's Laurie's turn to host this week and she has a theme challenge for us to work with:


We are a green-fingered bunch in the James household, however at this time of year the only flowers are those that have a fruit or vegetable attached - strawberries, climbing beans, courgettes and tomatoes to name a few. I don't have any vegetable stamps though, but never fear - this week's challenge can include everything from greenery, houseplants flowers and everything in between! I love flowers and with so many creative options, I was spoiled for choice. I was a little short on time though, so I decided to choose a beautiful new designer paper and let it do the heavy lifting - take a look:


Here's the low-down on today's card:

The beautiful Awash In Beauty designer paper makes a card all by itself - beautiful watercoloured blooms, with no effort! I added a diecut sentiment and a few iridescent rhinestones, and my card is complete!


I liked this card so much I used another one with the other half of the paper and changed up the sentiment for one from the 'Sending Smiles' bundle:


Check out the subtle sparkle from the rhinestones - so pretty!


I ended up liking this one the best! What about you - do you have a favourite?

Here is the visual summary of the key products used on today's project for you to pin for easy reference:


You can see all of my Product and 'How To' summaries on my 'How To - Tips and Techniques' Pinterest board in case you've missed any. 

Before you reach for your ink and papers, check out what our amazing team has created to inspire you this week:

Here's a quick recap of our challenge rules:
 
1.  Create a new paper project
2.  Upload your creation to your blog with a link back to us and provide a direct link to the post featuring your challenge submission.
3.  Please link your card to no more than four challenges, TOTAL.
4.  Have FUN!

Enjoy your day; ... I'll be back tomorrow with another project. Until then, happy stampin'!


Stampin' Up! Supplies Used: 

Table built using Product Table Builder by The Crafty Owl - Independent Stampin' Up! Demonstrator.

Windmill Flowering Tulip Fields Mother's Day Card With Belly Band PP580

by Joanne James27. February 2022 09:00

Today it's Sunday and time for this week's new challenge over at The Paper Players! It's the turn of the fabulous Anne Marie to host this week and she has my favourite, a sketch challenge, for you to work with:
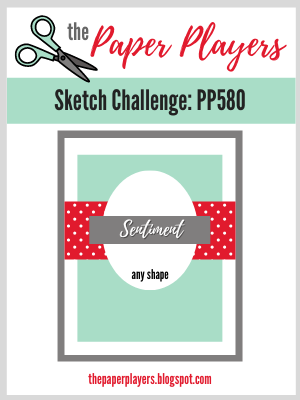
    

I do love a good sketch and this week I really went to town! I have been making lots of cards with the 'Tulip Fields' bundle as it was the feature bundle for my online class last week and I decided that the layout of Anne Marie's sketch was perfect for a diecut windmill for the central focal point and the beginnings of what turned out to be a rather special card - take a look:
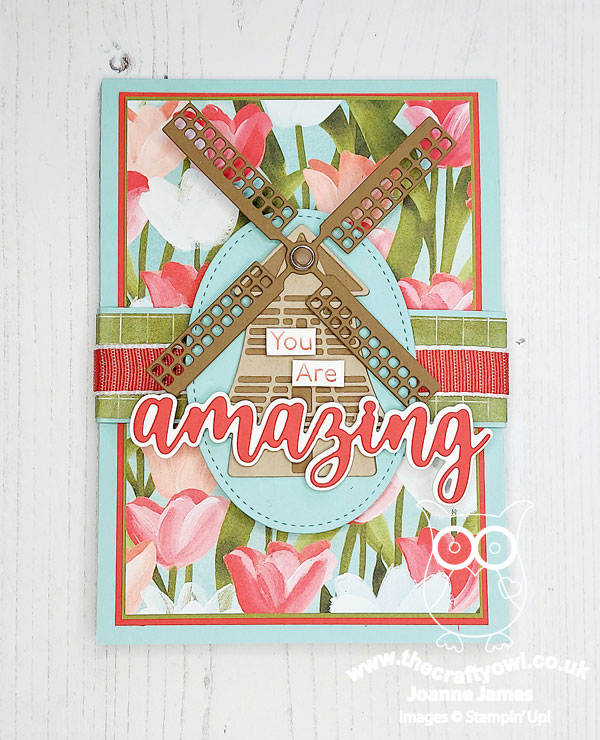
 

Here's the low-down on today's card:

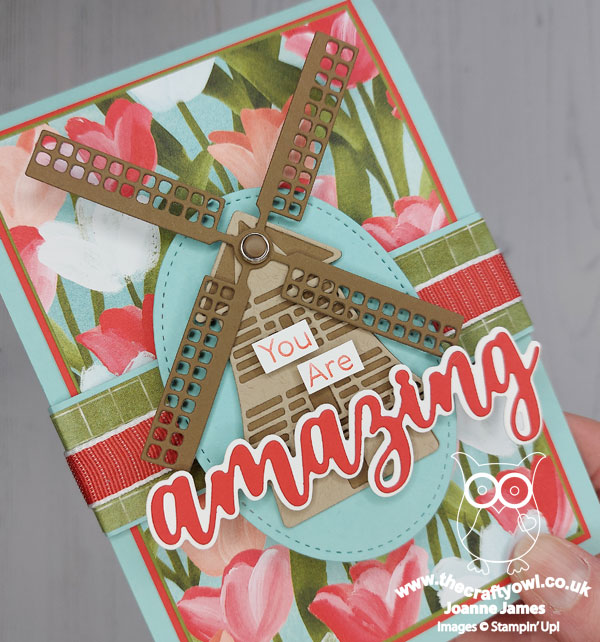
Many Layers - This is a card of many layers - which means I'm also playing along with the ladies at Just Add Ink this week where I chose 'layers' and patterned paper as my two things. More on patterned paper in a moment, but firstly those layers! I can count 13 on the front of my card alone (not including the band of ribbon!) - and there are even more inside! I used a (retired) stitched oval diecut as a base for my windmill cut using the Windmill dies and added a sentiment combining stamped words taken from 'Art Gallery' and a layered 'amazing' cut using the Amazing Thanks Dies. I attached these to a horizontal band as the focal point for the front of my card.You can see the layered loveliness in more detail below:
A Belly Band Surprise - The layered windmill is in fact attached to a belly band decorated with a strip of DSP, which when removed reveals the beautiful red, pink and white tulips of the Flowering Fields DSP in all it's glory, along with a sentiment made from a combination of some partial stamping from a stamp in the 'Flowering Tulips' stamp set and the word 'Mother's' cut using the Word Wishes Dies:
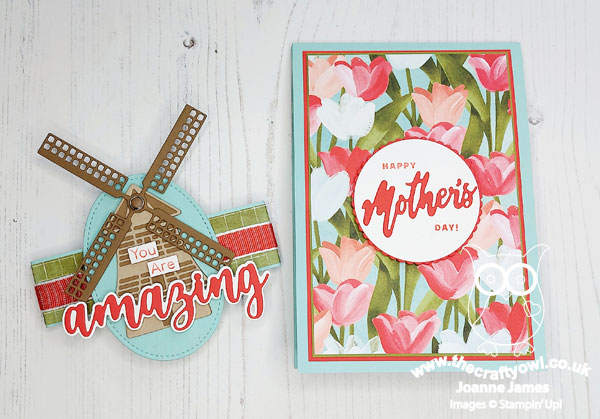
 

With Mother's Day here in the UK only a few weeks away, this was a great opportunity to get ahead and make my Mother's Day card. I love that the layered circle greeting sits below the windmill oval of the belly band and is only revealed when the belly band is removed. 

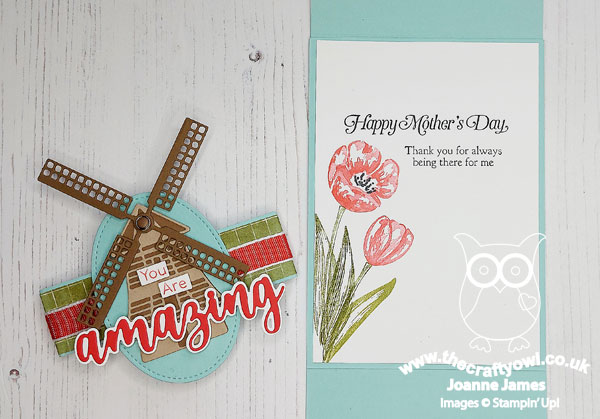
Mother's Day Details - The surprises don't end there though. My card has an additional flap, so when it's opened you see this panel, also decorated with another piece of Flowering Fields DSP and a trio of tulips cut with the Tulips Dies:
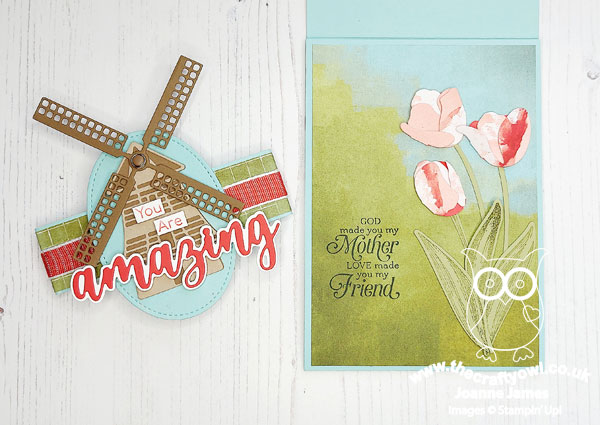
 

 These Tulips Dies are amazing - they create the most amazing dimensional tulips! I cut mine from another pattern in the Flowering Fields DSP pack; it is actually a Petal Pink sky with white and red clouds, but I like the mottled effect that it gives the tulips and they compliment the pattern on the front of the card:
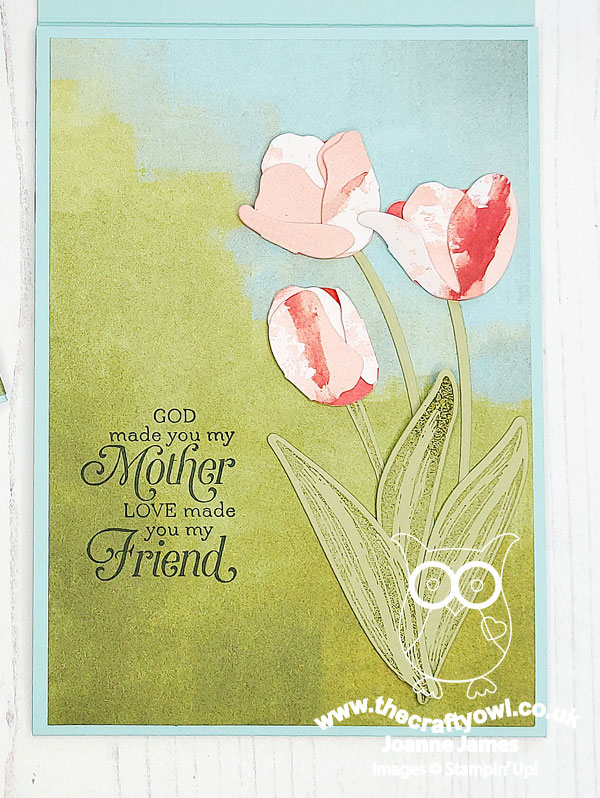
 

The sentiment, along with the one on the inside of the card is from the retired stamp set 'Strong and Beautiful'. This set is a keeper - the words in this set are so perfect for special female cards. when you open the next flap, the inside panel is revealed. I bordered the edge of the bottom panel with a trio of tulip border dies (I might add another diecut windmill behind these tulips - now that I am looking at it again this panel is a little light on decoration compared to the others):
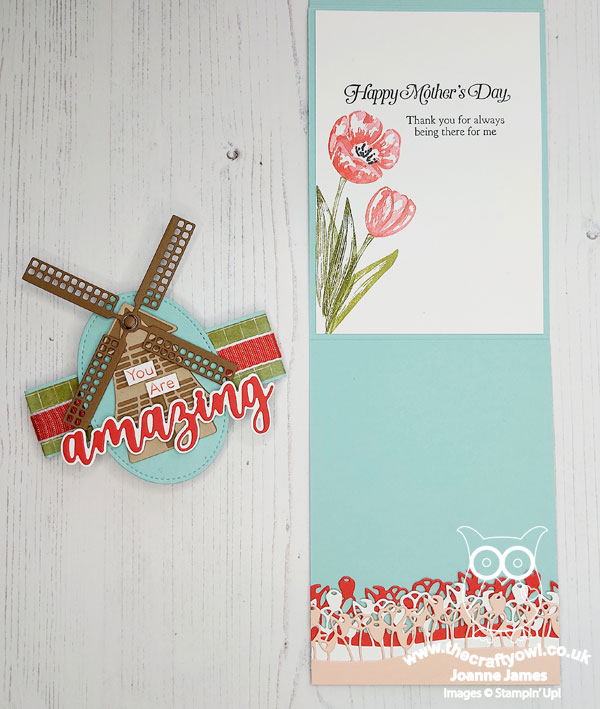
 

 And here's a close-up of the innermost panel, decorated with some layered tulips stamped with the 'flowering Tulips' stamp set:
 

As you can imagine, all those layers make for a bulkier than usual card, so I will be making a custom box-envelope to enclose it in. That's a job for another day though! This kind of card does take a long time to make, but it is worth it - I love the end result and know my Mum will appreciate it too.

Here is the visual summary of the key products used on today's project for you to pin for easy reference:
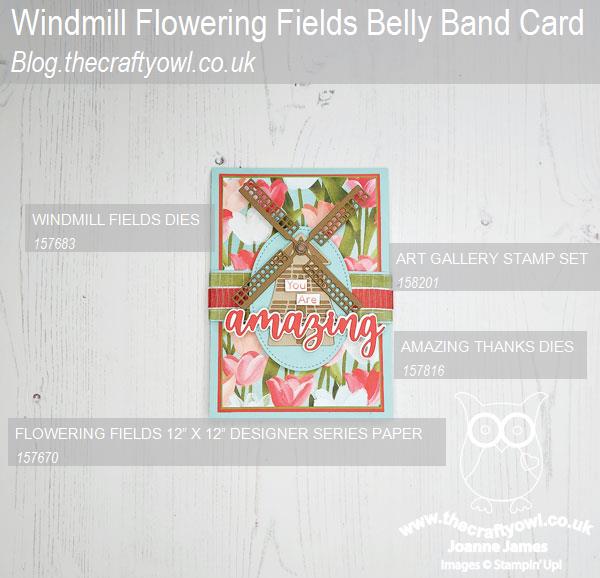
 

You can see all of my Product and 'How To' summaries on my 'How To - Tips and Techniques' Pinterest board in case you've missed any. 

Before you reach for your ink and papers, check out what our amazing team has created to inspire you this week:

Here's a quick recap of our challenge rules:
 
1.  Create a new paper project
2.  Upload your creation to your blog with a link back to us and provide a direct link to the post featuring your challenge submission.
3.  Please link your card to no more than four challenges, TOTAL.
4.  Have FUN!

Enjoy your day; we are hoping for another restful Sunday, mainly centred around cooking and eating - we are cooking a Turkish recipe for dinner today for the first time, so that should be fun! I'm also hoping to squeeze in another movie this afternoon - last week's 'Encanto' proved a big hit so this week we might go for 'Sing 2' - hope it's as good as the first one!

I'll be back tomorrow with another project. Until then, happy stampin'!


Stampin' Up! Supplies Used: 
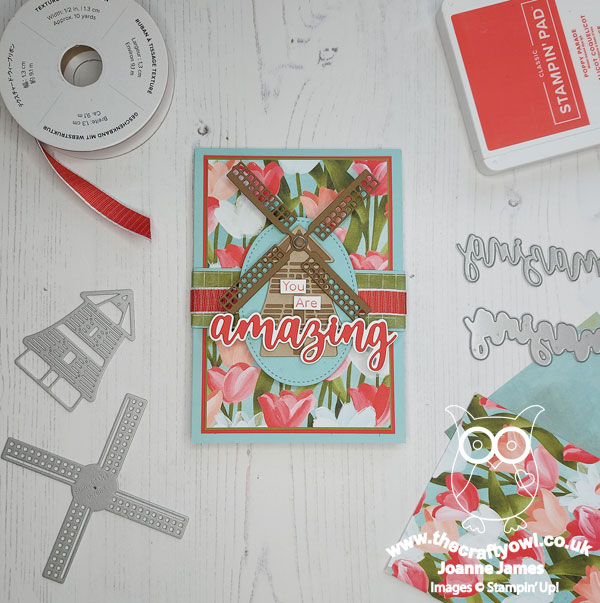
Table built using Product Table Builder by The Crafty Owl - Independent Stampin' Up! Demonstrator.

Blackberry Beauty A Reason To Celebrate CCS 441

by Joanne James12. October 2021 13:00

It's Tuesday and time for a new challenge over at CAS Colours & SketchesThis week's challenge is a sketch challenge and our hostess Vicky has asked that we create a card with a jaunty angle:


Feel free to flip or rotate the sketch when making your card.

I'm also linking up my card today with the team over at AAA cards who are celebrating their 200th challenge since my card has also been made to celebrate something special - take a look:


Here's the low-down on today's card:

A dear blogging friend of mine recently got married to her original childhood sweetheart, having been widowed for the past 11 years. I was delighted to hear this happy news and couldn't wait to create a card to send her my congratulations. I decided the Blackberry Beauty gold foiled paper was the perfect paper to showcase on that jaunty angled piece of the sketch, so I cut it with one of my Basic Borders Dies and added a simple gold embossed 'congratulations' greeting from the Art Gallery set.

Whilst this completed the outside of my card, I had to add some additional decoration to the inside, using both a floral image (stamped in gold) and a sentiment from the retired set 'Wonderful Romance':


I just love this set for wedding cards! I am sending this card overseas, so the flat clean and simple design is perfect. I wanted it to be special for my friend when she opened it though, so I created a custom envelope using shimmer gold vellum with a co-ordinating envelope flap to house her card, that I will then place inside another standard envelope for mailing:


I love the monochrome look for a clean and simple card and this elegant card is great for wedding congratulations I think - and definitely an event to be celebrated!

Here is the visual summary of the key products used on today's project for you to pin for easy reference:


You can see all of my 'How To' summaries on my 'How To - Tips and Techniques' Pinterest board in case you've missed any. 

Enjoy your day and I'll be back tomorrow with another project. Until then, happy stampin'!

Stampin' Up! Supplies Used:

Table built using Product Table Builder by The Crafty Owl - Independent Stampin' Up! Demonstrator.

Clean and Simple Striped Floral Square Die Card

by Joanne James30. August 2021 08:00

Happy Bank Holiday Monday to all my UK readers! It's the last holiday before Christmas so I hope you're going to make the most of it - maybe even squeeze in a little extra crafty time! Today I'm sharing another card featuring the Floral Squares Dies that I used on yesterday's card; this time using the sketch over at Fusion and colour inspiration from the fabulous photo over at Just Us Girls:


I love the Fusion sketch, which is a great layout for a wide variety of styles. I rotated the sketch through 90 degrees for my card and decided that I would focus on simple lines of block colour to draw the eye to just one of those gorgeous Floral Dies - take a look:


Here's the low-down on today's card:

I added interest by tilting my diecut square and weaving my central stripe through the die and heat-embossed my sentiment from the 'Art Gallery' stamp set in white:


Super simple and another great way to feature those floral square dies!

Here is the visual summary of the key products used on today's project for you to pin for easy reference:


You can see all of my 'How To' summaries on my 'How To - Tips and Techniques' Pinterest board in case you've missed any. 

Enjoy your day and I'll be back tomorrow with another project. Until then, happy stampin'!


Stampin' Up! Supplies Used:

Table built using Product Table Builder by The Crafty Owl - Independent Stampin' Up! Demonstrator.

New Online Exclusives

There are new products available exclusively in the online store from 5 November - check them out here.

Latest Kits!

Stampin Cut and Emboss

The Layered Landscapes Kit and Nature's Paintings Kit are the latest kits in the online store - get yours here!

Shop Online

Access my online shop 24 x 7, 365 days of the year:

Current November hostess code:

9NKXDTTR

Shop Online

Mini Catalogue

BROWSE THE CATALOGUE

'Tis The Season - the new Stampin' Up! Mini Catalogue is here! For more details and to download your copy click here

Scrapbooking

Stampin' Up! has introduced a new range of 12x12" scrapbooking product and kit - the full range is now available to purchase online. To download a copy of the new digital Scrapbooking Catalogue click here.

2024-25 Annual Catalogue

BROWSE THE CATALOGUE

Click on the image to download your copy of the 2024-25 annual catalogue. For a full list of current SU! supplies, go to my online store. If you would like any help or advice, please drop me a line at joanne@thecraftyowl.co.uk or give me a call on 07773 421446 - I'd be happy to help.

Join My Team

It's always a great time to join Stampin’ Up! New team members can get £130 worth of products for only £99 + free business supplies + free shipping + all the fun being a part of Stampin’ Up! Stampin' Up! has something for everyone: join my growing team and benefit from my support to enjoy Stampin' Up! however you choose.

If you're interested, call me for a chat to understand how I can help you realise your goals. Alternatively, if you have already decided to sign up and you just can't wait, please click here for the link to the online form where you can sign up and order your starter kit right away! 

About Me

Hi I'm Joanne and live in Northampton and when I'm not looking after my husband and two beautiful children, am an avid crafter with a passion for all things Stampin' Up!

I must confess that I have never been a big rubber stamper - until I discovered Stampin' Up! that is. I love the fact that I can get such great results with co-ordinating stamps, inks, papers and punches - the possibilities are endless! Join me on my stamping journey as I share the things I love and be inspired to create amazing things yourself!

Follow Me

Monthly Newsletter

Box Builder

Click the button above to use Box Buster to create your custom box design using the Envelope Punch Board!

Kits Collection Now Available!

Stampin Cut and Emboss

The new Kits Collection from Stampin' Up! is now available!

Click here to see the current kits available and order yours online today.

I Design For


Stampin' Up Stuff

This is my personal blog and is not endorsed by Stampin’ Up! I hope you find it a plentiful source of ideas and personal inspiration but please don't copy my designs for contest submission or use for classes, publication or sale without express permission.