by Joanne James23. February 2014 21:11I've had quite the busy weekend and today I had my first weekend project class of the year. I love weekend project classes; they allow a little more time than we have at our monthly card class to do something a bit more involved. Today we made the Burlaps and Blooms Spring Wreath - such a lovely welcome nod to Spring after the cold of winter and the wet weather of late. So without further ado, here is my completed wreath:
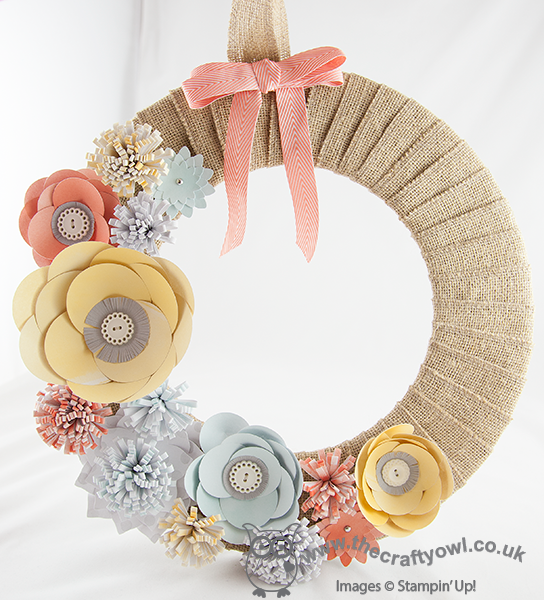
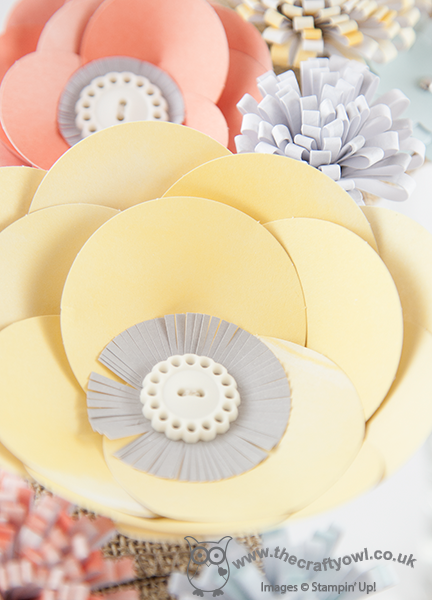
This wreath comes as a kit (minus the chevron ribbon) and with the aid of a hot glue gun contains everything you need to put it together. There are several different flower types that form part of the decoration. Here are some close up shots that show the detail - here's the large bloom made up of individual petals:
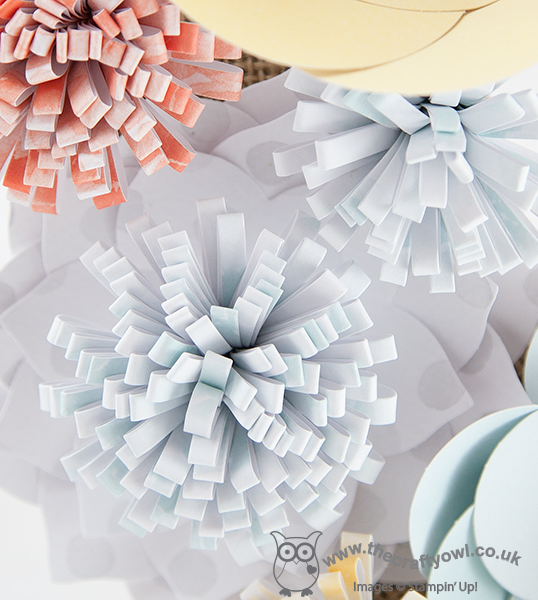
Here's one of the fringed flowers on a large flower base:
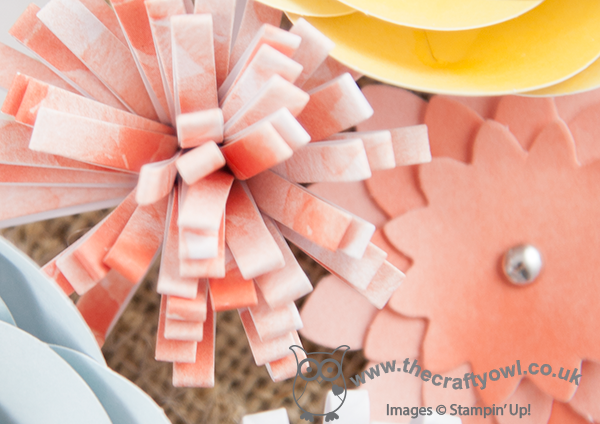
And lastly another fringed flower with a one of the layered flowers secured with a silver brad:
Isn't this wreath just so pretty? If you'd like to see the wreaths that the ladies at my class made today, do pop on over to my Facebook page to take a look (feel free to give me a 'like' at the same time!); they look similar to mine, but both have their individual touches that make their wreaths unique.
Half term is over so James Juniors are back to school tomorrow - normality (or at least, as 'normal' as it gets!) returns! I'll be here tomorrow with a fun card; until then, happy stampin'!
Stampin' Up! Supplies Used:
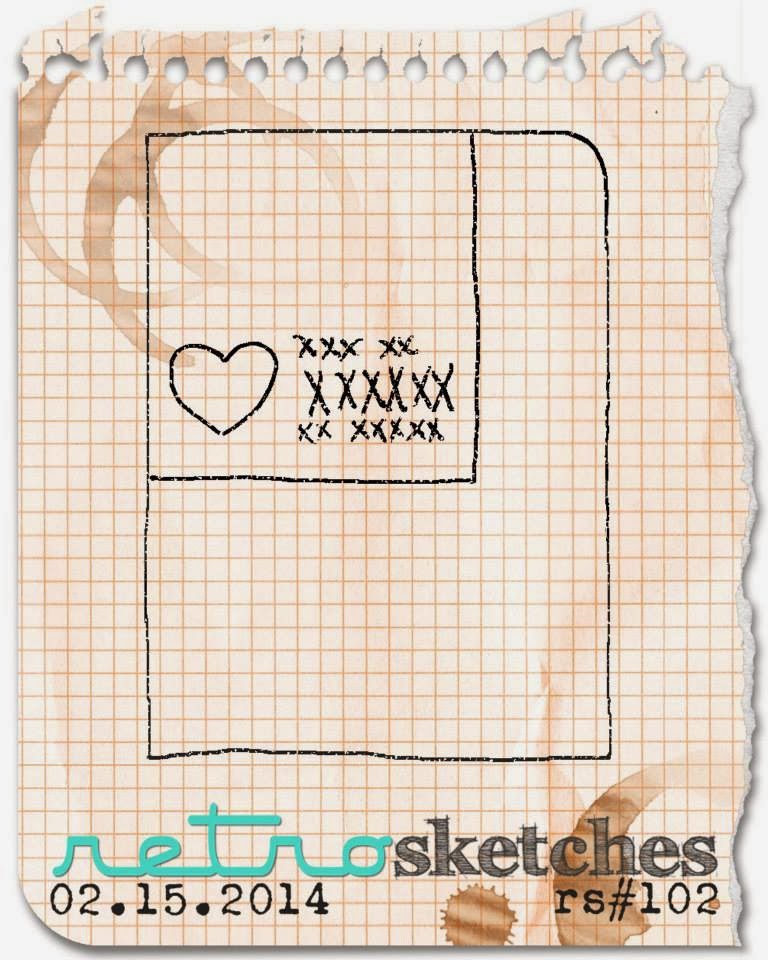
by Joanne James21. February 2014 22:37One last quick post from me today - call it an early post for tomorrow! I saw the current sketch over at Retrosketches and was really keen to have a go as I managed to squeeze in a little extra crafting time this afternoon, so thought I would combine it with the challenge over at Addicted to CAS this week:
Now I don't have a current coffee stamp, but I do have a cute little stamp that was part of one of last year's Sale-A-Bration sets that I knew would fit the bill. Here is my card:
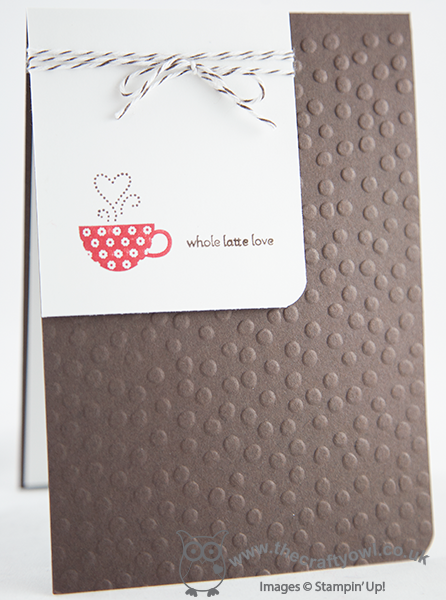
I used coffee as the inspiration for my colour scheme too, with my base card of Early Espresso picked up in the co-ordinating baker's twine. I coloured my coffee cup in red to give a pop of colour and embossed my card base with the Decorative Dots Textured Impressions Embossing Folder to add texture and interest.
That's all from me; I'm off to catch up on a little late night TV. Back tomorrow with another project; until then, happy stampin'!
Stampin' Up! Supplies Used:
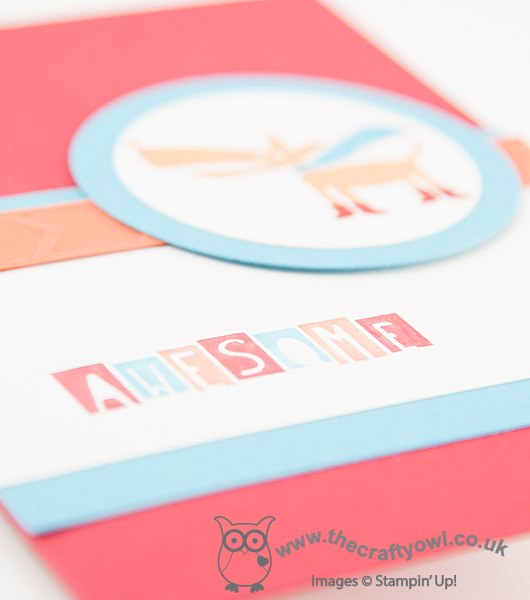
by Joanne James21. February 2014 21:01So here is my second card of the day, just in time for this week's challenge over at Less is More where the theme this week is 'masculine cards'. I decided to use the 'Cool Kid' stamp set for my card; when I saw this stamp set I just had to have it - my children always get so excited if they have been chosen as the class 'cool kid' for the day at school. So here is my card:
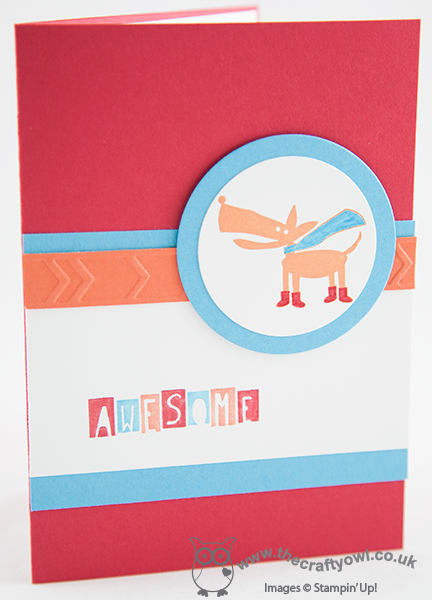
I chose to use the Brights colour combination of Real Red, Tempting Turquoise and Tangerine Tango for my card - all colours my son would love! - and having stamped the dog in orange, I coloured in his scarf and boots with my Stampin' Write markers. I used the blue to outline both my circle and sentiment panel, then picked up the orange with a thin strip cut from a piece of cardstock embossed with the new Arrows Textured Impressions Embossing Folder. I inked up the sentiment using my markers too, so that I could have multi-coloured lettering - I love the effect that this give on this card.
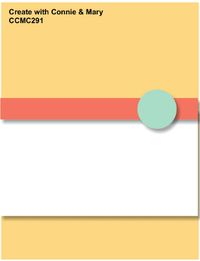
I used this week's sketch over at Create with Connie and Mary for my layout.
Back soon with another card; until then, happy stampin'!
Stampin' Up! Supplies Used:
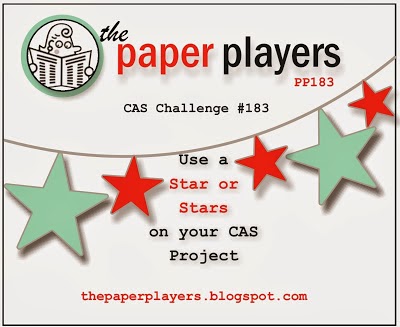
by Joanne James21. February 2014 19:46I've had a very crafty day today and managed to make a few quick cards to catch up on some of this week's challenges. I'm just in time to get in my entry for this week's challenge at The Paper Players, where LeAnne's challenge this week is CAS Clean and Simple with Stars:
I decided to go with a gold and blue theme and used the sketch over at CAS Colours & Sketches this week for my layout (too late to enter for the challenge, but I liked the unusual layout) - here is my card:
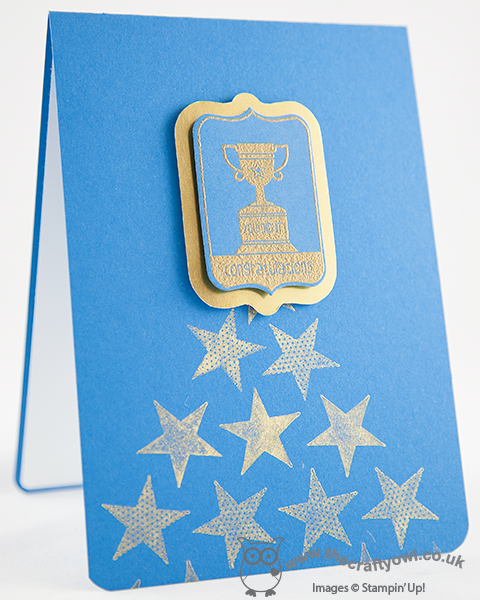
I stamped my stars with the gold metallic ink pad, then heat-embossed the 'Congratulations' stamp from the Ronald McDonald set on gold and set this on a mat of gold foil so that it really stood out. I cut out the label using the co-ordinating framelit and cut the foil mat freehand, using the outside edge of the framelit as a guide. This card will be on it's way to one of my team members - two of them have recently gained promotions, so along with a new team member this week, there's plenty to celebrate!
Back soon with another of my 'makes' today; until then, happy stampin'!
Stampin' Up! Supplies Used:
by Joanne James20. February 2014 21:28Good evening everyone! Today I have a video tutorial to share with you that I prepared a couple of weeks ago that shows you how to make an extra-wide pouch using the Scalloped Tag Topper Punch. Here's the finished extra-wide pouch:
Here is a standard size treat pouch made with the Scalloped Tag Topper Punch - you can find my previous video tutorial on how to make this here:

As you can see, when compared to the standard-size punch, the extra-wide version is about 1" or 2.5cm wider and taller. The video tutorial shows you how to adapt your punch and shares my top tip for a smooth punch every time - go and take a look:
Here are the measurements I used in the video in case you didn't catch them:
Cardstock: 2 3/4" x 7 3/4" or 7cm x 19.5cm
Score at: 3 3/4" and 4" or 9.5cm and 10cm
I hope you found this video tutorial useful - this is such a versatile punch with so many uses beyond a standard tag. The treat pouches make great little wedding favours too.
Back tomorrow with another project; until then, happy stampin'!
Stampin' Up! Supplies Used:
9f056e18-8f7c-4028-927f-66d960295930|0|.0|96d5b379-7e1d-4dac-a6ba-1e50db561b04
Tags: 3D Projects, Papillon Potpourri, Perfect Pennants, Petal Parade, Scalloped Tag Topper Punch, Shop online, Stampin' Up, Stampin' Up Card, Stampin' Up Card ideas, Stampin' Up Supplies, video tutorial, Weddings
3D Projects | Stamping | Video Tutorials
by Joanne James19. February 2014 21:02Good evening blog readers! My busy days continue as this week the James juniors are off school as it's half term. Today has been a day of piano and singing practice, book reading and review writing, nail painting and telling the time problems, with a little basketball and a couple of baskets of ironing thrown in! Crafting time is in short supply this week, so today I'm sharing with you a stepped up version of a card that we made in my Sale-A-Bration card class this month. This card was a CASE of this one by Mary Fish, although I tweaked a few things, primarily the colour scheme as I wanted to use the Pistachio Pudding DSP from the Sale-A-Bration set. Here is my card:
I stamped the image twice, once on Whisper White for the label, which I cut out using the Big Shot and Deco label Framelits and once on Summer Starfruit, which is the piece that I used to cut the flowers from. I paper-pieced all four of the flowers on this card and coloured the leaves and stems with a Pistachio Pudding marker, then finished with a few pearls. I think this would make quite a nice Easter card too, with an alternative sentiment.
Back tomorrow with another project; until then, happy stampin'!
Stampin' Up! Supplies Used:
by Joanne James18. February 2014 20:58Good evening blog readers! Today I'm going to share a scrapbook page with you that I made at a recent team training event and designed by the lovely Bekka Prideaux. It features a number of the Sweet Sorbet paper designs and the Petal Parade stamp set - both items that can be yours free during Sale-A-Bration with an order of £45 or more - some new Spring-Summer items and a somewhat overlooked item in the annual catalogue (more on that in a moment). So here is my scrapbook layout:
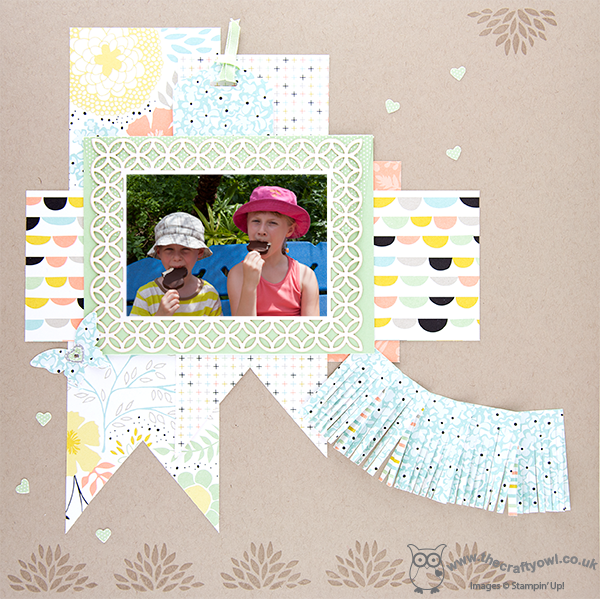
I decided to use one of my summer holiday photos of Rebecca and Ben as the centrepiece; I have so many amazing photographs from our holiday that I have yet to do something with, so this seemed a good opportunity to start. They are participating in one of my favourite activities at a Disney theme park - no not a roller coaster, but the ritual eating of a Mickey ice-cream bar (I am rather partial to these!) - and the concentration on their faces is a concerted attempt to get them eaten before they melt in the extreme heat!
The bright colours and patterns in the papers make a great background for my photo. Did you spot the 'hidden treasure' from the annual catalogue? The photograph is mounted on to one of the Simply Fabulous Simply Sent cards, with another attached to the Scallop tag Topper Punch piece behind for hidden journaling. These cards are great for quick cards but can also be used for journaling or as a photo mount. Lastly, a fringe cut using the new fringe scissors adds texture and draws the eye in to the focal point.
Back tomorrow with another project; until then, happy stampin'!
Stampin' Up! Supplies Used:
by Joanne James17. February 2014 21:26Today I've had the most fun day. I was privileged to be invited to run a Crafty Owl birthday party for a 10 year old and her classmates, which was great fun. We made some wall art and they had a fun time punching shapes and using the Big Shot to create their masterpieces. When I run a craft party, I always create a punch art kit for the party bags so that the children can continue the crafty fun at home. For today's party, the birthday girl loves horses so I knew that a pony needed to feature on my card. I had a quick surf on Pinterest for some general inspiration then set to work creating my card. This is what I came up with:
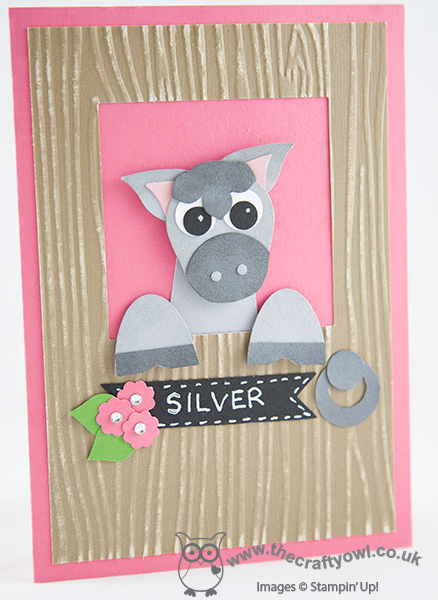
I used a variety of punches to create my card (see full list below) and some Core d'inations cardstock embossed with the woodgrain embossing folder to give texture to my stable door. I've always loved grey horses so made my card with a grey pony, but since my eight year-old informed me that this made it look like a donkey, the kits I made for the party girls all had brown horses to remove any doubt!
The girls loved their kits and I'm sure they will have had as much fun completing them as they did at the party itself. I'm linking today's card up with the challenge over at SUO Challenges where the theme this week is 'Punch Art', so this card fits perfectly.
I ended my day with a trip to the cinema to see the new Lego Movie; it was a great children's movie for half term and fulfilled one of Ben's main aims for the week, so all in all a good day was had by all.
Back tomorrow with another project; until then, happy stampin'!
Stampin' Up! Supplies Used:
45792198-643c-4601-ba20-b3a210ed6332|1|5.0|96d5b379-7e1d-4dac-a6ba-1e50db561b04
Tags: Big Shot, Owl Punch, bird builder punch, Bitty Banners Framelits, Itty Bitty Punches, Woodgrain TIEF, Merry Minis, Children's parties, Shop online, Stampin' Up, Stampin' Up Card, Stampin' Up Card ideas, Stampin' Up Supplies, Petite Petals Punch
Cards | Children's Parties | Host a Party | Punch Art
by Joanne James16. February 2014 20:50I've had a busy but productive day today exhibiting at the Budget Bride Live Wedding Fair at Diana's Health and Fitness Club in Wellingborough. Thank you to all of the lovely brides to be that came to say 'hello' to me in the Ruby lounge today - it was lovely to meet you all and I'm really looking forward to chatting with you again soon to begin the process of turning your stationery dreams into reality. Today I'm sharing one of the table decorations that I made for my exhibition display that received lots of positive feedback today - a birdcage decorated with flowers made with the new Spiral Flower Die:
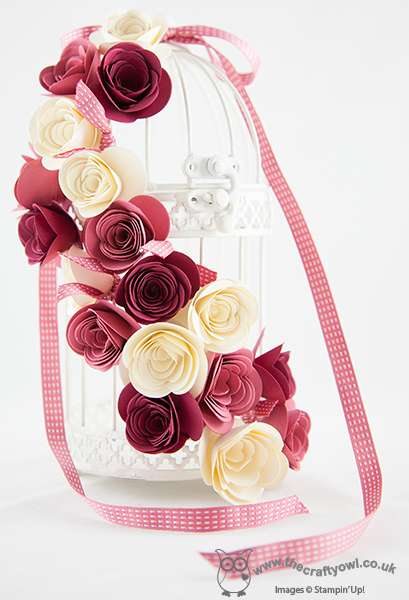
I made these flowers in three co-ordinating colours of cardstock and finished the centre of each flower with a pearl, then added some satin stitched ribbon to finish. You could make something similar in any colour to tie in with your chosen wedding colour scheme - it would make a lovely table centre.
That's all from me today; I am crafting at a children's birthday party tomorrow so will share one of the projects we are doing with you in tomorrow's post.
Until then, happy stampin'!
Stampin' Up! Supplies Used:
by Joanne James15. February 2014 21:50I've had the busiest of days today, dominated by last minute preparations for the wedding fair I am exhibiting at tomorrow, so today I've just got time for a quick post to share with you something I made with another of the items you can receive free with a £45 spend during Sale-A-Bration.
There are two My Digital Studio digital ensembles available as part of this year's Sale-A-bration free gift offering - one of them is the 'Hooray for Parties' set, which includes some great designer templates for invitations, thank yous, treat holders and much more. Here's a party invitation I made with it using the basic layout:
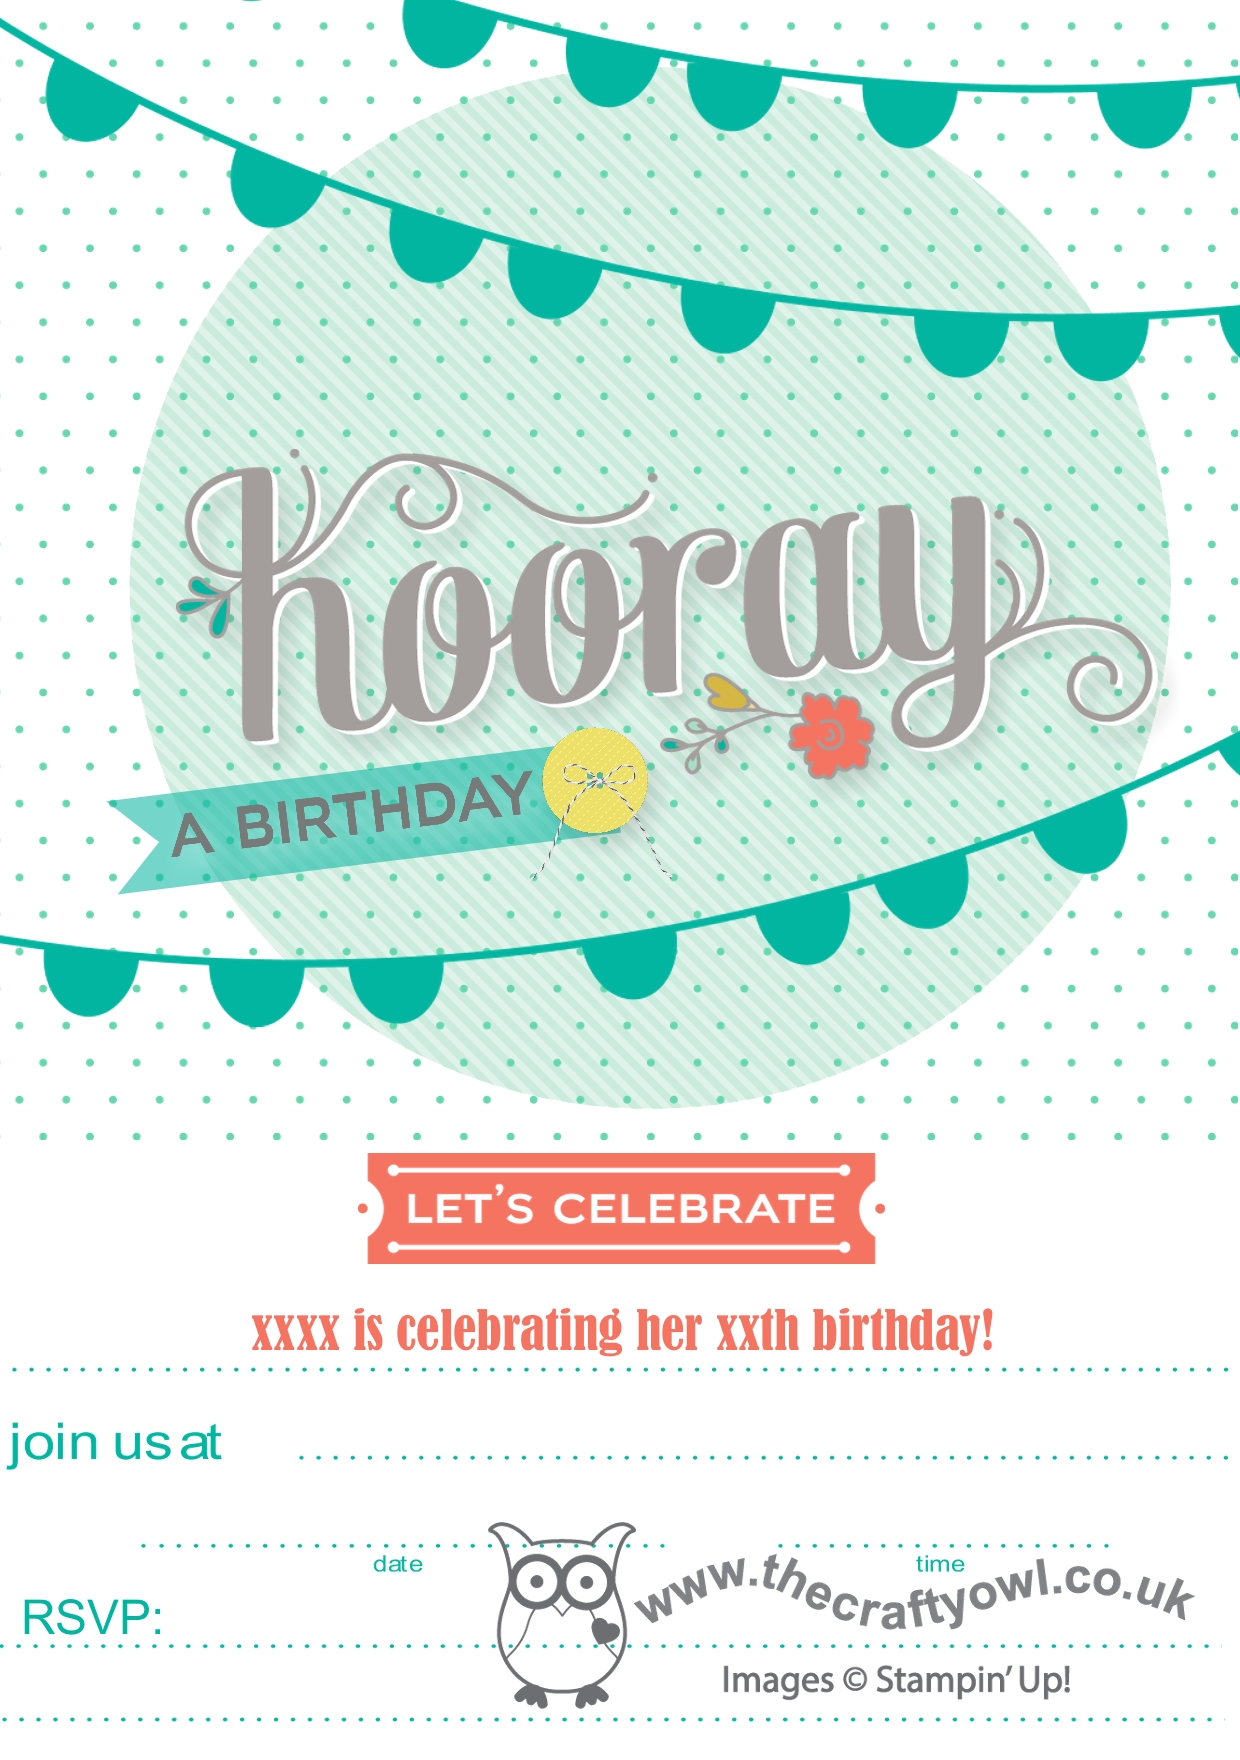
This is a great package if you need to make lots of invitations or party bits and pieces and have limited time - you only need to design once, then can just print out as few or as many as you need. And it can be yours free with a spend of £45 or more during Sale-A-Bration before 31st March.
Another busy day ahead tomorrow; if you're local to me and a bride-to-be, do pop in to the Budget Bride Live Wedding Fair at Diana's in Wellingborough - I'll be there talking to brides about how they can make the wedding stationery of their dreams using Stampin' Up! products and I would love to see you too.
Back tomorrow with another project; until then, happy stampin'!
Stampin' Up! Supplies Used: