Hats Off To You Masculine Birthday Card

by Joanne James24. February 2015 08:45

I'm here today to share my card for this week's challenge over at Create With Connie and Mary where they have a rather interesting sketch to play along with this week:


I've been playing with my new 'Guy Greetings' stamp set this week, in preparation for my next stamp-a-stack class which is featuring masculine cards and I decided that this sketch would work perfectly with a trio of hats - take a look at my card to see what I mean:

I went for a monochromatic look for my card with a Very Vanilla base and a piece of striped Typeset paper, set beneath another layer of Very Vanilla cut at an angle. I masked the hat stamp and inked three of the six hats and stamped them above a piece of black cardstock cut at an angle, then stamped my greeting on the Vanilla base panel. I finished my black strip with a trio of Very Vanilla candy dots. Clean and simple and I like it! 

Back tomorrow with another project; until then, happy stampin'!


Stampin' Up! Supplies Used:

Table built using Product Table Builder by The Crafty Owl - Independent Stampin' Up! Demonstrator.


Tags: , , , , , , , ,

Cards | Stamping

You're My Lobster Valentine's Card

by Joanne James2. February 2015 11:18

Happy Monday everyone! I have a desk-based week this week and I'm looking forward to getting a headstart on preparation for my next set of classes and getting some projects prepared, following the flurry of classes and parties last week. Today's card is one I made with my Valentine in mind - very masculine and not a heart in sight! - but with a sentiment that I just know will strike a chord - take a look:

Now if you are of a similar age to me (forty-something - I'm saying no more!!) you may well have lived through the era of the American sitcom 'Friends'. My husband and I have watched every episode more times than I can count and still laugh occasionally at the things we say or do that are inspired from this classic television series. One of my favourite episodes is the one where amidst the ongoing drama of the on-off relationship between Ross and Rachel, Phoebe announces that they will get back together again because just like lobsters, who are known to fall in love and stay together for life, Rachel is Ross's lobster. After some drama, it takes a viewing of Rachel and Monica's old prom video tape for Rachel to realise that she does indeed want to be with Ross and Phoebe triumphantly declares "He's her lobster!" I've made lots of cards featuring both the crab and lobster from the Sea Street set and I couldn't pass up the opportunity for a play on words with this one. I chose a simple layout featuring some of the co-ordinating Maritime DSP and used a simple font in Word for my bespoke sentiment. Whilst there's not a heart in sight, mu husband for one will appreciate the romantic gesture of this card!

If you too are nostalgic for some classic TV - or just want to know what the heck I'm rambling on about today! - here is that clip in all it's glory:

On that happy note, I will love you and leave you until tomorrow, when I will be back with another project. Until then, happy stampin'!


Stampin' Up! Supplies Used:

Table built using Product Table Builder by The Crafty Owl - Independent Stampin' Up! Demonstrator.


'You Da Man' Moustache Valentine's Card

by Joanne James8. January 2015 14:29

I'm having a busy day today; productive though, so I'm not complaining! Today's post is a quick one - I'm sharing my card for Less is More this week where the colour challenge is to use black, metallic and one other colour on your card. Now I must confess, this card was embarrasingly quick to put together, but I am also rather pleased with the finished result - here it is:

I decided to use Basic Black for my card base, then layered with a red glimmer heart cut out with my Big Shot and Heart Framelits and topped with a black moustache onto which I stamped the corresponding stamp from the 'Well Worded' stamp set in Versamark and heat embossed in gold, before cutting out with my moustache framelit. To finish, I stamped my hashtag sentiment from the '#hello' stamp set and heat embossed in gold onto the base of my card. Simple right? It really is as easy as that! Don't get me wrong, I experimented with lots of different versions of this card before I decided on this one as my preferred version to share, but end to end you could produce this card in minutes - and who doesn't love a moustache?! I think this makes a great guy card, despite the glimmer.

That's all from me today; back tomorrow with another project. Until then, happy stampin'!


Stampin' Up! Supplies Used:

Table built using Product Table Builder by The Crafty Owl - Independent Stampin' Up! Demonstrator.


Minecraft Creeper Pop-Up Birthday Card

by Joanne James17. August 2014 08:00

Today I'm sharing my Design team card for this week's challenge over at The Paper Players. This week LeAnne is hosting and she has a clean and simple challenge to create a child's birthday card this week:

Those of you who follow LeAnne's blog, Wee Inklings, regularly will know that today young Miss Cassidy is celebrating her fourth birthday - hooray! having seen the other Design Team members cards this week, I can vouch for the fact that mine looks quite different to everyone else's! My cards today are not made with four year old girls in mind (nowhere near enough pink for that!) however as the mother of two young children, I make lots of children's cards. Whilst they are sometimes stamped, I am often asked to make something that reflects the current favourite game/toy/theme of the moment. Those of you who follow my blog will know I am partial to Lego and have created some great Lego punch art in the past (see my most recent one here), although this can be time-consuming and not all that clean and simple. Today though I am sharing two of my tried and tested punch art cards for young boys.

First I am sharing another of Ben's birthday cards from last week; this time, the one I made for him from his big sister. Now as is true for most young boys of his age, Minecraft is a game that provides hours of endless entertainment for him. I've made a few creeper cards that I haven't shared previously (creepers are the monsters that come out at night and take your life, so I'm told) - they really are so easy to make! - but I thought I'd share this one, as after a browse on Pinterest I saw this card and decided I wanted to make a creeper card with a difference. Here's the outside of my card:


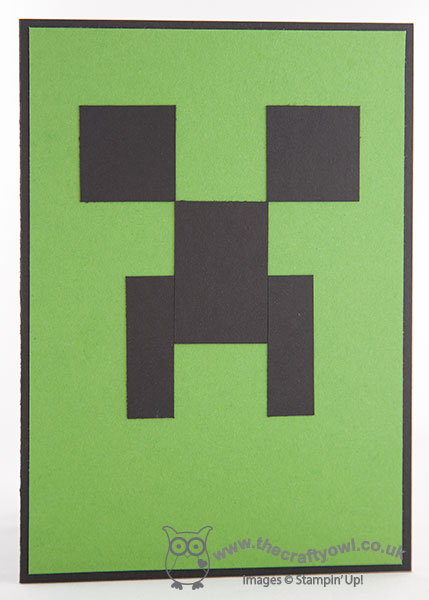
A simple creeper face made from 1" punched squares, along with 2 pieces of 1" x 1 1/2", one cut in half lengthways, on a background of now retired Gumball Green (I think this is the best creeper colour, but you could substitute with Garden Green if you don't have any), then when you open the card, he really comes to life:


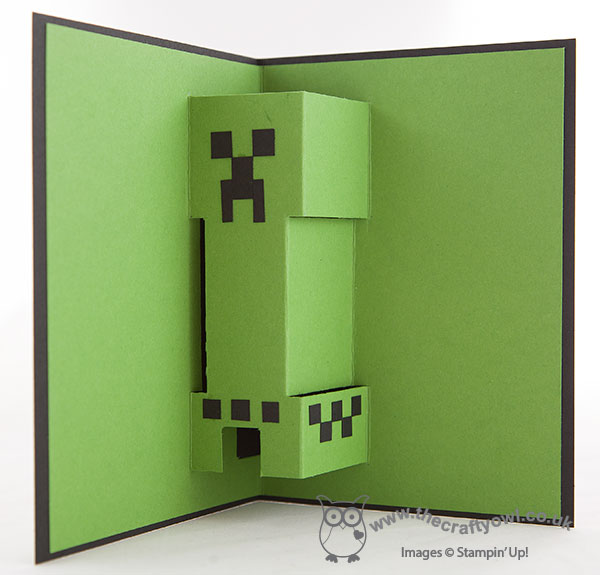
A simple pop-up - how fun is that?! This must be a record in terms of supplies, given that you can make one of these cards with some basic cardstock and not much else; it's also another 'no stamping' card - that's two in a week! Now I have to admit, as cards go it's not really my cup of tea, but then I'm not the target audience. The verdict? Rebecca thought it was awesome and Ben loved it, so if it ticks the box of the now seven year old, it's good enough for me!

I also wanted to share another clean and simple birthday card that I have made so many of, I can't quite believed I've never blogged before! All children seem to love shaped cards, and this cute Angry Bird is so easy to create using a few punches and a base made using the Circle Thinlits and the Big Shot:


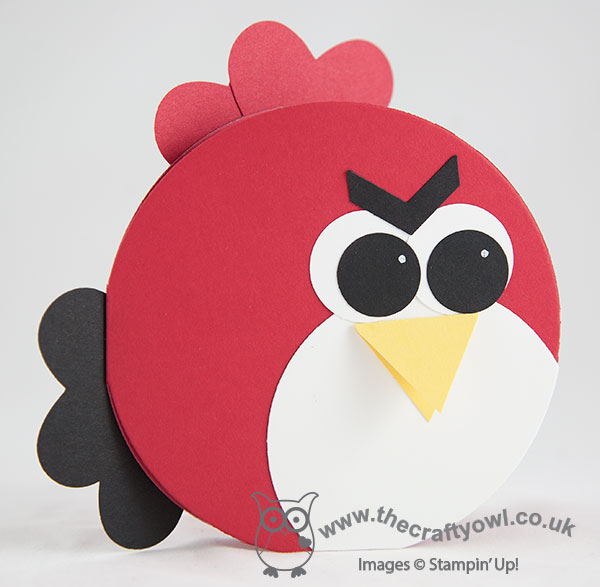
A custom envelope from some co-ordinating Brights DSP made using the Envelope Punch Board and you are good to go. Two cards that are really clean and simple, quick and easy. Do pop over to The Paper Players to see what the other designers have come up with - I promise they will be quite different to mine!

It's Sunday and I'm off to town today to collect some frames for a private home décor class I'm teaching tomorrow along with a visit to the shoe shop for new trainers and school shoes for the children in readiness for the new school year. Still two more weeks to go, yet I'm sure it will fly by.

Back tomorrow with another project; until then, happy stampin!


Stampin' Up! Supplies Used:

Table built using Product Table Builder by The Crafty Owl - Independent Stampin' Up! Demonstrator.


A Life On The Ocean Wave - Traveler Ocean Liner Card

by Joanne James20. June 2014 09:30

Yay - it's Friday! I'm not sure if I should be as happy about this as I naturally feel as I have a ton of work to do this weekend, but hey - I will at least get a cup of tea in bed to start my day as a weekend treat, so that will set me up for the day! I have a busy day today too: we cycled to school this morning, but now I have a spot of housework to do and then hairdressers, more leaflet deliveries for my new catalogue launch party, lunch, afternoon rounders game (Rebecca, not me!) then cycling home and if I'm lucky a spot of crafting before dinner - my UPS man is due today, so all being well I should have more new goodies to play with too! So it's time to show you my card: today I'm sharing another of the samples I made with the Traveler stamp set to take with me to Telford for the Stampin' Up! UK Regional Training Day that I presented at last month. This one features the ocean liner, so is perfect for linking up with the challenge over at The Card Concept, where the theme this week is all things nautical:

I'm also linking up with the team over at SUO Challenges, where their theme is Summer Time - anything from beaches, to ocean to patriotism - so I think my card will fit the bill. This stamp is my favourite in the set; here's just one of the cards that I've made with it:

For this card I've used a base of Night of Navy and stamped the World Atlas stamp in Island Indigo on a panel of the same colour. I stamped the liner in Black Stazon on a piece of Whisper White with my Circle Framelits and coloured with my aquapainter, then inset this circle behind a circle aperture in the Island Indigo layer. To finish, I cut a circle outline using two nested framelits from brushed silver cardstock, then added some mini silver brads to give the appearance of a porthole framing the liner image. A nice clean and layered card.

The front is sentiment-free as I didn't want to detract from my focal image; this also means I can stamp a sentiment on the inside of the card to suit when I'm ready to send it. This set is great for masculine cards - keep checking back as I've lots more to show you where this came from.

Right, I'm off to start ticking off the jobs - back tomorrow with another project; until then, happy stampin'!


Stampin' Up Supplies Used:

*Traveler stamp set - available 1st July 2014

Table built using Product Table Builder by The Crafty Owl - Independent Stampin' Up! Demonstrator.


Tags: , , , , , , , ,

Cards | Stamping

Traveler Happy Father's Day Card

by Joanne James11. June 2014 21:17

With Father's Day coming up this weekend, I thought I should share a few more suitably themed cards with you for anyone in need of last minute ideas! Today's card has both something old and something new - here's my card:

I used Soft Suede for my card base, then created a simple central panel by stamping the globe image from the new Traveler stamp set in Versamark and heat embossed in gold embossing powder. I created a mask for the globe using a piece of scrap cardstock, then carefully sponged in the colours on the globe using sponge daubers and Island Indigo, Garden Green and Encore Gold inks. Here's a close up of the central image:

This is one of those cards that looks so impressive in real life and the colours are really vibrant against the gold. I then matted this panel on some brushed gold cardstock and finished the card by stamping the 'Happy Father's Day' sentiment from the Delightful Dozen stamp set (it's on the retiring list) and heat embossing in gold, then stamping it in Versamark again slightly offset to create a shadow and add some depth to the card. I also created a slightly altered version of the same card, this time stamping the sentiment on a piece of Island Indigo to inject a little more colour - browns have their place, but I don't believe that just because cards are for men, they shouldn't have some brighter colours too.

These cards would work equally well for a male birthday or other masculine card with a change of sentiment; or maybe even a graduation or travel-themed card. That's all from me today; back tomorrow with another card. Until then, happy stampin'!


Stampin' Up! Supplies Used:

Table built using Product Table Builder by The Crafty Owl - Independent Stampin' Up! Demonstrator.


Tags: , , , , , , , , ,

Cards | Stamping

Get Well Soon Dad!

by Joanne James9. June 2014 23:10

Today I'm sharing a card I made using this week's sketch over at CAS(E) This Sketch and the lovely colours at Colour Q:


 My Dad had a knee replacement operation last week and so I wanted to send him a 'get well soon' card that would brighten his day - here is my card:

I used a base of Night of Navy along with a mat in Tangerine Tango and using the sticking plaster from an old 2013 Sale-A-Bration set, Patterned Occasions (minus the attached sentiment), stamped it in the challenge colours and cut them out and adhered them to my card following the sketch layout. I coupled them with a simple 'get well soon' sentiment from the ever-so-useful Delightful Dozen stamp set (due to retire at the end of this month) and added a tiny Bashful blue heart punched with my trusty owl punch to finish.

I love the look of the stuck-on sticky plasters, which works so well with the get well theme - I'm sure my Dad wishes his knee could have been fixed that easily!

Back tomorrow with another card; until then, happy stampin'!


Stampin' Up! Supplies Used:

Table built using Product Table Builder by The Crafty Owl - Independent Stampin' Up! Demonstrator.


Look Up To Father Acrylic Block Technique

by Joanne James12. April 2014 20:45

I've had a lovely day today finishing off my swaps in readiness for our quarterly team training tomorrow. Our swaps always have a theme and this quarter it's 'technique'; I've based my swaps on a card I made for the challenge over at Seize The Sketch this week, which has this great layout:

Here is my card - can you tell what technique I'm showcasing?

I know Father's Day is still a few months away, but I love the sentiment on this stamp and have been keen to use it for the first time. I decided that I would showcase the 'acrylic block & markers' technique on my card: this is where you colour an acrylic block with markers (I used a variety of greens and browns) and then spritz with water (I add a few drops of alcohol to mine so that it dries quicker) then stamp the block onto the paper.

I thought this technique would make a lovely background to the tree stamp and would add a little more interest than just colouring the image with markers directly. Here's a close-up of the stamped background:

Whilst all of my swap cards look the same, each has a slightly different central panel as each time you stamp using a block it comes out differently, making them all unique.

Sticking with the wood theme, I added a panel of Chocolate Chip embossed with the Woodgrain Textured Impressions Embossing Folder and stamped the layer of Crumb Cake beneath this with the Hardwood background stamp. To finish, I added a couple of chevrons as an accent - wooden of course, coloured with my Chocolate Chip Stampin' Write marker pen:


I also incorporated some Old Olive into the mat layers just to give the card a lift and so that it wouldn't appear too 'brown'.

I'm quite pleased with the overall end result - let's hope my team like their swaps tomorrow too!

Back tomorrow with another card; until then, happy stampin'!


Stampin' Up! Supplies Used:

Table built using Product Table Builder by The Crafty Owl - Independent Stampin' Up! Demonstrator.


Simply Sketched Male Card FMS122 and CAS C&S 60

by Joanne James10. February 2014 12:28

Today I'm sharing the card that was originally scheduled for yesterday! This card also uses the sketch layout at Freshly Made Sketches this week and I combined it with the colour challenge over at CAS Colours and Sketches this week:

I decided to go with an adult masculine card (it's always good to have a few of these on standby!) and inked up my Simply Sketched hostess set for the focal point of my card:

I stamped the little bird in Chocolate Chip ink and coloured him with a Chocolate Chip marker and blender pen, then used the blue and green to create a simple sponged background. I stamped my sentiment from the same stamp set on the front of the layered banner and used some of the Gingham Garden DSP to add interest without making the card too busy. This piece of Pear Pizzazz DSP seemed to be just right for this card, although you could be forgiven for not even knowing it's there as it isn't typical of the bright pink, indigo and yellow designs that are a key feature of this DSP pack.

I really like the understated finish of this card - and the little bird is perfect for a male card. This is the first time I've used the Simply Sketched stamp set and will definitely be making more with it. It has some lovely sketch stamps and three useful sentiments in a font that works with all kinds of cards. As I mentioned above, this set is an exclusive hostess set that can be yours only when you host a Stampin' Up! party. The current Sale-A-Bration promotion is a great time to host a party - not only will you and your party attendees get a free gift for every £45 you spend, but as the hostess you can earn an additional £25 in hostess benefits for qualifying party sales (£250 or more). If you would like to host a Stampin' Up! party, do give me a call or contact me to book a date.

I hope you like today's card; if you would like to see more ideas for using either today's sketch or the colour scheme, do pop by the Freshly Made Sketches and CAS Colours and Sketches blogs to see what the design teams and participants have created.

Back tomorrow with another project; until then, happy stampin'!


Stampin' Up! Supplies Used:

Table built using Stampin' Up! Product Table Builder from The Crafty Owl.


Masculine Love CCMC286

by Joanne James21. January 2014 20:39

Good evening blog readers! I had lots of jobs to do today, but after a morning of paperwork I decided the housework could wait and I spent the afternoon cardmaking instead (oops!!) Today I'm sharing another Valentine's card, this time with a more masculine feel. I used the colours from this week's challenge over at Create with Connie and Mary as my starting point:

I decided to use my 'Hearts A Flutter' stamp set, as although this is one of my favourite sets and one I use a lot all year round, I haven't used it on any of my Valentine's cards yet this year. Here is my card:

I stamped my hearts somewhat randomly across the lower half of my card, either side of my focal point. I mounted the top layer of cardstock on dimensionals for two reasons: firstly, to make the ribbon easier to attach and secondly so that the heart that I cut out (I used my hearts framelits for this) would have some depth and my die cut 'love' would have more impact. I deliberately chose to use Smoky Slate for my middle layer, as I wanted the heart to have a more masculine appeal, especially as I used ribbon on my card too; Island Indigo Chevron Ribbon isn't too girly, but adds a luxurious feel to the card. A few candy dots to finish just to add balance and done.

Whilst I designed this card with a man in mind, I think it would work equally well for a woman, especially if you're not the kind of person who is into all things pink and red.

Back tomorrow with another Valentine's themed card; until then, happy stampin'!

Stampin' Up! Supplies Used:

Table built using Stampin' Up! Product Table Builder from The Crafty Owl.


Mini Catalogue

BROWSE THE CATALOGUE

The mini catalogue is now live! Read and download your copy here.

Shop Online

Access my online shop 24 x 7, 365 days of the year:

Current April hostess code:

VDKNV7BH

Shop Online

Join My Team

It's always a great time to join Stampin’ Up! New team members can get £130 worth of products for only £99 + free business supplies + free shipping + all the fun being a part of Stampin’ Up! Stampin' Up! has something for everyone: join my growing team and benefit from my support to enjoy Stampin' Up! however you choose.

If you're interested, call me for a chat to understand how I can help you realise your goals. Alternatively, if you have already decided to sign up and you just can't wait, please click here for the link to the online form where you can sign up and order your starter kit right away! 

Latest Kit!

Stampin Cut and Emboss

The Rock Legend Kit has all you need to make 8 cards with coordinating envelopes. Along with the new Panda Friends Kit, both are available from January 4th for just £14 each - get yours here!

2023-24 Annual Catalogue

BROWSE THE CATALOGUE

Click on the catalogue for a full list of current SU! supplies - if you would like to order any of the items featured, please drop me a line at [email protected] or give me a call on 07773 421446 - I'd be happy to help.

New Online Exclusives

There are new products available exclusively in the online store from 5 March - check them out here.

About Me

Hi I'm Joanne and live in Northampton and when I'm not looking after my husband and two beautiful children, am an avid crafter with a passion for all things Stampin' Up!

I must confess that I have never been a big rubber stamper - until I discovered Stampin' Up! that is. I love the fact that I can get such great results with co-ordinating stamps, inks, papers and punches - the possibilities are endless! Join me on my stamping journey as I share the things I love and be inspired to create amazing things yourself!

Follow Me

Monthly Newsletter

Box Builder

Click the button above to use Box Buster to create your custom box design using the Envelope Punch Board!

Kits Collection Now Available!

Stampin Cut and Emboss

The new Kits Collection from Stampin' Up! is now available!

Click here to see the current kits available and order yours online today.

I Design For


Stampin' Up Stuff

This is my personal blog and is not endorsed by Stampin’ Up! I hope you find it a plentiful source of ideas and personal inspiration but please don't copy my designs for contest submission or use for classes, publication or sale without express permission.