Spiral Flower Bird Cage

by Joanne James16. February 2014 20:50

I've had a busy but productive day today exhibiting at the Budget Bride Live Wedding Fair at Diana's Health and Fitness Club in Wellingborough. Thank you to all of the lovely brides to be that came to say 'hello' to me in the Ruby lounge today - it was lovely to meet you all and I'm really looking forward to chatting with you again soon to begin the process of turning your stationery dreams into reality. Today I'm sharing one of the table decorations that I made for my exhibition display that received lots of positive feedback today - a birdcage decorated with flowers made with the new Spiral Flower Die:

I made these flowers in three co-ordinating colours of cardstock and finished the centre of each flower with a pearl, then added some satin stitched ribbon to finish. You could make something similar in any colour to tie in with your chosen wedding colour scheme - it would make a lovely table centre.

That's all from me today; I am crafting at a children's birthday party tomorrow so will share one of the projects we are doing with you in tomorrow's post.

Until then, happy stampin'!


Stampin' Up! Supplies Used:

Table built using Product Table Builder by The Crafty Owl - Independent Stampin' Up! Demonstrator.


One Layer Happy Anniversary - Back on Black!

by Joanne James12. February 2014 09:56

So I didn't quite manage to squeeze in another 'make' for you yesterday, but I'm here bright and breezy (or should that be windswept, given the gales we've had here for the last day or so!) this morning with today's card. Given my recent dalliances with the colour black, I thought I would try something different using black cardstock and one of my most favourite stamps - yes, the Flowerfull Heart (still available to order until Friday if you'd like one - click on the link to my online shop below!) Here is my card:

Now, I know you might be thinking "Anniversary card - on black??!" but hear me out! I wanted to use this stamp again with some heat embossing; I toyed with gold (well, it worked pretty well on this card I think) but eventually decided to use Pool Party embossing powder. My colour combination was inspired by one of the DSP patterns in the Sweet Sorbet pack that is available as one of the free Sale-A-Bration gifts currently when you spend £45 or more - the little blue Pool Party flowers with black centres. I would not necessarily have thought about using these colours together had it not been for this paper. A simple sentiment from the 'Express Yourself' hostess set (such a versatile set of greetings in a very usable font, it can be yours when you host a Stampin' Up! party - contact me to book yours) finishes this simple card.

So what do you think - a colour combination that works or one to be avoided, especially on a romantic card? I'd love to know what you think. I'm also linking this card up with the 'One Layer Card - Anything Goes' challenge over at Less is More this week (currently the only card using black for it's 'white space' - should I be worried?!) and CAS(E) This Sketch as my card uses their sketch again:

Funny how you can use the same two starting points, yet end up with two cards that couldn't be more different. Back tomorrow with another project; until then, happy stampin'!


Stampin' Up! Supplies Used:

Table built using Stampin' Up! Product Table Builder from The Crafty Owl.


Congratulations Acceptance Card PPA 190

by Joanne James11. February 2014 09:58

Good morning lovely blog readers! This morning's card is one I made as an acceptance card for a wedding invitation received recently. I actually had the stamp out on my desk for an alternative card which I will share with you tomorrow, when I decided it might work with this week's colour challenge combination at Pals Paper Arts:

When I originally saw this colour combination I did immediately think 'Valentine' (well, it's that time of year, right?!) Truth is, I've made lots of Valentine's cards already this year and I just don't have that many Valentine's to send them to! Instead, this is what I came up with:

I decided to keep the design quite simple and stamped the image and sentiment in Basic Grey directly onto the Blushing Bride cardstock. I wasn't sure about this beforehand, but it looks so much nicer than on white, which left the image too stark. I quite like the slightly mottled effect of the stamping, which reminds me of stone, however this was more by accident than design - my Basic Grey inkpad is one of my few remaining old style pads and having used it to stamp a solid image, you can really see the difference when compared to the finish of the new foam pads. Needless to say, I have since ordered a new Basic Grey foam pad! I also stamped the image onto a scrap of Rose Red and cut out the two hearts with my paper snips and just paper pieced them in place - none of my myriad of heart punches, stamps or framelits were quite the right shape to take care of this for me. Worth it though, just to give a little 'pop' of colour and bring the colour scheme together.

I hope you like today's card; come back tomorrow to see an alternative card using this same stamp and don't forget to check out the folks over at Pals Paper Arts for more great ideas using this colour combination. Until then, happy stampin'!


Stampin' Up! Supplies Used:

Table built using Stampin' Up! Product Table Builder from The Crafty Owl.


Simply Pressed Clay Language of Love Gift Tag Video Tutorial

by Joanne James29. January 2014 20:50

Today I have a little project to show you that is based on something I made using my Flowerfull Heart stamp at the beginning of January, but because I didn't have a voice I wasn't able to shoot a video to show you how to make it! Now that my beloved Flowerfull Heart stamp is no longer available to purchase, I decided to modify my original design and make it using one of the stamps in the new 'Language of Love' set that features in the Spring-Summer seasonal catalogue. I used Stampin' Up!'s Simply Pressed Clay to make an ornamental gift tag embellishment that you could use to decorate a card or package. Here's one on a box with a bow made out of some of the lovely Sale-A-Bration Sweet Sorbet DSP:

Here's a close-up of the tag, where you can really see the detail of the stamp:

These tags really are quite easy to make, although you need to bear in mind it's a two stage process, as you will need to allow time for the clay to dry before you can colour and finish it. Here's a link to my video tutorial that shows you how it's done - it also includes some larger ornamental hearts made with my Flowerfull Heart (I couldn't resist!) - and some useful hints and tips for working with Simply Pressed Clay:


These tags would look beautiful attached to a wedding gift, or could even be an alternative wedding favour. I hope you found today's video tutorial useful and it inspires you to make interesting things with Stampin' Up!'s Simply Pressed Clay - leave me a comment and let me know what you come up with, or better still share a photo of your work on my Facebook Page!

Back tomorrow with another project; until then, happy stampin'!


Stampin' Up! Supplies Used:

Table built using Stampin' Up! Product Table Builder from The Crafty Owl.


DIY Wedding Stationery - It's Easier Than You Think!

by Joanne James12. January 2014 19:56

Good evening lovely blog readers - I hope you have all enjoyed a lovely weekend. Mine seems to have revolved around cooking for a change, with more time in the kitchen trying out new things. I blame Gordon Ramsey - I caught the last few episodes of his recent home cooking series on Channel 4 and just had to buy the accompanying book. The whole family pored over it yesterday morning and are now in a race to work our way through the delicious recipes within! Coupled with the fact that I seem to have passed my recent ailments to my daughter, such that she couldn't manage her swim squad training today as usual, it has felt like a less frantic weekend than is usually the case in the James household.

Anyway, today I thought I would share something different with you: wedding stationery. I recently wrote an article for the Winter Edition of a local wedding magazine called 'Local Wedding Connections' on just how easy it is to create the wedding stationery of your dreams, at a fraction of the cost of purchasing ready-made. You can read my article in full here, but I wanted to share more of the samples I created for this shoot in my post today. So here is the entire collection: 
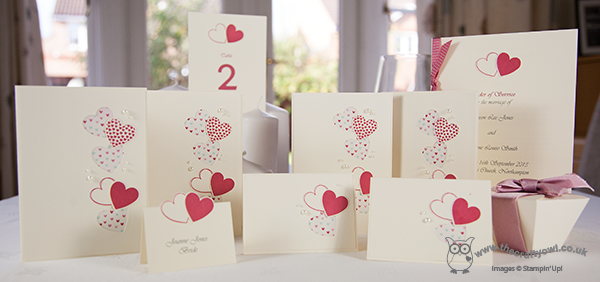
Creating your own wedding stationery can be not only cost-effective, but also means you can produce something that is unique and personal to you. I created the above range using the 'Hearts-A-Flutter' stamp set and matching framelits - here are some additional images that show some of the close-up design detail:

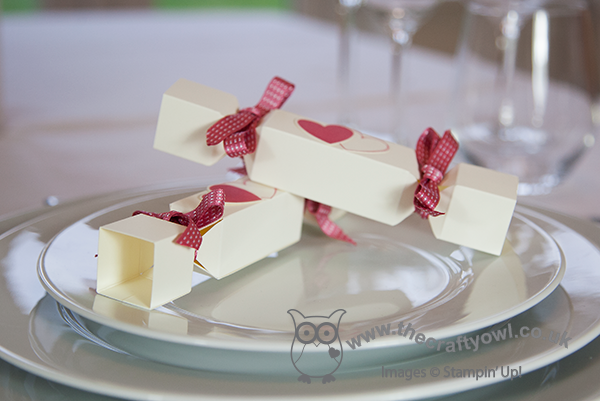
Wedding favour 'crackers' made using the Envelope Punch Board:
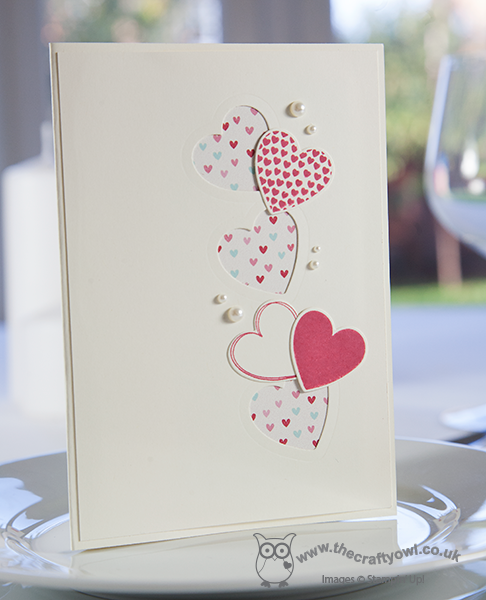
A dinner menu for the Reception dinner, where you can see the subtle layering of the design:
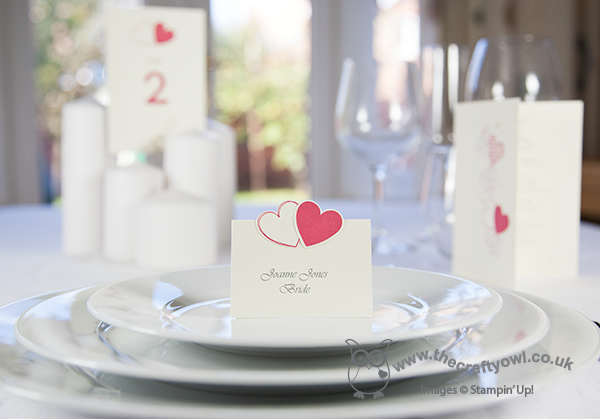
A place card, to denote the bride's place setting:
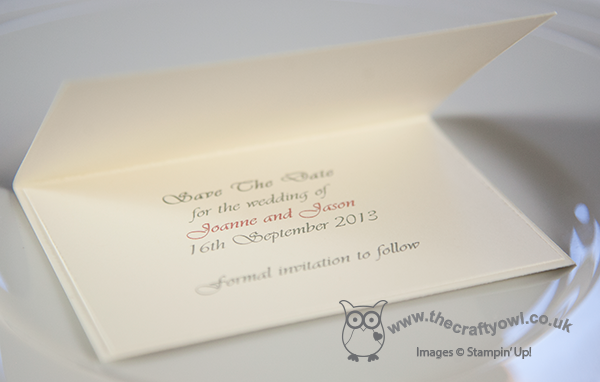
The inside of one of the 'Save The Date' cards:
You can go to my own website, www.thecraftyowl.co.uk for more information on the services I provide. As customers of mine that have made their own stationery will attest, if you choose a simple yet elegant design it is easier to produce large volumes of perfectly co-ordinating stationery than you might think. Best of all, Stampin' Up!'s extensive range of co-ordinating inks, papers, ribbons, embellishments and cardstock, alongside an extensive range of stamp designs, mean that pretty much anything is possible. That said, if making your own wedding stationery really isn't for you, I also offer a bespoke 'make to order' service - just contact me to discuss your requirements.

Christmas time is popular for engagements and many people will be making wedding plans at this time of year, so if you know someone who fits the bill do share my details with them - I can make a huge chunk of their wedding preparations easier! In addition, point them in the direction of the Local Wedding Connections website at www.localweddingconnections.co.uk; it contains lots of useful information, supplier details and general useful bits and pieces for anyone in the market for a wedding.

Back tomorrow with another project; until then, happy stampin'!


Stampin' Up! Supplies Used:

Table built using Stampin' Up! Product Table Builder from The Crafty Owl.


Tags: , , , , , , , ,

Cards | Stamping | Weddings

Flowerfull Heart Gift Card Holder

by Joanne James10. January 2014 19:45

Evening lovely blog readers! So big news of the day: my voice is (almost) back! Great news for me, not so great for my youngest when he announced he had lost his trainers following his PE lesson just 3 days into the new term - but that's a story for another time!

Today I'm going to share the last of this week's class projects: a gift card holder, once again made with the Envelope Punch Board. I've seen a few holders made in this way on the internet, but I adapted mine slightly to enable me to make it from half a sheet of A4, using metric measurements. So here is the finished gift card holder from the outside:

No apologies for once again using the Flowerfull Heart stamp (I still love it!), this time overlaid with 'love' cut from gold foil using the Expressions Thinlits die (don't forget these are only available to purchase until the 1st February). There's also another sneak peek of new product available in the Spring-Summer catalogue that launches on 28th January; did you spot it? Yes, it's the lovely gold washi tape which I paired here with Very Vanilla to make my pocket. There are lots of silver and gold items in the new catalogue, so if this is your thing, stay tuned - there will be more to come. The flap closure for the gift card holder is the bit you need the Envelope Punch Board for - it makes the two notches that enable the holder to stay closed and keep the gift card firmly in place.

When you unclasp the flap, this is what you see inside:

The insert is attached to the opening flap so that it slides out of the pocket as you open it and presents the gift card. I designed my gift card holder with a wedding or engagement gift in mind - vouchers or money seem very popular gifts these days, but you could easily adapt it for a birthday or other occasion. One thing is for sure - when it's as easy to make as this, there's really no excuse for a simply sticking a voucher in an envelope or worse still a carrier bag (believe me, it happens!!)

That's all the projects from my classes this week - I hope they've inspired you to go and be adventurous with your Envelope Punch Board. If you live local to me in Northampton and would like to attend any of my Stampin' Up! papercraft and card classes, you can find the current schedule of my card and project classes on my website here; please contact me for further information regarding location and any equipment you will need to bring. Classes must be booked at least 2 weeks in advance of the class date.

Back tomorrow with a Sale-A-Bration sneak peek; until then, happy stampin'!


Stampin' Up! Supplies Used:

Table built using Stampin' Up! Product Table Builder from The Crafty Owl.


For the New Mr & Mrs Harrison!

by Joanne James2. October 2013 21:06

A quick post from me today to share a wedding card and gift box I made for my friends and neighbours, Annette and Jason, who got married at the weekend. The theme of the wedding was bright pink and the gerbera was a feature flower, both in the bridal and bridesmaids bouquets and on the invitations and wedding favours. Having made the wedding invitations (I will share these in a future post - I have 'mislaid' the photographs I took on completion!), I decided to make a wedding card that was pink but not flower-themed, but I did design a gift box that complemented the overall décor to house their gift.

Here is the card, using the lovely 'From This Day Forward' stamp, inspired by a similar card by Monica Gale here:

I also created a gift box with a belly band with a gerbera design, that echoed the design of the wedding stationery and favours. My box was inspired by this mini version by Sam MacDonald of Pootles Paparcraft here, and although whilst the shape is the same, the overall dimensions are considerably larger! here is my full size version:


Very large, with a 9cm x 9cm square base, and very pink, but more sturdy than a gift bag and much more personal. I finished it off with some retired Melon Mambo organza ribbon (currently available to purchase on the Clearance Rack!) and a die-cut flower with co-ordinating Chalk Talk gift label. here's a close up of the detail:

The sun shone and the wedding day was perfect - what more can you ask for? Congratulations to the new Mr & Mrs Harrison - wishing you a happy future together.

Back tomorrow with another project and the detail behind the 2 week £25 sign up offer that begins on October 7th; until then, happy stampin'!


Stampin' Up Supplies Used (for the card only):

 This Day ForwardPetite Pairs - Clear-Mount Stamp Set - by Stampin' Up!Melon Mambo 1/8 Taffeta RibbonLinen Thread - by Stampin' Up!

Very Vintage Designer ButtonsBasic Pearls Jewel Accents - by Stampin' Up!

L O V E spells LOVE

by Joanne James12. February 2013 12:00

With only two days to go, I thought I would share another Valentine's Day card with you today. I actually took this card to the wedding fair I exhibited at last weekend, as I thought it would also make a lovely invitation and it could be adapted to a variety of different colour combinations.  

I took my inspiration from the current Stampin' Up! catalogue on page 179 and the card that demonstrates the new Stampin' Spritzer. It is a 5" square card with a base of Melon Mambo and mat of Basic Grey, with a sharp white typeset LOVE which is inset with a small punched heart and a little diamante for just the right amount of 'bling'. Simple, but oh so effective and if you're a crafter who likes to leave things until the very last minute, really quick to execute with no stamping required! I'll be back with another Valentines idea tomorrow, but meanwhile - happy stampin'!

Stampin' Up Supplies:

Paper: Whisper White, Melon Mambo, Basic Grey

Tools: Typeset Alphabet dies, Small Heart Punch, Basic Rhinestones Jewels, Big Shot

Tags: , , , , , , , ,

Cards

Forever and Always - Preparation for the Wedding Season has Begun!

by Joanne James7. February 2013 20:59

Before I share more of my 'Feeling Sentimental' notelets with you, today I thought I'd let you know about the wedding fair I'm attending at the weekend and give you a sneak peak of the 'make and take' wedding invitation you could try your hand at if you come along.

I've been busy all week preparing samples for the Budget Bride Live Wedding Fair at Diana's Health Club in Wellingborough this Sunday (click here for more information). If you're a bride-to-be and would like to know how to make your own wedding stationery, then do come along and discover how easy it can be with a little help from me and some Stampin' Up! supplies. You can enjoy making everything from invititations to place settings, guest favours to room decorations - all colour-coordinated to tie in to your chosen theme.

If you are attending on Sunday, you will also have the opportunity to have a go and discover just how easy making your own stationery can be - just take a look:


This invitation in classic white allows you to have a go at a number of basic techniques: embossing the raised flower design with the Big Shot, a simple sentiment stamped in black, along with two punched butterflies to add interest. I'm sure you'll agree it looks great as it is, but with the addition of some pearls or colour, can be easily tied in to your theme or given even more of a 'wow' factor.

You may also be surprised at how easy on the purse-strings making such beautiful wedding stationery can be: you could make 40 invitations like the one above for just £67.90 including envelopes and still have ink, stamps, punch and an embossing folder to make co-ordinating items too. When you consider that the average UK bride and groom spend £465 on wedding stationery alone*, then this is nothing short of a bargain and definitely something to think about if you're getting married on a budget.

If you would like to discuss your wedding stationery needs, do come along on Sunday or contact me for further information on how I can help make your day as special and individual as you are.


Stampin' Up Supplies:

Paper: Whisper White

Inks: Black Stazon

Stamps: Loving Thoughts

Tools: Elegant Bouquet Embossing Folder, Bitty Butterfly Punch, Big Shot

*Source: Weddingsday.co.uk


Tags: , , , , , ,

Cards | Host a Party | Stamping | Wedding Fairs

Mini Catalogue

BROWSE THE CATALOGUE

The mini catalogue is now live! Read and download your copy here.

Shop Online

Access my online shop 24 x 7, 365 days of the year:

Current April hostess code:

VDKNV7BH

Shop Online

Join My Team

It's always a great time to join Stampin’ Up! New team members can get £130 worth of products for only £99 + free business supplies + free shipping + all the fun being a part of Stampin’ Up! Stampin' Up! has something for everyone: join my growing team and benefit from my support to enjoy Stampin' Up! however you choose.

If you're interested, call me for a chat to understand how I can help you realise your goals. Alternatively, if you have already decided to sign up and you just can't wait, please click here for the link to the online form where you can sign up and order your starter kit right away! 

Latest Kit!

Stampin Cut and Emboss

The Rock Legend Kit has all you need to make 8 cards with coordinating envelopes. Along with the new Panda Friends Kit, both are available from January 4th for just £14 each - get yours here!

2023-24 Annual Catalogue

BROWSE THE CATALOGUE

Click on the catalogue for a full list of current SU! supplies - if you would like to order any of the items featured, please drop me a line at [email protected] or give me a call on 07773 421446 - I'd be happy to help.

New Online Exclusives

There are new products available exclusively in the online store from 5 March - check them out here.

About Me

Hi I'm Joanne and live in Northampton and when I'm not looking after my husband and two beautiful children, am an avid crafter with a passion for all things Stampin' Up!

I must confess that I have never been a big rubber stamper - until I discovered Stampin' Up! that is. I love the fact that I can get such great results with co-ordinating stamps, inks, papers and punches - the possibilities are endless! Join me on my stamping journey as I share the things I love and be inspired to create amazing things yourself!

Follow Me

Monthly Newsletter

Box Builder

Click the button above to use Box Buster to create your custom box design using the Envelope Punch Board!

Kits Collection Now Available!

Stampin Cut and Emboss

The new Kits Collection from Stampin' Up! is now available!

Click here to see the current kits available and order yours online today.

I Design For


Stampin' Up Stuff

This is my personal blog and is not endorsed by Stampin’ Up! I hope you find it a plentiful source of ideas and personal inspiration but please don't copy my designs for contest submission or use for classes, publication or sale without express permission.