by Joanne James10. May 2013 21:16Good evening, blog followers! Apologies for the lack of blog post yesterday; things have been very busy in the world of the Crafty Owl this past few days and yesterday just ran away with me. Anyway, back today with a card I wanted to share in advance of next week's card class featuring my favourite punch of all time - the owl punch. This punch really is so versatile; there are many examples of alternative uses for this punch. Today I'm sharing an alien pop-up card, inspired by the many examples found on Pinterest - this is the outside:
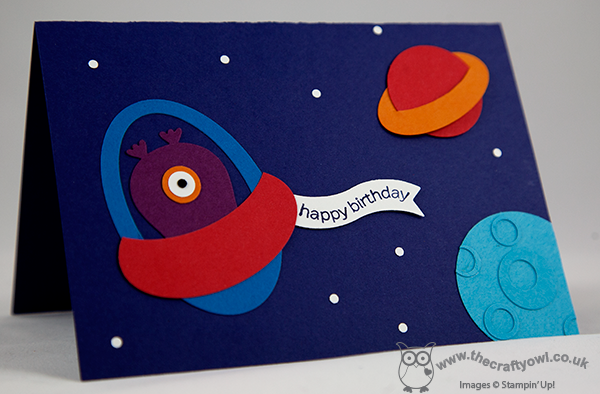
Recognise the alien in the spaceship? An upside-down owl with one eye, along with some punch art planets and stars. When you open it up, the inside looks like this:
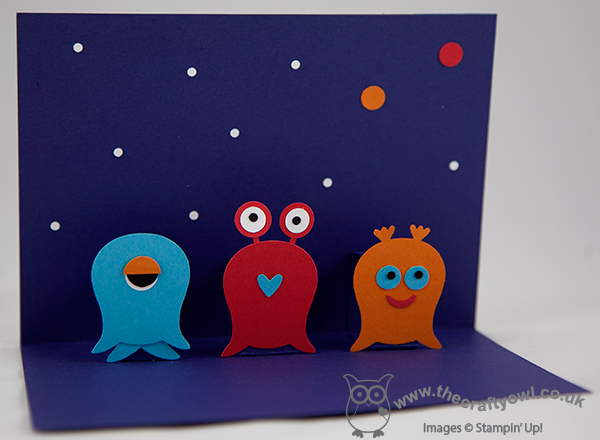
A trio of aliens pop up to wish you a happy birthday! This kind of card is such fun - you can customise your aliens and make them different every time. perfect for a birthday that's 'out of this world'! The owl punch is the feature punch for this month's card class - if you live in Northampton and the surrounding areas and would be interested in attending one of my classes, do get in touch for more details. Right - I'm done with the alien puns; I'm off to try and schedule tomorrow's blog post as I'll be on a Stampin' Up! regional training day in Telford all day - should be fun! Until tomorrow, happy stampin'!
Stampin' Up Supplies:
Stamps: Happiest Birthday Wishes (retired)
Cardstock: Whisper White, Rich Razzleberry, Tempting Turquoise, Pacific Point, Pumpkin Pie, Basic Black, Concord Crush (retired), Poppy Parade (retired)
Ink/Stampin' Write Markers: Concord Crush (retired)
Tools: Owl Punch, Large Oval Punch, Small Oval Punch, 1" Circle Punch, 1 1/4" Circle Punch, Oval Framelits, Bitty Banners
f79f64f2-a211-44b2-946e-f5843d8e7492|0|.0|96d5b379-7e1d-4dac-a6ba-1e50db561b04
Tags: Big Shot, Bitty Banners, circle punch, Happiest Birthday Wishes, large oval punch, Ovals Framelits, Owl Punch, Punch Art, small oval punch, Stampin' Up, Stampin' Up Card, Stampin' Up Card ideas, Stampin' Up Supplies
Cards | Classes | Punch Art
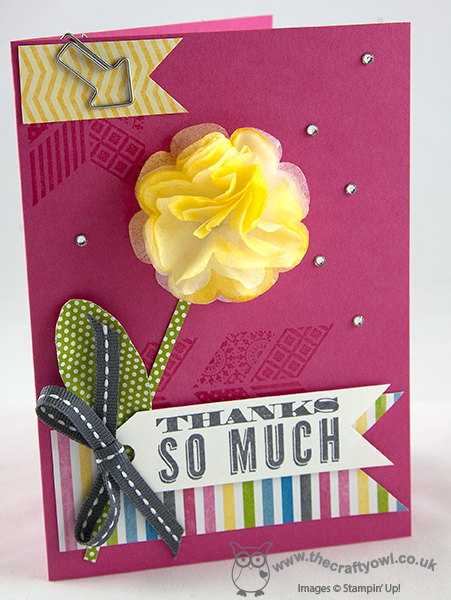
by Joanne James8. May 2013 21:51A quick post from me today, as I've spent most of my evening making a paper mache mask for my 5 year old to take into school tomorrow (apparently, this is Mum's homework - and that's according to the teacher, so I can't really quibble with my son!) My card is one I made to share with the ladies at my last stamp class, showing them the different effects you could get with the Blossom Punch flower:
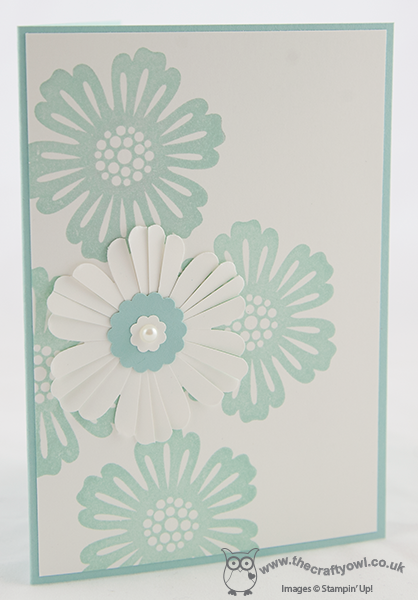
I chose Pool Party as the feature colour for this card - I'm so glad this in-colour is staying. A simple stamped background, but by cutting the petals right through along their length it gives a very delicate finish. All finished off with a couple of scalloped circles and a large pearl - very simple and could be used for a variety of occasions.
That's all for today; there is lots happening in my craft room at the moment, with regional training swaps, commissions, class planning and lots more to share, so come back tomorrow for another project. Until then, happy stampin'!
Stampin' Up Supplies:
Stamps: Mixed Bunch
Cardstock: Pool Party, Whisper White
Ink/Stampin' Write Markers: Pool Party
Tools: Blossom Punch, 7/8" Scallop Circle Punch, Itty Bitty Punches
Finishing Touches: Basics Pearls
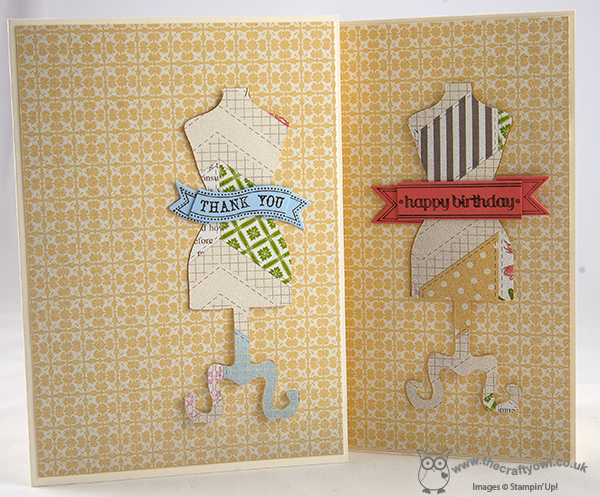
by Joanne James6. May 2013 17:41What a lovely day for a Bank Holiday! I'm writing this post sat in the afternoon sunshine in my garden, that I have been lovely trying to whip into shape all day after a winter that has lasted far too long for my liking - a blissful weather day. Today's card is another showcasing the versatility of the Dress Up framelits (well, I haven't blogged one for a few days now, so it must be time for another!). Here it is:
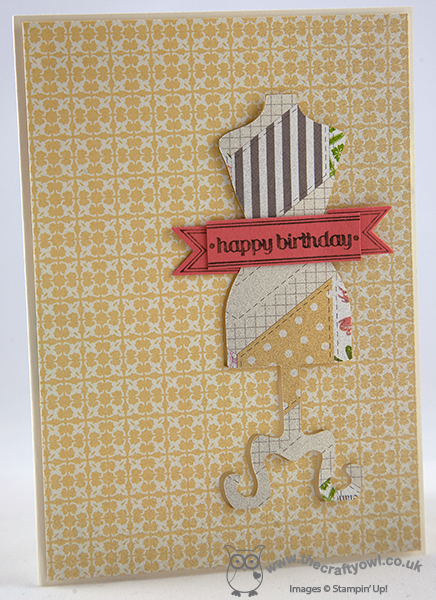
I love to design my own cards, but sometimes it's nice to recreate something I've seen designed by someone else too. Crafters are generous folks and don't mind you casing so long as you give them due credit; sometimes I just case because I really love the design and it needs no further explanation, however I decided to reproduce today's card because there were some specific things I liked about it that I thought would be good to share with you:
- This makes great use of the Tea for Two designer series paper; I had this out on my desk as I'd been using it for another project, but what better way to remove the indecision associated with which side of the DSP to use - simply cut out the mannequin and flip it over - you get to see both sides of the paper and there's no waste!
- This card is so quick and easy to make - you could turn one of these out in under 5 minutes. Sometimes time is of the essence!
- I love the little trick with the Bitty Banners: instead of printing and punching flat, you print and cut two banners, then cut the ends off one and adhere underneath the ends of the complete one using glue dots. This gives them just enough height to look like a ribbon floating across the mannequin. Another great way to get extra mileage from this set and create a different look.
This card was so quick to make, I made another one with a different banner at the same time - here they are both together:
Well, that's all for today - I'm off to enjoy my first proper BBQ of the year. I can smell the sausages cooking - typing this for the last 5 minutes has been close to torture! Back tomorrow with another project - until then, happy stampin'!
Stampin' Up Supplies:
Cardstock: Very Vanilla, Calypso Coral, Bashful Blue, Tea for Two DSP
Ink: Chocolate Chip
Tools: Dress Up Framelits, Big Shot, Bitty Banners Framelits
by Joanne James5. May 2013 21:33Today's card is one I made a while ago when I was going through my Spring Sampler workout, but lost the photograph so had to take it again. This is a great birthday card for a 'little person' and would work for either a boy or a girl:
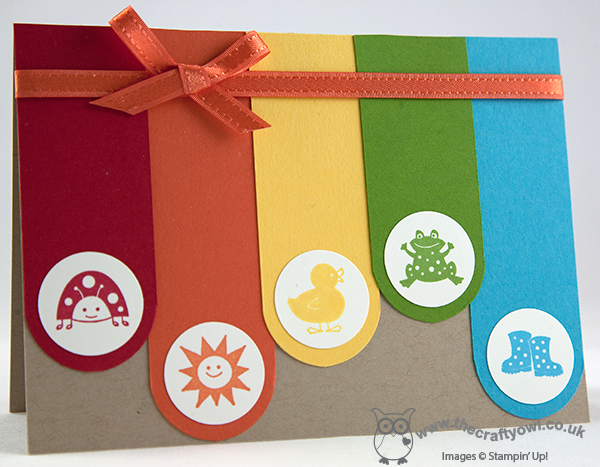
This type of card is so easy to make and really lends itself to a stamp set of small single images. Are you wondering how I got the curved edges on the coloured panels? I cut my strips to length and made them slightly narrower than 1 1/4", then fed the end into my 1 1/4" circle punch from the top so that only the end was punched, not a whole circle. I hope this makes sense - as I've tried to explain it I think I should have taken a picture as it would have been much clearer!
Back tomorrow with another project - until then, enjoy your Bank Holiday weekend and happy stampin'!
Stampin' Up Supplies:
Stamps: Spring Sampler
Cardstock: Whisper White, Real Red, Tangerine Tango, Daffodil Delight, Gumball Green, Tempting Turqouise, Crumb Cake
Ink: Real Red, Tangerine Tango, Daffodil Delight, Gumball Green, Tempting Turqouise
Tools: 1" Circle Punch, 1 1/4" circle punch
Finishing Touches: Sycamore Street Ribbon (Sale-A-Bration - retired)
by Joanne James4. May 2013 16:05Well, it might be May, but this is so a day of April showers! After my third trip back out to the washing line to rescue my washing from another downpour, I gave up and resorted to the tumble dryer. Not very eco-friendly I know, but with sports kits that need to be washed, dried and ironed to be back at school on Tuesday, what is a girl to do?!
Given the weather, it seems like a great oportunity to share another of my training day outputs with you:
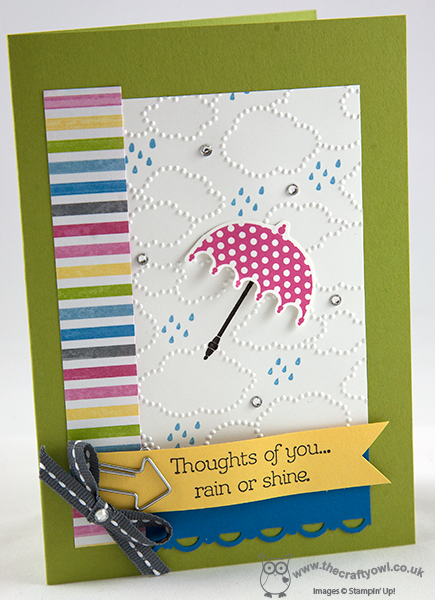
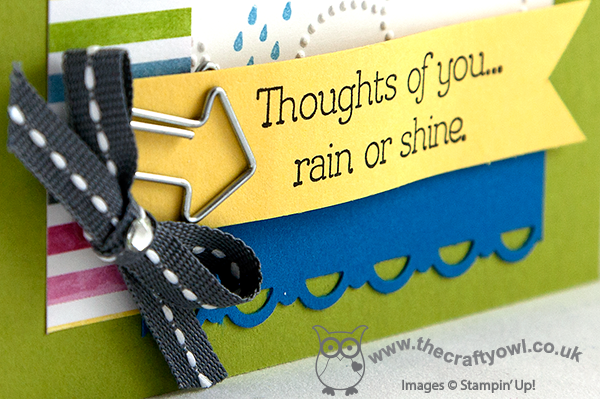
The Cloudy Day Embossing Folder is a personal favourite of mine, and my 'go to' embossing pattern at the moment - I love the ease with which you can create the cloud effect. A nice pink umbrella, fussy cut with my trusty paper snips - who wouldn't be cheered by one of these on a showery day? - and another Cute Clip, to highlight the sentiment. There's a lot going on around the sentiment - here's a close up view:
This would be a great card to brighten someone's day - I hope it has lifted your spirits too! I'm off to do a quick hour's crafting whilst the house is quiet, as everyone else has gone out to the weekly swimming lesson. Back tomorrow with another project; until then, happy stampin!
Stampin' Up Supplies:
Stamps: Rain or Shine
Cardstock: Lucky Limeade, Pacific Point, Whisper White, Sunshine and Sprinkles DSP
Ink: Basic Grey, Pacific Point
Tools: Cloudy Day Embossing Folder, Scallop Trim Border Punch
Finishing Touches: Basics Rhinestones, 1/4" Stitched Grosgrain Ribbon Basic Grey, Cute Clips
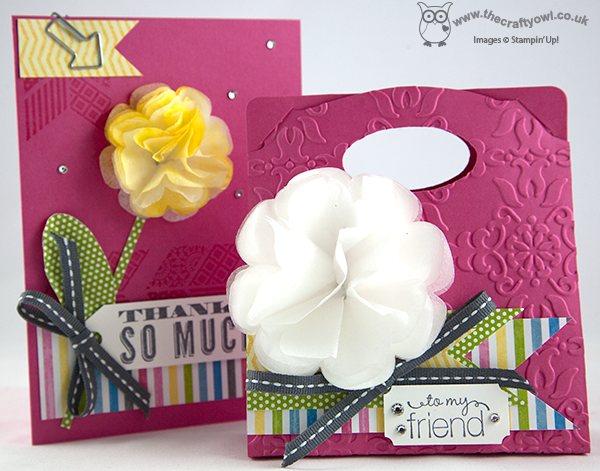
by Joanne James30. April 2013 19:56As promised, today I have a card to match yesterday's lovely Melon Mambo treat holder, made with the Pop 'n' Cuts base. No dresses today, but another of those gorgeous filter paper flowers, this time hand-dyed yellow to really make it 'pop':
This flower was made using the slightly smaller Floral Frames Framelit; the flowers can be coloured in a number of different ways - to achieve this effect, the edges were sponged with Daffodil Delight ink then the layers sprayed with a homemade mix of alcohol and shimmer spray to encourage the colour to 'bleed' and shimmer slightly. So easy and each time you make one, you get a slightly different look so all your flowers are unique.
The flower definitely takes centre stage here, however the background stamping, rhinestones and cute clip attaching the flag at the top all contribute to making this a great card, and one that perfectly co-ordinates with yesterday's treat holder. Here's a picture of both items together:
Rather lovely! Back tomorrow with another project and exciting news about a special promotion valid for the month of May only. To find out more, make sure you check back tomorrow for the full low-down. Until then, happy stampin'!
Stampin' Up Supplies:
Stamps: Oh, Hello
Cardstock: Melon Mambo, Whisper White, Sunshine and Sprinkles DSP
Ink: Basic Grey, Melon Mambo, Daffodil Delight
Tools: Floral Frames Framelits, Big Shot
Finishing Touches: Basics Rhinestones, 1/4" Stitched Grosgrain Ribbon Basic Grey, Creped Filter Paper, Cute Clips
4255a83d-a886-4460-8618-98ae62b82f6f|0|.0|96d5b379-7e1d-4dac-a6ba-1e50db561b04
Tags: 3D Projects, Big Shot, Creped Filter Paper, Cute Clips, Floral Frames Framelits, Oh Hello, Stampin' Up, Stampin' Up Card, Stampin' Up Card ideas, Stampin' Up Supplies, Sunshine and Sprinkles
3D Projects | Cards | Stamping
by Joanne James28. April 2013 20:14Any of you who saw my Facebook post yesterday will know I am officially 'IN LOVE' with the Dress Up framelits and Pop 'n' Cuts Base in the Spring-Summer catalogue. I've been resisting purchasing them since the catalogue came out - I don't know why, because it really was love at first sight - but having used them at our last training session and spent a fun few hours with my downline Barbara playing fashion designers, I have finally succumbed. I have seen so many great examples of projects made with this set and I'm excited to share these with you in future blog posts.
Today I am going to share a card I made using all three elements: the pop 'n' cuts card base, the dress form and the framelits. So not much stamping today - Big Shot definitely required! I will share some projects later in the week that show how these can be used separately; when used together, they will make a pop up card with a mannequin to be dressed as you wish. For my first card, I used some of my favourite 'More Amore' DSP along with a Pool Party card base. Here's the outside of the card that you see when the card is folded shut:
Then when you open it, the inside looks like this:
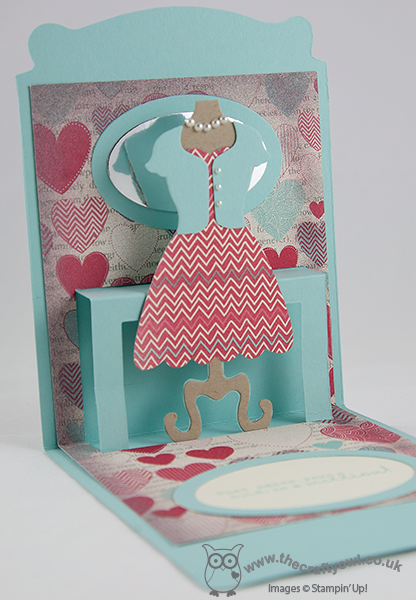
How cute is that??! Dressed mannequin, complete with pearls and pretty cardi, in front of a mirror and dresser. What little - or big - girl wouldn't want to get this in the post for their birthday? Here's one last close-up of the mannequin:
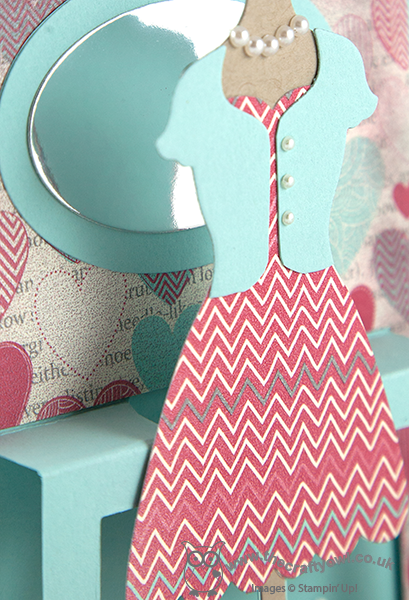
This will, I feel, be the first of many such pop-up cards; come back tomorrow to see another use for this great set. Until then, happy stampin'!
Stampin' Up Supplies:
Stamps: One in a Million
Cardstock: Pool Party, Crumb Cake, Very Vanilla, More Amore DSP
Ink: Pool Party
Tools: Pop 'n' Cuts Base, Pop 'n' Cuts Dress Form, Dress Up Framelits, Ovals Framelits, Big Shot, Stamp-a-ma-jig, Small Heart Punch
Finishing Touches: Basics Pearls
7d8b3320-2717-4b3f-976e-3f7ac0a2c5ff|0|.0|96d5b379-7e1d-4dac-a6ba-1e50db561b04
Tags: Big Shot, Hearts, One In A Million, Ovals Framelits, Stamp-a-ma-jig, Stampin' Up, Stampin' Up Card, Stampin' Up Card ideas, Stampin' Up Supplies, Pop 'n' Cuts, Dress Up Framelits
Cards | Pop Ups
by Joanne James27. April 2013 20:37Another birthday card today - this time a quartet of bright and colourful cupcakes:
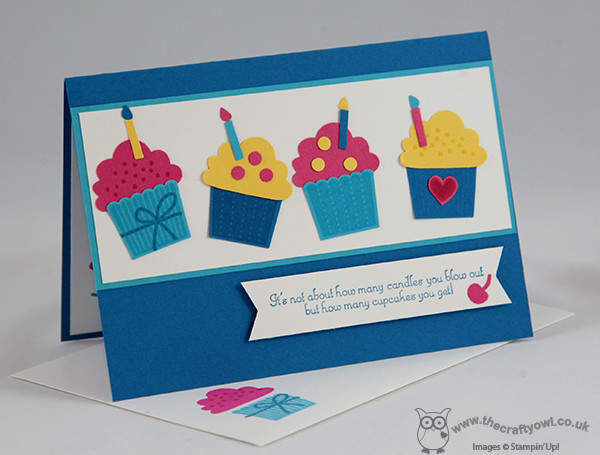
I made this card a while ago and the layout is a case of a Mary Fish card - I love her clean and simple style - and the Create a Cupcake stamp set and co-ordinating punch make this kind of card really easy. Its also great fun to see how many different cupcake combinations you can make using this set. The punch also makes birthday candles a doddle to create - handy as I have lots of friends (and family!) celebrating 'significant' birthdays this year where large numbers of candles are required. A co-ordinated envelope too makes this card a sweet treat!
Back tomorrow with another project - I've been very busy in my craft room today and have lots of great projects to share this coming week!
Stampin' Up Supplies:
Stamps: Create a Cupcake
Cardstock: Pacific Point, Melon Mambo, Daffodil Delight, Tempting Turquoise
Tools: Cupcake Builder Punch
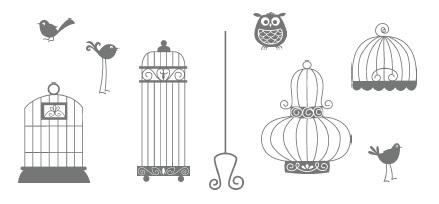
by Joanne James26. April 2013 20:57Apologies for my sense of humour, but I just couldn't resist! Today's card is a birthday card that I made for a male friend of mine, but would work equally well as as a female card and features one of the birdies from the Aviary stamp set:
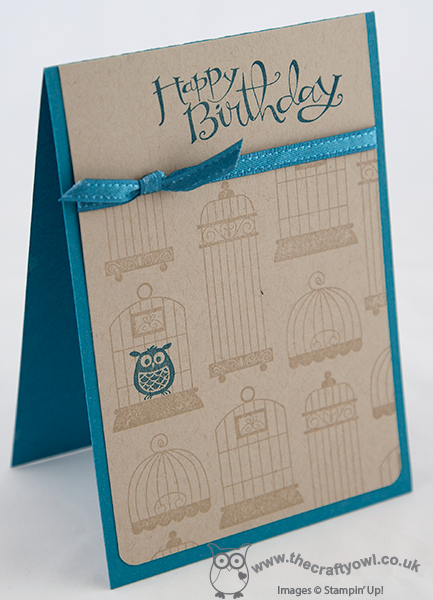
This card was inspired by a Paula Dobson card I saw on Pinterest; I love the two colour design but I felt that the muted Crumb Cake layer needed a solid Island Indigo base card to really bring out the flashes of colour of the owl, sentiment and ribbon trim. Top tip if you fancy recreating this card - use a stamp-a-ma-jig to line up the bird cages; they're not as random as they look!
That's all for today. Back tomorrow with something special - until then, happy stampin'!
Stampin' Up Supplies:
Stamps: Aviary, Sassy Salutations
Cardstock: Island Indigo, Crumb Cake
Tools: Stamp-a-ma-jig
Finishing Touches: Sycamore Street Ribbon (Sale-A-Bration - retired)
by Joanne James25. April 2013 20:52Today I thought I'd share another card with you from my recent 'Mixed Bunch' class. I created it after seeing something similar on Pinterest and it made it into the class because I think it's a good example of how you can use a punched shape to create the illusion of a flower without having used the co-ordinating stamp:
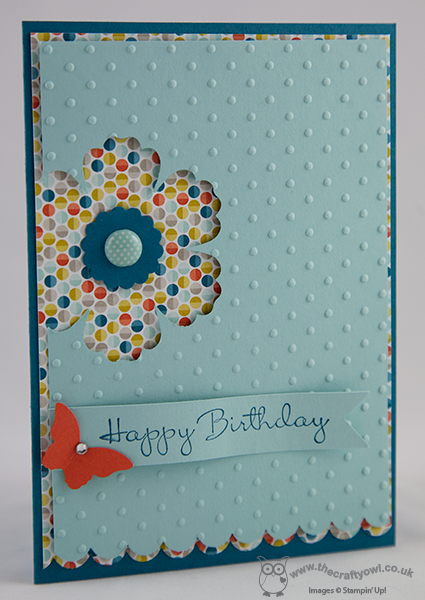
I cut a layer of Sycamore Street DSP and scalloped the edge and adhered it to the Island Indigo card base, then cut a further smaller layer out of Pool Party, embossed with the Perfect Polka Dots Embossing Folder and punched out a flower shape from the edge of the cardstock and adhered with dimensionals to reveal the patterned paper underneath. I then used a 7/8" scallop circle with a co-ordinating brad to create the flower centre. A banner sentiment and a bright orange butterfly completed the card.
Back with another card tomorrow - until then, happy stampin'!
Stampin' Up Supplies:
Stamps: Happiest Birthday Wishes (hostess - retired)
Cardstock: Island Indigo, Pool Party, Tangerine Tango, Sycamore Street DSP
Tools: Blossom Punch, Bitty Butterfly Punch, Perfect Polka Dots Embossing Folder, 7/8" Scallop Circle Punch
Finishing Touches: Basics Rhinestones, Designer Printed Brad