Snowflake Wishes Hexagonal Shaker Box and Matching Christmas Card PP520

by Joanne James6. December 2020 09:00

Today it's Sunday and time for this week's new challenge over at The Paper Players! It's my turn to host this week and I have a timely theme challenge for you to work with:
 

19 days to go and yes - it's beginning to feel a lot like Christmas, so that is my theme this week! You can share your gifts, cards, packaging - we would love to see your festive makes! I love to make co-ordinating cards and gift packaging at this time of year so I have one such set to share with you today. My post is photo-heavy as I'm going to share both a Christmas card and a rather fancy matching gift box using products from the Snowflake Splendor Suite. I even have a video tutorial for you!

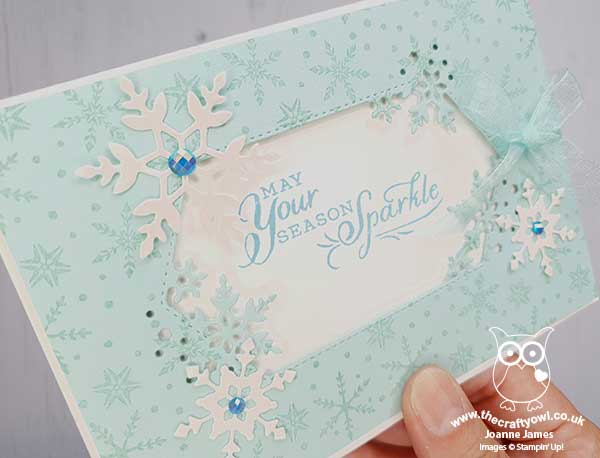
First up - here's my Christmas card, with the hexagonal aperture cut using the So Many Snowflake dies:
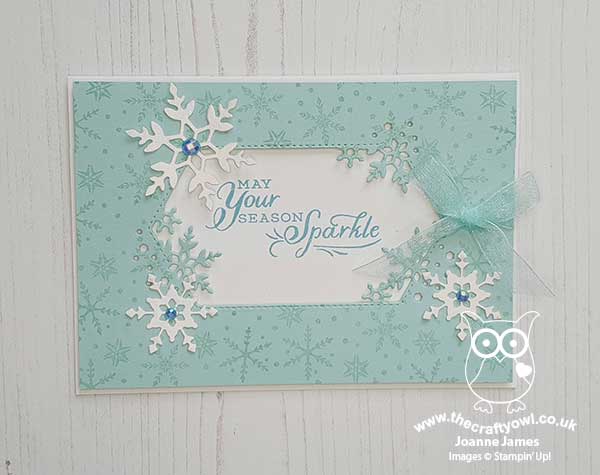
 

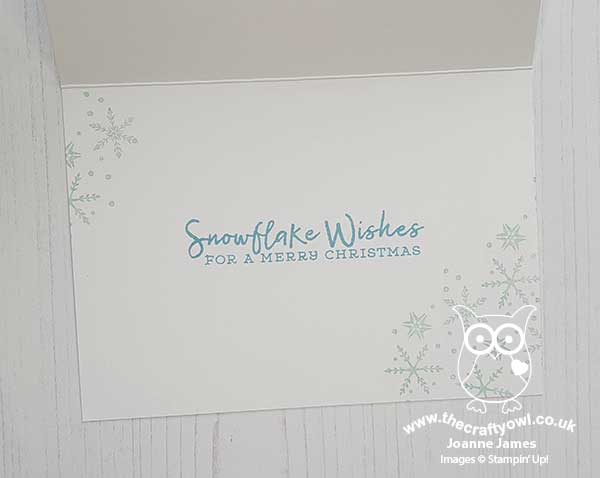
I added some diecut snowflakes painted with Frosted White shimmer paint and finished with those pretty Balmy Blue adhesive-backed gems and a pretty Pool Party sheer ribbon bow, with a simple sentiment and snowflake decoration on the inside of my card:
 

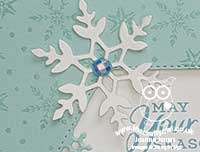
 Check out the effect of those faceted gems - so sparkly!
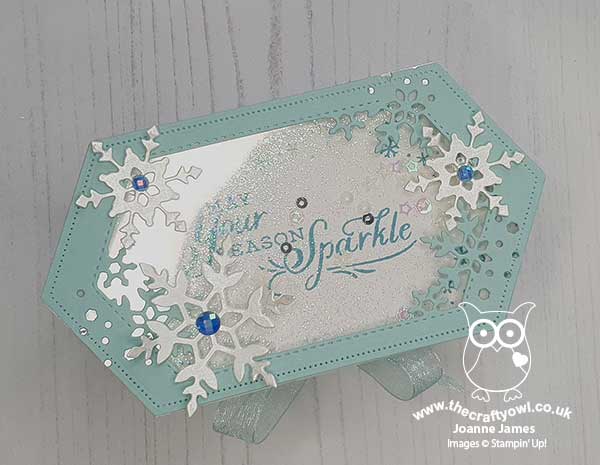
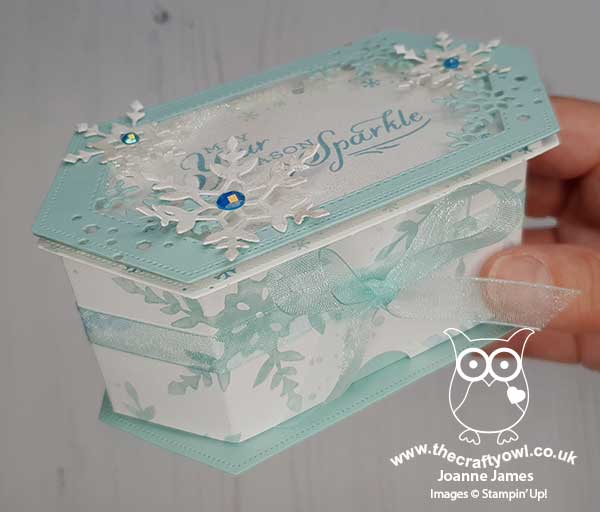
This card was a variation on one I made in my monthly card class featuring the Snowflake Wishes bundle a few months ago. I liked the card so much, I decided to make a matching box, using the same hexagonal aperture and the Stitched Nested Label Dies from the annual catalogue. I made a simple birthday gift box using these dies previously (you can see that box here if you missed it) and have been wanting to make a video tutorial to show how it was done, so this seemed like the perfect opportunity. Here is my finished box closed:
 

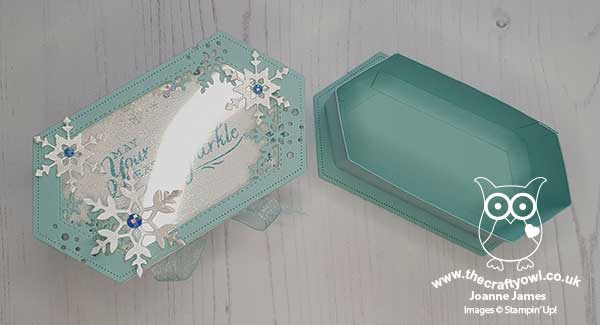
And this is what it looks like open - the lid and base extend beyond the sides of the box and the top slides off to reveal the inside:
 

I wanted to step up my box so instead of simply creating an open aperture on the lid, I added some acetate and created a shaker, filled with snowflake sequins and glitter - check out  this out - it's not only the sentiment that's full of sparkle:
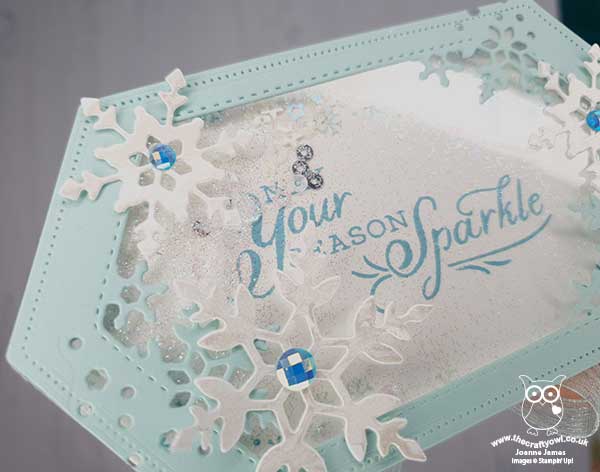
 

I added some Snowflake Splendor designer paper to the sides of my box lid and wrapped and tied it with more of the Pool Party sheer ribbon, to tie it in with the detail on my card - you can see that better below:
 

Rather than detail exactly how I made this project in words, I thought I would make a video tutorial should you wish to have a go at making one yourself - so here it is:

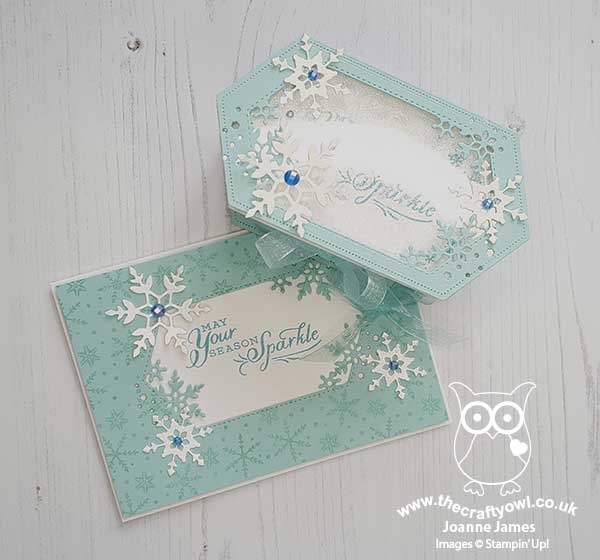
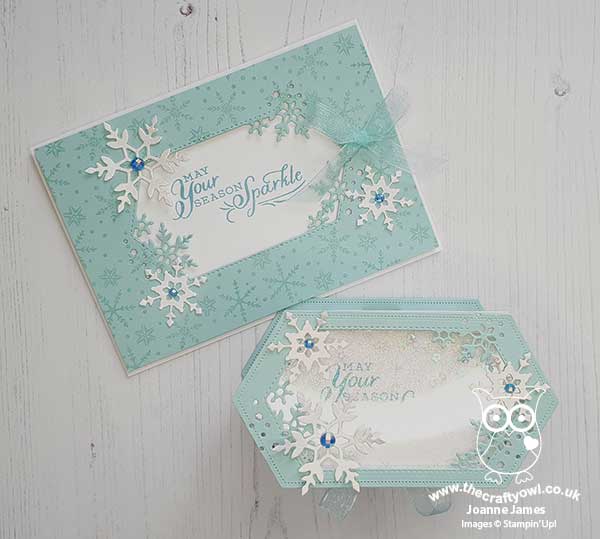
I am just in love with this set; the box isn't huge, but will hold small gifts such as chocolates, jewellery, a scented candle - lots of options! Here's a final photo of my projects together:
 

I would love to know what you thought of my video tutorial too; was it useful? Would you like to see more of this type of content. Do let me know - I would love to hear your thoughts!

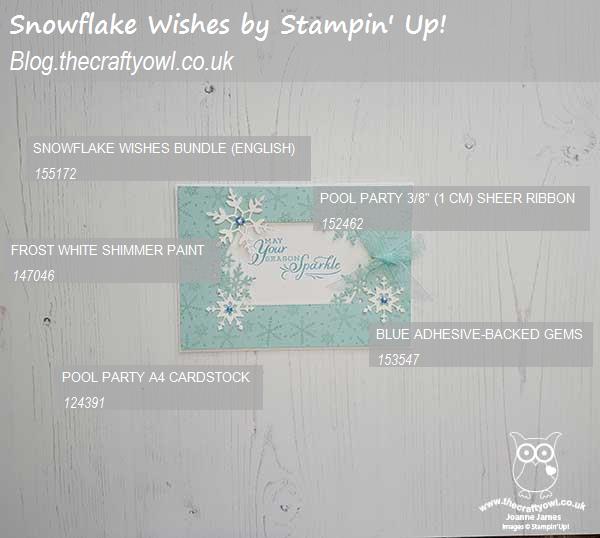
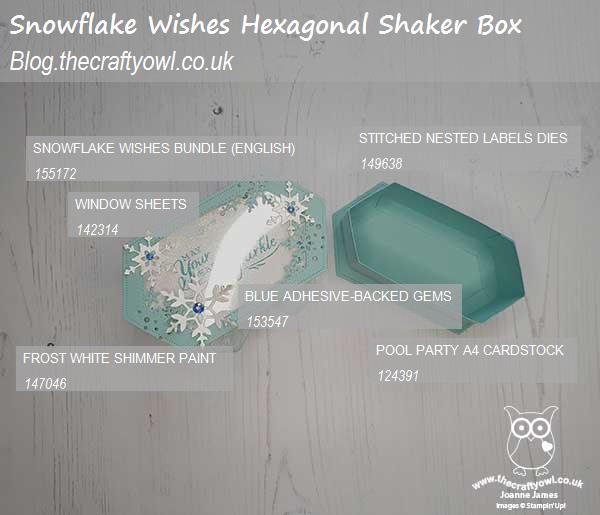
Here is the visual summary of the key products used on today's project for you to pin for easy reference:


You can see all of my Product and 'How To' summaries on my 'How To - Tips and Techniques' Pinterest board in case you've missed any. 

Before you reach for your ink and papers, check out what our amazing team has created to inspire you this week:

Here's a quick recap of our challenge rules:
 
1.  Create a new paper project
2.  Upload your creation to your blog with a link back to us and provide a direct link to the post featuring your challenge submission.
3.  Please link your card to no more than four challenges, TOTAL.
4.  Have FUN!

You can see all of my 'How To' summaries on my 'How To - Tips and Techniques' Pinterest board in case you've missed any. 

Enjoy your day; I started writing Christmas cards whilst at hockey yesterday and am hoping to crack on with those this afternoon to get them in the post tomorrow, which will be a huge achievement! I'll be back tomorrow with another project. Until then, happy stampin'!
Stampin' Up! Supplies Used: 

Table built using Product Table Builder by The Crafty Owl - Independent Stampin' Up! Demonstrator.

Honey Bee Shaker Card for AYSI 219

by Joanne James14. February 2020 12:00

Today I'm sharing my design team card for our new challenge over at As you See It where it's time for a sketch challenge:


My card today is all about the bees - take a look and you'll see what I mean:


Here's the low-down on today's card:

Shake It Up - Try as I might, I couldn't get past the fact that the shape on today's sketch looked like a beehive, so in the end I decided to roll with it and make a shaker card, because a shaker card is always fun, right? I stamped my beehive in Mango Melody then used this as the base for my beehive. I did take a little liberty with the sketch, in as much as I 'moved' my sentiment and used the one from the Honey Bee stamp set that fits around the curve of the beehive rather than place it bottom right on my card, as I wanted to use the big bee diecut and there wasn't really room for a sentiment too.  

It's In The Detail - The Detailed Bee Dies really make this card easy: I used them to cut out my beehive window, along with a couple of stamped bees and a pair of the teeny tiny hearts in this set too - well, today is Valentine's Day after all! I then cut out two of the honeycomb pieces, one in Daffodil Delight and one in Mango Melody, and cut them apart to create two honeycomb strips to mimic the banners of the sketch. I also used some retired gold flakes that are honeycomb shaped; along with the clear Wink of Stella on the bee's wings, this gives my shaker a nice sparkle. Here's a close up so that you can see it in all its glorious sparkly detail: 

A Bee Bonanza - Lastly, to my background paper. I resisted the urge to use the gorgeous Golden Honey Specialty DSP that is one of the current free Sale-A-Bration gifts and based the whole colour scheme for today's card on the bright stripes found in the Birthday Bonanza designer series paper pack. This paper is designed to co-ordinate with the 'Bonanza Buddies' birthday set featuring the cute animals, but this is a great example of how the more neutral patterns in a paper pack can be used successfully with other sets too.

Here is the visual summary of the key products used on today's project for you to pin for easy reference:


You can see all of my 'How To' summaries on my 'How To - Tips and Techniques' Pinterest board in case you've missed any. 

Before you put your creative thinking caps on, why not check out the blogs of the other As You See It team members:

Amy Jasper

Heather Cooper

Jan Clothier

Jane Knudsen

LeAnne Pugliese

Here's a summary of our challenge rules:

  • Create any card, scrapbooking page, 3D project or packaging project that fits the challenge.
  • Please include the challenge graphic and link back to the challenge in your blog post. Turn off word verification so we can leave you lots of lovely comments. Make sure you link the post not the whole blog to the Linky. Use #AYSIXXX when uploading to a public gallery.
  • If you’re unsure about ‘the rules’, check the details under the Challenge Guidelines tab on the As You See It Challenge homepage.
  • In a sketch challenge, you are welcome to rotate or flip a sketch. You can replace shapes used such as substituting a circle panel for a square panel. However, we must be able to still see the basis of the original sketch in your finished product. 

We look forward to seeing your creations in the AYSI gallery.

Enjoy your day - do you have special Valentine's Day plans? There are Valentine's themed Friday treats for the James Juniors when I collect them from school today and I'm sending cards to everyone of course; so far I am at a ratio of cards sent 3: cards received 0 - no surprise there then!! Otherwise today is much the same as any other in the James household. Do let me know if you are being wined and dined and experiencing a day filled with romance, hearts and flowers - and above all, enjoy it! I'll be back tomorrow with another project. Until then, happy stampin'!


Stampin' Up! Supplies Used:

Table built using Product Table Builder by The Crafty Owl - Independent Stampin' Up! Demonstrator.

Sale-A-Bration Lovely Lily Pad Shaker Card

by Joanne James5. January 2020 20:00

Today I'm sharing a second card (get me!) that uses the current sketch over at Inspire.Create and I'm squeezing in a link up:


I'm not that organised; I intended to blog this yesterday, but clearing away the Christmas decorations and a pre-season hockey get-together in the evening meant I ran out of time :-) Anyway, I digress! I used a trio of fun Sale-A-Bration items to create a Monet-inspired waterlily shaker card - take a look:


Here's the low-down on today's card:

Lily Impressions - With so many lovely free products to choose from, Sale-A-Bration is always a special time and today my card features three of the items you can obtain FREE with a £45 Stampin' Up! purchase. Whilst the sketch was the starting point for my card, the design is inspired by the lovely Lily Impressions Designer Series Paper. The impressionistic images and rich colours of these papers make elegant, bold backgrounds and I chose one of the waterlily patterns for my cardfront. I love the loose Monet-like brushstroke effect and if you look closely you can see the paper has the appearance of canvas, just like an oil painting. 

Lovely Lily - I didn't do a huge amount of stamping on this card. Aside from the sentiment (from the 'Botanical Bliss' stamp set) I stamped the large outlined waterlily in Melon Mambo on the inside on my shaker. I added a little one to my envelope and inside too, this time using both sides of the stamp to both outline and colour - yes, this set is reversible so will do both simply by reversing the stamp. 

Lilypad Dies - The third lily item in the Sale-A-Bration is the Lilypad Dies. A collection of outline and more detailed dies of both waterlily blooms, leaves and lilypads, along with an interesting diecut/border piece too. The dies are free with a £90 purchase, whereas the stamps and papers can be yours with two £45 purchases respectively. I used the largest outline to create the window for my shaker element and added some retired Melon Mambo sequins for the interactive element for a little co-ordinated sparkle.

Here is the visual summary of the key products used on today's project for you to pin for easy reference:


You can see all of my 'How To' summaries on my 'How To - Tips and Techniques' Pinterest board in case you've missed any. 

Enjoy your day and I'll be back tomorrow with another project. Until then, happy stampin'!


Stampin' Up! Supplies Used:

Table built using Product Table Builder by The Crafty Owl - Independent Stampin' Up! Demonstrator.

How Sweet It Is Sweetie Shaker Card #GDP179

by Joanne James8. March 2019 11:30

Good morning lovely readers! An apology is in order for the lack of blog posts this week. I have been fairly tired following another successful Creative Escapes Weekend Craft Retreat last weekend and whilst I've spent my days catching up on household chores and preparing for next week's card classes, when it comes to the evenings I've been good for nothing; I've fallen asleep in the chair for three nights in a row way before bedtime, much to the amusement of the James Juniors! So today I thought I would make time to blog early so that you didn't miss out!

I'm sharing a card for a couple of challenges this week: The team over at Global Design Project are all about the candy and the folks at Stamps Ink Paper are asking for cards featuring gingham, plaid or stripes:


Not only does my card feature lots of sweet treats and some fetching candy pink stripes, it's a shaker too - take a look:


 Here's the low-down on today's card:

How Sweet It Is -  If you have a sweet tooth, the 'How Sweet It Is' Suite is for you! Bright and fun, with bold patterns of sweets and traditional sweet jars, it's great for cards and packaging alike. The papers, which feature bold stripes and spots in addition to candy-inspired patterns, really are good enough to eat. I used a pink stripe for the front of my shaker and a sweetie print for the inside at the back of my window, I also used the Jar of Sweets Framelits to cut out one of the sweet jars directly from the designer series paper to decorate the front of my card - I love it when dies and paper co-ordinate like this!

Jar Of Sweets - I used another of the Jar of Sweets Framelits to cut out the aperture for the window of my shaker, stamping the same image onto Whisper White and fussy cutting the jar lid to adhere to the top of my window section. I filled my shaker with a selection of sequins and some diecut sweets in bright, co-ordinating colours; you can see from the extras that I added to the front of my card these dies emboss a pattern onto the diecut sweet shape too which adds an interesting textural detail. There's very little stamping on today's card, save the sentiment and jar lid. A little extra stamping on the inside of my card courtesy of the 'Sweetest Thing' stamp set too:


Sweeter Than Candy - The 'How Suite It Is' Suite also includes some fun treat cups, that are perfect for dressing up to contain some sweet treats for your loved ones. I managed to snag these shots with my phone of some of the decorated sweet cups that filled with a selection of jelly beans and gummy bear for the lucky ladies on my retreat as one of their little gifts - I do love to spoil the whilst they are with me! 


I covered the cups with designer series paper and stamped a simple label for each of them decorated with a sweet jar cut from the DSP, and tied the tags to the cups with some of the very yummy Coastal Cabana/Granny Apple Green 3/8" reversible ribbon:


So cute and easy to decorate and I know from the feedback that my ladies loved them!

Here is the visual summary of the key products used on today's project for you to pin for easy reference:


You can see all of my 'How To' summaries on my 'How To - Tips and Techniques' Pinterest board in case you've missed any. 

Enjoy your day and I'll be back tomorrow with another project. Until then, happy stampin'!


Stampin' Up! Supplies Used:

Table built using Product Table Builder by The Crafty Owl - Independent Stampin' Up! Demonstrator.

Autumn Patterned Pumpkin Shaker Thank You Card

by Joanne James24. September 2018 12:00

Firstly apologies to anyone who had difficulty accessing my Paper Players post early yesterday; there was a scheduling blip on my part which I hadn't appreciated until later in the evening, so apologies for that. Here's the link to yesterday's post if you missed it - it's a bumper project post too, so definitely worth a look! Back to today - I'm sharing a card for the current challenge over at CAS-ual Fridays that features sequins and I'm using the colours over at CAS Colours and Sketches:


I decided to with a simple fall-inspired shaker card - take a look:


Here's the low-down on today's card:

Seasonal Patterned Pumpkin Shaker - I have lots of spare sequins in my stash and just happened to have some in Pumpkin Pie, so decided to combine them with a few copper ones to create a simple shaker using the retired Patterned Pumpkin thinlits. I love the pop of bright green that the Granny Apple Green adds to the leaves and tendrils too! 

A Masked Sentiment - I wanted a simple sentiment in keeping with the theme of thankfulness (I could have gone with Halloween I guess, but I know this card will be more useful and these colours reminded me much more of autumn/fall) so inked one of the stamps in the 'Labels To Love' set with my Fresh Fig marker, omitting the branches above and below it. This is the only stamping on the front of my card, although I did use my markers to selectively colour a pumpkin from the 'Seasonal Chums' set to decorate the inside of my card too:


So Subtle Texture - The last feature of today's card is the subtle embossed texture that I added to my card base and orange banner piece, courtesy of the new Subtle 3D Dynamic Textured Impressions Embossing Folder. I finally caved and bought this embossing folder as I've seen so many wonderful cards that feature it, many from my lovely Paper Players teamie LeAnne over at WeeInklings (thank for being my enabler LeAnne - I think!) I must say, I'm not at all disappointed; whilst a little difficult to see on the dark colours of today's card, it adds a wonderful subtle texture that 

Here is the visual summary of the key products used on today's project for you to pin for easy reference:


You can see all of my 'How To' summaries on my 'How To - Tips and Techniques' Pinterest board in case you've missed any. 

Enjoy your day and I'll be back tomorrow with another project. Until then, happy stampin'!


Stampin' Up! Supplies Used:

Table built using Product Table Builder by The Crafty Owl - Independent Stampin' Up! Demonstrator.

Happy New Year 2018 Celebrate You Shaker Card #GDP119

by Joanne James2. January 2018 21:00

Hello lovely readers - and a happy new year to you all! Today I'm sharing a card that I made for some friends with whom welcomed in the new year - I was still enjoying the 'morning after the night before' yesterday so from a blog perspective today heralds the beginning of the end of my festive blog break! I'm also linking up with a couple of challenges - the current challenge over at Global Design Project where the theme is all about celebrating at home and the lovely ladies over at As You See It who are all about the sparkle for their first challenge of the year:


My card was inspired by my 2017 new year card, minus the owl of course (you can see that card in a previous post here) and has a little 'something old ... and lots new' about it - take a look:


Here's the low-down on today's card:

A Window Into 2018 - I used my much-loved Large Numbers Framelits to create fun shaker-card windows in the front of my card. This is so easy to do; you just need to remember to keep the middle of the 0 and 8 to complete the negative image. If you place the numbers that you've cut out over the window sheet without sticking them down, they will allow you to position the negative pieces in just the right position when you remove the numbers again. 

All That Glitters - My decision to create a shaker card was largely because I was looking for an opportunity to use these amazing gold glitter flakes from the new Spring-Summer catalogue that launches tomorrow. Check out the close-up below - aren't they gorgeous? So sparkly! 

Celebrate ... Amazing You - The main front panel of my card features a stamp from a new Sale-A-Bration set, Amazing You (stamped in Versamark and heat embossed in gold and silver) and the word 'celebrate' cut from silver glimmer paper using another of this year's Sale-A-Bration free items - a set of thinlits dies called 'Celebrate You' that co-ordinate with the stamp set and are available free with a £90 purchase. More news on Sale-A-Bration tomorrow, but I hope these sneak-peeks have got you all excited about the fabulous things that are to come!

Here is the visual summary of the key products used on today's project for you to pin for easy reference:


You can see all of my 'How To' summaries on my 'How To - Tips and Techniques' Pinterest board in case you've missed any. 

I'll be back tomorrow with all of the news and information on the 2018 Sale-A-Bration promotion and the launch of the new Spring-Summer seasonal catalogue. Until then, happy stampin'!


Stampin' Up! Supplies Used:

Table built using Product Table Builder by The Crafty Owl - Independent Stampin' Up! Demonstrator.

Card Front Builder Christmas Shaker Card PP361

by Joanne James10. September 2017 09:00

It's Sunday and time for this week's new challenge over at The Paper Players! It's the turn of my fellow Brit turned Yankee teamie, the lovely Jaydee, to host this week and she has a fun colour challenge for us to work with:


Before I get into my post today, you will notice that our esteemed team leader, the fabulous Nance Leedy, is off this week; she is currently battling with the effects of Hurricane Irma; we love you Nance and our thoughts and prayers are with you that you and your family are safe! The same goes for anyone else reading this who is impacted either directly or indirectly by the devastating effects of the hurricanes moving through the Caribbean and USA currently.

Back to my card. Whilst these colours made me think 'floral', I struggled to incorporate the silver into my floral design so decided instead to create an unconventionally-coloured Christmas card with my Card Front Builder Thinlits Dies - take a look:


Here's the low-down on today's card:

Card Front Builder Dies - With the exception of a one-word stamped sentiment, today's card focuses on the Card Front Thinlit Builder Dies. I used a trio of trees to edge my shaker window and the teeny tiny deer to create a simple wintry scene.

Softly Falling Snow - Today I've used another embossing folder - my all-time favourite, the Softly Falling Textured Impressions Embossing folder. It provides great texture for my top card layer and my winter scene.

Shake, Shake, Shake - I continued my softly falling snow by creating a shaker card window as a focal point for my winter scene and filled it with white mica flakes. These were in last year's seasonal catalogue however you can currently snap them up on the clearance rack; they make a great alternative to sequins for a softer look and feel.

Here is the visual summary of the key products used on today's project for you to pin for easy reference:


You can see all of my Product and 'How To' summaries on my 'How To - Tips and Techniques' Pinterest board in case you've missed any. 

These may be unusual colours for a Christmas card, but I think they work. What do you think? Are there any unusual colour combinations you like to try on your Christmas cards? Do leave me a comment below - I'd love to hear your thoughts. 

Before you reach for your ink and papers, check out what our amazing team has created to inspire you this week:

The Paper Players Design Team
 
 
Here's a quick recap of our challenge rules:
 
1.  Create a new paper project
2.  Upload your creation to your blog with a link back to us and provide a direct link to the post featuring your challenge submission.
3.  Please link your card to no more than four challenges, TOTAL.
4.  Have FUN! 


I look forward to seeing what you create with this week's colour palette. Enjoy the rest of your weekend as it will be over all too quickly; I'll be back tomorrow with another project; until then, happy stampin'!


Stampin' Up! Supplies Used: 

Table built using Product Table Builder by The Crafty Owl - Independent Stampin' Up! Demonstrator.

Balloon Adventures Shaker Birthday Card

by Joanne James11. May 2017 13:27

Apologies for my couple of blog-free days: I have had a combination of classes, preparation for a big team event at the weekend and new catalogue preparations that have simply left no time to share with you! Back to it today though with a card for this week's challenges over at As You See It and TGIF Challenge:


I took the AYSI sketch quite literally today and for my 'three of something' went with balloons and the retiring Balloon Pop-Up Thinlits Die to create a shaker, rather than a pop-up card, on this occasion using the bright colours of the TGIF palette this week:


Here's the low-down on today's card:

Balloon Adventures - Today's card is all about balloons of the party kind. The Balloon Pop-up thinlits make a great pop-up for the inside of a card, yet also work as a flat panel which, when backed with a piece of window sheet, can be transformed into a fun party shaker card. I stamped the balloons with the co-ordinating Balloon Adventures stamp set in each of the challenge colours then overlaid the corresponding diecuts. I also brushed the stamped area with my clear Wink of Stella for extra sparkle. The Balloon Adventures bundle has been very popular and I'm sad it's retiring; if you haven't got yours yet, get in quick before it's gone for good!

Shake, Shake, Shake - I filled my shaker with a combination of Emerald Envy mica flakes leftover from my Christmas projects (still available on the clearance rack), some gold sequins and a few retired in-colour sequins in Strawberry Slush for a hint of pink. 

Spots and Stripes - I decided to use some in-colour Emerald Envy designer series paper for my background striped panel, to tie in with the spots and stripes theme of my balloons. I find it easier to major in on two colours to maintain a co-ordinated look with such bold colours, as I've done here with the pink and green, with the Crushed Curry sparingly on a single balloon and to decorate my envelope and the inside of my card for a pop of sunny yellow.

Here is the visual summary of the key products used on today's project for you to pin for easy reference:


You can see all of my 'How To' summaries on my 'How To - Tips and Techniques' Pinterest board in case you've missed any. 

Enjoy the rest of your day and I'll be back tomorrow with another project. Until then, happy stampin'!


Stampin' Up! Supplies Used:

Table built using Product Table Builder by The Crafty Owl - Independent Stampin' Up! Demonstrator.

Detailed Santa Thinlits Shaker Card

by Joanne James30. October 2016 09:00

It's Sunday and time for a new challenge over at The Paper Players! It's the turn of the lovely LeAnne to host this week and she has a fun tic tac toe challenge for you to work with:


Normally I find these such a challenge (I know, I know - that's the whole point!) but today I knew exactly where I was going on the grid: straight down the left with Red, Santa and Diecut. I ended up making a couple of cards (if you check out the card on yesterday's post here you will see it also fits this column) but today's card is definitely one of my most favourite  - take a look:


Here's the low-down on today's card:

Detailed Santa Thinlits Die - Today I've used the whole of the diecut Santa image to create the front for my shaker card. I cut it in extra thick Whisper White and added a piece of window sheet behind, so that you could see both my white heat embossed 'ho ho ho' sentiment and the contents of my shaker. I left a wider border at the bottom in order to accommodate my embellishments and Real Red stamped sentiment - a line from my most favourite festive poem, 'Twas The Night Before Christmas', by Clement C. Moore. I recited this poem at Christmas concerts as a child on a number of occasions and I still know all the words -  I now read it to my own children each Christmas, it has become a James family tradition.

Snowy White - I used the white Mica Flakes on page 41 of the seasonal catalogue for my shaker card contents today. These are one of those products that could be easily overlooked  yet I love these soft flakes - perfect for snow, beards and great for shaker cards! I rubbed my Embossing Buddy over the inside of the window to reduce static so that they would shake freely and the whole thing is held in place using foam adhesive strips - they really do make shaker cards so easy. Check out the detail here of the mica flakes and the diecut:


Jingle All The Way - To finish my card today, I added some red and white Candy Cane Lane baker's twine and a couple of mini jingle bells, perfect for my red and white colour scheme today.

Here is the visual summary of the key products used on today's project for you to pin for easy reference:


You can see all of my 'How To' summaries on my 'How To - Tips and Techniques' Pinterest board in case you've missed any. 

I can't tell you how much I love this card, I might even have to send it to myself - shakers are such fun! 

Before you reach for your ink and papers, check out what our amazing team has created to inspire you this week:

The Paper Players Design Team
 
 
Here's a quick recap of our challenge rules:
 
1.  Create a new paper project
2.  Upload your creation to your blog with a link back to us and provide a direct link to the post featuring your challenge submission.
3.  Please link your card to no more than four challenges, TOTAL.
4.  Have FUN! 


I look forward to seeing what you create with this week's tic tac toe board. We have a week off from hockey so it's only basketball that's calling today, then I have a few errands to run but hopefully a restful afternoon in store before Rebecca returns to school tomorrow. Ben has another week off, much to Rebecca's dismay! Well, I guess you can't have everything! 

One last reminder: the 'Buy 3, Get 1 Free' offer on designer paper ends tomorrow. You can read the full details here if you need to refresh your memory about what's included. 

B3G1DSP_DemoHeader_UKSP

Enjoy the rest of your weekend as it will be over all too quickly; I'll be back tomorrow with another project; until then, happy stampin'!


Stampin' Up! Supplies Used:

Table built using Product Table Builder by The Crafty Owl - Independent Stampin' Up! Demonstrator.

Pop Of Pink Jar of Love Shaker Card

by Joanne James18. July 2016 07:00

Today I'm sharing the first of the cards from my second of this month's technique class featuring the very on-trend Jar of Love stamp set and co-ordinating Everyday Jars Framelits Dies. Each of the ladies received the bundle and as always I was on a mission to use as wide a variety as possible of the stamps in this set to showcase its versatility.

This was the easiest cards of the three - a fun 'pop of pink' shaker card:


Here's the low-down on today's card:

Pop of Pink - The colour scheme for my fun shaker is inspired by the Pop of Pink Suite of Products; I used some of the Pop of Pink washi tape to embellish with a little gold ribbon - here's the colours if you'd like to save them for inspiration too:


A Sweet Sentiment - This card uses one of the many sweet sentiments from the 'Jar of Love' stamp set and is perfect for the loveheart theme of my card. I added a Brights enamel heart too for added shine.

Confetti Fun - My confetti is a mix of Melon Mambo hearts, cut out with the little framelit in the Everyday Jars set, and the hearts in the metallic sequins assortment; I usually pick these out when I do other projects, so I had quite the collection for my shaker! 

Here is the visual summary of the key products used on today's project for you to pin for easy reference:


You can see all of my 'How To' summaries on my 'How To - Tips and Techniques' Pinterest board in case you've missed any. 

The Jar of Love and Everyday Jars Framelits bundle is another of those that has just has so many creative possibilities! If you haven't bought yours yet, this month would be the perfect time to do so; if you purchase the bundle at £48.50 you will earn yourself a £4.50 money-off coupon any purchases next month too - bargain! Just click on the links below to hop on over to my online store to order yours today - and don't forget to add this month's hostess code 63RNATE3 to get a little thank you in the post from me too.

I'll be back tomorrow with the second of the cards from my Jar of Love class; come back then, you won't want to miss it! Until then, happy stampin'!


Stampin' Up! Supplies Used:

Table built using Product Table Builder by The Crafty Owl - Independent Stampin' Up! Demonstrator.

Mini Catalogue

BROWSE THE CATALOGUE

The mini catalogue is now live! Read and download your copy here.

Shop Online

Access my online shop 24 x 7, 365 days of the year:

Current March hostess code:

S9F2XJJW

Shop Online

Join My Team

It's always a great time to join Stampin’ Up! New team members can get £130 worth of products for only £99 + free business supplies + free shipping + all the fun being a part of Stampin’ Up! Stampin' Up! has something for everyone: join my growing team and benefit from my support to enjoy Stampin' Up! however you choose.

If you're interested, call me for a chat to understand how I can help you realise your goals. Alternatively, if you have already decided to sign up and you just can't wait, please click here for the link to the online form where you can sign up and order your starter kit right away! 

Latest Kit!

Stampin Cut and Emboss

The Rock Legend Kit has all you need to make 8 cards with coordinating envelopes. Along with the new Panda Friends Kit, both are available from January 4th for just £14 each - get yours here!

2023-24 Annual Catalogue

BROWSE THE CATALOGUE

Click on the catalogue for a full list of current SU! supplies - if you would like to order any of the items featured, please drop me a line at [email protected] or give me a call on 07773 421446 - I'd be happy to help.

New Online Exclusives

There will be new products available exclusively in the online store from 5 March - check them out here.

About Me

Hi I'm Joanne and live in Northampton and when I'm not looking after my husband and two beautiful children, am an avid crafter with a passion for all things Stampin' Up!

I must confess that I have never been a big rubber stamper - until I discovered Stampin' Up! that is. I love the fact that I can get such great results with co-ordinating stamps, inks, papers and punches - the possibilities are endless! Join me on my stamping journey as I share the things I love and be inspired to create amazing things yourself!

Follow Me

Monthly Newsletter

Box Builder

Click the button above to use Box Buster to create your custom box design using the Envelope Punch Board!

Kits Collection Now Available!

Stampin Cut and Emboss

The new Kits Collection from Stampin' Up! is now available!

Click here to see the current kits available and order yours online today.

I Design For


Stampin' Up Stuff

This is my personal blog and is not endorsed by Stampin’ Up! I hope you find it a plentiful source of ideas and personal inspiration but please don't copy my designs for contest submission or use for classes, publication or sale without express permission.