Happy First Birthday Colour Me...! and 2015 Sale-A-Bration Sneak Peeks!

by Joanne James31. December 2014 10:00

Today it's a special day: the Colour Me...! challenge is celebrating its first birthday and so the co-creators, the lovely Hayley and Tara, are hosting a party to celebrate! As one of the outgoing designers, I was invited to choose any previous challenge colour combination and create a card for this week's showcase. I decided to go with the creative choice from week 5, which enabled me to use some of the gorgeous new 'Best Year Ever' DSP from the 2015 Sale-A-Bration offering; I also used this week's sketch layout over at Create With Connie and Mary, as this layout was perfect for what I had in mind: 


As much as I've enjoyed making Christmas cards these past few months, I am so ready for a change! The colours of the promotional designer series paper and co-ordinating embellishment packs are like a breath of spring air - take a look:

I based the colour scheme for my card on the feature colours of the Best Day Ever papers - Calypso Coral, Coastal Cabana, Crushed Curry, Soft Suede and Sahara Sand, with white as my neutral - isn't it a gorgeous colour combination for Spring? I used two pieces of the same paper for my card, paired with a couple of blocks of solid colour, as the background for my card, then used another Sale-A-Bration promotional item, the 'Big Day' stamp set to create my focal point. What better than a birthday cake with a single candle for a first birthday?! The sentiment is from the same set. I stamped them both in Soft Suede, before colouring with my Calypso Coral and Coastal Cabana Blendabilities. Did you know that Stampin' Up! Blendabilities work with many of the standard Stampin' Up! coloured ink pads, in addition to Memento Black? Sometimes an alternative colour outline works really well and can give a different effect. I decided to create a little 'badge' to anchor my sentiment, using a punched circle, a number 1 cut with my retired Typeset alphabet Bigz Die (you could use the Perfect Print Bigz Number Die as an alternative) and a punched gold glimmer star. I coloured the envelope to match and I even created a fancy sentiment inside my card:

Both the Best Day Ever DSP and the Big Day stamp set are items that could be yours free with a purchase of £45 or more during Sale-A-Bration; Slae-A-Bration starts early this year on 6th January, so not long to wait now! I made this card to congratulate Hayley and Tara on their first Colour Me...! anniversary, however it would work just as well for a child's first birthday I think in this colour scheme.

That's all from me today; do pop by the Colour Me...! challenge blog and see what other birthday delights are in store. I hope you have a fun New Year's Eve planned - mine will be a quiet one - and I'll be back tomorrow with another project; until then, happy stampin'!


Stampin' Up! Supplies Used:

* Best Day Ever Designer Series Paper and Big Day stamp set available 6th January.

Table built using Product Table Builder by The Crafty Owl - Independent Stampin' Up! Demonstrator.


Good as Gold ... and then some!

by Joanne James18. March 2014 20:24

So, who's loving Sale-A-Bration 2014? All my customers are for sure - it's the best time of the Stampin' Up! year, with a free gift each and every time you spend £45 and so much to choose from. You can click on the 'Sale-A-Bration' icon on the right of my home page for a complete overview of all the gifts on offer, however today I'm going to share with you one of my favourites if you are short on time, but still want cards that are high on impact: the Good As Gold card kit. The kit comes complete with everything you need to make 8 cards with co-ordinating gold-lined envelopes, even pre-stamped sentiments; here's what the finished cards will look like straight out of the kit:

Pretty, right? As is often the way though with Stampin' Up! card kits, the packs are very generous and include lots of bits and pieces, but with a few extra envelopes and card bases, you can make your card kit go even further. Here's an example of a slightly altered version of the basic kit card:

I simply cut the card in half and used it as a piece of DSP, picking out one of the feature colours (in this case Tangerine Tango) and using it for a card base. The pre-stamped tags in the kit come in 3 different languages and you could simply stamp your own additional tags, but since I think everyone is familiar with 'thanks' in both French and German, I figured I would just use the additional pennants in the kit. The stars are those punched out from the gold pennants that come in the pack and the gold banner is cut from an offcut of gold foil and you can even cut down the envelope liners and make two from one, to insert into a standard SU! notecard envelope. I also added some leftover baker's twine from a Tag a Box kit.

I made 10 cards out of my kit, but if you really wanted to stretch your kit, you could easily make 16 cards with a few extra bits and pieces. Here's my full collection of completed cards: 

I'm using my cards as thank yous to pop in with my next customer orders; when I went to make my carrier bag labels too, I decided to create my tags using the same colour scheme: 

If you would like to get your hands on a Good As Gold card kit, you have only 13 more days to place a £45 order to get this or one of the other Sale-A-Bration items free. So what are you waiting for? Follow the links below to place an order in my online store or contact me if you live locally - I'm always on hand to help.

Back tomorrow with another card; until then, happy stampin'!


Stampin' Up! Supplies Used:

Table built using Product Table Builder by The Crafty Owl - Independent Stampin' Up! Demonstrator.


Petal Parade Thank You

by Joanne James6. March 2014 22:41

Firstly, I would like to say thank you to everyone who left comments on my blog and Facebook pages in the last couple of days about my new Box Buster from The Crafty Owl tool - I'm so glad that you are all finding this tool useful. Please feel free to share with anyone and everyone you know who likes box making and has an Envelope Punch Board; it takes all the guesswork out of box making! I have another Box Buster video tutorial for you tomorrow, but meanwhile I want to share my card for this week's challenge over at The Paper Players, where Ann's theme challenge this week is to make a 'Thankful for Spring' thank you card. I decided to combine the challenge with the one over at the Fusion Card Challenge, where I used the colours in the photo and the unusual sketch layout as the inspiration for my card:

I've invested in a few new sets of flower stamps lately, so was a little spoilt for choice, but decided that the lovely Sale-A-Bration Petal Parade stamp set would work perfectly with the sketch layout. Lots of my customers have chosen this item as their free Sale-A-Bration gift so I'm keen to share ideas with them on how to use it. Here's my card:

I chose a base od Summer Starfruit, then added a Whisper White layer that I had stamped with the Petal Parade flowers. I then added a top layer in Pool Party with a circle cut using my Circle Framelits to reveal the flowers beneath. I added my simple 'thanks' sentiment to the white layer beneath the curved edge of the top layer and added the Petal Parade border stamp for definition. To finish, I added some of the Summer Starfruit Sale-A-Bration baker's twine, first punching some little notches out of the Pool Party layer with the point of my mosaic punch to ensure the twine sits flat and evenly across the front of my card.

I hope you like my card; check out the links above to see what the respective design teams have created for these challenges for some great inspiration and ideas. Back tomorrow with another Box Buster video tutorial; until then, happy stampin'!


Stampin' Up! Supplies Used:

Table built using Product Table Builder by The Crafty Owl - Independent Stampin' Up! Demonstrator.


Video Tutorial 2: Make Any Size Box Using Your Envelope Punch Board and Box Buster from The Crafty Owl

by Joanne James5. March 2014 09:52

Good morning blog readers and crafters! Back nice and early this morning with the second of my video tutorial posts showing you how to make any size box using your Envelope Punch Board and my new Box Buster tool. I've started early on my Easter treat boxes, so today's box shows you how to make this cute box:

The finished dimensions of today's box are 100mm x 75mm x 15mm. It was designed to fit a specific Easter treat - but you'll have to watch the video below to find out what it was! My new Box Buster from The Crafty Owl tool is just great for that - you can easily create a box to fit your chosen contents, without any hassle or wasted paper - you just measure the thing you want to put in the box, input the dimensions into the Box Buster tool and it does all the hard work for you: it will tell you exactly what size paper you need and where to make your first and second punch markings.

Today's project was worked out in millimetres, but the Box Buster tool will let you construct your box in either millimetres or inches - you choose! Here's the link to today's video tutorial:


Wasn't that SOOO easy?! Keep following this week as there are more box tutorials to come, showcasing a variety of box types with handy hints and tips for making the most of your Envelope Punch Board and my new Box Buster tool.

Back soon with another project; until then, happy stampin' (and box making!)


Stampin' Up! Supplies Used:

Table built using Product Table Builder by The Crafty Owl - Independent Stampin' Up! Demonstrator.


Hoppy Easter - Paper Craft Crew

by Joanne James4. March 2014 22:24

Good evening lovely readers! I have finished editing my next video tutorial but have bumped it to tomorrow so that I can fit in a quick card that I made for this week's Paper Craft Crew challenge. here is this week's sketch layout:

Here is the card I made using this layout:

I went with a 4" square card for a change and a Crumb Cake base, then took a strip of Whisper White that I lightly sponged in Soft Sky across the top with Wild Wasabi across the bottom, then stamped the bunny minus the sentiment in Chocolate Chip and coloured him with Crumb Cake ink and a blender pen, before adding a candy dot for his tail. I matted this section on a strip of Chocolate Chip and then added a fringe of Wild Wasabi to the front of the card to make it look like the bunny was hiding in the grass. The new fringe scissors are great for creating grass in an instant and add a lovely texture. I then finished by wrapping some Early Espresso baker's twine around my card and tying in a bow. I stamped the sentiment onto an oval of Crumb Cake cardstock and finished with two co-ordinating banners, stamped using the Banner Blast stamp set and punched out with the matching punch. Both of these items are available free with a spend of £45 or more during Sale-A-Bration - contact me or visit my online store if you would like to place a £45 order and receive these gifts for free.

I've had a busy day today so am off to bed for a well-earned rest; back tomorrow with the second in my 'Any Size' box tutorial series. Until then, happy stampin'!


Stampin' Up! Supplies Used:

Table built using Product Table Builder by The Crafty Owl - Independent Stampin' Up! Demonstrator.


Petal Parade Happy Day

by Joanne James17. January 2014 19:30

Good evening blog readers! Today I've been busy putting together my swaps for our team training session on Sunday and watching a couple of netball matches at school this afternoon. The theme for our swaps at training this month is 'Sale-A-Bration' and along with my final swap card, which I'll share with you on Sunday, I've made one or two other cards using some of the items you can earn free with a £45 order during the Sale-A-Bration promotion, which starts on 28th January. Here's another card that I made using one of the flower stamps from the Petal Parade set, that also features one of the papers from the Sweet Sorbet DSP pack:

This time I used my Stampin' Write markers to colour the flowers so that I could give them a two-tone look with different coloured centres, and I anchored them to the card with some of the fabby extra-thick baker's twine that is another of the SAB promotional products.

I created a split front to my patterned paper layer and included the 'happy day' sentiment from the stamp set of the same name.

I'm off now to finish my swaps. Back tomorrow with another card; until then, happy stampin'!


Stampin' Up! Supplies Used:

Table built using Stampin' Up! Product Table Builder from The Crafty Owl.


Flowerfull Heart and Sale-A-Bration Sneak Peek!

by Joanne James5. January 2014 20:39

Today I'm sharing another card using my current 'stamp of the moment', the Flowerfull Heart, but this time on a non-romantic card that could be used for a birthday or just to send someone 'happy post'. I've also got a sneak peek of some new product that will be available at the end of the month as part of this year's Sale-A-Bration promotion. Excited? Well, let's take a look! Here's my card:

Aren't those Spring colours so fresh, after the darker winter colours that we've been using so much of in recent months? The base of my card is Crisp Cantaloupe, one of the feature colours of the Designer Series Paper that I've used, which is one of the products that will be available during Sale-A-Bration this year. I used Sahara Sand for my flag, which I embellished with an In-Colour Boutique Detail and some Calypso Coral baker's twine, but the star of the show is once again the Flowerfull Heart. Sale-A-Bration is always a great time to earn additional products and benefits, and is one of the best times of the year to host a party. I am already taking booking for parties during the Sale-A-Bration period, which runs from 28th January - 31st march 2014, so if you'd like to get in on the action, call me on 07773 421446 or email me [email protected] to arrange a party today.

A busy day for me tomorrow, with the first of this month's classes. Likely to be something of a challenge, as I have been completely without voice for the last 2 days, nothing more than a faint whisper. I'll let you know how it goes - I think I might have to take a whistle!

Back tomorrow with another project; until then, happy stampin'!


Stampin' Up! Supplies Used:

Table built using Stampin' Up! Product Table Builder from The Crafty Owl.


Two Minute Tuesday Easter Card

by Joanne James20. March 2013 22:14

Well, the weather outside has been raining on and off all day - so much for the first day of Spring! I have another Easter card for you today, a 4" square card that literally took only a couple of minutes to make: 

I wanted something plain and simple, but with some bold colour to remind me of brighter days. The images are from the Spring Sampler set in the Spring-Summer catalogue. I love the versatility of this set and have lots more to share with you over the coming days, so stay tuned. The sentiment is a partial stamp from the Wacky Wishes set again - this is the only Easter sentiment I own, so I warn you now you'll definitely be seeing more of this!

I have had a busy couple of days, with a day in London at the Biscuiteers Icing Cafe icing Easter biscuits yesterday and a 'Sounds of Spring' music concert at school this evening - I am willing the weather to get warmer and hoping it will soon oblidge! A class assembly tomorrow based on the musical 'Matilda', which should be fun and another Easter concert next week - don't you just love the end of term?

Also, whilst I remember - there was a video link about the new borders scoring plate missing from my last post; this has now been fixed, so if you'd like to see it, it's there now. One last reminder - Sale-a-bration finishes this Friday, so if you would like to place a £45 order and receive one of the 17 free gifts, or if you would like to sign up as a demonstrator and take advantage of the 25% extra free offer where you receive £162.50 worth of product on your starter kit for £99, you only have 2 days left to do so. Hopefully back tomorrow with some more Easter treats; until then, happy stampin'!


Stampin' Up Supplies:

Stamps: Spring Sampler, Wacky Wishes

Cardstock: Whisper White, Tempting Turqouise, Melon Mambo, Daffodil Delight

Ink: Tempting Turqouise, Melon Mambo, Daffodil Delight

Tools: 1 1/4" circle punch, circle die


Bloomin' Marvelous Thank You Cards

by Joanne James3. March 2013 21:59

I've been out a wedding fair all day today but as I haven't blogged for a few days, thought I'd do a quick post to share with you some thank you cards I made for the lovely ladies who placed orders at the last party I ran. I wanted something simple as I had several to make and decided to use the Sale-A-Bration Bloomin' Marvelous stamp set as many of them had chosen it as their free gift with a £45 order and I wanted to give them a little inspiration. So this is what I came up with:

I love the effect you can get by using a frame within your picture to add focus, and by stamping the third butterfly and punching out it looks like the butterflies are almost flying off the page. A little sparkle adds a finishing touch. I also used the precut notelet and envelope sets to make these (card measures 12.7 x 8.9cm), so I didn't even need to cut and score the basic cardstock - super quick. If you would like this stamp set, Sale-A-Bration is running for another 19 days so drop me a line if you would like to place an order. That's it for today - I'm off to soak my aching feet!

Until next time, happy stampin'!


Stampin' Up Supplies:

Stamps: Bloomin' Marvelous

Cardstock: Pool Party, Whisper White

Ink: Pool Party, Primrose Petals, Raspberry Ripple, Island Indigo

Tools: Bitty Butterfly Punch

Finishing Touches: Dazzling Details, Whisper White Notelets and Envelopes

Elephants Never Forget ... Belated Birthday Wishes

by Joanne James28. February 2013 22:25

So the saying goes that 'Elephants never forget'; if only the same could be said for me! I'm usually pretty good at remembering birthdays, but with such a busy start to this year I must confess to having forgotten not one, but two birthdays! Well actually only one was truly forgotten (apologies Belinda - the card is now in the post!); the other was my good friend Barbara who actually kept her birthday date very much to herself - then wondered why she didn't receive lots of cards and birthday wishes!

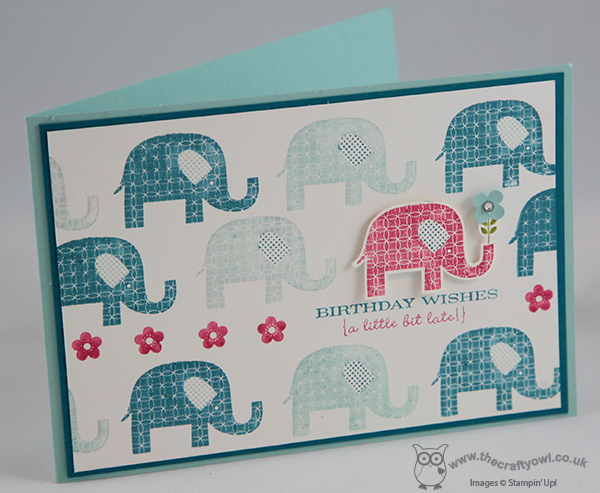
Anyway, this led me to thinking about belated birthday wishes, and I just knew that elephant from the Sale-A-Bration Patterned Occasions set would have to make an appearance. I made two slightly different cards, each using the same colourway of Pool Party, Island Indigo and Rose Red. The first one was a herd of elephants marching, with one raised on dimensionals and carrying a punched flower. On both cards, the stamps were coloured with markers to allow the sentiment and flowers to be omitted.

Whilst I liked this card when finished, it felt a little busy. So, take two still on the elephant theme but something much simpler:

This card is much more me and I love the finish of the ruched Raspberry Ripple ribbon that adds a touch of luxury. So which one do you prefer? Leave me a comment below and let me know.

Let's hope these are the last belated wishes I send this year (although somehow I doubt it!). On the up side, at least I kept to my resolution to send only handmade cards this year.

Until next time, happy stampin'!


Stampin' Up! Supplies:

Cardstock: Pool Party, Island Indigo, Whisper White

Stamps: Patterned Occasions, Itty Bitty Shapes. Sentiment - Birthday Wishes (hostess - now retired)

Ink: Pool Party, Island Indigo, Rose Red

Finishing Touches: Raspberry Ripple 3/8" Stitched Satin Ribbon, Rhinestone Basic Jewels

Tools: Stamp-a-ma-jig, Itty Bitty Punches


Mini Catalogue

BROWSE THE CATALOGUE

The mini catalogue is now live! Read and download your copy here.

Shop Online

Access my online shop 24 x 7, 365 days of the year:

Current April hostess code:

VDKNV7BH

Shop Online

Join My Team

It's always a great time to join Stampin’ Up! New team members can get £130 worth of products for only £99 + free business supplies + free shipping + all the fun being a part of Stampin’ Up! Stampin' Up! has something for everyone: join my growing team and benefit from my support to enjoy Stampin' Up! however you choose.

If you're interested, call me for a chat to understand how I can help you realise your goals. Alternatively, if you have already decided to sign up and you just can't wait, please click here for the link to the online form where you can sign up and order your starter kit right away! 

Latest Kit!

Stampin Cut and Emboss

The Rock Legend Kit has all you need to make 8 cards with coordinating envelopes. Along with the new Panda Friends Kit, both are available from January 4th for just £14 each - get yours here!

2023-24 Annual Catalogue

BROWSE THE CATALOGUE

Click on the catalogue for a full list of current SU! supplies - if you would like to order any of the items featured, please drop me a line at [email protected] or give me a call on 07773 421446 - I'd be happy to help.

New Online Exclusives

There are new products available exclusively in the online store from 5 March - check them out here.

About Me

Hi I'm Joanne and live in Northampton and when I'm not looking after my husband and two beautiful children, am an avid crafter with a passion for all things Stampin' Up!

I must confess that I have never been a big rubber stamper - until I discovered Stampin' Up! that is. I love the fact that I can get such great results with co-ordinating stamps, inks, papers and punches - the possibilities are endless! Join me on my stamping journey as I share the things I love and be inspired to create amazing things yourself!

Follow Me

Monthly Newsletter

Box Builder

Click the button above to use Box Buster to create your custom box design using the Envelope Punch Board!

Kits Collection Now Available!

Stampin Cut and Emboss

The new Kits Collection from Stampin' Up! is now available!

Click here to see the current kits available and order yours online today.

I Design For


Stampin' Up Stuff

This is my personal blog and is not endorsed by Stampin’ Up! I hope you find it a plentiful source of ideas and personal inspiration but please don't copy my designs for contest submission or use for classes, publication or sale without express permission.