Make a Cake Quatrefancy Wedding Card

by Joanne James18. June 2014 08:45

Back so soon, I know - here is today's creative post! I'm sharing a card I made using the sketch over at Create with Connie and Mary this week:

I decided to use some of my retiring stamps and papers for my card and started out making a birthday card because the cake reminded me of Rebecca's birthday cake at the weekend, but by the time I had everything laid out on my desk I decided that the card would make a nicer wedding card. Here's my finished card:

I made a 5" square card and matted a piece of Quatrefancy paper onto Midnight Muse and a Pool Party base (I know technically the dots on the paper are Island Indigo, but since the dots are so small the whole thing still works, even though I've not followed the colours exactly for the rest of the card - what a rule-breaker am I??!) I then stamped a three tier cake with butterfly decoration from the 'Make a Cake' stamp set, stamping the base section twice, once in Midnight Muse for the stand and then again in Pool Party. I fussy cut the Pool Party cake out and used it to create the base layer for my cake. I used my oval framelits to cut out my framed oval and finished with a Mr & Mrs banner flag from the 'Banner Greetings' stamp set, a couple of double-stamped and punched butterflies to echo those on top of the cake and a strip of silver glimmer paper for just the right amount of sparkle.

I really like this finished card but despite where my mind started out it looks absolutely nothing like Rebecca's kitkat cake that I made for her birthday this past weekend:

If that's not death by chocolate, then I don't know what is - it did taste delicious though!

Back tomorrow with another project; until then, happy stampin'!


Stampin' Up! Supplies Used:

Table built using Product Table Builder by The Crafty Owl - Independent Stampin' Up! Demonstrator.


Blessed Easter Pink Tulips

by Joanne James5. April 2014 20:27

Another tulip card for you today - no apologies, I love this stamp! This card was inspired by the flecked pink tulips I received from my James juniors for Mother's Day last week. This card features this stamp used in another different way, this time to create an outlined background panel:

In splitting the tulips away from the sentiment on the original stamp, this makes it really easy to use the tulips for non-Easter cards, as I've done here. I used a Whisper White base, then stamped the tulips in Rose Red on a strip of Pink Pirouette cardstock. I then stamped the tulips again, this time in Black Stazon on watercolour paper and coloured with inks and my Aquapainter and cut out using my oval framelits and mounted on a second oval in Rose Red.

That's all for today; tomorrow's card may well have to be a 'get well soon' card as this afternoon my young son appears to have succumbed to the chicken pox - his THIRD dose in just 6 years!!! I didn't think this was even possible, but his itchy spots tell me otherwise. On the upside, at least it's the Easter holidays, so he should be over it by the time the new term starts :-)

Back tomorrow with another card; until then, happy stampin'!


Stampin' Up! Supplies Used:

Table built using Product Table Builder by The Crafty Owl - Independent Stampin' Up! Demonstrator.


Happy Easter CCMC295

by Joanne James25. March 2014 23:00

Good evening lovely blog readers - a quick post from me today as I've been out and had a full-on day today. I finally found the time to make a card for this week's challenge over at Create with Connie and Mary. They have a great design team with inspiring sketches and designs; this week it's a sketch challenge:

I decided to make an Easter card using the egg stamp from the Eggstra Spectacular stamp and designed a card that is entirely faithful to the sketch layout - here it is:

I made a 5" x 5" square card and using a piece of the lovely Watercolour Wonder DSP as my focal background and layered with some simple card stock strips, picking out the colours in the paper. I finished with an oval featuring the 'Happy Easter' stamp which I inked up with my Stampin' Write Markers in the same 3 colours as my paper strips. I inset this oval inside a larger one in Tangerine Tango as opposed to mounting it onto a base layer, as I wanted the oval to sit flat across the strips underneath. Here's a close up:

Hope you like today's card; back tomorrow with another project. Until then, happy stampin'!


Stampin' Up! Supplies Used:

Table built using Product Table Builder by The Crafty Owl - Independent Stampin' Up! Demonstrator.


Tags: , , , , , , ,

Cards | Stamping

A Card with the Midas Touch? CCMC287

by Joanne James28. January 2014 22:06

After all the news-related posts of the day, I thought I would share a quick creative post of a card I made using some of the new products that feature in the Stampin' Up! Spring-Summer catalogue released today. Today's card is my entry for this week's sketch challenge over at Create With Connie and Mary; last week I was delighted to be chosen as one of the 'Top 3 Picks' for the colour challenge with the card I featured here. This week's challenge is to design a card using the following sketch layout:

Here is my finished card:

So if you were expecting spring pastels, I'm afraid you're already disappointed!! This card is something of a departure for me - I don't often use black as a card base, but I was inspired recently by this card created by Justin Krieger (check out his blog here - I love his style.) and decided that black would provide the perfect backdrop to showcase lots of the new gold products that feature in the new seasonal catalogue.

I stayed quite faithful to the sketch and edged my oval in gold foil and embellished with a layered flower using the Flower Shop and Mixed Bunch stamp sets. I embossed the bottom flower in black on Very Vanilla and the top layer in gold on black to give it a luxurious feel - the photo at the bottom of this post really shows the detail. I finished with a vintage button threaded with the new gold baker's twine and some gold foil leaves punched from my two step bird punch. The background banner is made from one of the gold vellum sheets, another new product; each pack contains 3 designs (it also includes a spot and a heart pattern) and I love them! I finished by adding my floating dots of gold sequins, which I removed from the thread so that I could use them individually. Oh and I almost forgot - the 'Live happy' sentiment is one of those included in the Sale-A-Bration stamp set, 'You're Lovely'.

I hope you like my card; if you would like to see what the designers and other participants did with this sketch, pop over to the CCMC page for more design inspiration.

Back tomorrow with a video tutorial for you and an exciting make using a new stamp set from the Spring-Summer seasonal catalogue. Until then, happy stampin'!

Stampin' Up! Supplies Used:

Table built using Stampin' Up! Product Table Builder from The Crafty Owl.


Believe in Yourself

by Joanne James23. September 2013 19:32

Today's card is one I made for a dear friend of mine to celebrate a recent achievement. It was also my first attempt at rolled paper flowers! Here is the card I made:

I used the lovely new Afternoon Picnic papers as the basis for my colour scheme, as I seem to have lots of the Wisteria Wonder lilac card in my box which I never use (much more of a Brights girl!). I love how it tones in with the Coastal Cabana blue and the ruffle trim and paper flowers make for a very feminine card. This stamp from the 'Feel Goods' stamp set is one of my favourites and is perfect for someone celebrating a milestone or achievement, or even motivating along the way.

The funny thing is, my friend surprised herself with her achievement, yet it didn't surprise me one bit - I knew she could do it. Isn't it funny how sometimes others have more faith in us than we have in ourselves? So whilst she didn't 'believe she could' beforehand, as I wrote inside her card I don't have a stamp that says 'She believed she couldn't ...' - it just wouldn't be right! I made the front oval section of the card detachable though and attached a magnet to the back, so that when she's done looking at the card she can attach the oval section to her fridge door and use the magnet to remind her that she can do great things - sometimes we just need to believe in ourselves.

That's my motivational talk over for today - back tomorrow with some butterflies! until then, happy stampin'!


Stampin' Up Supplies Used:

Afternoon Picnic Designer Series PaperFeel Goods Clear-Mount Stamp SetOvals Collection Framelits DiesCoastal Cabana Classic Stampin' PadCoastal Cabana 3/8 Ruffle Stretch Trim


Bird Punch - by Stampin' Up!Basic Pearls Jewel Accents - by Stampin' Up!

Tags: , , , , , , ,

Cards | Stamping

A Patio Party Cupcake, Starburst Style!

by Joanne James17. September 2013 20:59

Did you know that 16-23rd September is National Cupcake Week here in the UK? Not that I need an excuse for a good cupcake, but this is surely reason enough! With this in mind, I have a cupcake card for you today, but alas of the paper rather than edible kind! Here's my card:

Starburst cards are very popular at the moment, so I thought I would take the opportunity to use up some of my retired Patio Party DSP which has a number of cake-themed papers to echo the punched cake that features in the foreground. This card would work equally well with any of the current papers though, if you wanted to create something similar. As you can see, the sentiment uses a combination of one of the ones in the Create a Cupcake stamp set and another personalisation from my retired 'For My Family' set. This was the card I made from the children for Granny's birthday last week, although I must confess the cakes on the card look somewhat more tasteful than the chocolate-covered rainbow sugar creations the children made the last time they baked with Granny - they definitely wouldn't taste as good though!

Back tomorrow with the first of my projects using some of my new Christmas goodies; until then, happy stampin'!


Stampin' Up! Supplies Used:

Cupcake Punch - by Stampin' Up!Create a Cupcake - Clear-Mount Stamp - Clear-Mount Stamp Set - by Stampin' Up!Ovals Collection Framelits DiesBasic Rhinestones Jewel Accents - by Stampin' Up!


Happy 70th Birthday Ann!

by Joanne James3. September 2013 21:51

Today I'm sharing a birthday card commission that I made for my sister-in-law's very special Mum, who celebrates her 70th birthday today. I decided to use a combination of some of my favourite of this year's in-colours and the lovely Secret Garden framelits. Here's the finished card:

I love the pretty ruffle trim ribbon and added a tiny sliver of silver glimmer paper to add a little sparkle. I must confess to having had a few failed attempts before producing a card that I was really happy with - I needed this card to be 'just right' and am pleased to say I was happy with the finished result. Here's a quick picture of the card I made for Ann to wish her a special 70th birthday: 

Not the best of photographs, I'm afraid - when flat you can see the sentiment through the aperture cut with an oval framelit - but hopefully good enough to give you an idea. This one uses a similar colour scheme and the Flower Shop stamp set - check out the vellum flowers on the front, which I stamped then heat embossed with Iridescent Ice for a lovely sparkle.

One last thing on my original card: did you notice the little butterfly stamped on vellum that highlighted my label? Here's a close-up:


This is one of the butterflies in the Papillion Potpourri stamp set, punched out with the Bitty Butterfly punch - these are the items on offer at 15% off when you buy them together before 30th September - you can read more about this offer here.

Both James Juniors are back at school tomorrow; whilst I'll miss them not being at home, I can't deny that I'm looking forward to getting back into my craft room for a bit more creating - lots to do!

Do come back in the next day or so to see what I've been creating; I'm looking forward to sharing some of my Christmas ideas and September is a month of birthdays for me, so I'll have lots on this front too. Until next time, happy, stampin'!


Stampin' Up Supplies:

Stamps: Secret Garden, Delightful Dozen, Memorable Moments, Papillion Potpourri

Cardstock: Whisper White, Strawberry Slush, vellum

Ink/Stampin' Write Markers:  Strawberry Slush, Crisp Cantaloupe, Pistachio Pudding

Tools: Secret Garden Framelits, Oval Framelits, Bitty Butterfly Punch, Stamp-a-ma-jig

Finishing Touches: Strawberry Slush Stretch Ribbon Trim, Silver Glimmer Paper, Basics Pearls

Christmas Tea Lights

by Joanne James8. August 2013 09:44

Another week, another late post - I'm loving the summer holidays but when school's out it sure is tricky to keep everything else on track! So today I'm posting nice and early, so that I don't run out of time again!

Today I'm sharing another of the makes from my Christmas workshop that I held last weekend: a lovely set of four tea lights in a handmade box. This workshop was less about the stamping and much more about the scoring - if my ladies weren't proficient with their Simply Scored scoreboard beforehand, they sure are now! So here is our finished box:
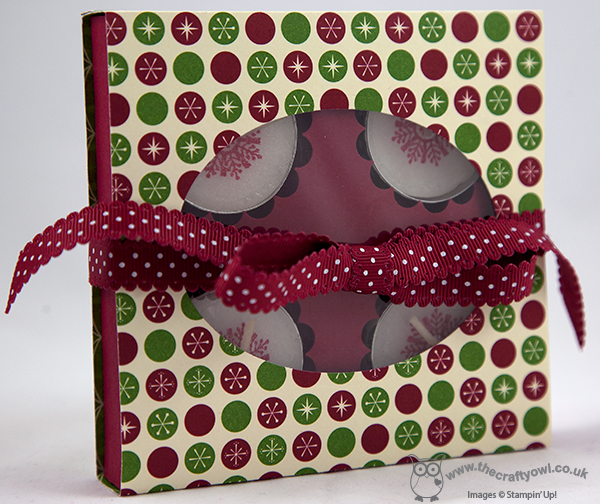
 

We made a box with a sliding sleeve cover, from which we cut out an oval aperture with the Oval Framelits and backed with a window sheet, to allow a glimpse of our lovely hand-stamped candles inside. Here's a picture of the open box, with a peek at our 'dressed up' tea lights:
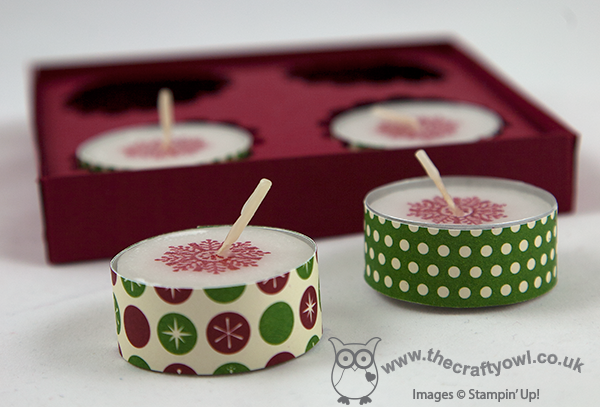
We edged each of them with a strip of DSP; I'll be making more of these when my festive washi tape arrives, as this is perfect for this kind of project. The candle stamping was really easy to achieve and as none of the ladies present had done this before, was a real 'wow' moment for them. I suspect lots of their friends and neighbours will be receiving stamped tea light gift sets for Christmas now that they've learned this clever technique!

I love this spotted star/snowflake paper from the retired 'Be of Good Cheer' paper set; with so many designs to choose from, we all made different ones though - here's one of the other finished sets made by Kathy during the workshop:
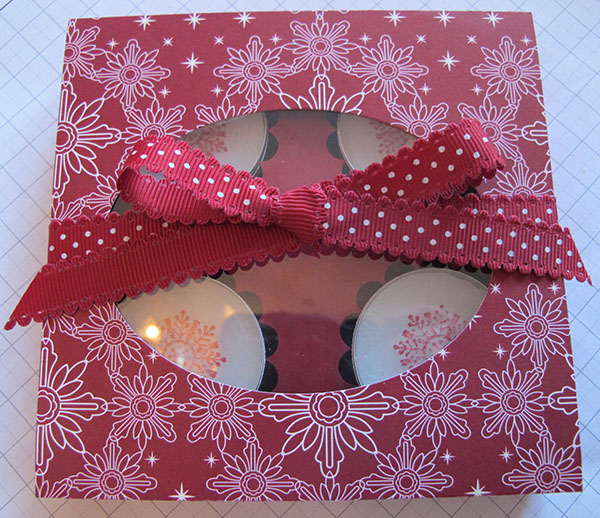
These papers are just so lovely, but don't be too sad that they are now retired; I have had a 'sneak peek' of the new Autumn-Winter seasonal catalogue and can honestly say, you will not be disappointed with this year's offerings!

All being well, I will be back tomorrow with the last of my Christmas workshop projects. I'm off to have a quick spot of making before meeting friends in the park for a picnic - lovely! Until then, happy stampin'!


Stampin' Up Supplies:

Stamps: Four Seasons (hostess - retired)

Cardstock: Cherry Cobbler, Be of Good Cheer Designer Series Paper (retired)

Ink/Stampin' Write Markers: Cherry Cobbler

Tools: Simply Scored, Big Shot, 1 1/4" Circle Punch, 1 3/4" Scallop Circle Punches, Oval Framelits

Finishing Touches: Creped Filter Paper, Window Sheet,  Cherry Cobbler 1/2" Scallop Dots Ribbon (retired)

Oh, Whale Party Invitations and Thank Yous - Take Two

by Joanne James5. August 2013 18:11

Today I am having a brief interlude in sharing the festive makes from my weekend Christmas workshop, to share with you another party invitation and co-ordinating thank you card made with the 'Oh, Whale!' stamp set. As I mentioned in yesterday's post, my youngest celebrated his forthcoming 6th birthday with a swimming pool party held jointly with one of his classmates, whose 6th birthday was last week. Having used the 'Oh, Whale' set for Rebecca's party a couple of months ago (you can see her invites here), it seemed the obvious choice, although a different design was required. Here is what I came up with:

This time 2 whales were the order of the day and they were attached to the inside of the card, visible through an aperture cut with an oval framelit. Here's the view of the inside of the card; the 'Make a Wish' set is great for creating party invitations and makes it really easy:

Luckily for me, the classmate who was celebrating his birthday jointly with Ben was no other than the son of one of my downlines, Barbara, so between us we managed to get a great production line going and knocked out these invitations in super quick time. We also created our co-ordinating thank you postcards, which we pre-printed with a short thank you message (well, have you ever tried to get two six year old boys to write a bunch of thank you cards from scratch during the school summer holidays? We needed to give them a helping hand!). Here's the finished card:

This time I created a mask to enable me to stamp two whales without the need to cut out and layer and I printed the text using MDS.

That's my last set of 'Oh, Whale' party invitations for a while. Back tomorrow with another of the projects we made in our Christmas workshop. Until then, happy stampin'!


Stampin' Up Supplies:

Stamps: Oh Whale, Make a Wish

Cardstock: Whisper White, Marina Mist

Ink/Stampin' Write Markers: Night of Navy, Marina Mist, Basic Grey

Tools: Cloudy Day Textured Embossing Folder, Ovals Framelits, Happy Whale Clearlits, Stamp-a-ma-jig

Finishing Touches: 1/4" Night of Navy Stitched Grosgrain Ribbon, Basics Rhinestones (coloured black with a Sharpie)

Another Best of Flowers Bouquet

by Joanne James25. July 2013 21:05

What can I say? Busy, busy, busy! Now that my little ones are on holiday, I'm struggling to find blog time; usually I'm short on time to make up my creations (well, there's never enough time to put all one's creative ideas into practice!) but having got ahead of myself on the making front, I now can't seem  to get in front of my laptop. Hey ho - I am going to try and schedule a few posts starting tomorrow, so that should make things easier.

Now that I am here, I wanted to share with you the other of my 'Best of Flowers' cards featuring the floral bouquet. This time I went for a more colourful look and took the opportunity to use up some of my Tea For Two designer series paper:

I stamped the bouquet in Early Espresso, then picked up the colour of the rose on the DSP with my marker pen to create the central focus of my bouquet. I made this card notecard size, to fit in one of the crumb cake notelet envelopes. Quite different to the last card using this stamp, but altogether very pretty.

More fun in the sun tomorrow, but all being well will have something new to share with you too, so do pop back to see. Until then, happy stampin'!


Stampin' Up Supplies:

Stamps: Best of Flowers

Cardstock: Crumb Cake, Very Vanilla Tea For Two Designer Series Paper (retired)

Ink/Stampin' Write Markers: Early Espresso, Calypso Coral, So Saffron, Pink Pirouette, Old Olive

Tools: Stamp-a-ma-jig, Designer Frames Embossing Folder, Ovals Framelits

Mini Catalogue

BROWSE THE CATALOGUE

The mini catalogue is now live! Read and download your copy here.

Shop Online

Access my online shop 24 x 7, 365 days of the year:

Current April hostess code:

VDKNV7BH

Shop Online

Join My Team

It's always a great time to join Stampin’ Up! New team members can get £130 worth of products for only £99 + free business supplies + free shipping + all the fun being a part of Stampin’ Up! Stampin' Up! has something for everyone: join my growing team and benefit from my support to enjoy Stampin' Up! however you choose.

If you're interested, call me for a chat to understand how I can help you realise your goals. Alternatively, if you have already decided to sign up and you just can't wait, please click here for the link to the online form where you can sign up and order your starter kit right away! 

Latest Kit!

Stampin Cut and Emboss

The Rock Legend Kit has all you need to make 8 cards with coordinating envelopes. Along with the new Panda Friends Kit, both are available from January 4th for just £14 each - get yours here!

2023-24 Annual Catalogue

BROWSE THE CATALOGUE

Click on the catalogue for a full list of current SU! supplies - if you would like to order any of the items featured, please drop me a line at [email protected] or give me a call on 07773 421446 - I'd be happy to help.

New Online Exclusives

There are new products available exclusively in the online store from 5 March - check them out here.

About Me

Hi I'm Joanne and live in Northampton and when I'm not looking after my husband and two beautiful children, am an avid crafter with a passion for all things Stampin' Up!

I must confess that I have never been a big rubber stamper - until I discovered Stampin' Up! that is. I love the fact that I can get such great results with co-ordinating stamps, inks, papers and punches - the possibilities are endless! Join me on my stamping journey as I share the things I love and be inspired to create amazing things yourself!

Follow Me

Monthly Newsletter

Box Builder

Click the button above to use Box Buster to create your custom box design using the Envelope Punch Board!

Kits Collection Now Available!

Stampin Cut and Emboss

The new Kits Collection from Stampin' Up! is now available!

Click here to see the current kits available and order yours online today.

I Design For


Stampin' Up Stuff

This is my personal blog and is not endorsed by Stampin’ Up! I hope you find it a plentiful source of ideas and personal inspiration but please don't copy my designs for contest submission or use for classes, publication or sale without express permission.