Remember When...?

by Joanne James13. June 2013 22:37

Last night's card class was fun as always but too late for a blog post and today has been another busy day making birthday cards for the young lady of the house and some Father's Day cards, ahead of the big birthday weekend. I'll share these in the next few days, but meanwhile tonight I thought I'd share the last of the Golden Anniversary cards I made recently. This one is quite different to the previous two; instead of leading with a 50th Anniversary sentiment, I used one of the stamps from the retiring Word Play set as the focus:

I've never used this stamp before, as it never seemed right for anything I was designing. I have toyed with using it as a feature stamp on a scrapbook page (a project for another time though!) then as I was thinking about what it would be like to celebrate 50 years of marriage myself (believe me, that is a LONG way off!) and it struck me how appropriate this stamp would be for a milestone anniversary card - 50 years is a lot of memories!

I decided to use white and brushed gold cardstock again and leave the layout quite simple, with Oval and Label Framelits making light work of the layered front. You can see the lovely gold embossing in this photo too - it adds a real shine. I finished the front with a fussy organza double bow then stamped the inside with my congratulatory anniversary message:

So that's all my Golden Anniversary cards for the time being - which one do you prefer? The other big news of the day is that registration for this year's Stampin' Up! European Convention opened today. Better still, this year convention is being held in Manchester in the UK. I've signed up already; if you would like to enjoy two days of stampin' fun from 22nd-23rd November, contact me for a chat about this and the other benefits being a Stampin' Up! demonstrator can offer.

Back tomorrow with another project - until then, happy stampin'!


Stampin' Up Supplies:

Stamps: Word Play, Memorable Moments

Cardstock: Whisper White, Brushed Gold

Ink/Stampin' Write Markers: Versamark

Tools: Ovals Framelits, Labels Framelits, Stamp-a-ma-jig

Finishing Touches:  Gold Embossing Powder, Whisper White 5/8" Organza Ribbon

Elements of Style Birthday Mannequin

by Joanne James7. June 2013 19:51

A change from the masculine theme today, to something much more feminine: a birthday card using my much-loved Dress Up framelits and a couple of soon to be retired products. So here is my card:


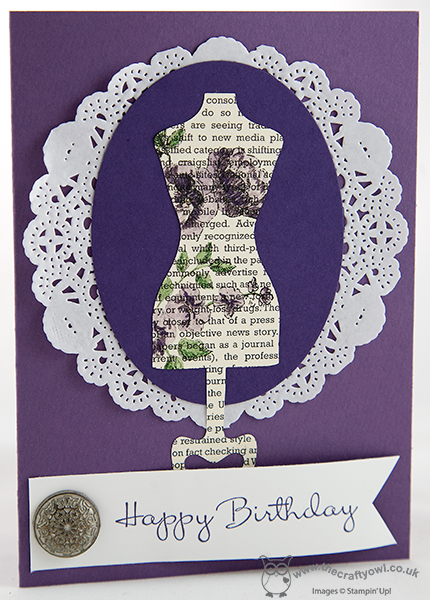
The design of the card was inspired by a card kit that has recently been on sale to Stampin' Up's American customers, but not available here in the UK. So have you worked out the retiring products yet? The mannequin is made from the First Edition Specialty Designer Series Paper, which has been partially overstamped with the floral stamp from the Elements of Style set. This has then been coloured with Stampin' Right Markers in Perfect Plum and Elegant Eggplant. This has been layered with a paper doily beneath the dark background oval to add to the vintage feel - well, this is about as vintage as I get! The card has been finished with a birthday sentiment banner that has been attached with a lovely vintage brad, to add to the overall effect.

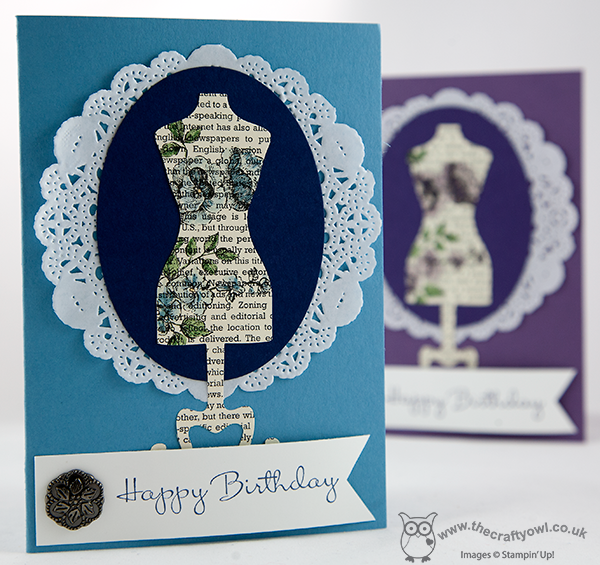
I liked the finished result and made another card using the same design but in a blue colourway using Marina Mist and Night of Navy, which you can see below:

If you would like to own Elements of Style or get your hands on some First Edition paper, then act now as they will only be available until the end of the month (or until stocks last).

Back tomorrow with another project using more retiring goodies; until then, happy stampin'!


Stampin' Up Supplies:

Stamps: Elements of Style, Happiest Birthday Wishes (retired)

Cardstock: Whisper White, Perfect Plum, Elegant Eggplant, Marina Mist, Night of Navy, First Edition Specialty DSP

Ink/Stampin' Write Markers: Basic Black, Perfect Plum, Elegant Eggplant, Marina Mist, Night of Navy, Daffodil Delight, Wild Wasabi

Tools: Dress Up Framelits, Oval Framelits, Blender Pen

Finishing Touches: Paper Doily, Antique Brads

Giraffe Punch Art

by Joanne James24. May 2013 21:19

As promised, I'm back today with the last of the owl punch cards from this month's class. Our last card was another alternative use for this versatile punch; this time, to make a cute giraffe punch art card:


To make this card, the owl's body (minus his feet!) becomes the giraffe's head - clever, right?! We then used a variety of circle punches and the large oval punch to create the rest of him. The edges of the finished giraffe were sponged in So Saffron ink to add dimension and I placed him inside the card looking out, for added interest. The oval aperture was easy to make using an oval framelit and a few branches from the Bird Builder punch were added to give the giraffe something to munch on. I finished this card with embossed clouds and an 'Oh Hello' sentiment highlighted with a Cute Clip (love these!), but you could just as easily use a happy birthday greeting - I think this would make a lovely card for a little person.

I hope you like the finished card - there were a few interesting adaptations to this card by the ladies at my class: everything from hearts added to the sentiment banner to eyelashes on the giraffe. That's one of the things I love about teaching classes - whilst I scope out the original design, it can still be adapted or customised to make it individual to you. If you would like to attend my stamping classes, please do get in touch via [email protected] for more details. Next month's class is a One Sheet Wonder class using the Secret Garden stamp set and framelits. 

Back tomorrow with another project - until then, happy stampin'!


Stampin' Up Supplies:

Stamps: Oh Hello

Cardstock: Whisper White, Marina Mist, Pink Pirouette, So Saffron, Chocolate Chip, Basic Black, Certainly Celery

Ink/Stampin' Write Markers: Early Espresso

Tools: Owl Punch, Cloudy Day Textured Impressions Embossing Folder, 1" Circle Punch, 3/4" Circle Punch, Bird Builder Punch, Oval Framelits, Itty Bitty Shapes Punch (circle), Large Oval Punch

Finishing Touches: Cute Clip


Tiptoe Through the Tulips

by Joanne James18. May 2013 20:19

A busy week this week! I was partying last night - will share the card later this week - with an old and dear friend of mine who was celebrating a milestone birthday, so no blog post, I'm afraid. I've so much ready to share though - so keep checking back for lots of card and crafting inspiration as I should be back to daily posts now. Today I thought I would share a card inspired by a Wendy Weixler card (you can see her original card here) but I changed a few things, including the colourway to reflect the tulips in my garden, which finally bloomed a couple of weeks ago:

Tulips are one of my favourite flowers and there's nothing like a bunch of spring blooms to brighten your day. I love the dimension and depth of this card; the tulips are made using a heart punched with the Small Heart Punch, then the hearts are cut in half down the centre and three halves layered to achieve the petal effect. The leaves were made using the smallest of the oval framelits, just cutting away the edges. Here's a couple of photos of the tulips on my garden, which inspired my choice of pink and purple colours:

 These are really blousy and frilly and open out into huge blooms, whereas the ones below are much more traditional in their shape and style:

I'll leave you with one last picture that shows a close up of the tulip punch art on my card today; back tomorrow with another project, until then happy stampin'!

Stampin' Up Supplies:

Stamps: Itty Bitty Banners

Cardstock: Whisper White, Rich Razzleberry, Melon Mambo, Pink Pirouette, Gumball Green, Polka Dot Parade DSP

Ink/Stampin' Write Markers: Rich Razzleberry

Tools: Small Heart Punch, Ovals Framelits, Windows Framelits, Bitty Banners Framelits, Perfect Polka Dots Embossing Folder

The Aliens Have Landed!

by Joanne James10. May 2013 21:16

Good evening, blog followers! Apologies for the lack of blog post yesterday; things have been very busy in the world of the Crafty Owl this past few days and yesterday just ran away with me. Anyway, back today with a card I wanted to share in advance of next week's card class featuring my favourite punch of all time - the owl punch. This punch really is so versatile; there are many examples of alternative uses for this punch.  Today I'm sharing an alien pop-up card, inspired by the many examples found on Pinterest - this is the outside: 

Recognise the alien in the spaceship? An upside-down owl with one eye, along with some punch art planets and stars. When you open it up, the inside looks like this: 

A trio of aliens pop up to wish you a happy birthday! This kind of card is such fun - you can customise your aliens and make them different every time. perfect for a birthday that's 'out of this world'! The owl punch is the feature punch for this month's card class - if you live in Northampton and the surrounding areas and would be interested in attending one of my classes, do get in touch for more details. Right - I'm done with the alien puns; I'm off to try and schedule tomorrow's blog post as I'll be on a Stampin' Up! regional training day in Telford all day - should be fun! Until tomorrow, happy stampin'!


Stampin' Up Supplies:

Stamps: Happiest Birthday Wishes (retired)

Cardstock: Whisper White, Rich Razzleberry, Tempting Turquoise, Pacific Point, Pumpkin Pie, Basic Black, Concord Crush (retired), Poppy Parade (retired) 

Ink/Stampin' Write Markers: Concord Crush (retired)

Tools: Owl Punch, Large Oval Punch, Small Oval Punch, 1" Circle Punch, 1 1/4" Circle Punch, Oval Framelits, Bitty Banners

My First Dress Up Pop Up Card

by Joanne James28. April 2013 20:14

Any of you who saw my Facebook post yesterday will know I am officially 'IN LOVE' with the Dress Up framelits and Pop 'n' Cuts Base in the Spring-Summer catalogue. I've been resisting purchasing them since the catalogue came out - I don't know why, because it really was love at first sight - but having used them at our last training session and spent a fun few hours with my downline Barbara playing fashion designers, I have finally succumbed. I have seen so many great examples of projects made with this set and I'm excited to share these with you in future blog posts.

Today I am going to share a card I made using all three elements: the pop 'n' cuts card base, the dress form and the framelits. So not much stamping today - Big Shot definitely required! I will share some projects later in the week that show how these can be used separately; when used together, they will make a pop up card with a mannequin to be dressed as you wish. For my first card, I used some of my favourite 'More Amore' DSP along with a Pool Party card base. Here's the outside of the card that you see when the card is folded shut:

Then when you open it, the inside looks like this:

How cute is that??! Dressed mannequin, complete with pearls and pretty cardi, in front of a mirror and dresser. What little - or big - girl wouldn't want to get this in the post for their birthday? Here's one last close-up of the mannequin:

This will, I feel, be the first of many such pop-up cards; come back tomorrow to see another use for this great set. Until then, happy stampin'!


Stampin' Up Supplies:

Stamps: One in a Million

Cardstock: Pool Party, Crumb Cake, Very Vanilla, More Amore DSP

Ink: Pool Party

Tools: Pop 'n' Cuts Base, Pop 'n' Cuts Dress Form, Dress Up Framelits, Ovals Framelits, Big Shot, Stamp-a-ma-jig, Small Heart Punch

Finishing Touches: Basics Pearls

Butterfly Brights

by Joanne James23. April 2013 17:38

Today's card is one I made as a commission for a friend of mine, who wanted a 'thoughtful' sentiment and bright blues, yellows and oranges. I love rising to the challenge of working to a specific brief and actually used it as the basis for a number of very different cards. I'll share the others with you some other time, but here's one of them for today:

The sentiment is from a set called 'Word Play' and is the perfect size for one of my oval framelits, which also made creating a frame for it a breeze. I used a strip of striped brights DSP to tie the frame to the card background, then used the Beautiful Wings butterfly embosslits to make a variety of butterflies and really create a strong focal point. I love these butterflies - well, I love all butterflies, but these have lovely textures and are great for using with plain coloured cardstock. A cheery card that meets the brief - job done!

There are lots of other great sentiments in the Word Play set, so I've included an illustration of the whole set below. They are suitable for so many occasions and work for both for cards and scrapbooking.

A quick post from me today - I have a Parents' Association meeting at school to attend, so am rushing out the door. Back tomorrow with another project - until then, happy stampin'!


Stampin' Up Supplies:

Stamps: Word Play

Cardstock: Tempting Turquoise, Daffodil Delight, Tangerine Tango, Whisper White, Brights DSP

Ink/Stampin' Write Markers: Tempting Turquoise

Tools: Ovals Framelits, Beautiful Wings Embosslits

Finishing Touches: Basics Rhinestones

Tags: , , , , , ,

Cards | Stamping

Mini Catalogue

BROWSE THE CATALOGUE

The mini catalogue is now live! Read and download your copy here.

Shop Online

Access my online shop 24 x 7, 365 days of the year:

Current April hostess code:

VDKNV7BH

Shop Online

Join My Team

It's always a great time to join Stampin’ Up! New team members can get £130 worth of products for only £99 + free business supplies + free shipping + all the fun being a part of Stampin’ Up! Stampin' Up! has something for everyone: join my growing team and benefit from my support to enjoy Stampin' Up! however you choose.

If you're interested, call me for a chat to understand how I can help you realise your goals. Alternatively, if you have already decided to sign up and you just can't wait, please click here for the link to the online form where you can sign up and order your starter kit right away! 

Latest Kit!

Stampin Cut and Emboss

The Rock Legend Kit has all you need to make 8 cards with coordinating envelopes. Along with the new Panda Friends Kit, both are available from January 4th for just £14 each - get yours here!

2023-24 Annual Catalogue

BROWSE THE CATALOGUE

Click on the catalogue for a full list of current SU! supplies - if you would like to order any of the items featured, please drop me a line at [email protected] or give me a call on 07773 421446 - I'd be happy to help.

New Online Exclusives

There are new products available exclusively in the online store from 5 March - check them out here.

About Me

Hi I'm Joanne and live in Northampton and when I'm not looking after my husband and two beautiful children, am an avid crafter with a passion for all things Stampin' Up!

I must confess that I have never been a big rubber stamper - until I discovered Stampin' Up! that is. I love the fact that I can get such great results with co-ordinating stamps, inks, papers and punches - the possibilities are endless! Join me on my stamping journey as I share the things I love and be inspired to create amazing things yourself!

Follow Me

Monthly Newsletter

Box Builder

Click the button above to use Box Buster to create your custom box design using the Envelope Punch Board!

Kits Collection Now Available!

Stampin Cut and Emboss

The new Kits Collection from Stampin' Up! is now available!

Click here to see the current kits available and order yours online today.

I Design For


Stampin' Up Stuff

This is my personal blog and is not endorsed by Stampin’ Up! I hope you find it a plentiful source of ideas and personal inspiration but please don't copy my designs for contest submission or use for classes, publication or sale without express permission.