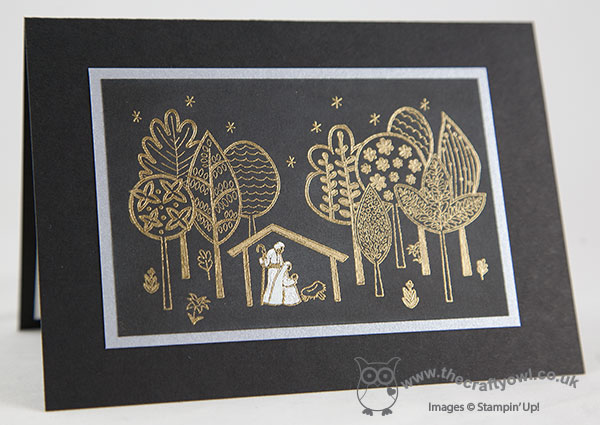
by Joanne James31. August 2014 08:00No blog post yesterday I'm afraid, as I was busy with family activities and just couldn't find the time. Today though it's Sunday and time for my Design Team card for The Paper Players, where this week Nance has a fun tic-tac-toe challenge for us:
I had such fun trying to decide which boxes of the grid to use - in the end I went for the diagonal of 'patterned paper, embossing, buttons' and made my first Christmas card using the 'Cheerful Christmas' stamp set - I took the inspiration for my layout from this week's sketch over at Fab Friday:
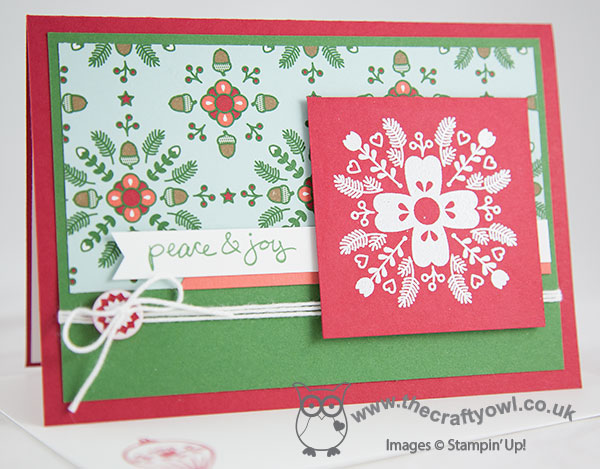
This stamp set appealed to me the moment I saw it - I love the Scandanavian-inspired patterns that look so great in traditional Christmas reds and greens, along with white and kraft. For this card, I matted my Real Red base with Garden Green, then adhered a piece of Nordic Noel Designer Series Paper to the top of the card; this DSP carries on the Nordic theme and lots of the papers in this set co-ordinate with these stamps - I love it! I stamped the main flower stamp in the set in Versamark on Real Red and heat embossed in white, then adhered this to my card using dimensionals. Lastly, I added a flag of Calypso Coral and stamped my sentiment, from the new hostess set 'Good Greetings' in Garden Green, onto a flag of Whisper White and tucked it beneath my flower square. Lastly, I finished by wrapping around some white baker's twine and adhering one of the red and white Nordic Designer Buttons to finish.
I even took the time to decorate the inside of my card and the envelope - I thought I'd make the most of it now, as by the time I get to the last minute rush these little acts of prettiness will be all but out the window! Pop over to the rest of the team to see what they did with this week's challenge - there's a huge variety in there this week and as always some great designs.
In the James household, swimming lessons resume today before the new term starts and then I will be doing the final preparations for my first monthly card class featuring Christmas cards tomorrow - yippee! Hope you enjoy your Sunday, however you are spending it.
Lastly, in case you needed a reminder - today is the last day of the Big Shot offer - see here for details.
Back tomorrow with another project; until then, happy stampin'!
Stampin' Up! Supplies Used:
ccbcb1fc-5623-4ffe-a863-11e868153c45|0|.0|96d5b379-7e1d-4dac-a6ba-1e50db561b04
Tags: Christmas, Cheerful Christmas, Nordic Noel, Embossing, Good Greetings, Seasonal Autumn Winter Catalogue 2014, Shop online, Stampin' Up, Stampin' Up Card, Stampin' Up Card ideas, Stampin' Up Supplies, The Paper Players
Cards | Stamping
by Joanne James27. August 2014 09:00It's Wednesday so time for the challenge over at Colour Me...! where this week we have a playful palette to work with:
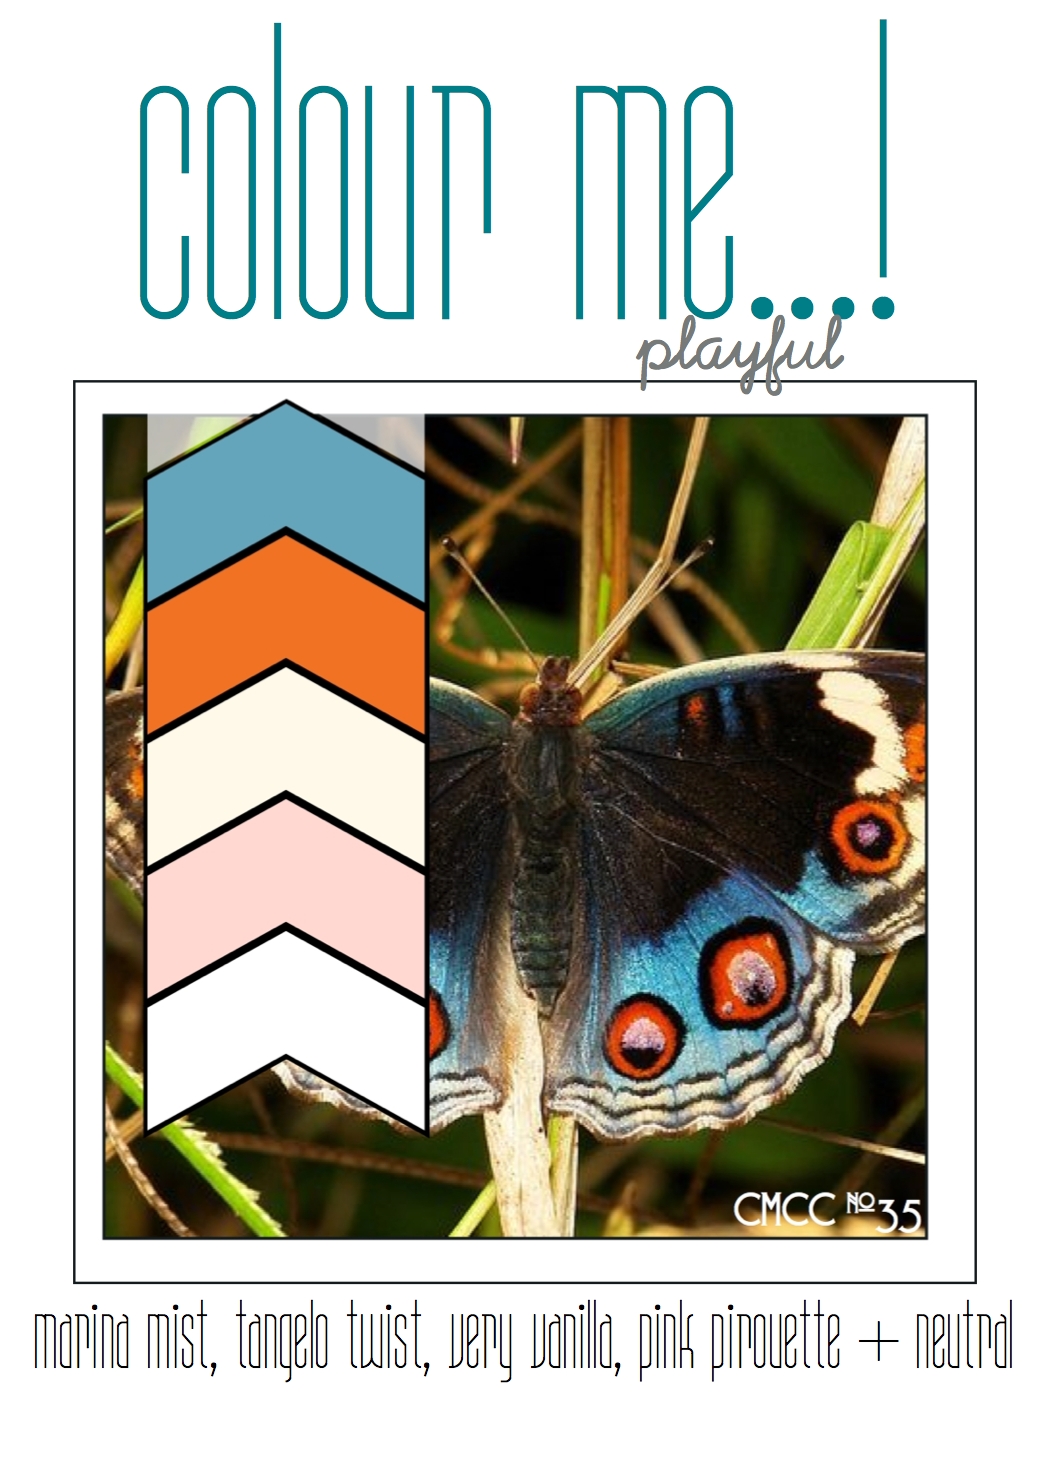
What do you see when you look at these colours? They are quite clashing - pink, vanilla, orange and blue - from different areas of the colour wheel, yet they can work together. I decided to go with an unconventionally coloured Christmas card, using the new nutcracker stamp from the Santa Stache stamp set. Here is my card:
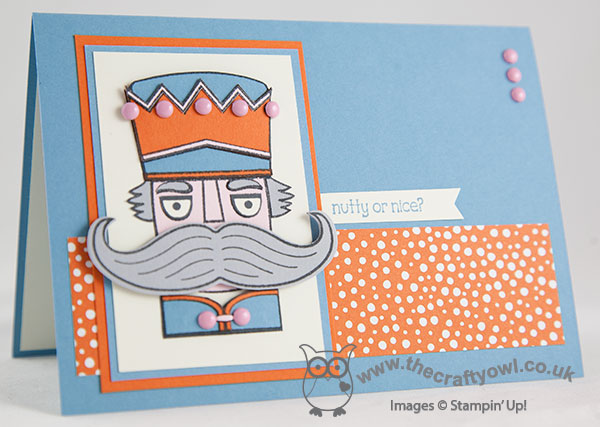
I used Marina Mist for my card base, then layered a strip of spotty Tangerine Tango DSP from the Flowerpot stamp set before creating a paper pieced layered image of the nutcracker. To do this, I stamped the nutcracker 5 times, once each on a piece of Very Vanilla, Marina Mist, Tangerine Tango, Pink Pirouette and Smoky Slate. Using the Very Vanilla piece as my base mat, I then fussy cut the pieces from the remaining images and paper-pieced them together, layering the edges on the hat and jacket for added dimension. I used some now-retired Pink Pirouette mini brads to accent the buttons on the nutcrackers jacket, hat and the edge of my card front for balance - these were lurking in the back of my drawer and were just the right size and shape for the domed effect I was after, but you could use candy dots or maybe small enamel dots in lace of these for a similar effect. Lastly, I cut out the Smoky Slate moustache using the moustache framelit and adhered to my paper pieced image with dimensionals. This vanilla base was matted onto both Marina Mist and Tangerine Tango before adhering to my card base and a little flag with the fun sentiment 'nutty or nice?' added just underneath.
I hope you like my unconventional card this week - only one more day to go until you can order this fun set for yourself. meanwhile, why not visit the other Colour Me...! designers and check out their takes on this week's colour combination:
And our talented guest designer for August -
Stephanie K
We look forward to seeing what interesting ways you choose to use this colour palette in your designs. Back tomorrow with another project; until then, happy stampin'!
Stampin' Up! Supplies Used:
* Santa Stache - Available 28th August
by Joanne James21. August 2014 20:41Yesterday the beach, today Christmas! I follow the Merry Monday Christmas Challenge all year round, but must confess I don't often manage to enter 'out of season', even though I tell myself that this would be a good way to be more prepared with my own Christmas card stash! With lots of new pre-order items to play with though, this week there was no excuse! This week Sue's challenge is to use black, silver and gold on your Christmas card:
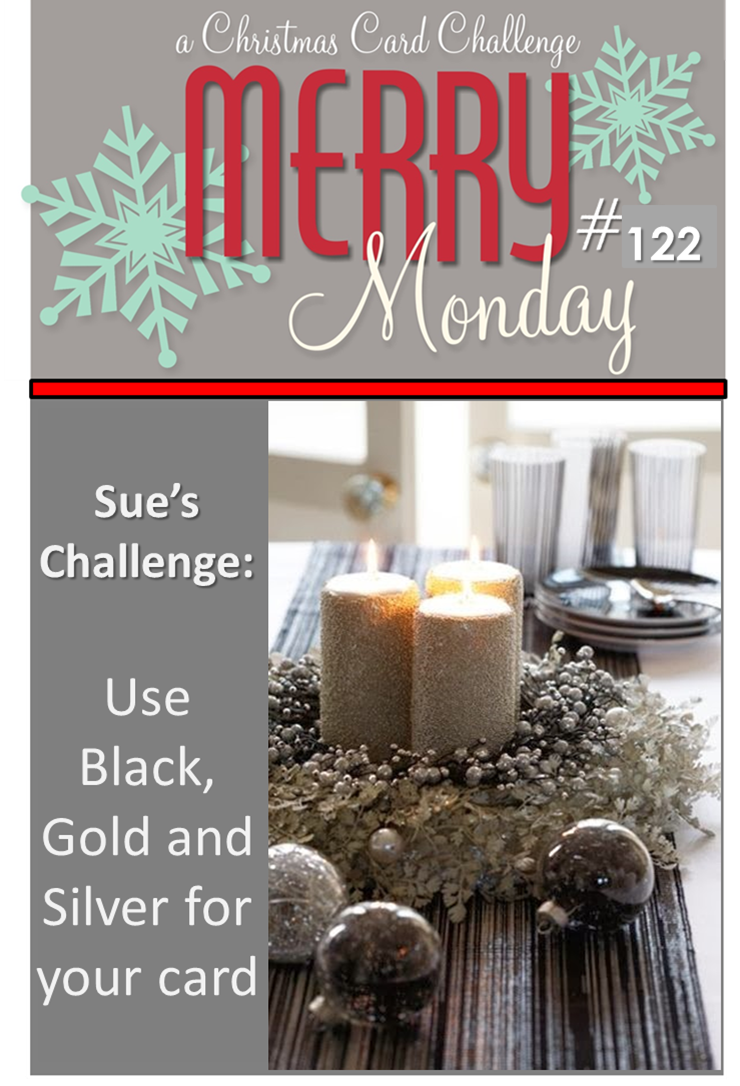
I don't usually use both gold and silver together on a card (I don't know why!), but when I saw this challenge I knew exactly what I wanted to make (I love it when that happens!) Here is my card featuring a new stampset called 'The Newborn King' from the new seasonal autumn-winter catalogue out next week (28th August - not long now!):
I stamped the single image in Versamark onto Basic Black cardstock and then heat embossed with gold embossing powder. I then took my gold Stampin' Dazzle marker and went over a few areas of the image and coloured them in. Slightly more tricky to see on my phototgraph, I then coloured in Joseph and Mary's clothes with the silver Stampin' Dazzle marker and their headdresses using my white gel pen. Lastly, I mounted this piece onto a mat of brushed silver then adhered this to my Basic Black card base.
I would not have thought of using black on a Christmas card in this way had it not been for the challenge and I'm really pleased with how this turned out. Also, it's embellishment-free, so is post-friendly too - bonus! Check out the lovely ladies over at Merry Monday for more festive design inspiration using this colour combination.
That's all from me today - back tomorrow with a one-week only sign-up deal that will knock your socks off; if you've been thinking about joining Stampin' Up!, then make sure you come back tomorrow for the low-down - this is one pre-Christmas deal you're not going to want to miss!
Until then, happy stampin'!
Stampin' Up! Supplies Used:
*The Newborn King - available 28th August
by Joanne James19. August 2014 21:33Today I'm sharing another of the cards we made at our quarterly training session last month, designed by Monica Gale. Yes, it is a Christmas card, but with the exception of the sentiment, uses products that can all be purchased from the Annual Catalogue. Here is the card we made:
Using Mossy Meadow for the card base, we then cut a piece of kraft cardstock, embossed with the dots embossing folder and lightly wiped with white kraft ink to give the impression of snow. We cut a piece of Naturals Ivory cardstock and punched the edge with the scallop punch, then layered a couple of pieces of DSP from the All Abloom DSP stack on top. Real Red cotton ribbon was wrapped around this section and tied in a bow across the join, and a few green stems punched from the bird punch tucked in around the bow before adhering the bird on top, along with a trio of tiny pearls: the bird is from the 'Choose Happiness' stamp set and is stamped in Real Red on naturals Ivory and fussy cut. Lastly, the sentiment was stamped in Real Red onto Naturals Ivory and punched out with the Decorative Label punch, and adhered using dimensionals.
This sentiment is from the set 'Christmas Messages', which is one of the sets that is available on the Autumn/Winter carryover list until August 27th. Full details of all items on the carryover list can be found in the box on the right-hand side of my blog page and they can be purchased either by clicking directly on the links in the product table below or by clicking the 'shop online' icon that will take you directly to my online store, or of course you can email me or give me a call if you prefer and I can take your order over the phone.
That's me done for today; back tomorrow with a new set of Wednesday Weekly Deals and my Design Team card for this week's Colour Me...! challenge. until then, happy stampin'!
Stampin' Up! Supplies Used:
by Joanne James28. July 2014 18:51I know, I know - we re experiencing some of the hottest weather we've had in the UK for ages and I'm making Christmas cards with snowflakes on!!! My new seasonal catalogue arrived with the postman on Saturday (it doesn't go live until the beginning of September, but as a demonstrator we receive them early so that we can pre-order items to plan classes and make samples to share with you (one of the many perks of being a demonstrator) and so for the last couple of days I have well and truly had Christmas on the brain! When I saw this week's sketch over at Freshly Made Sketches I decided festive was the order of the day - here's the sketch:
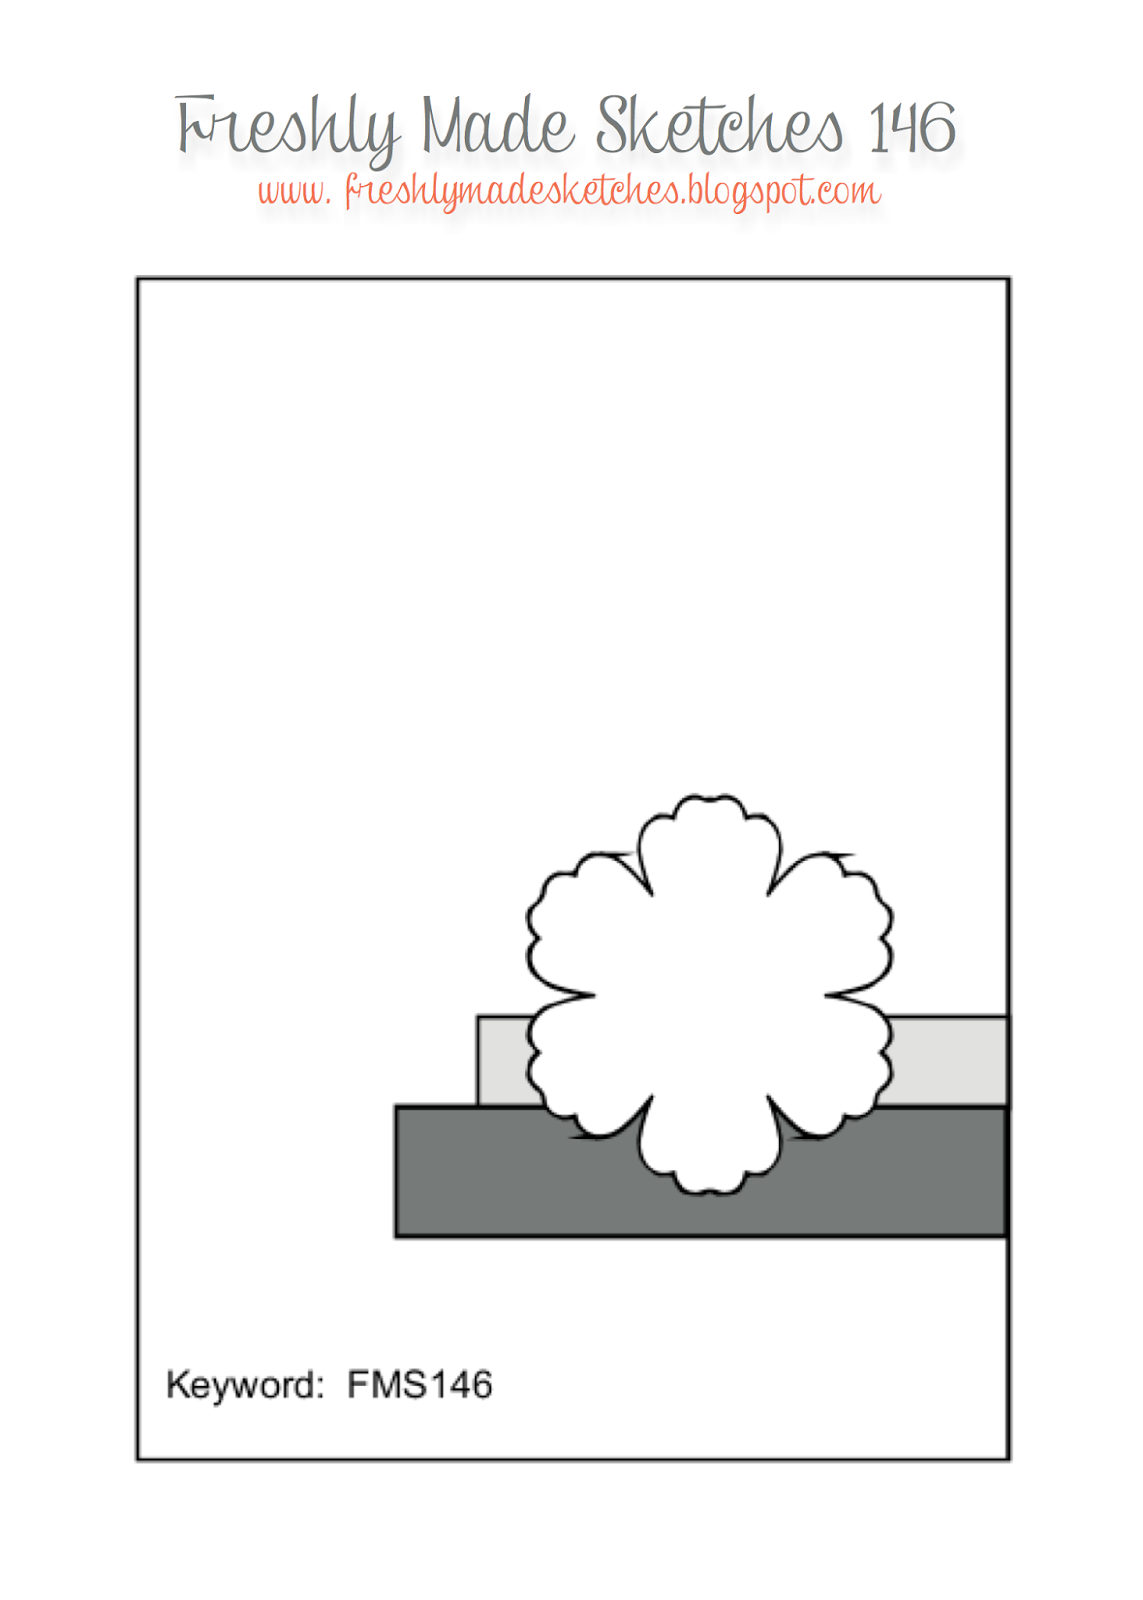
And here's my card:
I changed the orientation of my card as I wanted to use two of the embossed layered snowflakes stamped with the Festive Flurry stamp set and cut out with the coordinating framelits and needed it to be wider rather than taller. I cut my banners out of silver foil sheet and a scrap of last year's Winter Frost DSP that I found in my box, along with a retired snowflake embellishment. I added a few of the current in-colour sequins in Coastal Cabana to add a little more sparkle and finished with a vintage sentiment (from the 'Sweet Essentials' set).
You still have another month and a bit to wait until the launch of the new seasonal catalogue, however if you're the kind of person who likes to get organised and wants to start making Christmas cards now, the Festive Flurry stamps and Framelits are on the Holiday Carryover List and, along with a number of other seasonal items, are still available to purchase until 27th August. You can find the full list of items in the 'Holiday Carryover' section on the right hand side of my blog page, or by clicking here.
That's all from me today - no more Christmas cards I promise - well, at least not this week. Once my pre-order arrives next week, I might not be able to stop myself from sharing a few 'sneak peeks' of festive loveliness!
Back tomorrow with another card; until then, happy stampin'!
Stampin' Up! Supplies Used:
a0a43734-b506-4367-b703-b05cd76d4926|0|.0|96d5b379-7e1d-4dac-a6ba-1e50db561b04
Tags: Big Shot, Christmas, Festive Flurry, Festive Flurry Framelits, Winter Frost, Frosted Finish Embellishments, Sweet Essentials, Stampin' Up Supplies, Stampin' Up Card ideas, Stampin' Up Card, Stampin' Up, Shop online
Cards | Stamping
by Joanne James30. December 2013 22:41Good evening blog readers! I have spent a lovely day crafting today and putting together lots of lovely things using the current 'Whole Lot of Love' promotion products and items from the forthcoming Sale-A-Bration celebration, but today I wanted to share with you a New Year card that I created in MDS using the Year End Review infographic digital download. This set is great for creating a family Christmas card that shares important news and milestones over the year along with some fun festive facts however since I am approaching the first anniversary of the start of my blog I thought it would be a great way to take stock of everything I've achieved this year and record some of the Crafty Owl's milestones.
So here is the image that forms the basis of my card:

I'm still getting the hang of MDS and don't profess to be an expert, but it's a great way to create things that you could possibly stamp and this card is a good example of that. If you're a new MDS user or would just like to know more about what MDS has to offer, I am considering running small face-to-face classes to develop your use and understanding further in 2014 - if you live in Northampton or the surrounding area and this is something that interests you, please do contact me at [email protected] for more details.
For the above project, I used lots of the elements within the Year End Review download, some of which I modified to suit my theme, along with one or two others in place of the seasonal embellishments that were more Christmas-themed. I hope you enjoy reading the fun facts I've included about my Stampin' Up! journey this year - thanks to all of you my blog readers, customers, Product Table Builder users and my wonderful downline and wider extended team members for all of your support and encouragement this year - here's to an equally successful 2014!
Back tomorrow with another project; in the meantime, happy stampin'!
Stampin' Up! Supplies Used:
by Joanne James28. December 2013 20:33Another quick post from me today in between continuing festivities. We had one of our two annual trips to the pantomime today: this one our family visit to one of the smaller theatres in town, which is always guaranteed to put on a good show. This year was no exception - the performance of 'Wind In The Willows' was one of the best I've seen in some time and we all had a lovely time. If you're local to Northampton you really should visit the Royal before the run finishes - you won't regret it.
Now for today's project! As my regular blog readers will know, one of my other hobbies is biscuit baking and decorating. I've made lots of them in the last few weeks, mostly as gifts for teachers, friends and neighbours. I've packaged them in lots of different ways and often use jars tied with ribbon for my bite-size cookies, but one of my favourite methods of presentation for standard size biscuits has to be the Tag a Bag Gift Boxes - you can decorate and embellish, but I love the 'sneak peek' you get of the contents inside through the acetate sleeve. These boxes are also super sturdy, which is great for transporting their reasonably fragile contents. Many of my boxes were made and gifted before I got the chance to photograph them, but I managed to get a shot of my very last box before its departure:
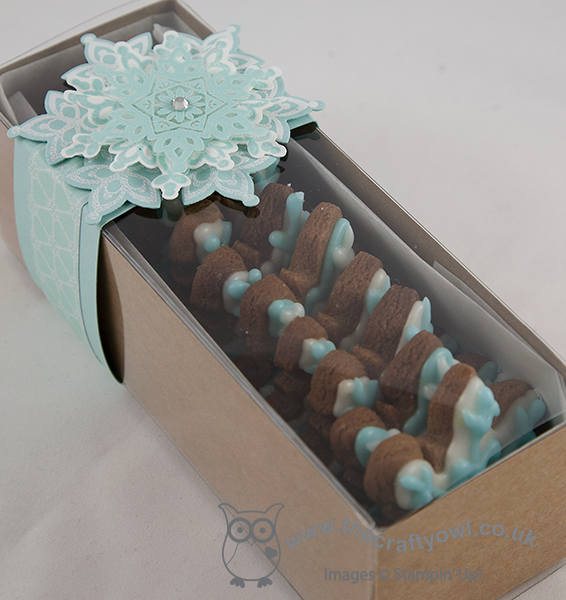
I finished the box with a belly band of Pool Party layered with a strip of Winter Frost DSP through the centre and finished with a pretty triple-layered snowflake, just right for my festive snowflake iced gingerbread biscuits in a co-ordinating colourway. This particular box of biscuits was destined for Aaron, the UPS man who delivers my Stampin' Up! parcels all year round; just one of the many people I like to show my appreciation for, especially at this time of year.
Tomorrow I have a special project to share: not a Christmas themed project, but rather something I made for a dear friend of mine as a Christmas gift. Here's a little glimpse just to whet your appetite:
Hopefully you're intrigued - pop back tomorrow to see the whole thing. Until then, happy stampin'!
Stampin' Up! Supplies Used:
by Joanne James26. December 2013 20:29Today I'm going to share another of my Christmas projects, this time a fun packaging solution for a cute chocolate snowman that I bought at my local supermarket. From the outside, it looked like a fairly straightforward nicely packaged box, complete with bow:
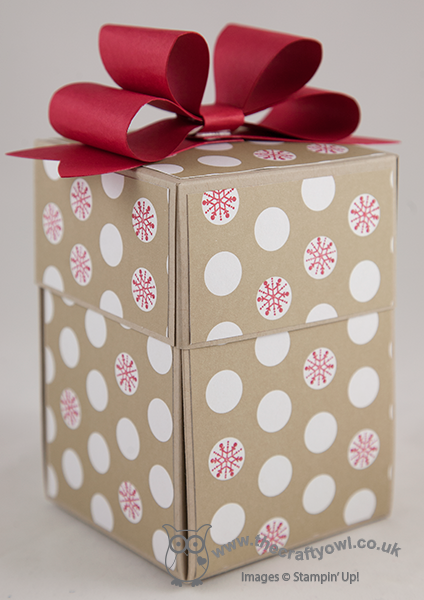
It's when the box is opened that the 'reveal' happens - the snowman is sitting in the middle with the inside of the box decorated with four co-ordinating stamped 'snow day' snowmen:

I love the snowman stamp set in the 'Snow Day' set and as soon as I saw the chocolate snowman I knew the two belonged together. The box base uses one 12" x 12" sheet of Crumb Cake cardstock and is a great way to turn a simple chocolate gift into something extra-special.
Today is going to be an early night for me I think; after all the food and excesses of the last few days and a lovely long walk in the fresh air this afternoon, I am absolutely shattered! Back tomorrow with another project; until then, happy stampin'!
Stampin' Up! Supplies Used:
e255bd13-0bdf-4533-8c21-96bf506938a9|0|.0|96d5b379-7e1d-4dac-a6ba-1e50db561b04
Tags: 3D Projects, boxes, Christmas, Big Shot, Gift Bow Bigz L Die, Snow Day, Shop online, Stampin' Up, Stampin' Up Supplies, Exploding Box, Season of Style
3D Projects | Boxes | Stamping
by Joanne James25. December 2013 21:05Well, it's here at last - Merry Christmas lovely blog readers! We've had a lovely day today that has involved much present unwrapping, eating and Lego building - don't you just love Christmas?!
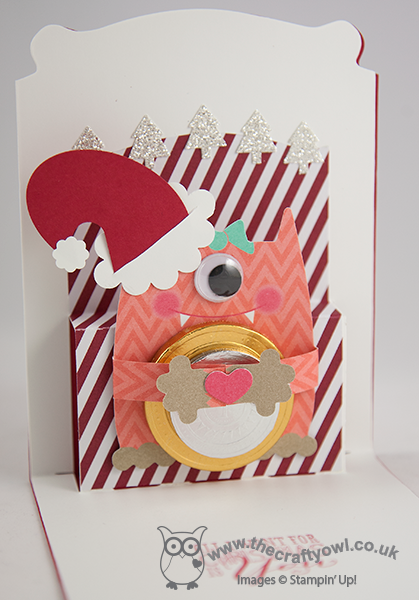
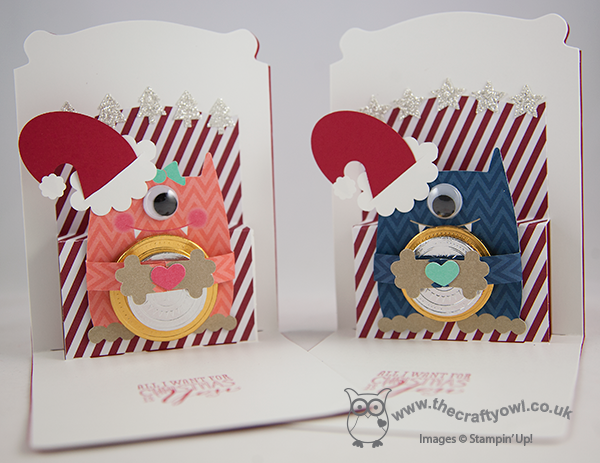
I still have a few Christmas things that I haven't shared with you, so today thought I would share the Christmas cards I made for my little James juniors. I was inspired by Lizy Bartaby's card here - I loved the idea of the Santa Monster Hugs but took my cards a step further by making them into pop-ups using my Pop 'n' Cuts base; I'm always looking for new ways to use this. So I made a co-ordinating pair of his and hers santa monster hugs. Here's the little girl santa monster:
Cute, huh? Here's the little boy monster that is her partner-in-crime:

How cute are these? I made my hats using an oval punch with a section cut out using the word window punch to create the curve of the hat. I made the brim using a 'squashed' scallop circle as I don't own a scalloped oval punch, which would of course make this slightly easier. A pop up card and chocolate coins - I'm not sure which the children thought was best (who I am kidding - the chocolate, of course!)
I'm sure this won't be the last we'll be seeing of these little guys - but for now, I hope you have all had a wonderful Christmas and that Santa brought you everything that was on your wish list.
Back tomorrow with another project; until then, happy stampin'!
Stampin' Up! Supplies Used:
8697ac64-5747-40a2-873e-ccca9c8231c3|0|.0|96d5b379-7e1d-4dac-a6ba-1e50db561b04
Tags: Christmas, large oval punch, Merry Minis, Season of Style, Shop online, Stampin' Up, Stampin' Up Card, Stampin' Up Card ideas, Stampin' Up Supplies, Christmas Messages, Monster Hugs, Pop 'n' Cuts
Cards | Pop Ups | Stamping
by Joanne James23. December 2013 21:51Today a quick post to share the Christmas cards I made for my Mum and Dad and Mother-in-law respectively - and a little 'sneak peek' of some new product that will be available in the Spring-Summer seasonal catalogue at the end of January. I wanted to use the single stamp 'Christmas Star' for my cards; this is such a great statement stamp but feel like I haven't used it anywhere near enough this season. I was inspired by this Brian King card I saw a while ago here. For my version, I decided to use the same design for each card, but create it in two different colourways. Here's the first one in silver and Midnight Muse:
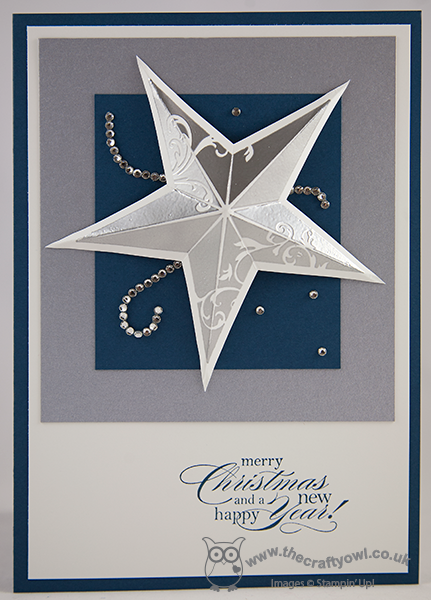
I wanted the star to take centre stage, so kept the design fairly simple and embossed the star then hand cut and scored along the point lines to create a lovely 3-dimensional effect. I adhered the star to the card with rolled glue dots at the end of each point; this is a better option where you don't want the bulk of a dimensional. To finish I added the Christmas sentiment from the 'Delightful Dozen' stamp set.
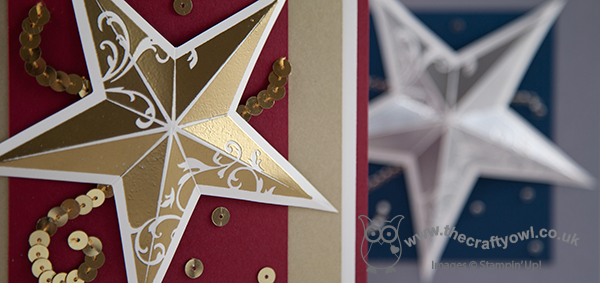
For the second version, I used gold and Cherry Cobbler:
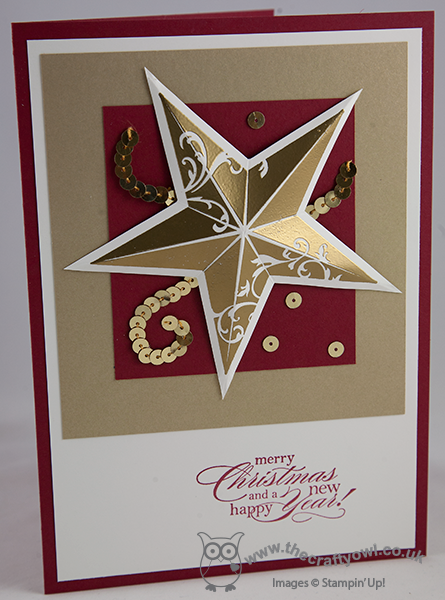
Did you spot the 'sneak peek' of the new product? Yes, shiny gold sequins - just one of a number of new gold products that will make their appearance in the Spring-Summer seasonal catalogue in just over a month's time. I just couldn't resist using a few to finish off my Christmas projects.
So here's a picture of both cards together; the question is, which one do you prefer?
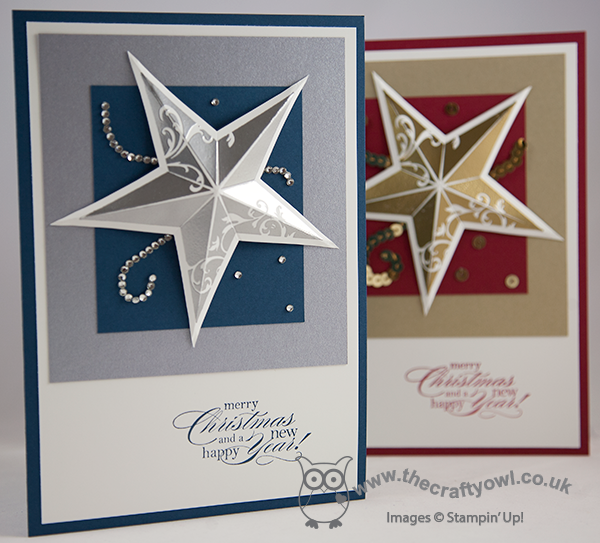
I must say, I think it's a tough call - I like them both, and I'm not sure which I would choose as my favourite. Both were well received by the recipients, so I guess that's the main thing!
Tomorrow is Christmas Eve, so will be a day of food preparations for the big day, along with a few fun things too. I'll be back to share another Christmas project too; until then, happy stampin'!
Stampin' Up! Supplies Used: