Christmas Tree Warmth and Cheer Washi Tape Card

by Joanne James5. December 2016 19:27

Happy Monday everyone! I've had a busy start to my week with deliveries and appointments but did manage to catch up with a couple of friends for a festive afternoon tea, which was lovely. I have a quick card to share with you today  - this one is from one of last month's classes where we were using the Santa's Sleigh bundle. This was our warm up card and features the traditional colours that the Paper Craft Crew are challenging us to use this week:

Visit the Paper Craft Crew and play along with Color Challenge 221. www.papercraftcrew.com

I got out the washi tape and set to work - here's my card:


Here's the low-down on today's card:

O Christmas Tree -  The tree framelit in the Santa's Sleigh Thinlits set makes for an elegant Christmas tree, and does double duty when the negative space is used creatively too. On this card the focal point is the absence of the actual tree, as opposed to the tree itself. 

Warmth and Cheer Washi - Here the tree is decorated with Warmth and Cheer washi tape, simple strips of colour onto the Crumb Cake card base. Perfect within the Garden Green top layer, to add to the feeling of foliage.

And A Star - I finished my card with a stamped sentiment, tied twine bow and a metallic gold star.

A great simple card, easy for mass production - and don't we all need those at this time of year!

Here is the visual summary of the key products used on today's project for you to pin for easy reference:


You can see all of my 'How To' summaries on my 'How To - Tips and Techniques' Pinterest board in case you've missed any. 

That's all from me; I'll be back soon with another project; until then, happy stampin'!


Stampin' Up! Supplies Used:

Table built using Product Table Builder by The Crafty Owl - Independent Stampin' Up! Demonstrator.

Forever Evergreen Christmas Tree Home Decor Wall Art - Free Tutorial

by Joanne James26. November 2016 16:08

Another week over! Mine has been a busy one, with two full days of classes, Christmas preparations and not a minute to spare, hence the lack of blog posts. So I hope you have all been making the most of this week's Online Extravaganza; I know that Monday's flash sale was popular with my customers and I am already receiving orders for the second one, to take place next Monday.

Today I have another 3D home decor project for you and it uses items from the Forever Evergreen Project Kit on page 35 of the seasonal catalogue - one of the products that is available at a 10% discount during this week's sale and the co-ordinating Forever Evergreen stamp set is also available at a 20% discount. This project is a CASE of one that was included in our Demonstrator-only quarterly magazine and it's a great way to get more mileage from the stamp set if you've invested in it to complete your trees and use up lots of leftover bits and pieces from the kit. Here's a reminder of what those fabulous Christmas trees look like (you can read my previous blog post on those here):


Using one of the tree sections, some leftover sequins, card and by adding a few other supplies, I created this lovely piece of wall art:


It's shown here without its frame as it was easier to photograph and has some lovely detail. Here's a close up of the white holly berries (liberally coated in clear Wink of Stella for a wonderful sparkle) with the pinecone embellishment:


There are also a number of paper-toled gold heat embossed ornaments:


Lastly, check out the Noel sentiment from the Christmas Pines set (this could be substituted with one of those in the Forever Evergreen set) - stamped in Versamark and heat embossed in gold, then fussy cut, layered and finished with gold ribbon:


Making cards or additional home decor projects such as this one is a great way to extend the usefulness of both the kit and co-ordinating stamp set.

Now for the good news! Would you like to make this project? Every customer who purchases a Forever Evergreen Project Kit and a co-ordinating Forever Evergreen stamp set from me either in person or through my online store will receive a written tutorial from me FOR FREE with complete instructions on how to make the above piece of Christmas Tree Home Decor Wall Art, along with an extra piece of green tree so that you don't have to use one from your kit. Isn't that just something?!

This offer will last until the end of the current seasonal catalogue, but since both the kit and stamp set have 10% and 20% respectively off before 10.50pm GMT on Monday (28th November 2016) and are now available only while stock lasts, I wouldn't leave it too long before placing your order if this is an offer that you would like to take advantage of. Tutorials will be sent separately by me directly to you once your order has been shipped - please note if you are ordering online you will need to ensure you have not ticked the 'no contact' box in order for me to be able to access your details.

Here is the visual summary of the key products used on today's project for you to pin for easy reference:

You can see all of my 'How To' summaries on my 'How To - Tips and Techniques' Pinterest board in case you've missed any. 

Right I'm off to a swimming gala (helping not participating of course!); I'll be back tomorrow with a card (or two!) for this week's new challenge from the lovely Sandy over at The Paper Players. Until then, happy stampin'!


Stampin' Up! Supplies Used:

Table built using Product Table Builder by The Crafty Owl - Independent Stampin' Up! Demonstrator.

Clean and Simple Christmas Joy

by Joanne James20. November 2016 09:00

It's Sunday and time for a new challenge over at The Paper Players! It's the turn of my sweet friend Claire to host this week and she has a fun clean and simple challenge for you to work with:
        

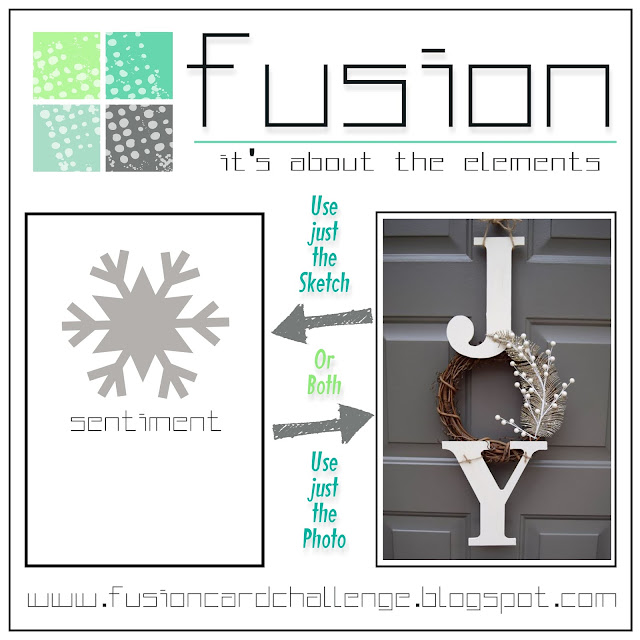
I was inspired by a few other challenges too for my cards today - yes, not one, not two but three cards to share with you! The challenge over at Fusion has a great inspiration photo (you can see it below as the card that I am entering for this challenge is further down the post) that led me to use the 'Joyful Nativity' Christmas set from the annual catalogue and with the Addicted to CAS challenge codeword is ombre and CAS Colours and Sketches calling for monochromatic blues, I dug out my Marina Mist, Dapper Denim and Night of Navy ink pads and set to work.

The genre of 'clean and simple' tends to be rather subjective and whilst my general style is definitely 'clean' it tends toward 'clean and layered' rather than 'clean and simple'. So today I decided to take the same basic idea and create both a clean and simple and a clean and layered card to illustrate the difference! So here's my first card, a simple one layer affair stamped on extra thick Whisper White cardstock:
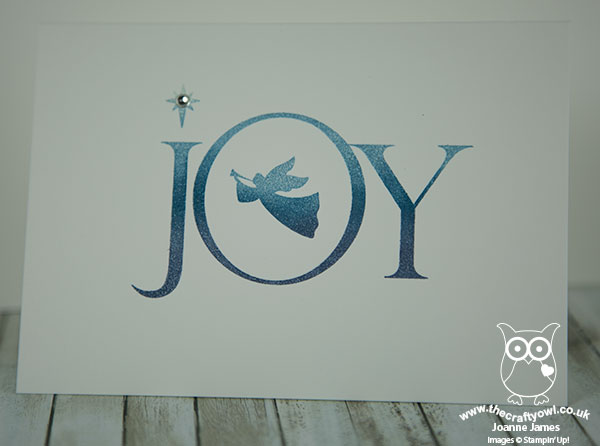
 

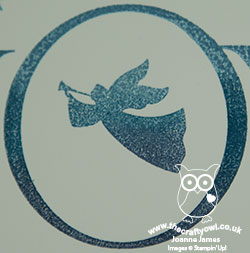
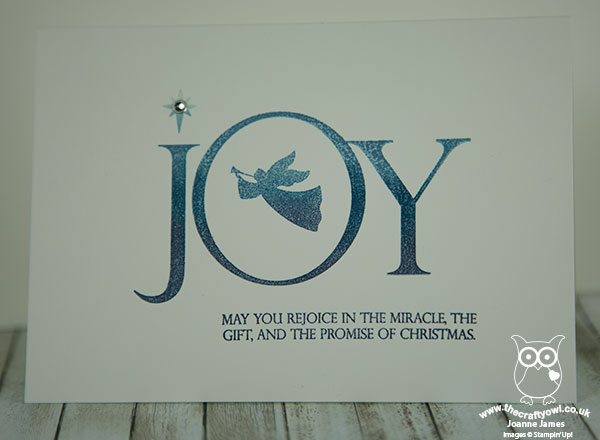
I stamped the angel in the centre of my 'o', brushed the stamped areas with my clear Wink of Stella brush and added a metallic shape to the star to finish my card. Super clean and simple! I also made a second version of this card, this time adding in the secondary sentiment, stamped in Night of Navy:
 

For my final card, I created a clean yet layered card, using this week's sketch over at the Global Design Project:

     

I used a cardbase of Marina Mist and switched out the angel for the Bethlehem skyline, added a piece of in-colour envelope paper for my background layer and heat embossed my sentiment in silver onto a strip of Night of Navy cardstock:
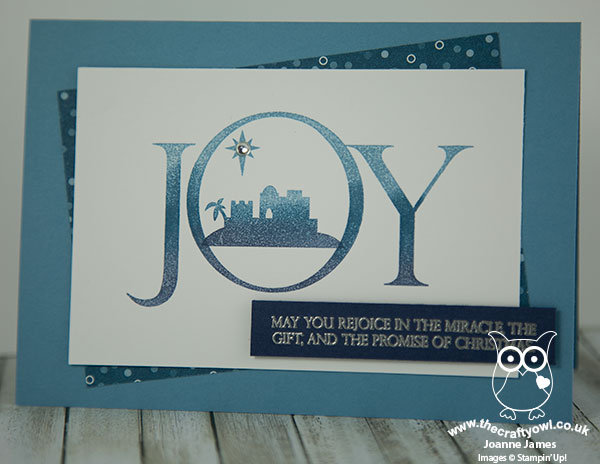
 

All three of the cards have a beautiful shimmer as a result of the careful brushing with my Clear Wink of Stella which adds a gorgeous subtle sparkle in real life. So which one do you prefer? Do leave me a comment below - I'd love to hear your thoughts!

Here is the visual summary of the key products used on today's project for you to pin for easy reference:
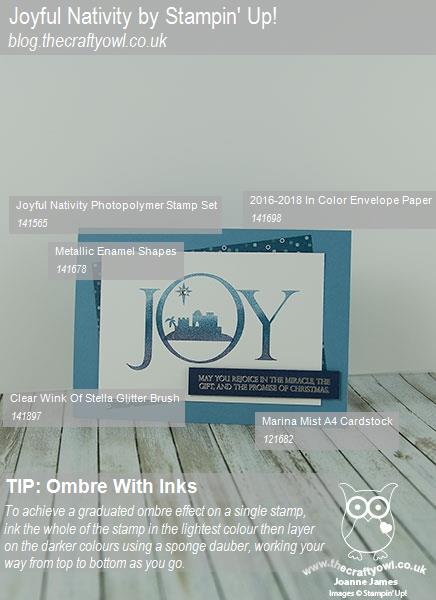
 

You can see all of my 'How To' summaries on my 'How To - Tips and Techniques' Pinterest board in case you've missed any. 

Before you reach for your ink and papers, check out what our amazing team has created to inspire you this week:

The Paper Players Design Team
 
 
Here's a quick recap of our challenge rules:
 
1.  Create a new paper project
2.  Upload your creation to your blog with a link back to us and provide a direct link to the post featuring your challenge submission.
3.  Please link your card to no more than four challenges, TOTAL.
4.  Have FUN! 


I look forward to seeing your clean and simple cards this week. We are off for our usual Sunday morning of sport assuming the hockey pitch hasn't frozen with the sub-zero temperatures we've been having for the last couple of days, followed by lunch, some baking for a school bake sale this week and then a birthday party to attend for the youngest of the James Juniors, so another full-on Sunday!

Enjoy the rest of your weekend as it will be over all too quickly; I'll be back tomorrow with another project and news of an exciting new promotion for next week only; until then, happy stampin'!


Stampin' Up! Supplies Used:

Table built using Product Table Builder by The Crafty Owl - Independent Stampin' Up! Demonstrator.

Pretty Pines Christmas Home Decor Frame

by Joanne James13. November 2016 09:00

It's Sunday and time for a new challenge over at The Paper Players! It's my turn to host this week and I have a colour challenge for you to work with:


I have another Pretty Pines project for you today, but a 3D project for a change as opposed to a card. I made this home decor frame to showcase these fabulous dies - and adorn my home during the festive season of course! Take a look:


Here's the low-down on today's project:

Pretty Pines - I love these dies and they are perfect to create festive embellishments for cards, gift packaging or a home decor project such as this one. I focused on the pine needles, berries and mistletoe pieces to make my wreath - not a pinecone in sight - as I wanted to stick to my red, green and white colour scheme. Using the Big Shot Precision Base Plate and the die brush also made light work of removing the pieces from the framelits. I added a bow in Real Red stitched edge ribbon as a finishing touch:

A Joyful Christmas and a Wonderful Year - I chose the Joyful Christmas sentiment from the 'Wonderful Year' stamp set as the focal point for my frame. This is the perfect sentiment for this frame, which I am intending to display in my hallway to welcome guests over the festive season.

Ombre, Ombre - I stamped my focal sentiment in Emerald Envy using the ombre stamping pad for added interest. I love the gradation of colour you get with these stamp pads and they really are so easy to use.

Here is the visual summary of the key products used on today's project for you to pin for easy reference:


You can see all of my 'How To' summaries on my 'How To - Tips and Techniques' Pinterest board in case you've missed any. 

Before you reach for your ink and papers, check out what our amazing team has created to inspire you this week:

The Paper Players Design Team
 
 
Here's a quick recap of our challenge rules:
 
1.  Create a new paper project
2.  Upload your creation to your blog with a link back to us and provide a direct link to the post featuring your challenge submission.
3.  Please link your card to no more than four challenges, TOTAL.
4.  Have FUN! 

I look forward to seeing what you create with my colour choices this week. We are doing something a little different in terms of sporting pursuits today: Ben is off for his usual session of basketball, however Rebecca is going to be at the swimming pool bright and early as she is participating in a sponsored swim in aid of For Zachary, a charity set up in memory of a little boy who lived for only 69 days before dying from a rare neonatal lung disease. The swimmers are aiming to cover a distance of 69km in total, one kilometre for each day of young Zachary's life - and Rebecca is aiming to swim just over 3km herself. That will be no mean feat! She is still collecting sponsorship, so if you're reading this and you would like to sponsor her, here is the event's JustGiving page - many thanks and I''l let you know how she gets on.

Enjoy the rest of your weekend as it will be over all too quickly; I'll be back tomorrow with another project; until then, happy stampin'!


Stampin' Up! Supplies Used:

Table built using Product Table Builder by The Crafty Owl - Independent Stampin' Up! Demonstrator.

Snow Place Snowmen Family Large Christmas Card

by Joanne James3. November 2016 08:05

Today it's time for a new challenge over at Create With Connie and Mary and this week we have a sketch for you:


I saw this sketch and immediately saw ... snowmen! Take a look:


Here's the low-down on today's card:

Snow Place Like The Front of a Christmas Card - Apologies for the pun, but these snowmen - and women - definitely deserve to be showcased on the front of a Christmas card. 'Snow Place' is such a fun stamp set with infinite dress up possibilities for the snowmen and penguin in the set. What's more, the co-ordinating Snow Friends Framelits Dies make cutting out the shapes easy-peasy.

Go Large - Bigger is not always better, granted, however to accommodate my snow family of five I needed more cardfront, so I decided to make my card A5 size (21cm x 14.9cm) instead of a more standard A6. This allowed me enough room for my mats and layers, without my family needing to jostle too much for a space on my card.

A Pattern Surprise - Do you recognise my patterned paper? Are you wondering where I found my seasonal snowfall? This paper isn't from one of the festive seasonal packs at all; it's actually one of the patterns in the Floral Boutique Designer Series Paper. As with many of our DSP packs, the reverse of the feature papers often has a more repetitive pattern with spots, stripes or solid colours. This gorgeous mix of navy and white papers hides this spotted pattern which makes perfect snow. The moral of the story? Always check both sides of your papers and don't assume that because a pack isn't designed with Christmas in mind, there won't be a hidden gem that is perfect for your card.

Here is the visual summary of the key products used on today's project for you to pin for easy reference:


You can see all of my 'How To' summaries on my 'How To - Tips and Techniques' Pinterest board in case you've missed any. 

Do visit the other Design Team members to see what they did with this week's sketch; there's lots of inspiration over on their blogs too!

Enjoy your day and I'll be back tomorrow with another project; until then, happy stampin'!


Stampin' Up! Supplies Used:

Table built using Product Table Builder by The Crafty Owl - Independent Stampin' Up! Demonstrator.

Forever Evergreen Project Kit Christmas Trees

by Joanne James2. November 2016 09:40

Wednesday already? Happy 'hump day' everyone! Today I have a 3D project for a change - I want to share the trio of Christmas trees I made using the Forever Evergreen Project Kit in the seasonal catalogue. My regular readers will know what a fan I am of Stampin' Up!'s kits: they are great for everyone from the complete novice to the seasoned crafter and are the perfect option for a fun afternoon or evening activity with friends.

The Forever Evergreen kit comprises three Christmas trees, one 33cm tall and two 27.9cm tall - complete with decorations. You then need some additional basic items to complete the project: the Forever Evergreen stamp set, ink pads and adhesives. Here are my trees in all their glory - first the largest one in Garden Green:


The second, smaller one also in Garden Green:


And lastly, the final smaller one, this time in Wild Wasabi:


I have to say the catalogue really doesn't do these trees justice; they are way more impressive in real life and having had them on display at the craft show I exhibited at recently they were the subject of many 'oohs' and 'aahs'. Many of my customers have passed comment on them as they've been in and out for classes too. If you would like to purchase these kits to make at home, Stampin' Up! has produced a very helpful video that is worth watching before you start putting the kit together:

If you would like to get together with me in person to make this kit, you have a couple of options: you can gather with friends and purchase a kit each and have me bring the extra supplies needed for a crafty afternoon or evening in with friends. Alternatively you could join me for my next Crafternoon Tea at Bell's in Kingsthorpe, Northampton, on Saturday 19th November from 10am-2pm, when we will be making this kit and finishing with an afternoon tea prepared by the Cafe @ Bells in store - contact me to book your place. 

I hope you've enjoyed your day today; I enjoyed a crisp autumn day kicking leaves in the country park and a hockey match (unfortunately no win today, but another match on Saturday so hopefully their luck will change!). I'll be back tomorrow with a Christmas card for this week's new challenge over at Create With Connie and Mary. Until then, happy stampin'!


Stampin' Up! Supplies Used:

Table built using Product Table Builder by The Crafty Owl - Independent Stampin' Up! Demonstrator.

Presents and Pinecones Large Square Double Display Christmas Card

by Joanne James1. November 2016 20:00

This is my second post of today - if you missed the first one about the new Stitched Shapes Framelits you are going to want to check that out here. No blog post yesterday as I still have one of the James Juniors on half term this week and then my evening was spent trick or treating. Today I've had full day with back to back classes, one of which was my first technique class of the month featuring the Christmas/Pretty Pines bundle. I've made lots of projects with this bundle, although I've yet to blog them all (so many projects, so little time!) Click here to see one of the cards that I've shared previously using this set, that was also one of our makes in our class. 

Today I want to share a card that I CASE'd from the lovely Amanda Bates over at The Craft Spa, who is for me the queen of fancy folds. She has made lots of versions of her Large Square Double Display Card but this one using the Presents and Pinecones Designer Series Paper and the Pretty Pines Thinlits Dies really caught my eye and I just had to have a go at re-creating it. Here's my card:


Here's the low-down on today's card:

Presents & Pinecones - What can I say, the Presents & Pinecones Designer Series Paper is definitely the star of this card. Four of the twelve designs in this pack are showcased here, such a great layout to really let these papers shine. What's more, they are the perfect pairing for the Christmas/Pretty Pines stamp set thinlits combo. The colours are traditional yet fresh and modern, with the addition of the mint and white to the red and Emerald Envy green.

Christmas Pines - Whilst it's rare that I advocate buying a stamp set or thinlit set without its counterpart when it's available as a bundle (and this is most definitely not one of those times!), it is easy to focus on the detail of the thinlits with this set and rather overlook the stamp set. This would be such a mistake though, as it's a set choc full of great scripted sentiments in a variety of sizes, along with some useful border stamps, a fancy frame and a snowy background stamp that will have tons of uses on so many Christmas cards. This card showcases two of the sentiments and the snowflake background stamp, which adds subtle interest and detail to the panels on the front and inside. This set is definitely worthy of a place on your shelf!

The 'How' - I made a few tweaks to Amanda's tutorial when I made this card, so thought I would share the details with measurements below. This card is measured in cm and is a metric template for standard A4 cardstock; if you would like to make one in inches or using 12" x 12" cardstock, do check out Amanda's blog via the above link where she has lots of useful tutorials to follow. Here goes:

To make this A4 metric large square double display card, you will need:

  • Thick Whisper White A4 Cardstock 15x 29cm
  • Whisper White Cardstock 15cm Square
  • Early Espresso Cardstock 10 cm Square
  • Presents & Pinecones Paper Mint Macaron Mini Chevron 9.5cm Square (x2)
  • Presents & Pinecones Paper White Cones and Pines 4.5cm x 9.5cm (x2)
  • Presents & Pinecones Paper White Cones and Pines 4.5cm x 2cm (x2)
  • Presents & Pinecones Paper Stripes 4.5cm x 2cm (x4)
  • Stamps & Dies – Christmas Pines Stamp Set and Pretty Pines Thinlits Dies Bundle 
 Instructions:
  • PORTRAIT (short side): 
  • Line up at 2.5cm across the top ruler
  • Cut from 2 to 12cm. LIFT. Cut from 17 to 27cm
  • Turn 180 degrees and repeat both steps above.
  • LANDSCAPE (long side):
  • Score across whole width at 4.5cm and 9.5cm 
  • Score top and bottom sections only at 2cm and 12cm 
  • Turn 180 degrees and repeat both steps above.
  • From the PORTRAIT end (short side):
  • Fold the outer creases into a mountain, valley, mountain, valley set of folds
  • Fold the centre section score lines into first a mountain fold then a valley fold 
  • This gives you the basic layout for the base of your card.

I just love this card - a little time and effort but well worth it for the end result. Thank you Amanda for the inspiration!

Here is the visual summary of the key products used on today's project for you to pin for easy reference:


You can see all of my 'How To' summaries on my 'How To - Tips and Techniques' Pinterest board in case you've missed any. 

I'll be back tomorrow with another project. Until then, happy stampin'!


Stampin' Up! Supplies Used:

Table built using Product Table Builder by The Crafty Owl - Independent Stampin' Up! Demonstrator.

Detailed Santa Thinlits Banner Card

by Joanne James29. October 2016 19:37

I hope you're all enjoying a lovely weekend. Today I have a card using this week's sketch over at Freshly Made Sketches:

I've finally managed to break the seal on Detailed Santa Thinlits Dies and been putting them through their paces. Today's card also features a new background stamp - take a look:


Here's the low-down on today's card:

Detailed Santa Thinlits Die - Although I haven't used it before, this Santa die was one of my first purchases from the seasonal catalogue. I adore the detail of his face and beard and there are so many ways in which he can be used. Here I've cut a section of the image in Whisper White and mounted it on a banner of Real Red. You can't see in the photograph, but the whole of the white layer has been brushed with clear Wink of Stella and has a lovely subtle shimmer to it.

Put A Label On It - I stamped my sentiment from the co-ordinating 'Greetings From Santa' stamp set and cut it out with one of my Project Life Cards and Labels Framelits, great for memory keeping but perfect for card making too.

A Merry Medley - For my base, I chose to use the 'Merry Medley' background stamp, stamped in Soft Suede onto neutral kraft cardstock. I like that it adds interest without fuss and too much detail, yet is in keeping with the festive theme of my card.

Here is the visual summary of the key products used on today's project for you to pin for easy reference:


You can see all of my 'How To' summaries on my 'How To - Tips and Techniques' Pinterest board in case you've missed any. 

I'll be back tomorrow with another santa project, this time for this week's new challenge over at The Paper Players; until then, happy stampin'!


Stampin' Up! Supplies Used:

Table built using Product Table Builder by The Crafty Owl - Independent Stampin' Up! Demonstrator.

Banners For Christmas Candy Cane Card

by Joanne James28. October 2016 08:00

Yay it's Friday - the weekend is almost upon us! Today I have a clean and simple Christmas card inspire by the great photo over at The Challenge this week:

I was totally inspired by the gift on the left to create this festive card:


Here's the low-down on today's card:

Christmas Pines - For the background to my candy cane, I both stamped a pine sprig from teh 'Christmas Pines' stamp set and added a couple of Garden green Pretty Pines diecuts for a little extra dimension.

Banners for Christmas - My oversize candy cane is from the 'Banners for Christmas' set, stamped in Real Red and fussy cut. I also used the sentiment and banner, evocative of the blue ribbon on the parcel in the inspiration photo, from the same set. 

A Sweet Colour Combination - My colour palette for today's card was pulled directly from the inspiration photo and is one that works really well for a fresh, festive take on Christmas. Here it is if you would like to save it to use on your seasonal projects:


I added a little striped washi tape and sentiment inside my card and then - card complete! Here is the visual summary of the key products used on today's project for you to pin for easy reference:


You can see all of my 'How To' summaries on my 'How To - Tips and Techniques' Pinterest board in case you've missed any. 

Enjoy your day and I'll be back tomorrow with another project; until then, happy stampin'!


Stampin' Up! Supplies Used:

Table built using Product Table Builder by The Crafty Owl - Independent Stampin' Up! Demonstrator.

Oh What Fun Meets Warmth and Cheer

by Joanne James23. October 2016 09:00

It's Sunday and time for a new challenge over at The Paper Players! It's the turn of the lovely Jaydee to host this week and she has a great sketch for you to work with:


I decided to combine my card with the challenge over at Merry Monday and use some of the lovely plaids featured in the Warmth and Cheer designer series paper stack. I actually made two cards for today's challenge and couldn't decide which one I liked best, so thought I'd share them both! Here's my first card:


Here's the low-down on today's card:

Warmth and Cheer - Both of my warm plaids are from the Warmth and Cheer designer series paper pack, which is choc full of great plaid patterns that work for both autumnal and Christmas cards. Here I've combined two of the plaid patterns, each featuring Cherry Cobbler, for my vertical panel and mat. 

Oh What Fun - I was prompted to use this sentiment from the 'Oh What Fun' set following a conversation with one of my team members this week. This set is choc-full of great sentiments and having featured in last year's seasonal catalogue this year has made the transition to the annual catalogue. It was perfect for my card today, allowing me to ink up each half with Delightful Dijon and Cherry Cobbler markers on a 1 3/4" punched circle and separated by a fussy cut Cherry Cobbler banner. 

Dijon Doily - To finish I added a 2015-17 In-Color Doily in Delightful Dijon behind my circle sentiment. I often forget to use doilies yet I like the added detail it adds to my circle here without being overly fussy, clean and simple person that I am! 

Here's the second card that I made - this one has a few less layers and features only one piece of plaid, along with a couple of metallic sequins:


Lastly, here is the visual summary of the key products used on today's project for you to pin for easy reference:


You can see all of my 'How To' summaries on my 'How To - Tips and Techniques' Pinterest board in case you've missed any. 

So which one of today's cards do you prefer? Do leave me a comment below with your thoughts - I love reading them!

Before you reach for your ink and papers, check out what our amazing team has created to inspire you this week:

The Paper Players Design Team
 
 
Here's a quick recap of our challenge rules:
 
1.  Create a new paper project
2.  Upload your creation to your blog with a link back to us and provide a direct link to the post featuring your challenge submission.
3.  Please link your card to no more than four challenges, TOTAL.
4.  Have FUN! 


I look forward to seeing what you create with this week's sketch.

Back tomorrow with another project; until then, happy stampin'!


Stampin' Up! Supplies Used:

Table built using Product Table Builder by The Crafty Owl - Independent Stampin' Up! Demonstrator.

Mini Catalogue

BROWSE THE CATALOGUE

The mini catalogue is now live! Read and download your copy here.

Shop Online

Access my online shop 24 x 7, 365 days of the year:

Current April hostess code:

VDKNV7BH

Shop Online

Join My Team

It's always a great time to join Stampin’ Up! New team members can get £130 worth of products for only £99 + free business supplies + free shipping + all the fun being a part of Stampin’ Up! Stampin' Up! has something for everyone: join my growing team and benefit from my support to enjoy Stampin' Up! however you choose.

If you're interested, call me for a chat to understand how I can help you realise your goals. Alternatively, if you have already decided to sign up and you just can't wait, please click here for the link to the online form where you can sign up and order your starter kit right away! 

Latest Kit!

Stampin Cut and Emboss

The Rock Legend Kit has all you need to make 8 cards with coordinating envelopes. Along with the new Panda Friends Kit, both are available from January 4th for just £14 each - get yours here!

2023-24 Annual Catalogue

BROWSE THE CATALOGUE

Click on the catalogue for a full list of current SU! supplies - if you would like to order any of the items featured, please drop me a line at [email protected] or give me a call on 07773 421446 - I'd be happy to help.

New Online Exclusives

There are new products available exclusively in the online store from 5 March - check them out here.

About Me

Hi I'm Joanne and live in Northampton and when I'm not looking after my husband and two beautiful children, am an avid crafter with a passion for all things Stampin' Up!

I must confess that I have never been a big rubber stamper - until I discovered Stampin' Up! that is. I love the fact that I can get such great results with co-ordinating stamps, inks, papers and punches - the possibilities are endless! Join me on my stamping journey as I share the things I love and be inspired to create amazing things yourself!

Follow Me

Monthly Newsletter

Box Builder

Click the button above to use Box Buster to create your custom box design using the Envelope Punch Board!

Kits Collection Now Available!

Stampin Cut and Emboss

The new Kits Collection from Stampin' Up! is now available!

Click here to see the current kits available and order yours online today.

I Design For


Stampin' Up Stuff

This is my personal blog and is not endorsed by Stampin’ Up! I hope you find it a plentiful source of ideas and personal inspiration but please don't copy my designs for contest submission or use for classes, publication or sale without express permission.