To A Wild Rose Blessed Easter Wishes CCS 411

by Joanne James16. March 2021 12:00

It's Tuesday and time for a new challenge over at CAS Colours & Sketches. YoonYoung is hosting this month and today we have a colour challenge: 


For my card today I decided to go with some triple-step stamping and a sunny yellow rose for a cheery Easter card - take a look:


Here's the low-down on today's card:

To A Wild Rose - I'm not sure I've used this set on my blog before, but the 'To A Wild Rose' stamp set has some wonderful blousy blooms, that have great dimension just by layering colour - perfect for clean and simple cards. I used each of the challenge colours to create my layers, stamping off the third layer of both the leaves and the petals in order to get the depth of colour with only 3 inks.  

Bricks and Mortar - Over at Just Us Girls this week Bobby has asked us to embrace the trend of embossing folders. I decided to use a So Saffron card base so that I could use a white circle embossed with the Bricks and Mortar embossing folder to highlight my yellow rose. I'm sure there will be some wonderful and creative uses of embossing over in the JUGs gallery, but in an effort to keep things clean and simple I used a simple punched circle of texture on my card:


 Sometimes less is more I think!

Blessed Easter Wishes - I love the font of the large 'Blessed' stamp in the 'To A Wild Rose' stamp set, which works beautifully with the other friendship-themed sentiments included. I used a little creative licence and heat-embossed it in gold before I paired it with some other stamps from the super-versatile 'A Wish For Everything' stamp set to create my Easter greeting, which you can see in more detail below:


Do you ever combine stamp sets in this way? I love that with lots to choose from, the possibilities are endless! I also added a trio of sparkly enamel dots - I just couldn't help myself!

Here is the visual summary of the key products used on today's project for you to pin for easy reference:


You can see all of my 'How To' summaries on my 'How To - Tips and Techniques' Pinterest board in case you've missed any. 

As a reminder, for our colour challenges, you must use all of the stated challenge colours. You may also use neutral colours; however, the challenge colours should be the most noticeable ones featured on your card. We use Stampin' Up! color names for reference, but you are welcome to use any other companies' products as long as you match the challenge colours as closely as possible.

Enjoy your day; I have a date with the ironing pile but will be back later with a quick post about something very exciting that's happening tomorrow! I'll be back later! Until then, happy stampin'!


Stampin' Up! Supplies Used:

Table built using Product Table Builder by The Crafty Owl - Independent Stampin' Up! Demonstrator.

Pampered Pets CAS Sympathy Card CCS 410

by Joanne James9. March 2021 13:00

It's Tuesday and time for a new challenge over at CAS Colours & Sketches. This week's challenge is a sketch challenge and YoonYoung has asked that we create something with a crescent shape as the main feature on our card:


Feel free to flip or rotate the sketch when making your card.  

For my card today I was tempted to go with a spray of florals or even dig out a retired baby stamp that would be perfect for this card (in fact, if you'd like to check out this old post you will see two cards that I made for this very challenge using the exact set that I had in mind!), but in the end decided to go with something a little more obtuse that ended up ultra-CAS - take a look:


Here's the low-down on today's card:

I decided to go with the dog from 'Pampered Pets' for today's card - you can see the distinct curved shape of my pooch, right?!

I heat embossed my dog in white onto Basic Black cardstock for a change and used the Pets Dies to diecut out the shape with ease. The angle of the dog fitted around the sentiment perfectly and all I needed to do was add a red resin heart for a pop of colour on my otherwise monochromatic pet sympathy card. I actually started with a card that had a lot more going on (I actually turned that card into something else so will share another time) but for a variety of different reasons evolved beyond the sketch, so I decided to pare things right back and go ultra CAS. I debated with adding twine or even some sponging behind my pooch, but decided to go with the 'less is more' look after the positive comments I received on the one layer floral I created for last week's challenge. Besides, when it comes to the loss of a beloved pet, I'm not sure that any amount of frills or card details take away from the sense of loss that an owner feels. 

I am also linking today's card up over at Addicted to CAS where their codeword is 'Animal' and I'm hoping they will appreciate my CAS efforts. The simplicity of today's card rely does not reflect the thought and effort that went into it - I find that's often the way where 'clean and simple' is concerned!

Here is the visual summary of the key products used on today's project for you to pin for easy reference:


You can see all of my 'How To' summaries on my 'How To - Tips and Techniques' Pinterest board in case you've missed any. 

I am 'home alone' today for the first time in months as both James Juniors are now officially Covid-free and back at school. So I shall be playing the radio at full blast and making tea whenever I like, without fear of remonstration! Sometimes one must delight in the simple pleasures of life!! Enjoy your day and I'll be back tomorrow with another project. Until then, happy stampin'!


Stampin' Up! Supplies Used:

Table built using Product Table Builder by The Crafty Owl - Independent Stampin' Up! Demonstrator.

#SimpleStamping Art Gallery One Layer Floral Birthday Card CCS409

by Joanne James2. March 2021 13:00

It's Tuesday and time for a new challenge over at CAS Colours & Sketches. YoonYoung is hosting this month and our first challenge of March is a colour challenge: 


Feel free to flip or rotate the sketch when making your card. For my card today I thought I would take the opportunity to use these colours for an oh-so-simple CAS card and embrace this week's Less Is More ongoing celebrations too with a one layer floral - take a look:


Here's the low-down on today's card:

Today's card uses just 5 items: the Art Gallery stamp set, 3 ink pads and some Basic White thick cardstock - #SimpleStamping at its best. The Art Gallery stamp set is perfect for beginners and experienced crafters alike; the double-layered florals are very forgiving in terms of needing to be stamped accurately and the two-step stamping adds interest and the illusion of texture.  Having recently re-inked my Calypso Coral ink pad, it was stamping quite dark but you can see the contrast between it and the Terracotta Tile overlay more clearly below:


Whilst I was making this card, I also experimented with adding in some gold leaf; I stamped an identical card and added some gold leaf detail to the Terracotta Tile layer and I added a trio of gold gilded gems:


I discounted it as my main card today as it obscured too much of the Teracotta Tile colour, even though I tried to add a little more in with some stamens:


I thought I would share it with you as it shows a quick way to step up my original card. Here are both cards together:


Which one do you prefer? After much playing around, I think actaully 'less is more' and the most basic card is my favourite. 

Here is the visual summary of the key products used on today's project for you to pin for easy reference:


You can see all of my 'How To' summaries on my 'How To - Tips and Techniques' Pinterest board in case you've missed any. 

As a reminder, for our colour challenges, you must use all of the stated challenge colours. You may also use neutral colours; however, the challenge colours should be the most noticeable ones featured on your card. We use Stampin' Up! color names for reference, but you are welcome to use any other companies' products as long as you match the challenge colours as closely as possible.

Enjoy your day and I'll be back tomorrow with another project. Until then, happy stampin'!


Stampin' Up! Supplies Used:

Table built using Product Table Builder by The Crafty Owl - Independent Stampin' Up! Demonstrator.


Hey Rainbow Birthday Chick CCS 408

by Joanne James23. February 2021 13:00

It's Tuesday and time for a new challenge over at CAS Colours & Sketches. This week's challenge is a sketch challenge and Julie has asked that we use the following layout:


Feel free to flip or rotate the sketch when making your card. For my card today I am excited to use a new stamp set that I've been waiting for an age to arrive - take a look:


Here's the low-down on today's card:

Hey Birthday Chick - Remember the 'Hey Chick' stamp set that was a Sale-A-Bration stamp set in 2017? Well, you may have noticed a set in the current mini catalogue called 'Hey Birthday Chick' featuring the same group of feathered friends, this time all ready to celebrate a birthday, complete with cake, balloon and party hat! I used that crazy chicken with the mad hair on my card today, featuring both the old one from the 'Hey Chick' set and the one with the birthday cake from the 'Hey Birthday Chick' set. 

Chick and Birthday Chick Dies Exclusive - Not only are there the two chick stamps available, they are also available as part of exclusive bundles that will be available until 30 June. In addition to some great standalone dies, such as a fence, hen house, eggs, corn and a trellis, to name but a few, there are also dies to make cutting out any of the chicken shapes with ease. I used them to cut out one of my chickens to add a little dimension to my pair:


I am doing very well at meeting the CAS brief this week even if I say so myself, although I did take a small liberty with the sketch since my shapes are not identical. They would have been, but the temptation of the cupcake proved too much for chicken number one!!

Playing With Patterns - The colours for the rainbow colouring on my card today comes from the Playing With Patterns designer paper (Blends colours detailed below). Those subtle stripes were just enough to add interest to the base of my card. 

My rainbow stripes and funky rainbow-feathered chicks are perfect for the colour theme of 'rainbow colours' over at Just Us Girls this week and I'm also playing along with my gal pals over at TicTacToe where Team O are in charge this week and I went down the first column of Jeanne's board with Cute Critter/Celebrate/Coloured. 

Here is the visual summary of the key products used on today's project for you to pin for easy reference:


You can see all of my 'How To' summaries on my 'How To - Tips and Techniques' Pinterest board in case you've missed any. 

Enjoy your day; the sun is shining here so since one of the James Juniors is officially on a Games lesson this afternoon, it looks like I am going to have company for a nice long walk. Following yesterday's announcement, we are officially on a two-week countdown to a return to school, so I think I need to make the most of it! I'll be back tomorrow with another project. Until then, happy stampin'!


Stampin' Up! Supplies Used:

Table built using Product Table Builder by The Crafty Owl - Independent Stampin' Up! Demonstrator.

Kick Up Your Heels With Darling Donkeys CCS 407

by Joanne James16. February 2021 13:00

It's Tuesday and time for a new challenge over at CAS Colours & Sketches. Julie is hosting this month and this week we have a colour challenge: 


The colour palette gave me the perfect reason to break out 'Darling Donkeys' again, which is also perfect to link up with the challenge over at Global Design Project #GDP279 where their theme this week is 'animal' - and mine is ready to party! Take a look:


Here's the low-down on today's card:

Darling Donkeys - I couldn't resist these sweet little donkeys again for my card, today featuring the frolicking donkey on the front of my card, rather than the sweet seated one that I've used on all my previous cards, although I did add one of those to the inside:


Kick Up Your Heels - I thought this donkey would be perfect for a birthday card, and his happy demeanour reminded me of the zebras in the 'Zaony Zebras' stamp set. So I borrowed a sentiment that seemed equally appropriate for a party-going donkey as a fun-loving zebra, along with a party hat, and got my donkey ready to celebrate!

Circles, Circles - I was really pleased with how I met the 'clean and simple' brief this week - lots of white space, minimal layers and patterns and one main focal point. I did use a circle shape to tie my design together: the stitched circle background for my donkey, the circular pattern on my strips of designer paper and the polka dots on his party hat. A subtle detail but a clever way to create harmony in my CAS design:

Here is the visual summary of the key products used on today's project for you to pin for easy reference:


You can see all of my 'How To' summaries on my 'How To - Tips and Techniques' Pinterest board in case you've missed any. 

As a reminder, for our colour challenges, you must use all of the stated challenge colours. You may also use neutral colours; however, the challenge colours should be the most noticeable ones featured on your card. We use Stampin' Up! color names for reference, but you are welcome to use any other companies' products as long as you match the challenge colours as closely as possible.

The James Juniors are on half term this week so in an effot to keep them off their screens and give them a proper break from home schooling, I am being a very hands-on parent this week. So not much crafting from me, unless they are in tow! Enjoy your day and I'll be back tomorrow with another project. Until then, happy stampin'!


Stampin' Up! Supplies Used:

Table built using Product Table Builder by The Crafty Owl - Independent Stampin' Up! Demonstrator.

Bermuda Bay Oh So Ombre Valentine Darling Donkey CCS 406

by Joanne James9. February 2021 13:00

It's Tuesday and time for a new challenge over at CAS Colours & Sketches. This week's challenge is a sketch challenge and Julie has asked that we use the following layout:


Feel free to flip or rotate the sketch when making your card. For my card today I chose to use two of my favourite Sale-A-Bration free gifts - take a look:


Here's the low-down on today's card:

Darling Donkey - Yes, the sweet donkey is here, this time bearing gifts, or more specifically the gift of love with a single red rose - how romantic! Is there anything cuter than a donkey at Valentine's, I wonder?! With only another 5 days to go until the day itself, I thought I would take the opportunity to make another card for one of my loved ones. I'm also linking up with the ladies over at Just Us Girls again as 'Valentine' is their word of the week.

Oh So Ombre - I backed my oval with a panel of patterned Oh So Ombre paper - another Sale-A-Bration freebie that I can't get enough of! My card today is uncluttered and clean, although the reduction in white space does leave me sailing close to the wind as far as our challenge CAS rules are concerned. So if you are reading this and considering playing along, you have been warned! 

Still Time To Sale-A-Brate - If either of the above products are on your wish list, you still have another 3 weeks to go before the current Sale-A-Braiton promotion ends. That is a month earlier than usual though, so bear this in mind and be sure to place your order in good time. Links to the online store are included below or get in touch if you would like me to place your order for you.

Here is the visual summary of the key products used on today's project for you to pin for easy reference:


You can see all of my 'How To' summaries on my 'How To - Tips and Techniques' Pinterest board in case you've missed any. 

Enjoy your day; I'm hoping to complete the second room on my current house decorating quest, so that I can spend the rest of the week getting up straight and having a good tidy up. Why is it that the minute I start decorating anywhere, the rest of the house seems to descend into disorganised chaos?! Does that happen in your house too? I'll be back tomorrow with another project. Until then, happy stampin'!


Stampin' Up! Supplies Used:

Table built using Product Table Builder by The Crafty Owl - Independent Stampin' Up! Demonstrator.

A Tricolour Birthday Card Approaching Perfection CCS 405

by Joanne James2. February 2021 13:00

It's Tuesday and time for a new challenge over at CAS Colours & Sketches. Julie is hosting this month and our first challenge of the month is a colour challenge: 


These colours were a bit of a challenge for me originally but I thought they would work well for a birthday card for a teenage boy - and I always need those! I decided to showcase another free Sale-A-Bration stamp set today - take a look:


Here's the low-down on today's card:

'Approaching Perfection' is another of the stamp sets that you can get for free with a Stampin' Up! order of £45 or more during Sale-A-Bration - and you still have another month to take advantage of this promotion! Full of fun birthday sentiments, it is perfect for clean and simple cards. I used my Stamp-a-ma-jig to create an outer border of multi-coloured candles on my base, then add a stitched square featuring my sentiment to the centre, fussy cutting the 'news flash' so that I could highlight it in red - reminiscent of a red-top tabloid:


I'm also joining in with the current challenge over at Less Is More where they are looking for 'things in a row' - in addition to the rows of candles on my card, I decorated the flap of my envelope to match too:


A detail that might be wasted on the average teenage boy to be fair, but it made me happy! This is a great set for #SimpleStamping - you could easily forgo the stitched diecut. All you need is stamps, ink and paper - #SimpleStamping at its best!

Here is the visual summary of the key products used on today's project for you to pin for easy reference:


You can see all of my 'How To' summaries on my 'How To - Tips and Techniques' Pinterest board in case you've missed any. 

As a reminder, for our colour challenges, you must use all of the stated challenge colours. You may also use neutral colours; however, the challenge colours should be the most noticeable ones featured on your card. We use Stampin' Up! color names for reference, but you are welcome to use any other companies' products as long as you match the challenge colours as closely as possible.

Enjoy your day and I'll be back tomorrow with another project. Until then, happy stampin'!


Stampin' Up! Supplies Used:

Table built using Product Table Builder by The Crafty Owl - Independent Stampin' Up! Demonstrator.

Curvy Flower and Field CAS Birthday Card CCS 404

by Joanne James26. January 2021 13:00

It's Tuesday and time for a new challenge over at CAS Colours & Sketches. Today we have a sketch challenge and Jeanne has asked that we incorporate a curve into our design. Feel free to flip or rotate the sketch when making your card.


Following last week's inner wrestling, for my card today I went uber clean and simple - just 4 items make today's card:


Here's the low-down on today's card:

Curvy Dies - Jeanne's sketch was a gift to Curvy Dies this week! A swift run through the diecutting machine with the simple dotted edge die and my Seaside Spray panel had the necessary curve I was looking for. 

Quite Curvy - I added a birthday sentiment from the co-ordinating Quite Curvy stamp set in Tuxedo Black to my panel; it aligns to the contour of the diecut perfectly and has the bonus of being photopolymer, so is super easy to line up too.

Flower and Field - Having chosen to keep my top layer completely 'clean' (remember, 'white space' doesn't have to white in colour, just free from detail), I decided to add a little detail to the edge of my card base below with a strip of designer paper. This pattern is one of the designs in the Flower & Field Designer Series Paper pack, one of the items that can be yours FREE with a purchase of £45 during Stampin' Up!'s Sale-A-Bration promotion. The patterns in the pack are a collection of bold florals, perfect for all kinds of projects.

Here is the visual summary of the key products used on today's project for you to pin for easy reference:


You can see all of my 'How To' summaries on my 'How To - Tips and Techniques' Pinterest board in case you've missed any. 

Enjoy your day and I'll be back tomorrow with another project. Until then, happy stampin'!


Stampin' Up! Supplies Used:


Table built using Product Table Builder by The Crafty Owl - Independent Stampin' Up! Demonstrator.

A Spotlight on Dragonfly Garden CCS 403

by Joanne James19. January 2021 13:00

It's Tuesday and time for a new challenge over at CAS Colours & Sketches. This week Jeanne has a colour challenge for us: 


I like all of these colours, yet for some reason I really struggled to create my card. Then the more I tinkered, the more my card strayed from the 'clean and simple'. Check out my card and I'll walk you through my creative process:


Here's the low-down on today's card:

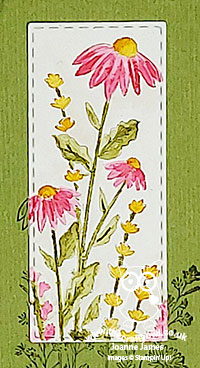
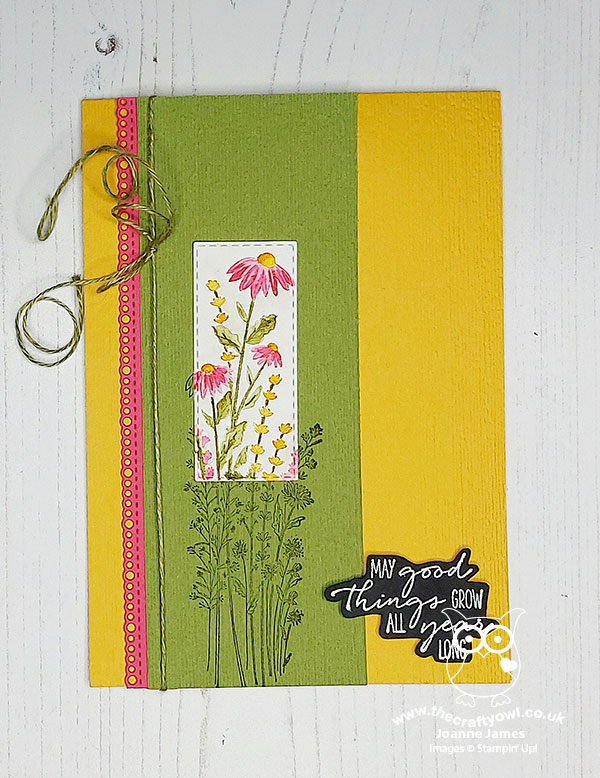
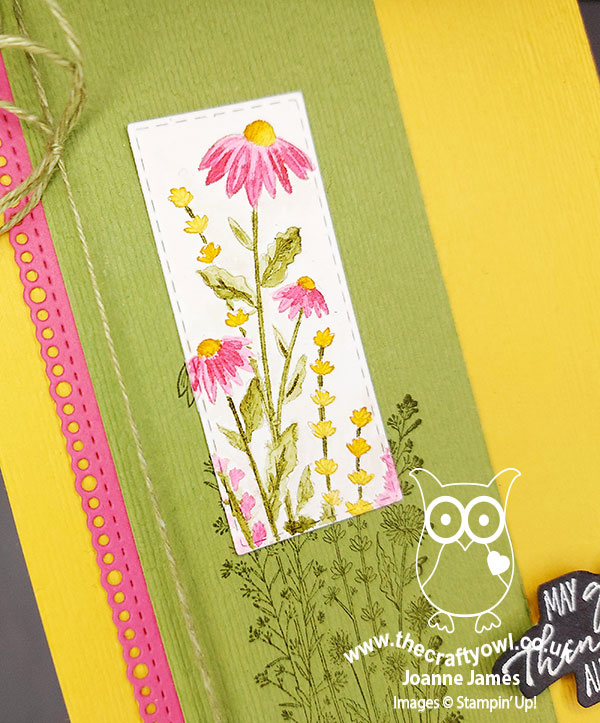
A Spotlight on Dandy Garden - I thought these colours would be perfect for florals, so decided to use the single large grassy wildflower image from the Dandy Garden stamp set. I decided to use the spotlight technique to highlight a small area of the florals with the challenge colours, with some no-line watercolouring on a rectangle of watercolour paper, stamping the main image tone-on-tone on a panel of Old Olive.  

A Balance of Colour - I decided to use a Crushed Curry cardbase instead of white, with a panel of Old Olive; this base was run through my Subtle Embossing Folder to add some texture and create a seamless panel. I also added a border detail of Melon Mambo, for another touch of colour. Whilst I don't always use white as a base for a clean and simple card, the all important 'white space' is usually a single colour - my earlier card here is a good example of that. In hindsight, I think using all three colours of cardstock was probably too much and perhaps just using Old Olive without highlighting the flowers with an alternative base colour would have been a better idea. 

It's In The Details - There are a number of small details that in themselves I love - the subtle embossed texture of the base, the Melon Mambo border detail, the tone-on-tone twine bow and the heat-embossed fussy cut sentiment. Again, on reflection all of these things together may be why my card feels less 'clean and simple' than it otherwise would be. So a lesson learned for me this week and hopefully as you're reading this a lesson in clean and simple cardmaking for you too! All that said, I still like this card and it's already been sent to someone who will hopefully love it too ;-)

The visual summary of the key products used on today's project for you to pin for easy reference is to follow. 

You can see all of my 'How To' summaries on my 'How To - Tips and Techniques' Pinterest board in case you've missed any. 

As a reminder, for our colour challenges, you must use all of the stated challenge colours. You may also use neutral colours; however, the challenge colours should be the most noticeable ones featured on your card. We use Stampin' Up! color names for reference, but you are welcome to use any other companies' products as long as you match the challenge colours as closely as possible.

Enjoy your day; we woke up this morning to find that we have no broadband at Casa James and on investigation that it's unlikely to be fixed until the end of the week. Not ideal, when everyone is working at home due to lockdown and both James Juniors are having to follow a distance learning programme. We are managing so far, but seriously rationing access to the internet, much to the dismay of the teenagers!! Wish me luck!!!All being well, I'll be back tomorrow with another project. Until then, happy stampin'!


Stampin' Up! Supplies Used:

Table built using Product Table Builder by The Crafty Owl - Independent Stampin' Up! Demonstrator.

Happy Birthday Snail CCS 402

by Joanne James12. January 2021 13:00

It's Tuesday and time for a new challenge over at CAS Colours & Sketches. Today we have a sketch challenge and Jeanne has asked that we use any non-geometric shape. Feel free to flip or rotate the sketch when making your card.


For my card today I decided to make another card using the 'Snailed It' set. I know I used this set last week for my CC&S card too, but I just couldn't resist another outing (don't worry, if you're not a snail fan I have something different in store for my challenge card next week!) These snails are just perfect for a clean and simple card - take a look:


Here's the low-down on today's card:

Snailed It - For today's card, I used the alternative snail in the 'Snailed It' set, who instead of bearing snail mail comes bearing gifts - of the birthday kind! I coloured him using my Stampin' Blends markers and took the inspiration for my colours from the other elements of the suite.

Snail Mail - I decided to create a recessed panel from the horizontal line of the sketch that is both spanned by my birth!day snail and home to a narrow strip of Snail Mail designer paper on the panel below. It's a rare thing to use designer series paper on a clean-and-simple card, but used sparingly and to accentuate a specific design element, such as the recess, and with a clear pattern element, it can be used to great effect (as I've shown here, even if I say so myself ;-) ) 

Art Gallery Birthday - Lastly, the sentiment from today's comes from the Art Gallery stamp set. This set is so, so beautiful and contain some of the most amazing florals, but is also home to some fabulous basic block-type greetings, which are perfect for clean and simple cards.

And that's it - clean and simple, done!

Here is the visual summary of the key products used on today's project for you to pin for easy reference:


You can see all of my 'How To' summaries on my 'How To - Tips and Techniques' Pinterest board in case you've missed any. 

Enjoy your day; today both James Juniors are officially 'back to (virtual) school. I was fully anticipating getting some of my desk jobs ticked off, but so far I have had a steady stream of interruptions from each of them, who are both on breaks at different times and are requiring attention of one form or another, even if it's just real-life human interaction. Something tells me home-schooling is not a route to peace and quiet ... or productivity, or at least not for me anyway! Sanity aside, all being well I'll be back tomorrow with another project. Until then, happy stampin'!


Stampin' Up! Supplies Used:

Table built using Product Table Builder by The Crafty Owl - Independent Stampin' Up! Demonstrator.

Mini Catalogue

BROWSE THE CATALOGUE

The mini catalogue is now live! Read and download your copy here.

Shop Online

Access my online shop 24 x 7, 365 days of the year:

Current April hostess code:

VDKNV7BH

Shop Online

Join My Team

It's always a great time to join Stampin’ Up! New team members can get £130 worth of products for only £99 + free business supplies + free shipping + all the fun being a part of Stampin’ Up! Stampin' Up! has something for everyone: join my growing team and benefit from my support to enjoy Stampin' Up! however you choose.

If you're interested, call me for a chat to understand how I can help you realise your goals. Alternatively, if you have already decided to sign up and you just can't wait, please click here for the link to the online form where you can sign up and order your starter kit right away! 

Latest Kit!

Stampin Cut and Emboss

The Rock Legend Kit has all you need to make 8 cards with coordinating envelopes. Along with the new Panda Friends Kit, both are available from January 4th for just £14 each - get yours here!

2023-24 Annual Catalogue

BROWSE THE CATALOGUE

Click on the catalogue for a full list of current SU! supplies - if you would like to order any of the items featured, please drop me a line at [email protected] or give me a call on 07773 421446 - I'd be happy to help.

New Online Exclusives

There are new products available exclusively in the online store from 5 March - check them out here.

About Me

Hi I'm Joanne and live in Northampton and when I'm not looking after my husband and two beautiful children, am an avid crafter with a passion for all things Stampin' Up!

I must confess that I have never been a big rubber stamper - until I discovered Stampin' Up! that is. I love the fact that I can get such great results with co-ordinating stamps, inks, papers and punches - the possibilities are endless! Join me on my stamping journey as I share the things I love and be inspired to create amazing things yourself!

Follow Me

Monthly Newsletter

Box Builder

Click the button above to use Box Buster to create your custom box design using the Envelope Punch Board!

Kits Collection Now Available!

Stampin Cut and Emboss

The new Kits Collection from Stampin' Up! is now available!

Click here to see the current kits available and order yours online today.

I Design For


Stampin' Up Stuff

This is my personal blog and is not endorsed by Stampin’ Up! I hope you find it a plentiful source of ideas and personal inspiration but please don't copy my designs for contest submission or use for classes, publication or sale without express permission.