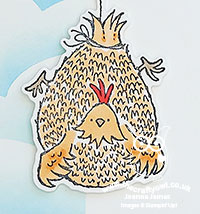
Artistically Inked CAS Thank You Card CCS421

by Joanne James25. May 2021 13:00

It's Tuesday and time for a new challenge over at CAS Colours & Sketches. This week's challenge is a sketch challenge and Samantha has asked that we feature a non-geometrical shape on our cards: 


Feel free to flip or rotate the sketch when making your card.

For my card today I had to make another card using items from the 'Expressions In Ink' Suite - take a look:


Here's the low-down on today's card:

Artistically Inked - The main feature on today's card is a gold foil leaf branch cut with my Artistic Dies and a trio of Polished Pink blooms that I've stamped and diecut and tucked in amongst the leaves.  The flowers in this set are so pretty and they are so easy to stamp - perfect for clean and simple cards.

A Distinktive Inking Tip - As beautiful as they are, there is no patterned paper from the suite on today's card. Instead, I added a 'hint of pink' both behind my floral stem and in the opposing corner beneath my sentiment. Instead of inking the stamp directly, or even stamping off, I added ink to the stamp using my blending brush; this gave perfect coverage with no harsh lines and allowed the detail of the distinktive stamp to show through, but with just a hint of colour:


I really like this effect, so soft and subtle.

Finishing Touches - A gold heat-embossed sentiment and a trio of gold gilded gems finish today's card. Just enough bling to make it special without breaking too many CAS rules!

Here is the visual summary of the key products used on today's project for you to pin for easy reference:


You can see all of my 'How To' summaries on my 'How To - Tips and Techniques' Pinterest board in case you've missed any. 

It's still freezing cold and blowing a gail here in the UK today, although mercifully the torrential rain has stopped for the time being. Summer, oh summer - where are you??!

Enjoy your day and I'll be back tomorrow with another project. Until then, happy stampin'!


Stampin' Up! Supplies Used:

Table built using Product Table Builder by The Crafty Owl - Independent Stampin' Up! Demonstrator.

Lots of Hearts Scalloped Heart Floral Thank You CCS 420

by Joanne James18. May 2021 12:00

It's Tuesday and time for a new challenge over at CAS Colours & Sketches. Samantha is hosting this month and this week we have a colour challenge: 


For my card today I also chose to use the sketch and thank you theme over at Fusion and made another card with my Lots of Hearts bundle that was out on my desk when I made Sunday's card - take a look:


Here's the low-down on today's card:

Lots of Heart - Today's card features a scalloped heart overlaid with the floral heart die that also comes in the Many Hearts Dies set. I picked up this set long after Valentine's, but I like how although it features hearts it is a great 'all year round' set and has some lovely sentiments too.

A Colour Conundrum - As I often find when I'm faced with a trio of colours, two become dominant and the third takes something of a back seat. That absolutely played out on today's card: I used some Soft See Foam and Highland Heather DSP to compliment the colours of the diecut flowers and leaves, and given the muted tones of my pastels, I was struggling to incorporate either Blushing Bride ink or cardstock without it overpowering the other elements of my card. I solved my problem by using it really sparingly - I found some retired Blushing Bride enamel dots in my stash and used them to accent the centre of my open flowers - problem solved!

You're All Heart - As I mentioned above, there are some great generic sentiments in the 'Lots of Heart' set; to accompany the 'thank you' on the outside of my card, I stamped this one on the inside of my card, complete with a stamped-off Blushing Bride pink heart:

I actually really like this card and think the soft pastels are really pretty - so looking forward to seeing what you make of these colours this week!

Here is the visual summary of the key products used on today's project for you to pin for easy reference:


You can see all of my 'How To' summaries on my 'How To - Tips and Techniques' Pinterest board in case you've missed any. 

As a reminder, for our colour challenges, you must use all of the stated challenge colours. You may also use neutral colours; however, the challenge colours should be the most noticeable ones featured on your card. We use Stampin' Up! color names for reference, but you are welcome to use any other companies' products as long as you match the challenge colours as closely as possible.

Enjoy your day and I'll be back tomorrow with another project. Until then, happy stampin'!


Stampin' Up! Supplies Used:

Table built using Product Table Builder by The Crafty Owl - Independent Stampin' Up! Demonstrator.

Pansy Petals CAS Hello Card CCS 419

by Joanne James11. May 2021 12:00

It's Tuesday and time for a new challenge over at CAS Colours & Sketches. This week's challenge is a sketch challenge and Samantha has asked that we create a mini slimline card measuring 3.5" x 6.25" using the following layout: 


Feel free to flip or rotate the sketch when making your card.

So slimline cards are truly 'in vogue' at the moment, but I haven't yet made one in this mini slimline size. For my card today I went with the new in-colour Polished Pink and some pansies - take a look:


Here's the low-down on today's card:

This card was super simple to put together: a base of Polished Pink and an extended scalloped stitched rectangle in white, with a strip of Melon Mambo onto which I heat-embossed my sentiment. I then used my Pansy Dies to diecut a large and small pink pansy from the Pansy Petals designer paper and added a trio of clear faceted gems to finish. 

I added a little extra stamped pansy to finish off the inside of my card:


Here is the visual summary of the key products used on today's project for you to pin for easy reference:


You can see all of my 'How To' summaries on my 'How To - Tips and Techniques' Pinterest board in case you've missed any. 

I really like this mini-slimline card size - I need to make some custom envelopes now to fit!

Enjoy your day and I'll be back tomorrow with another project. Until then, happy stampin'!


Stampin' Up! Supplies Used:

Table built using Product Table Builder by The Crafty Owl - Independent Stampin' Up! Demonstrator.

Pantone-Inspired Pierced Blooms You're Amazing Card CCS 418

by Joanne James4. May 2021 12:00

It's Tuesday and time for a new challenge over at CAS Colours & Sketches. Samantha is hosting for the month of May and our first challenge is a colour challenge: 


Samantha's chosen colours this week are very reminiscent of the 2021 Pantone Colour of the Year pairing of grey and yellow so are very contemporary and on point. I wanted the yellow to be my 'white space' on my card as I wanted to use white as part of my design, so I grabbed this week's Global Design Project sketch layout and set to work with my 'In Bloom' stamp set and co-ordinating Pierced Blooms Dies - take a look:


Here's the low-down on today's card:

I used the label from the Pierced Blooms dieset for my sentiment which I stamped in Basic Grey, then added a cluster of diecut flowers and leaves in the challenge colours and white to mimic the circular shape of the sketch. In order to preserve a feeling of CAS and my all-important white (or yellow!) space, I resisted the urge to add any additional embellishments to my card:


I had a spare diecut flower leftover so I added that to the inside too:


Here is the visual summary of the key products used on today's project for you to pin for easy reference:


You can see all of my 'How To' summaries on my 'How To - Tips and Techniques' Pinterest board in case you've missed any. I really love this dieset and am thrilled that it has carried over to the new annual catalogue too so will be with us beyond the end of June when the mini catalogue leaves us. I can see me getting lots more use from it!

As a reminder, for our colour challenges, you must use all of the stated challenge colours. You may also use neutral colours; however, the challenge colours should be the most noticeable ones featured on your card. We use Stampin' Up! color names for reference, but you are welcome to use any other companies' products as long as you match the challenge colours as closely as possible.

Enjoy your day and I'll be back tomorrow with another project. Until then, happy stampin'!

Stampin' Up! Supplies Used:

Table built using Product Table Builder by The Crafty Owl - Independent Stampin' Up! Demonstrator.

Under My Umbrella Rainbow Scraps Card CCS417

by Joanne James27. April 2021 13:00

It's Tuesday and time for a new challenge over at CAS Colours & Sketches. This week's challenge is a sketch challenge and Wei has asked that we get creative with diagonals this week:


Feel free to flip or rotate the sketch when making your card - which I did this week! I looked at those diagonals and thought that if I rotated the base through 180 degrees, they would make a rainbow! Take a look to see what I mean:


Here's the low-down on today's card:

I used a selection of 5mm wide offcuts from my scrapbox in a selection of rainbow colours (see below) and glue them across the diagonal of my Balmy Blue card base. I extended the Highland Heather piece across the card front, then took a piece of Basic White and cut an angled border with my clouds die from the retiring Happy Dies set for my top panel:

A simple sentiment from the also retiring 'Under My Umbrella' stamp set in Pacific Point finished my card - and not an umbrella in sight!

Our lovely DT member Vicky is also the hostess over at Addicted to CAS this week where she has chosen the code word 'sky' so I'm linking up there too - with sky, rainbow and clouds, my card today doesn't have anything else!!

Here is the visual summary of the key products used on today's project for you to pin for easy reference:


You can see all of my 'How To' summaries on my 'How To - Tips and Techniques' Pinterest board in case you've missed any. 

As a reminder, for our colour challenges, you must use all of the stated challenge colours. You may also use neutral colours; however, the challenge colours should be the most noticeable ones featured on your card. We use Stampin' Up! color names for reference, but you are welcome to use any other companies' products as long as you match the challenge colours as closely as possible.

Enjoy your day and I'll be back tomorrow with another project. Until then, happy stampin'!


Stampin' Up! Supplies Used:

Table built using Product Table Builder by The Crafty Owl - Independent Stampin' Up! Demonstrator.

Vase Builder Punch CAS Notecard CCS416

by Joanne James20. April 2021 13:00

It's Tuesday and time for a new challenge over at CAS Colours & Sketches. Wei is hosting this month and today we have a colour challenge: 


For my card today I took my inspiration from the vase of flowers on the table in the inspiration over at Time Out:


Here's the low-down on today's card:

A super simple punched flower in a vase, courtesy of the retiring Vase Builder Punch, is the focal point for my card today. I popped the flower head and vase on dimensionals for a little extra lift: 

I paired my vase with a sentiment from the also retiring 'Butterfly Gala' stamp set and centred on a Stitched So Sweetly scalloped stitched rectangle with a Balmy Blue card base is all there is to it! I'm also entering my card over at Addicted to CAS where their code word this week is 'flower'. 

Here is the visual summary of the key products used on today's project for you to pin for easy reference:


You can see all of my 'How To' summaries on my 'How To - Tips and Techniques' Pinterest board in case you've missed any. 

As a reminder, for our colour challenges, you must use all of the stated challenge colours. You may also use neutral colours; however, the challenge colours should be the most noticeable ones featured on your card. We use Stampin' Up! color names for reference, but you are welcome to use any other companies' products as long as you match the challenge colours as closely as possible.

Enjoy your day; I have joined the ranks of the vaccinated population, having received my first jab this morning - one down, one more to go! I'll be back tomorrow with another project. Until then, happy stampin'!


Stampin' Up! Supplies Used:

Table built using Product Table Builder by The Crafty Owl - Independent Stampin' Up! Demonstrator.

Well Written In Colour Circles Birthday Wishes CCS 415

by Joanne James13. April 2021 13:00

It's Tuesday and time for a new challenge over at CAS Colours & Sketches. This week's challenge is a sketch challenge and Wei has asked that we create something with the following layout:


 Feel free to flip or rotate the sketch when making your card. For my card today I wanted to showcase one of my most favourite retiring circles of all time, one of the circles from the Stitched Shapes Dies (unfortunately already out of stock and discontinued by the time you read this):


Here's the low-down on today's card:

I chose to feature Magenta Madness as the colour with my black and white colour combo today for the current challenge over at Color Dare, but this card would work paired with any colour. I cut a partial circle from the front of my card and infilled it with a piece of window sheet, and added a stitched circle to the acetate panel. I added a sheet of In-Colour DSP with a circle pattern to the inside of my card so that a small portion of it could be seen through my cardfront. Whilst the outside of my card has plenty of white space, inside there's not so much! Wondering what I did with the piece of cardstock I removed to accommodate my window sheet? I flipped it and adhered it to the inside of my card to write my greeting:


 Waste not, want not and all that! I added a stacked birthday diecut from the retiring Well Written dies along with a stamped greeting from 'A Wish For Everything' to complete the front of my card:


Super simple but I really like it! What do you think? Do leave me a comment below - I would love to hear your thoughts!

Here is the visual summary of the key products used on today's project for you to pin for easy reference:


You can see all of my 'How To' summaries on my 'How To - Tips and Techniques' Pinterest board in case you've missed any. 

Enjoy your day and I'll be back tomorrow with another project. Until then, happy stampin'!


Stampin' Up! Supplies Used:

Table built using Product Table Builder by The Crafty Owl - Independent Stampin' Up! Demonstrator.

Bloom And Grow Yellow Floral Thank You CCS 414

by Joanne James6. April 2021 13:00

It's Tuesday and time for a new challenge over at CAS Colours & Sketches. Wei is hosting this month and our first challenge of the month is a colour challenge: 


For my card today I used the sketch layout over at Fusion along with our colours this week for some pretty florals and start the process of saying goodbye to one of my favourite floral sets in the annual catalogue - take a look:


Here's the low-down on today's card:

Bloom And Grow - I love the floral boughs in the 'Bloom and Grow' stamp set that a perfect for a spot of colouring and chose a simple floral that allowed for all three challenge colours to be featured then die cut with the co-ordinating Budding Blooms Dies. 

In Stitches - There are also a few stitched elements to my card today: I placed my sentiment on a Stitched Shapes circle and added a stitched scalloped border from the 'Stitched Me Mine' Dies to my white panel. Both of these die sets are also retiring at the end of the month - so if you don't have them, grab them whilst you still can.

Balancing Black - Having considered stamping my sentiment black-on-white straight onto my panel, I eventually opted for the reverse and heat embossed my sentiment on black. It provided better contrast and really compliments the Bumblebee yellow I think, whilst not encroaching overly on my 'white space':

So what do you think? I'd love you to leave me a comment below with your thoughts! Here is the visual summary of the key products used on today's project for you to pin for easy reference:


You can see all of my 'How To' summaries on my 'How To - Tips and Techniques' Pinterest board in case you've missed any. 

As a reminder, for our colour challenges, you must use all of the stated challenge colours. You may also use neutral colours; however, the challenge colours should be the most noticeable ones featured on your card. We use Stampin' Up! color names for reference, but you are welcome to use any other companies' products as long as you match the challenge colours as closely as possible.

Enjoy your day and I'll be back tomorrow with another project. Until then, happy stampin'!


Stampin' Up! Supplies Used:

Table built using Product Table Builder by The Crafty Owl - Independent Stampin' Up! Demonstrator.

Hey Birthday Chick Best of Cluck CCS 413

by Joanne James30. March 2021 12:00

It's Tuesday and time for a new challenge over at CAS Colours & Sketches. It's the fifth Tuesday of March, and you know what that means:  Timeless Tuesday Double Challenge!  We're throwing back with a trio of retired Stampin' Up colours and one of our past sketch challenges, combining them into one color and sketch challenge:  


For our colour challenges, you must use all of the stated challenge colours. You may also use neutrals such as white, ivory, black, brown, grey, or metallics; however, no other colours should be added to your card. We use Stampin' Up! colour names for reference, but you are welcome to use any other companies' products as long as you match the challenge colours as closely as possible.  Also, you're free to flip or rotate the sketch when creating your card.  Just remember to keep it clean and simple in style!

For my card today I decided to create a fun tongue-in-cheek good luck card for my favourite chicken expert - take a look:
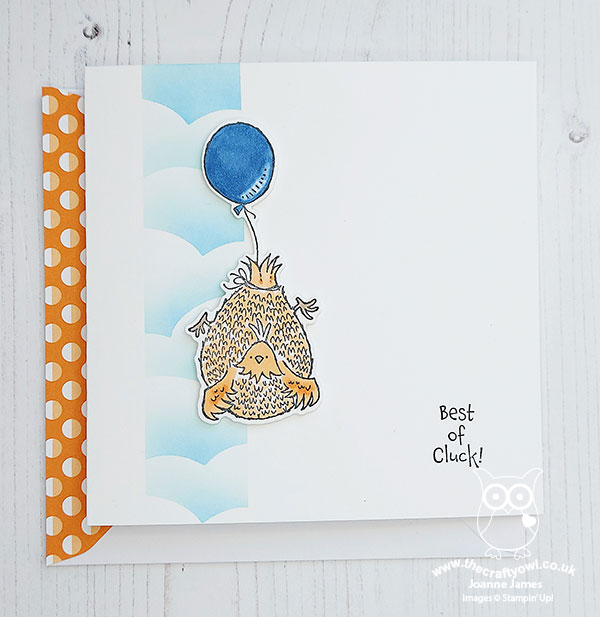
 

Here's the low-down on today's card:

A Colour Challenge - This week's colours were something of a challenge for me, as whilst I still have a Tempting Turquoise ink pad to hand, the same can't be said of the other two colours so some creative colour-matching was required! Fortunately the light Pumpkin Pie Blends marker is very close to Peekaboo Peach, and the light Night of Navy my closest match to Marina Mist, so they are the colours I used for my balloon and chicken respectively. I kept with the square format of the sketch, and the orange dotty paper you can see to the left of my card is the customised envelope flap of the co-ordinating envelope (just in case you were wondering!)

Happy Dies Masking - I used some large post-it notes and a stencil made using the cloud die from the Happy Dies set to create a column of masked sky and clouds, using my blending brush and Tempting Turquoise ink to work down the card. I then positioned my chicken (in lieu of the circle on the sketch) to the right of this and added my sentiment to the corner of my white space. I am pleased with my clean and simple look this week - so much so, I am also linking up with the lovely peeps over at Less Is More who are looking for CAS inking on no more than a third of your card - I think I managed it!

Best of Cluck: Spot The Difference - So I have two versions of my card today; the second one is below. Can you spot the difference? 
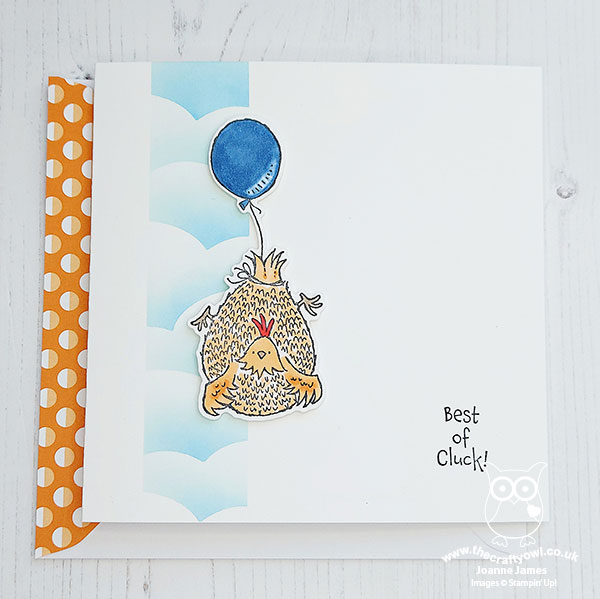
 

The eagle-eyed amongst you will notice that in order to comply with our colour challenge, I did not colour the comb of my chicken on my original card. I really missed that pop of red though, so subsequently added it to version two! Did you know that not all chickens have red combs, with some breeds of chicken displaying purple or even black combs, although I must confess I've never seen one. Did you know that chickens are attracted to red, but not in a positive sense? If a chicken sees red blood on another chicken, they will turn cannibal and left untreated, peck at it until the wounded chicken eventually dies. Gruesome, I know! My investigation into comb colours caused me to wonder why, given the former, those with red combs don't automatically all attack each other; it turns out that comb size and redness is one of the things that chickens use to establish their pecking order and will peck each other within a flock until this has been established, however not usually to the lengths of devouring each other to oblivion!

I made today's card for Rebecca, who is currently studying for her GCSEs and still has exams to sit next term after the Easter break in order to form part of the teacher assessment criteria, as I knew she would find it funny. She loves all things chicken-related and is an absolute mine of information as far as her feathered friends is concerned. We keep chickens and in order to prevent the scenario outlined above, one of them is currently bright purple, curtesy of a liberal dose of antiseptic spray to confuse the others - she really does look funny! As the saying goes, no harm, no fowl - or something like that!

Here is the visual summary of the key products used on today's project for you to pin for easy reference:
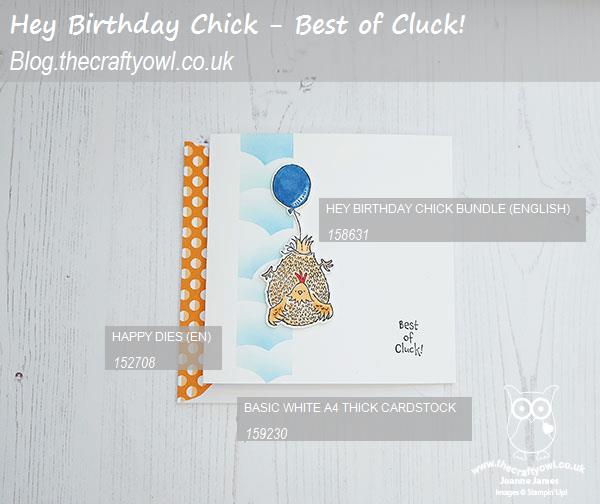
 

You can see all of my 'How To' summaries on my 'How To - Tips and Techniques' Pinterest board in case you've missed any. 

As a reminder, for our colour challenges, you must use all of the stated challenge colours. You may also use neutral colours; however, the challenge colours should be the most noticeable ones featured on your card. We use Stampin' Up! color names for reference, but you are welcome to use any other companies' products as long as you match the challenge colours as closely as possible.

Enjoy your day and I'll be back tomorrow with another project. Until then, happy stampin'!


Stampin' Up! Supplies Used:
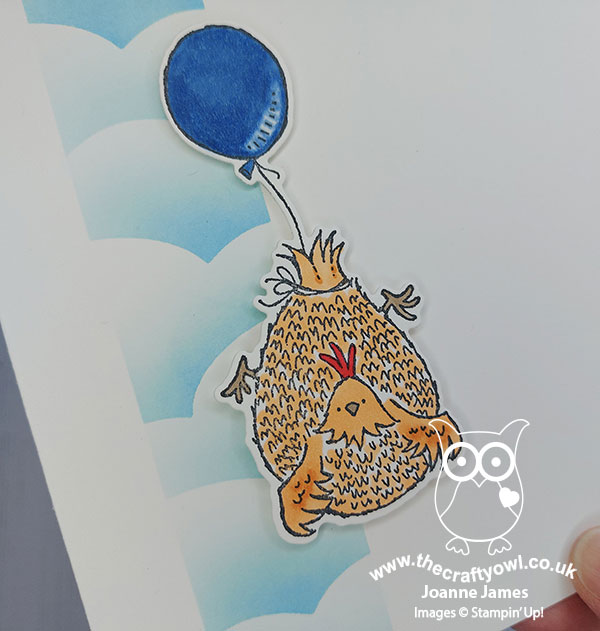
Table built using Product Table Builder by The Crafty Owl - Independent Stampin' Up! Demonstrator.

Shades of Purple Ornate Borders Thank You Card CCS412

by Joanne James23. March 2021 12:00

It's Tuesday and time for a new challenge over at CAS Colours & Sketches. Can you believe it was exactly one year ago today that the UK went into lockdown; my how times have changed in the last year - thank heavens for crafting! This week's challenge is a sketch challenge and YoonYoung has asked that we create something with three vertical elements and a central sentiment as our focal point:


Feel free to flip or rotate the sketch when making your card. For my card today I decided to use a floral border die in shades of purple for my vertical elements - here's my card:


Here's the low-down on today's card:

Ornate Borders - Whilst designed for use along the edge of a card as the name suggests, I thought that the simplest of the floral borders would also work when layered into my design to create the three vertical lines of interest in the sketch. I measure them carefully so that they were placed an equal distance apart; I like the way that the flowers show through the colour beneath to add further interest to each diecut. 

Shades of Purple - Purples are a favourite of mine and were perfect for today's card, where I decided I needed three complimentary shades of one colour, to maintain something of a CAS feel; I used the soon-to-be retiring Purple Posy, Highland Heather and Gorgeous Grape. I am also playing along with a new-to-me challenge, The Flower Challenge, introduced to me by my blogging friend, the lovely Michele Ferguson of I Card Everyone who has just joined their team of designers, where they are looking for flowers in shades of purple too. Mine are diecut as opposed to stamped (I think that's still allowed!) and if you are a purple-lover too, you should check out their gallery - there are some fabulous purple stamped creations to peruse!


Inside Detail - I chose a super simple 'thanks' from the co-ordinating 'Ornate Thanks' stamp set in a stitched oval for the front of my card, in an effort to increase my proportion of 'white space' and maintain a clean and simple feel, and finished it on the inside of my card, adding a flower made up from the pieces leftover from the diecuts on the front:

So what do you think? Is purple friend or foe in your cardmaking and how will you interpret those verticals on our sketch this week? I'm looking forward to finding out!

Here is the visual summary of the key products used on today's project for you to pin for easy reference:


You can see all of my 'How To' summaries on my 'How To - Tips and Techniques' Pinterest board in case you've missed any. 

As a reminder, for our colour challenges, you must use all of the stated challenge colours. You may also use neutral colours; however, the challenge colours should be the most noticeable ones featured on your card. We use Stampin' Up! color names for reference, but you are welcome to use any other companies' products as long as you match the challenge colours as closely as possible.

Enjoy your day and I'll be back tomorrow with another project. Until then, happy stampin'!


Stampin' Up! Supplies Used:

Table built using Product Table Builder by The Crafty Owl - Independent Stampin' Up! Demonstrator.

Mini Catalogue

BROWSE THE CATALOGUE

The mini catalogue is now live! Read and download your copy here.

Shop Online

Access my online shop 24 x 7, 365 days of the year:

Current April hostess code:

VDKNV7BH

Shop Online

Join My Team

It's always a great time to join Stampin’ Up! New team members can get £130 worth of products for only £99 + free business supplies + free shipping + all the fun being a part of Stampin’ Up! Stampin' Up! has something for everyone: join my growing team and benefit from my support to enjoy Stampin' Up! however you choose.

If you're interested, call me for a chat to understand how I can help you realise your goals. Alternatively, if you have already decided to sign up and you just can't wait, please click here for the link to the online form where you can sign up and order your starter kit right away! 

Latest Kit!

Stampin Cut and Emboss

The Rock Legend Kit has all you need to make 8 cards with coordinating envelopes. Along with the new Panda Friends Kit, both are available from January 4th for just £14 each - get yours here!

2023-24 Annual Catalogue

BROWSE THE CATALOGUE

Click on the catalogue for a full list of current SU! supplies - if you would like to order any of the items featured, please drop me a line at [email protected] or give me a call on 07773 421446 - I'd be happy to help.

New Online Exclusives

There are new products available exclusively in the online store from 5 March - check them out here.

About Me

Hi I'm Joanne and live in Northampton and when I'm not looking after my husband and two beautiful children, am an avid crafter with a passion for all things Stampin' Up!

I must confess that I have never been a big rubber stamper - until I discovered Stampin' Up! that is. I love the fact that I can get such great results with co-ordinating stamps, inks, papers and punches - the possibilities are endless! Join me on my stamping journey as I share the things I love and be inspired to create amazing things yourself!

Follow Me

Monthly Newsletter

Box Builder

Click the button above to use Box Buster to create your custom box design using the Envelope Punch Board!

Kits Collection Now Available!

Stampin Cut and Emboss

The new Kits Collection from Stampin' Up! is now available!

Click here to see the current kits available and order yours online today.

I Design For


Stampin' Up Stuff

This is my personal blog and is not endorsed by Stampin’ Up! I hope you find it a plentiful source of ideas and personal inspiration but please don't copy my designs for contest submission or use for classes, publication or sale without express permission.