It's Tuesday and time for a new challenge over at CAS Colours & Sketches. It's the fifth Tuesday of March, and you know what that means: Timeless Tuesday Double Challenge! We're throwing back with a trio of retired Stampin' Up colours and one of our past sketch challenges, combining them into one color and sketch challenge:


For our colour challenges, you must use all of the stated challenge colours. You may also use neutrals such as white, ivory, black, brown, grey, or metallics; however, no other colours should be added to your card. We use Stampin' Up! colour names for reference, but you are welcome to use any other companies' products as long as you match the challenge colours as closely as possible. Also, you're free to flip or rotate the sketch when creating your card. Just remember to keep it clean and simple in style!
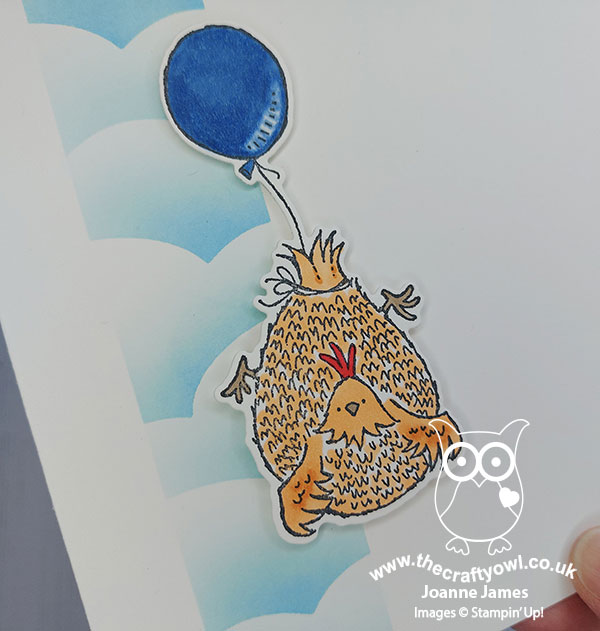
For my card today I decided to create a fun tongue-in-cheek good luck card for my favourite chicken expert - take a look:

Here's the low-down on today's card:
A Colour Challenge - This week's colours were something of a challenge for me, as whilst I still have a Tempting Turquoise ink pad to hand, the same can't be said of the other two colours so some creative colour-matching was required! Fortunately the light Pumpkin Pie Blends marker is very close to Peekaboo Peach, and the light Night of Navy my closest match to Marina Mist, so they are the colours I used for my balloon and chicken respectively. I kept with the square format of the sketch, and the orange dotty paper you can see to the left of my card is the customised envelope flap of the co-ordinating envelope (just in case you were wondering!)
Happy Dies Masking - I used some large post-it notes and a stencil made using the cloud die from the Happy Dies set to create a column of masked sky and clouds, using my blending brush and Tempting Turquoise ink to work down the card. I then positioned my chicken (in lieu of the circle on the sketch) to the right of this and added my sentiment to the corner of my white space. I am pleased with my clean and simple look this week - so much so, I am also linking up with the lovely peeps over at Less Is More who are looking for CAS inking on no more than a third of your card - I think I managed it!
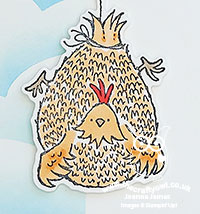
Best of Cluck: Spot The Difference - So I have two versions of my card today; the second one is below. Can you spot the difference?

The eagle-eyed amongst you will notice that in order to comply with our colour challenge, I did not colour the comb of my chicken on my original card. I really missed that pop of red though, so subsequently added it to version two! Did you know that not all chickens have red combs, with some breeds of chicken displaying purple or even black combs, although I must confess I've never seen one. Did you know that chickens are attracted to red, but not in a positive sense? If a chicken sees red blood on another chicken, they will turn cannibal and left untreated, peck at it until the wounded chicken eventually dies. Gruesome, I know! My investigation into comb colours caused me to wonder why, given the former, those with red combs don't automatically all attack each other; it turns out that comb size and redness is one of the things that chickens use to establish their pecking order and will peck each other within a flock until this has been established, however not usually to the lengths of devouring each other to oblivion!
I made today's card for Rebecca, who is currently studying for her GCSEs and still has exams to sit next term after the Easter break in order to form part of the teacher assessment criteria, as I knew she would find it funny. She loves all things chicken-related and is an absolute mine of information as far as her feathered friends is concerned. We keep chickens and in order to prevent the scenario outlined above, one of them is currently bright purple, curtesy of a liberal dose of antiseptic spray to confuse the others - she really does look funny! As the saying goes, no harm, no fowl - or something like that!
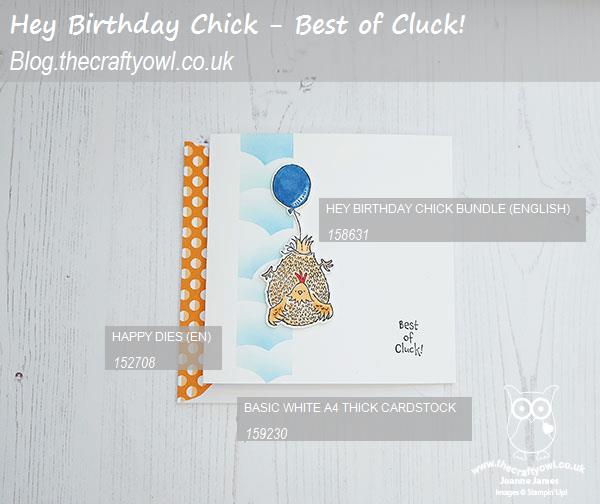
Here is the visual summary of the key products used on today's project for you to pin for easy reference:
You can see all of my 'How To' summaries on my 'How To - Tips and Techniques' Pinterest board in case you've missed any.
As a reminder, for our colour challenges, you must use all of the stated challenge colours. You may also use neutral colours; however, the challenge colours should be the most noticeable ones featured on your card. We use Stampin' Up! color names for reference, but you are welcome to use any other companies' products as long as you match the challenge colours as closely as possible.
Enjoy your day and I'll be back tomorrow with another project. Until then, happy stampin'!
Stampin' Up! Supplies Used: