Brights Thank You Card with hand-dyed Filter Paper Flower

by Joanne James30. April 2013 19:56

As promised, today I have a card to match yesterday's lovely Melon Mambo treat holder, made with the Pop 'n' Cuts base. No dresses today, but another of those gorgeous filter paper flowers, this time hand-dyed yellow to really make it 'pop': 

This flower was made using the slightly smaller Floral Frames Framelit; the flowers can be coloured in a number of different ways - to achieve this effect, the edges were sponged with Daffodil Delight ink then the layers sprayed with a homemade mix of alcohol and shimmer spray to encourage the colour to 'bleed' and shimmer slightly. So easy and each time you make one, you get a slightly different look so all your flowers are unique.

The flower definitely takes centre stage here, however the background stamping, rhinestones and cute clip attaching the flag at the top all contribute to making this a great card, and one that perfectly co-ordinates with yesterday's treat holder. Here's a picture of both items together:

Rather lovely! Back tomorrow with another project and exciting news about a special promotion valid for the month of May only. To find out more, make sure you check back tomorrow for the full low-down. Until then, happy stampin'!


Stampin' Up Supplies:

Stamps: Oh, Hello

Cardstock: Melon Mambo, Whisper White, Sunshine and Sprinkles DSP

Ink: Basic Grey, Melon Mambo, Daffodil Delight

Tools: Floral Frames Framelits, Big Shot

Finishing Touches: Basics Rhinestones, 1/4" Stitched Grosgrain Ribbon Basic Grey, Creped Filter Paper, Cute Clips

Pop 'n' Cuts Treat Holder

by Joanne James29. April 2013 20:32

I'm back with more Pop 'n' Cuts to share today, but not as a card. As I mentioned yesterday, in the same way that the Dress Up Framelits can be used without the Pop 'n' Cuts base, the base can also be used without the framelits as a structure to make a pocket or treat holder. Here's an example of one such treat holder, designed by the lovely Monica Gale, that I made at my quarterly training session:

How lovely is this? it was so easy to put together: just cut a base using the die and the Big Shot, then emboss the front panel, score in the base lines and punch some ovals for handles, then decorate as desired. We used some strips of Sunshine and Sprinkles DSP and made a gorgeous flower from the filter paper that features on page 7 of the Spring-ummer catalogue. If you haven't noticed this, at £2.75 for 12 sheets it represents great value and each pack has enough to make lots of flowers in all different shapes and sizes. This flower was made with 6 layers of filter paper and the second smallest frameit in the Floral Frames set.

This treat holder would be great to wrap around a cellophane bag of chocolates or a hand-iced biscuit (that's what I'll be using mine for!) as a sweet treat for someone special. Come back tomorrow to see the card I made that co-ordinates with the treat holder that features a 'stepped up' filter paper flower. Until then, happy stampin'!


Stampin' Up Supplies:

Stamps: Friendly Phrases

Cardstock: Melon Mambo, Whisper White, Sunshine and Sprinkles DSP

Ink: Basic Grey

Tools: Pop 'n' Cuts Base, Floral Frames Framelits, Big Shot, Ticket Duo Builder Punch, Large Oval Punch, Vintage Wallpaper Embossing Folder

Finishing Touches: Basics Rhinestones, 1/4" Stitched Grosgrain Ribbon Basic Grey, Creped Filter Paper

Oh Hello - Welcome to my Team!

by Joanne James16. April 2013 22:19

Lots to share today: new Stampin' Up! offers, some lovely makes and a 'sneak peek' of tomorrow's post - but you'll have to read everything else first!

Stampin' Up! has announced two great offers that will run from April 15th-May 30th: If you host a £250 party, you will earn an additional £25 in hostess credits to spend on any items you like from the current annual and Spring-Summer catalogues - that's a whopping £65 worth of product absolutely free, just for hosting a party. All you need to do is contact me to arrange a date, invite your friends round and pop the kettle on - I'll take care of the rest.

If you've ever thought about becoming a Stampin' Up! demonstrator, there's another great offer that will be of interest to you: if you sign up before 30th May, you will receive an extra £25 worth of product of your choice in your starter kit - that's a total of £155 worth of product for £99 cost - bargain! You will also receive a business supplies pack worth £45, which brings the total value of the starter pack to £200 - a great deal at half the price. Whether you want to be a hobby demonstrator and simply take advantage of the opportunity to purchase your craft supplies at a discount, supplement your existing income or work with a specific financial goal in mind, or build a business out of your love of crafting that has endless opportunities and the flexibility to work the hours of your choice and do a much or as little as you like, Stampin' Up! has something for everyone. In addition to the extensive resources that Stampin' Up! offers, I like to give my team members something 'extra'. In addition to my personal support in helping you make the most of everything that Stampin' Up! has to offer, I like to share my enthusiasm and passion and inspire them to create great things. Here's the welcome card and gift I made for new members of my team during Sale-A-Bration earlier this year, inspired by something similar I had seen on the SU corporate blog:
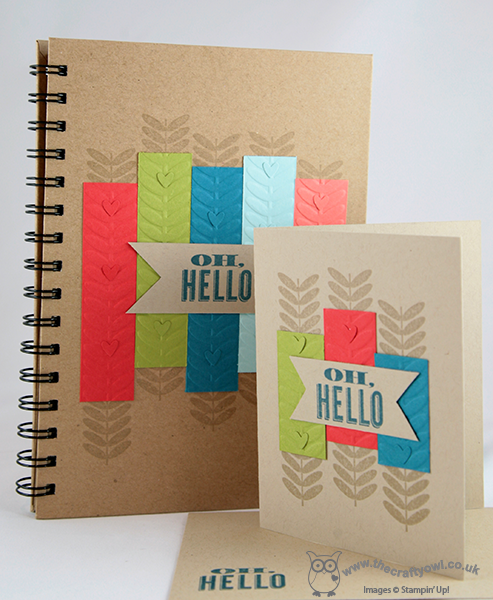
 

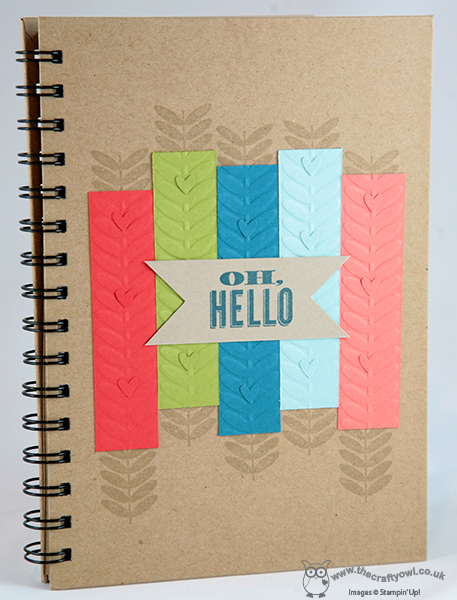
A lovely decorated notebook for those all important moments when inspiration strikes and a co-ordinating welcome card. I used the Vine Embossing Folder and co-ordinating stamp from the Madison Avenue stamp set, highlighting with some hearts from my Owl Punch and the 'Oh Hello' stamp set from the stamp set of the same name. Here's a close-up of the notebook:
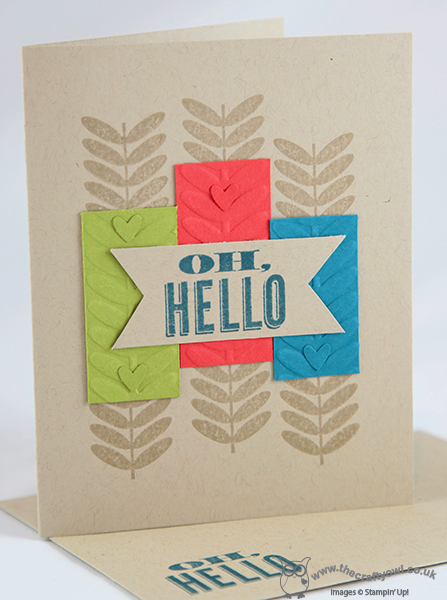
And here's a close-up of the co-ordinating welcome card: 
So if you would like to say 'Oh Hello' and join my team of Crafty Owls, do get in touch with me here if you'd like more information. Alternatively, if you've already decided and are ready to order your starter pack, just click here to complete the form online - it's really straightforward.

Lastly, I promised a 'sneak peek' of tomorrow's post, which will feature one of the cards from my class tomorrow evening - so here it is:

You'll have to come back tomorrow to see the whole thing though - until then, happy stampin'!


Stampin' Up Supplies:

Stamps: Oh Hello, Madison Avenue (Sale-A-Bration - retired)

Cardstock: Island Indigo, Pool Party, Lucky Limeade, Calypso Coral, Poppy Parade (retired)

Inks: Crumb Cake, Island Indigo

Tools: Vine Embossing Folder (Sale-A-Bration - retired), Stamp-a-ma-jig, Owl Punch


Punch Art Angry Birds Bookmarks

by Joanne James14. April 2013 21:38

I've been enjoying a quarterly training day with my wider Stampin'Up! team today, so have lots of lovely new craft things to share with you over the next week or so. The theme of our swaps today was 'masculine'; I'll share mine with you in the next day or two when I have a half-decent photo. Meanwhile, to get you in the mood another non-card project today, keeping with the masculine theme: I made these Angry Bird punch art bookmarks a while a go and for the 'little men' in my life, they were certainly a big hit:

Aren't they just the cutest? They take a little while to make and use lots of different punches, but they're really effective. Guaranteed to make even the most reluctant reader want to open their storybook! They also make a great party bag gift for a child's birthday, either ready made or in kit form: contact me at [email protected] if you are interested in either of these. I made lots of these so here's one more picture of the whole collection:

Back tomorrow with another project; until then, happy stampin'!


Stampin' Up Supplies:

Cardstock: Real Red, Daffodil Delight, Gumball Green, Basic Black, Whisper White, Tangerine Tango

Tools: Heart Punch, 1 3/4" Circle Punch, Small Heart Punch, Owl Punch

Tags: , , , , , , ,

3D Projects | Punch Art

Summer Smooches Meets Blossom Punch!

by Joanne James12. April 2013 16:58

Every once in a while I get a little bit more creative than usual and make something different to a card or box. I've been wanting to have a go at a paper wreath for a while and initially wanted to make a spring wreath in pastel shades, however when I received my Summer Smooches designer paper I fell in love with the bright colours and decided they would definitely enable me to create something that would brighten things up. So, after much punching, piercing and gluing, here's what I came up with: 

I used a combination of Summer Smooches and Brights designer series papers, mixed in with some solid colours, all finished off with some co-ordinating brads and a lovely piece of wide vanilla and Rich Razzleberry ribbon, sadly now retired. I love the overall fiished effect - perfect to brighten up a dull corner of the house - and not a stamp or ink pad in sight!

Here's a close up of some of the flowers: 

I think the layered flowers look really effective; another great example of what you can do with the blossom punch. You can also make a variety of stemmed flowers using this punch, but that's a blog post for another time! Meanwhile, if you would like to see more of this punch and the co-ordinating Mixed Bunch stamp set in action, join me for next week's Card and Technique class on Wednesday 17th April. The details are included in yesterday's post - if you'd like to come along, just drop me a line at [email protected].

I'll be back tomorrow with another project; until then, happy stampin'!


Stampin' Up Supplies:

Cardstock: Real Red, Tempting Turquoise, Daffodil Delight, Lucky Limeade, Island Indigo, Rich Razzleberry, Tangerine Tango, Summer Smooches DSP

Tools: Blossom Punch, 1" Circle Punch, 3/4" Circle Punch, hot glue gun

Finishing Touches: Brights Brads, Razzleberry Ribbon (retired)

Tags: , , , ,

3D Projects | Classes

Quick Butterfly Easter Egg Treat

by Joanne James30. March 2013 22:11

I haven't blogged for a couple of days, so two posts today to make up for it! The first one is a really quick last-minute Easter make by Sarah Willis that I saw on Pinterest; these cute butterflies are so quick and easy to do you could easily make a whole pile of them in ten minutes:


And we did! My 7 year old made all the butterflies in today's post - they were left over from a huge pile that she made as little end of term Easter gifts for the other children in her class at school. She simply stamped one of the flowers from the Mixed Bunch stamp set in four different colours, punched out with the co-ordinating punch, snipped out the top and bottom petals then used some sticky strip to attach some antenna and a mini egg to the centre of the wings and voila - one Easter egg butterfly, done. She managed to make a whole pile of these in no time at all: 

Another great way to use this stamp set, which is one of my personal favourites. I am running a card class featuring this stamp set and the co-ordinating punch on the 16th and 17th of April. There will be more details to follow shortly; if you live local to me and would like to know more, please contact me for further details.

That's all for now - another quick post from me shortly to share an Easter card I made today. Happy stampin'!


Stampin' Up Supplies:

Stamps: Mixed Bunch

Cardstock: Whisper White

Ink: Melon Mambo, Tempting Turquoise, Gumball Green, Perfect Plum

Tools: Blossom Punch

Tags: , , , , ,

3D Projects | Classes | Stamping

Which came first: the chick or the egg?

by Joanne James26. March 2013 21:51

Today I'm sharing one of my favourite Easter projects with you. I think the new oval framelits in the Spring-Summer seasonal catalogue were crying out to be made into an Easter gate-fold card, so here's my version: 

I used oval framelits 1-4 and 6 to create an Easter egg on the outside; I deliberately chose to keep the front quite simple with some paper piercing for interest and a large paper bow to tie the whole thing together. The outer oval lifts up to release the fold and reveal the surprise on the inside:

A cute punch art chick with a happy Easter message! So for this card at least, the egg came first. One last photo of a close up of the bow - a dramatic focal point for this card and I love it:


Hope you like it. Back tomorrow with more Spring loveliness; until then, happy stampin'!


Stampin' Up Supplies:

Stamps: Wacky Wishes

Cardstock: Daffodil Delight, Melon Mambo, Tangerine Tango, Old Olive

Ink: Tangerine Tango

Tools: Oval Framelits, Oval Paper Piercing Template, 1 3/4" Circle Punch, Two Step Bird Punch (for wings), Heart Punch (for feet - retired)


Tags: , , , , , , , ,

3D Projects | Cards | Punch Art

Easter Egg Treat Holder

by Joanne James25. March 2013 22:07

Today I have a lovely treat holder for you, the perfect size for a Creme Egg or something similar as a great way to 'dress up' your egg into something a little bit special. I made something similar when experimenting with wedding favour boxes a few weeks ago (I will photograph these and share another time!) and modified my original design slightly to accommodate a small Easter egg:


They were so easy: an open box base, sandwiched between two of the bookmark-style tags from the Two Tags Die set. A small hole punched for a handle, tied with some co-ordinating ribbon and a little tag made with one of the Hearts A Flutter framelits and decorated with the basket of Easter eggs stamp from the Spring Sampler set. The photo below just shows the eggs inside so you can see in more detail:

I'd like to say the eggs were still around, but ... well it is nearly Easter, right??! Might need to buy a couple more before I gift these to anyone!

Back tomorrow with another Easter project; until then, happy stampin'!


Stampin' Up Supplies:

Stamps: Spring Sampler, Bitty Banners

Cardstock: Calypso Coral, Pool Party

Ink/Stampin' Write Markers: Island Indigo, Calypso Coral, Lucky Limeade, Wisteria Wonder, Pool Party

Tools: Hearts A Flutter Framelits, Bitty Banners

Finishing Touches: Pool Party and Calypso Coral Ruffled Ribbon, Bakers Twine


Tags: , , , , , ,

3D Projects | Boxes | Stamping

Xin Nian Kuai Le - or Happy New Year, in Mandarin!

by Joanne James10. February 2013 20:38

I have been very busy exhibiting at my first wedding fair today, so today's work is that of a guest crafter - my daughter! Today is Chinese New Year and as my daughter is very fortunate to learn Mandarin at school, we decided to make a new year card for her Mandarin teacher, Wan Lau Shu (or Mrs Nelson to the uninitiated - apologies for  the poor phonetics!!) and a small gift.

So first up, the card:

This year is the Year of the Snake, so we decided to decorate the card with a golden snake (yellow/gold is considered the most important colour and the colour of Imperial China) made using a paper-folding technique learned at a lunchtime 'Maths through Art and Design' club (aren't schools great these days?!). We stuck the snake to a bright red card, as red is an important colour in Chinese culture symbolising good fortune and joy and is very popular during new year celebrations. To finish, my daughter carefully wrote 'Happy New Year' in her best character writing alongside it.

She then also made a small gift of a punch art panda bookmark to go with the card. Isn't he cute?


Just a few simple punched shapes, diamantes to give his eyes some sparkle and a red bow for luck. So to everyone out there who is celebrating today, a Happy New Year! Until next time, happy stampin'!

Stampin' Up Supplies (Panda Bookmark only):

Paper: Whisper White, Basic Black

Tools: Large oval punch, 2-step bird punch (the wing), owl punch (circles for eyes and heart for nose), diamantes


Tags: , , , , , , , ,

3D Projects | Cards | Punch Art

When is a Heart not a Heart? When it's a Flower!

by Joanne James3. February 2013 21:34

Back today as promised with a 3D project for you. I've seen a number of versions of similar pictures to these in cyberspace and am not sure who gets the credit for the original version - possibly the Australian company Mondo Cherry (you can check out their website here). Anyway, I've always wanted to have a go at creating one of these hearts, so inspired by my absolutely favourite new designer paper, More Amore, and hearts in a variety of shapes and sizes, this is what I came up with:

I kept things simple and just finished off with a few pearls to add interest. I love the way you get to see both sides of the paper in the design too - often one side is sacrificed for the other.


I think this would make such a lovely piece of wall art and would look beautiful in a little girl's bedroom. That's where this particular version is headed; my daughter loved it the moment she set eyes on it and has been desperate for me to take its picture and blog it so that it can be hung in its final destination! I love the effect that this kind of design creates; I may have a go with brighter colours and a more random pattern some other time - watch this space!

That's all for today - until next time, happy stampin'!


Stampin' Up Supplies:

Paper: Whisper White, More Amore (DSP)

Tools: Full Heart Punch, Small Heart Punch, Hearts a Flutter Framelits, Simply Scored, Bone Folder

Finishing Touches: Pearl Basic Jewels


Tags: , , , , , , , ,

3D Projects

Mini Catalogue

BROWSE THE CATALOGUE

The mini catalogue is now live! Read and download your copy here.

Shop Online

Access my online shop 24 x 7, 365 days of the year:

Current March hostess code:

S9F2XJJW

Shop Online

Join My Team

It's always a great time to join Stampin’ Up! New team members can get £130 worth of products for only £99 + free business supplies + free shipping + all the fun being a part of Stampin’ Up! Stampin' Up! has something for everyone: join my growing team and benefit from my support to enjoy Stampin' Up! however you choose.

If you're interested, call me for a chat to understand how I can help you realise your goals. Alternatively, if you have already decided to sign up and you just can't wait, please click here for the link to the online form where you can sign up and order your starter kit right away! 

Latest Kit!

Stampin Cut and Emboss

The Rock Legend Kit has all you need to make 8 cards with coordinating envelopes. Along with the new Panda Friends Kit, both are available from January 4th for just £14 each - get yours here!

2023-24 Annual Catalogue

BROWSE THE CATALOGUE

Click on the catalogue for a full list of current SU! supplies - if you would like to order any of the items featured, please drop me a line at [email protected] or give me a call on 07773 421446 - I'd be happy to help.

New Online Exclusives

There will be new products available exclusively in the online store from 5 March - check them out here.

About Me

Hi I'm Joanne and live in Northampton and when I'm not looking after my husband and two beautiful children, am an avid crafter with a passion for all things Stampin' Up!

I must confess that I have never been a big rubber stamper - until I discovered Stampin' Up! that is. I love the fact that I can get such great results with co-ordinating stamps, inks, papers and punches - the possibilities are endless! Join me on my stamping journey as I share the things I love and be inspired to create amazing things yourself!

Follow Me

Monthly Newsletter

Box Builder

Click the button above to use Box Buster to create your custom box design using the Envelope Punch Board!

Kits Collection Now Available!

Stampin Cut and Emboss

The new Kits Collection from Stampin' Up! is now available!

Click here to see the current kits available and order yours online today.

I Design For


Stampin' Up Stuff

This is my personal blog and is not endorsed by Stampin’ Up! I hope you find it a plentiful source of ideas and personal inspiration but please don't copy my designs for contest submission or use for classes, publication or sale without express permission.