Today's Wednesday Weekly Deals

by Joanne James4. June 2014 10:01

It's Wednesday and that can only mean one thing - a new collection of Wednesday Weekly Deals! This week's deals are included below - they will be available for one week only, before a new collection of deals is announced.

As always, if you want to take advantage of any of the deals on offer, you can support my business by placing your order online by clicking here or using the link to my store on the right hand side of my blog page where it says 'Shop Online' or with me in person. Don't forget to add the Hostess Code for June (you can find this under the 'Shop Online' section on the right). 

Here's a summary of this week's one-week only Wednesday deals - click on each item to go to the online store to purchase:

Table built using Product Table Builder by The Crafty Owl - Independent Stampin' Up! Demonstrator.

This week there are lots of dies on special, so if you're a Big Shot owner this is a great time to make some savings whilst adding to your collection. Also some lovely pink ribbon and the Twitterpated DSP MDS download - this is such a pretty floral paper!

Back shortly with today's creative post; meanwhile, happy shopping!

Tags: , , , , , , , ,

Promotions | Shop Online

Merry Christmas Monster Hugs!

by Joanne James25. December 2013 21:05

Well, it's here at last - Merry Christmas lovely blog readers! We've had a lovely day today that has involved much present unwrapping, eating and Lego building - don't you just love Christmas?!

I still have a few Christmas things that I haven't shared with you, so today thought I would share the Christmas cards I made for my little James juniors. I was inspired by Lizy Bartaby's card here - I loved the idea of the Santa Monster Hugs but took my cards a step further by making them into pop-ups using my Pop 'n' Cuts base; I'm always looking for new ways to use this. So I made a co-ordinating pair of his and hers santa monster hugs. Here's the little girl santa monster:

Cute, huh? Here's the little boy monster that is her partner-in-crime:

How cute are these? I made my hats using an oval punch with a section cut out using the word window punch to create the curve of the hat. I made the brim using a 'squashed' scallop circle as I don't own a scalloped oval punch, which would of course make this slightly easier. A pop up card and chocolate coins - I'm not sure which the children thought was best (who I am kidding - the chocolate, of course!)

I'm sure this won't be the last we'll be seeing of these little guys - but for now, I hope you have all had a wonderful Christmas and that Santa brought you everything that was on your wish list.

Back tomorrow with another project; until then, happy stampin'!


Stampin' Up! Supplies Used:

Table built using Stampin' Up! Product Table Builder from The Crafty Owl.


Pop Up Lego City Fireman Birthday Card

by Joanne James11. August 2013 21:36

A busy weekend of birthday celebrations in the James family this weekend: yesterday my brother-in-law celebrated his 40th birthday (I was back too late and had drunk too many cocktails to blog when I arrived home yesterday evening; I will share his cards later in the week!) and today was my 'baby' the not-so-little Benjamin's 6th birthday.

I had something of a quandary when trying to decide what kind of card to make Ben; I needed something special but this birthday featured so many of the things that he loves that choosing was difficult. One of the things that he really wanted for his birthday was a Lego City Coastguard Patrol boat - he loves all kinds of Lego, but his first and enduring love is for the fire brigade - the only reason this wasn't on the wishlist is because I think he must own every mortal piece of the Fire Department and then some! His big sister bought him a Lego City Fire Chief alarm clock for his birthday and this ultimately became the inspiration for my pop-up card. This is the card from the outside:

A Lego brick number 6 (lots of glue dots used to get the pins on the bricks just right!). Then on the inside, this cheery little fellow:

I used my Pop 'n' Cuts base and modified my dress form insert to accommodate my fire chief mini figure in front of his desk. I am very pleased with how he turned out and doubly so when Ben opened it this morning and deemed his card 'totally awesome - the best card you've ever made!' Praise indeed!!

Back tomorrow with another of Ben's birthday cards - from his big sister. Until then, happy stampin'!


Stampin' Up Supplies:

Stamps: Make a Wish

Cardstock: Real Red, Basic Black, Daffodil Delight, Whisper White, Basic Grey, Crumb Cake

Ink: Real Red

Tools: Pop 'n' Cuts Base, Pop 'n' Cuts Dress Form, Big Shot, Stamp-a-ma-jig, Small Oval Punch, 1 1/4" Circle Punch, 1 3/4" Circle Punch, Itty Bitty Shapes Punch (circle), Corner Punch


Pop Up Teacher Thank You Card

by Joanne James9. July 2013 21:38

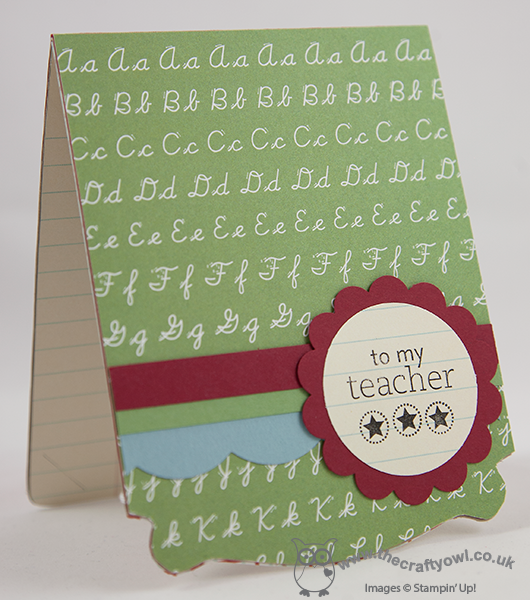
Back again with the last of my teacher cards (I think!) this year - this time a pop-up card using my dress up framelits. The credit for this design goes to Fran Sabad; you can see her original card, a teacher birthday card, here. If you're looking for ways to use your Dress Up Framelits, I thoroughly recommend you check out Fran's blog - she has made some amazing cards using the Pop 'n' Cuts base and co-ordinating framelits. I thought this card would work equally well as a teacher thank you card with a few minor alterations and give me yet another opportunity to get stuck in to my Storytime DSP. So here is the outside of my card:
It's the inside that is the real star of the show though - a teacher mannequin in her classroom, in front of a traditional blackboard:
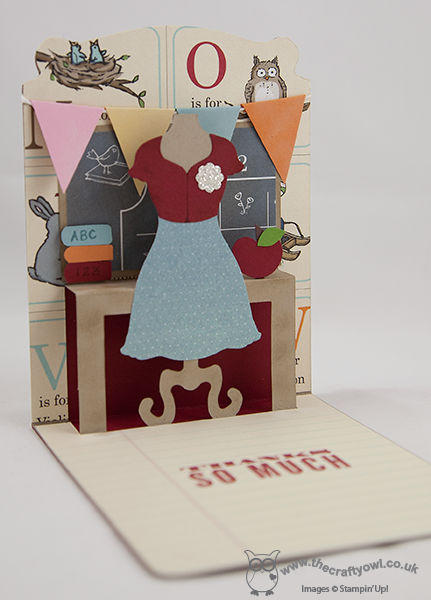
I absolutely love this card, complete with all the little details - check out the apple on the corner of the teacher's desk - how cute is that?! In case you're wondering about the glimmer paper 'brooch' pinned to the teacher's blouse, I know it looks a little out of place against the muted colours and traditional classroom feel, but Rebecca's teacher has what can only be described as a glitter obsession - she can't complete an art project without using tons of the stuff, so I know she wouldn't think this card complete without just a little bit of 'bling'. I wish I could convert her to the benefits of SU no-shed glimmer paper; well, Ben is likely to have her as his teacher the year after next, so there's still time!

The funniest thing about this card was when I showed it to Rebecca to see if it met with her approval; she said, "I love it - but why is there a blackboard? We've never had one of those in the classroom Mummy, all our classrooms have interactive whiteboards". What can I say? A sign of the times and made me feel quite old!

Back tomorrow with something different; until then, happy stampin'!


Stampin' Up Supplies:

Stamps: Word Play (retired), For My Family (retired)

Cardstock: Cherry Cobbler, Baja Breeze, Wild Wasabi, So Saffron, Pumpkin Pie, Pink Pirouette, Gumball Green, Crumb Cake, Storytime DSP

Ink/Stampin' Write Markers: Cherry Cobbler

Tools: 1 3/4" Circle Punch, 2 3/8" Scallop Circle Punch, Large Scallop Edgelits, Dress Up Framelits, Pop 'n' Cuts Card Base

Finishing Touches: White Baker's Twine, Silver Glimmer Paper

Fashionista Gift Tag Set

by Joanne James3. May 2013 20:49

No stamping today! I have another Dress Up project from last month's quarterly training session: this time a lovely set of gift tags in a nice little pocket holder made using the Pop n' Cuts base again. Here's the outside of the box, decorated with its own dress on a Cute Clip hanger and another of those little filter paper flowers:

Open up the box to reveal a lovely set of dressed mannequin gift tags, each one with its own outfit:

This kind of holder is so easy to make just by adding in a couple of central score lines and box section to hold the tags; it would also make a nice notelet holder. As for the tags - what better way to ensure a gift for someone special is 'all dressed up'? My particular favourite outfit combo is the embossed filter paper sundress with the hot pink patterned bolero cardigan; leave me a comment and let me know which one you prefer, or better still how you would dress yours?

If you would like to get your hands on a gift tag set like the one above, you can do one of three things:

host a party during the month of May - this will be my hostess gift to thank you for booking a party and if you have party sales totally £300 or more, you could use your hostess credits to obtain the Pop 'n' Cuts Card base, Pop 'n' Cuts Dress Form and All Dressed Up framelit and stamps bundle ABSOLUTELY FREE!*

ask me about a class - if I have enough interested crafters, I will run a class featuring the Dress Up framelits and Pop 'n' Cuts base and you can learn how to make this set and more

contact me via joanne@thecraftyowl.co.uk to place your order today

So many choices - I hope one of them tick's your box and I look forward to hearing from you. Back tomorrow with anohter project - until then, happy stampin'!


*Hostess credits for party sales of £300 totalling £75 (£50 plus £25 bonus if you host a party before May 30th) with one item purchased at 50% discount price


Stampin' Up Supplies:

Cardstock: Marina Mist, Sunshine and Sprinkles DSP

Ink: Basic Grey

Tools: Dress Up Framelits, Big Shot, Itty Bitty Punches, Elegant Bouquet Embossing Folder, Fancy Fan Embossing Folder, Heart Punch

Finishing Touches: Basics Rhinestones, 1/4" Stitched Grosgrain Ribbon Basic Grey, Creped Filter Paper, Cute Clips

Pop 'n' Cuts Treat Holder

by Joanne James29. April 2013 20:32

I'm back with more Pop 'n' Cuts to share today, but not as a card. As I mentioned yesterday, in the same way that the Dress Up Framelits can be used without the Pop 'n' Cuts base, the base can also be used without the framelits as a structure to make a pocket or treat holder. Here's an example of one such treat holder, designed by the lovely Monica Gale, that I made at my quarterly training session:

How lovely is this? it was so easy to put together: just cut a base using the die and the Big Shot, then emboss the front panel, score in the base lines and punch some ovals for handles, then decorate as desired. We used some strips of Sunshine and Sprinkles DSP and made a gorgeous flower from the filter paper that features on page 7 of the Spring-ummer catalogue. If you haven't noticed this, at £2.75 for 12 sheets it represents great value and each pack has enough to make lots of flowers in all different shapes and sizes. This flower was made with 6 layers of filter paper and the second smallest frameit in the Floral Frames set.

This treat holder would be great to wrap around a cellophane bag of chocolates or a hand-iced biscuit (that's what I'll be using mine for!) as a sweet treat for someone special. Come back tomorrow to see the card I made that co-ordinates with the treat holder that features a 'stepped up' filter paper flower. Until then, happy stampin'!


Stampin' Up Supplies:

Stamps: Friendly Phrases

Cardstock: Melon Mambo, Whisper White, Sunshine and Sprinkles DSP

Ink: Basic Grey

Tools: Pop 'n' Cuts Base, Floral Frames Framelits, Big Shot, Ticket Duo Builder Punch, Large Oval Punch, Vintage Wallpaper Embossing Folder

Finishing Touches: Basics Rhinestones, 1/4" Stitched Grosgrain Ribbon Basic Grey, Creped Filter Paper

My First Dress Up Pop Up Card

by Joanne James28. April 2013 20:14

Any of you who saw my Facebook post yesterday will know I am officially 'IN LOVE' with the Dress Up framelits and Pop 'n' Cuts Base in the Spring-Summer catalogue. I've been resisting purchasing them since the catalogue came out - I don't know why, because it really was love at first sight - but having used them at our last training session and spent a fun few hours with my downline Barbara playing fashion designers, I have finally succumbed. I have seen so many great examples of projects made with this set and I'm excited to share these with you in future blog posts.

Today I am going to share a card I made using all three elements: the pop 'n' cuts card base, the dress form and the framelits. So not much stamping today - Big Shot definitely required! I will share some projects later in the week that show how these can be used separately; when used together, they will make a pop up card with a mannequin to be dressed as you wish. For my first card, I used some of my favourite 'More Amore' DSP along with a Pool Party card base. Here's the outside of the card that you see when the card is folded shut:

Then when you open it, the inside looks like this:

How cute is that??! Dressed mannequin, complete with pearls and pretty cardi, in front of a mirror and dresser. What little - or big - girl wouldn't want to get this in the post for their birthday? Here's one last close-up of the mannequin:

This will, I feel, be the first of many such pop-up cards; come back tomorrow to see another use for this great set. Until then, happy stampin'!


Stampin' Up Supplies:

Stamps: One in a Million

Cardstock: Pool Party, Crumb Cake, Very Vanilla, More Amore DSP

Ink: Pool Party

Tools: Pop 'n' Cuts Base, Pop 'n' Cuts Dress Form, Dress Up Framelits, Ovals Framelits, Big Shot, Stamp-a-ma-jig, Small Heart Punch

Finishing Touches: Basics Pearls

New Online Exclusives

There are new products available exclusively in the online store from 5 November - check them out here.

Latest Kits!

Stampin Cut and Emboss

The Layered Landscapes Kit and Nature's Paintings Kit are the latest kits in the online store - get yours here!

Shop Online

Access my online shop 24 x 7, 365 days of the year:

Current November hostess code:

9NKXDTTR

Shop Online

Mini Catalogue

BROWSE THE CATALOGUE

'Tis The Season - the new Stampin' Up! Mini Catalogue is here! For more details and to download your copy click here

Scrapbooking

Stampin' Up! has introduced a new range of 12x12" scrapbooking product and kit - the full range is now available to purchase online. To download a copy of the new digital Scrapbooking Catalogue click here.

2024-25 Annual Catalogue

BROWSE THE CATALOGUE

Click on the image to download your copy of the 2024-25 annual catalogue. For a full list of current SU! supplies, go to my online store. If you would like any help or advice, please drop me a line at joanne@thecraftyowl.co.uk or give me a call on 07773 421446 - I'd be happy to help.

Join My Team

It's always a great time to join Stampin’ Up! New team members can get £130 worth of products for only £99 + free business supplies + free shipping + all the fun being a part of Stampin’ Up! Stampin' Up! has something for everyone: join my growing team and benefit from my support to enjoy Stampin' Up! however you choose.

If you're interested, call me for a chat to understand how I can help you realise your goals. Alternatively, if you have already decided to sign up and you just can't wait, please click here for the link to the online form where you can sign up and order your starter kit right away! 

About Me

Hi I'm Joanne and live in Northampton and when I'm not looking after my husband and two beautiful children, am an avid crafter with a passion for all things Stampin' Up!

I must confess that I have never been a big rubber stamper - until I discovered Stampin' Up! that is. I love the fact that I can get such great results with co-ordinating stamps, inks, papers and punches - the possibilities are endless! Join me on my stamping journey as I share the things I love and be inspired to create amazing things yourself!

Follow Me

Monthly Newsletter

Box Builder

Click the button above to use Box Buster to create your custom box design using the Envelope Punch Board!

Kits Collection Now Available!

Stampin Cut and Emboss

The new Kits Collection from Stampin' Up! is now available!

Click here to see the current kits available and order yours online today.

I Design For


Stampin' Up Stuff

This is my personal blog and is not endorsed by Stampin’ Up! I hope you find it a plentiful source of ideas and personal inspiration but please don't copy my designs for contest submission or use for classes, publication or sale without express permission.