XOXO Heart Shaker Card FMS420

by Joanne James3. February 2020 15:00

I had a little extra time at the weekend and managed to  squeeze in (or out!) a couple of extra cards that I've had buzzing around my head! The first one uses this week's sketch by Jen T over at Freshly Made Sketches which I adapted by using a heart shape instead of a circle to make a fun shaker card that is also inspired in colours and theme by this week's photo inspiration over at Inspired By and fits with the current Valentine's challenge at TGIF too:


My fellow Paper Player teamies the lovely LeAnne and Claire both design on the Inspired By team with Laurel Seabrook and whilst I follow these lovely ladies and the Inspired by blog, it's the first time I've managed to play along - yay! Here is my clean and graphic modern Valentine's: 


Here's the low-down on today's card:

I made the shaker window aperture using the largest of the Stitched Be Mine Dies with some retired black and white heart-patterned paper to contrast with my bright Melon Mambo background. The shaker elements are a combination of hearts from another of the dies in the same die set, along with white, black and gold sequins and a few retired Melon Mambo heart-shaped sequins. I finished my card with an 'XOXO' diecut from the retired Circle Thinlit Card Die set in sparkly gold glimmer paper.

Here is the visual summary of the key products used on today's project for you to pin for easy reference:


You can see all of my 'How To' summaries on my 'How To - Tips and Techniques' Pinterest board in case you've missed any. 

I love Jen's sketch and will definitely use this again as a circle - a super versatile layout!

Enjoy your day and I'll be back shortly with one of the cards from today's class. Until then, happy stampin'!


Stampin' Up! Supplies Used:

Table built using Product Table Builder by The Crafty Owl - Independent Stampin' Up! Demonstrator.

Cup of Cheer Meets Home For Christmas Card

by Joanne James15. August 2015 22:14

Here's today's post - a little later than planned due to the activities of the day! - with a Christmas card I made for this week's Mojo Monday challenge:

Having unpacked my new seasonal pre-order goodies (demonstrator perks - let me know if you would like to know more!!), I have been keen to use some of new supplies. There's nothing like some new goodies to get you in the crafting mood! Here is my card, featuring the gorgeous holly pattern from the 'Home For Christmas' DSP and one of the stamps in the new 'Cup Of Cheer' stamp set:

I matted my paper with Mossy Meadow on a Real Red card base and in addition to a thin circle of Real Red cut with my Circle Framelits, I used my framelits to cut another circle of Mossy Meadow which I used to mat my focal sentiment - this gorgeous stamp from the 'Cup of Cheer' stamp set. I stamped this sentiment in two stages, firstly masking off the outer wreath and stamping the centre with Versamark, then removing the mask and colouring the outer wreath in Mossy Meadow using my Stampin' Write marker. I then heat embossed the centre using gold embossing powder and added a few tiny pearl berries that I coloured with my red copic marker to finish, before punching out with my 2 1/2" circle punch. This card looks so lovely in real life - the sentiment is so shiny and the wreath has a dusting of gold too where the green ink was also slightly wet still prior to embossing. The photo really doesn't do it justice! Did you notice my bow too? This is some of the new Gold Cording Trim (it comes in silver too!) - love this!

This is actually the second card I made using this sketch; having made the first one, when I went to upload it to the gallery I saw one that was very similar to it, so I decided to go back to the drawing board to come up with something different. I love my first card though - rest assured I will be sharing it with you later this week!

Back tomorrow with a new challenge over at The Paper Players - and not a Christmas card in sight! Until then, happy stampin'!


Stampin' Up! Supplies Used:

*Cup Of Cheer - available September 1st

*Home for Christmas Designer Series Paper - available September 1st

*Cording Trim - available September 1st

Table built using Product Table Builder by The Crafty Owl - Independent Stampin' Up! Demonstrator.


Football Circle Thinlit Birthday Card

by Joanne James14. August 2015 09:00

Today I'm sharing the birthday card I made for Ben to celebrate his 8th birthday. Basketball and football are his two sporting passions and lately he has been football mad. He also has a belief that pop-up cards are the best; whilst this isn't quite a pop-up, it does have a fun flip element with the Circle Thinlit card base - here's my card:

I used Soft Sky for my base and built my football out of a 2 1/2" circle punch and black and white hexagons and decorated my card with some grass cut with my fringe scissors and a bunting banner and greeting from Celebrate today, complete with personalisation using the Epic Alphabet set.

This card actually came together surprisingly quickly and Ben loved it - I'd forgotten quite how much fun a circle thinlit card could be! Here is a picture of the birthday boy blowing out the candles on his amazing birthday cake, made by one of my extended family, the super-talented Helen Vowles:


Ben declared his basketball cake the best ever and was mighty impressed. If you live in Northampton I would urge you to check out Helen's Facebook page here - she really does make the most amazing cakes! Here's another photograph of him in the garden trying out his new goalie gloves (don't look too closely at my lawn, it really doesn't appreciate being used as a football pitch!):


8 years old - my, where did those years go??!

That's all from me today; back tomorrow with another project - a Christmas card, no less! Until then, happy stampin'!


Stampin' Up! Supplies Used:

Table built using Product Table Builder by The Crafty Owl - Independent Stampin' Up! Demonstrator.


Another Hugs and Kisses Valentine's Card!

by Joanne James12. February 2015 07:00

Another quick, clean and simple Valentine's card for you today - a second crack at the 'hugs and kisses' challenge over at Addicted to CAS and Can You Case It:


My card was inspired by Kylie's in the ATCAS Design Team - it reminded me of the little 'xoxo' framelit in the circle thinlits set, which was perfect for the fun little game I had in mind - here's my card:

I cut out a few of the 'xoxo' in both Real Red and Basic Black, then snipped them apart so that I could use them for my game of tic-tac-toe. I created my 'board' by piercing some holes in my Whisper White layer and threading them with black baker's twine - here's a close up so that you can see it in more detail:

I substituted my final 'x' with a little red heart, popped up on a dimensional - sweet! Another no stamping card too - that doesn't happen often!!

Today's post is short and sweet too - I have a very busy day ahead so I'm off to get started. Back with another project tomorrow - until then, happy stampin'!


Stampin' Up! Supplies Used:

Table built using Product Table Builder by The Crafty Owl - Independent Stampin' Up! Demonstrator.


Tags: , , , , , , , ,

Cards | Punch Art | Stamping

Simply Created Thank You Collage Card

by Joanne James10. August 2014 08:00

Yay - it's Sunday and time for a new challenge over at The Paper Players! Today Nance has an interesting colour challenge for us:


Today I have an unusual card to share with you, in more ways than one! When I saw Nance's colour palette, I immediately thought of the Simply Created Banner Kit that I used for the decorations for Rebecca's recent birthday party; I knew I had a few offcuts and leftover pieces of DSP from the kit and that Calypso Coral, Blushing Bride and Basic Grey were 3 of the feature colours of the add-on kit, so using this week's sketch over at Create with Connie and Mary as my starting point (perfect for using up scraps!) I set to work. Here is my finished card:

Using Calypso Coral as my base, I layered a number of strips of DSP in varying widths/lengths across the front of my card, alternating between the Calypso Coral/Blushing Bride chevron pattern and the Basic Grey/Smoky Slate chevron pattern. I then embossed a strip of Blushing Bride cardstock with the Arrows Embossing Folder and cut one end to a point. I layered some Calypso Coral chevrons that I had cut out with one of the framelits from the Circle Thinlit card, then created a tag, again using a pre-printed leftover tag from the kit. I added some black chevron ribbon (a little bit of a liberty as far as the colour scheme is concerned, but the closest match I could get from my stash!) and tied it with some retired Calypso Coral baker's twine in a double bow. I finished my tag with a die cut 'thank' in Hello Honey, part of the 'thankful' framelit from the now retired Expressions Thinlits set (still available on the European Clearance Rack if you fancy snapping up a bargain!) and the YOU cut out of Basic Grey with my Big Shot and the new Perfect Print Alphabet Bigz die. lastly, I added an Essentials Hardware Clip to my tag before adhering it to my card with dimensionals.

I love the idea of collage cards but find them really difficult to create, so am quite pleased with the way this arrow-filled card turned out. Also, on completion I realised that I hadn't done any stamping at all on this card - how unusual is that??! For more inspiration from the Design Team and to see the fabulous cards they've made using this colour palette, pop on over to The Paper Players blog to see what they've created and to link up your own card.

Back tomorrow with a fun birthday card; until then, happy stampin'!


Stampin' Up! Supplies Used:

Table built using Product Table Builder by The Crafty Owl - Independent Stampin' Up! Demonstrator.


Yay for Retro Fresh!

by Joanne James13. February 2014 10:54

Good morning everyone! Today's blog post could have been titled so many things: 'Yay it's Valentine's Day!', 'Yay it's Friday!', 'Yay it's stopped raining!' - I could go on, but instead I went with 'Yay for Retro Fresh!' as the Retro Fresh DSP is definitely the star of this card. I have used the sketch layout over at Create with Connie and Mary for week 3 of the Spring 2014 Challenge for my card (I love a good sketch challenge!).

I decided to go with a congratulations card, as I seem to be using a lot of these for different things lately and inspired by the DT samples this week I went against my natural instinct and challenged myself to see just how many different designs of Retro Fresh DSP I could use on one card without overwhelming the focal point. Here's my card - can you spot them all? 

I used four in total, which might not sound like much, but for me that's unusual. Funny thing is, like all of Stampin' Up!'s designer series papers, the Retro Fresh patterns all work really well together, so it works. I decided to keep my focal point sentiment bold and clean, then used striped paper for my banners, broken up with a flag of 'homemade' DSP using Tangerine Tango cardstock randomly stamped with the star from the Banner Blast stamp set. I cut the banners using the new Banners Framelits dies - these are great for perfect banners in a jiffy. I used a thin strip of the arrow paper to draw the eye to the focal sentiment and edged this with some stretch ruffle trim to echo the scalloped circle, then lastly used a light pattern for my base layer. I considered leaving it plain, either just above the horizontal strip or both above and below it, but it was just too bland, so I added yet another pattern to the mix.

So there you have it - yay for Retro Fresh! Sometimes it pays to be a bit more adventurous with your patterned papers and not be afraid of using more than one at a time. Don't forget to hop on over to Create with Connie and Mary to see what everyone else has done with this sketch.

As it is Valentine's Day today, I shouldn't let it pass without a mention; I received the cutest card this morning from the number one man in my life - I'm sharing a picture on my Facebook page, so pop over if you'd like to see and share some love today!

Back tomorrow with another project. until then, happy stampin'!


Stampin' Up! Supplies Used:

Table built using Stampin' Up! Product Table Builder from The Crafty Owl.


Tags: , , , , , , ,

Cards | Stamping

Best of Christmas Nativity - Paper Craft Crew #67

by Joanne James18. November 2013 20:08

Today I'm sharing my entry for this week's Paper Craft Crew sketch challenge. Here is this week's challenge sketch:

I decided to use the nativity stamp from the Stapin' Up! 'Best of Christmas' stamp set. I haven't used this stamp before and think it's rather cute, however a few of my customers have avoided using this stamp as they see it as a children's stamp so I wanted to create a card using this stamp that had a more grown-up feel to it. This is what I came up with:

I used a Night of Navy card base, then stamped the image in gold metallic ink on Whisper White and matted it on squares of both navy and brushed gold. I highlighted the stars and heart with some gold glitter just to add a little extra sparkle, but otherwise left the image as stamped. Here's a close up of the stamped image so you can see the shimmer:

The layer beneath the image that runs across the card was made from a strip of navy cardstock embossed with the Print Poetry Embossing Folder with I then swiped the gold metallic ink pad across the surface to add some shine and pick up the detail of the embossed script. This was border was also matted with brushed gold cardstock and finally the sentiment was stamped in gold to finish.  I used the narrow label from the Circle Card Thinlits set for the label piece and finished with three Night of Navy candy dots to tone in with the rest of my card.

Whilst this stamp will always look a child's drawing, I think this card shows that with the right colour combination and layout the boundaries can be stretched a little. Why don't you pop over to the Paper Craft Crew's challenge page and have a look at the design team inspiration there and see what the other challenge entrants have come up with.

Back tomorrow with a project and another video tutorial using the Envelope Punch Board; until then, happy stampin'!


Stampin' Up! Supplies Used:


Mosaic Bauble Thinlit Card and Punch Tip Video

by Joanne James26. October 2013 22:16

We have had a lovely day today; we've stayed indoors out of the howling winds and had some family over for Sunday lunch. It's been lovely to spend time with my brother- and sister-in-law, nephew and niece, as we don't do it nearly often enough with the busy lives we all lead.

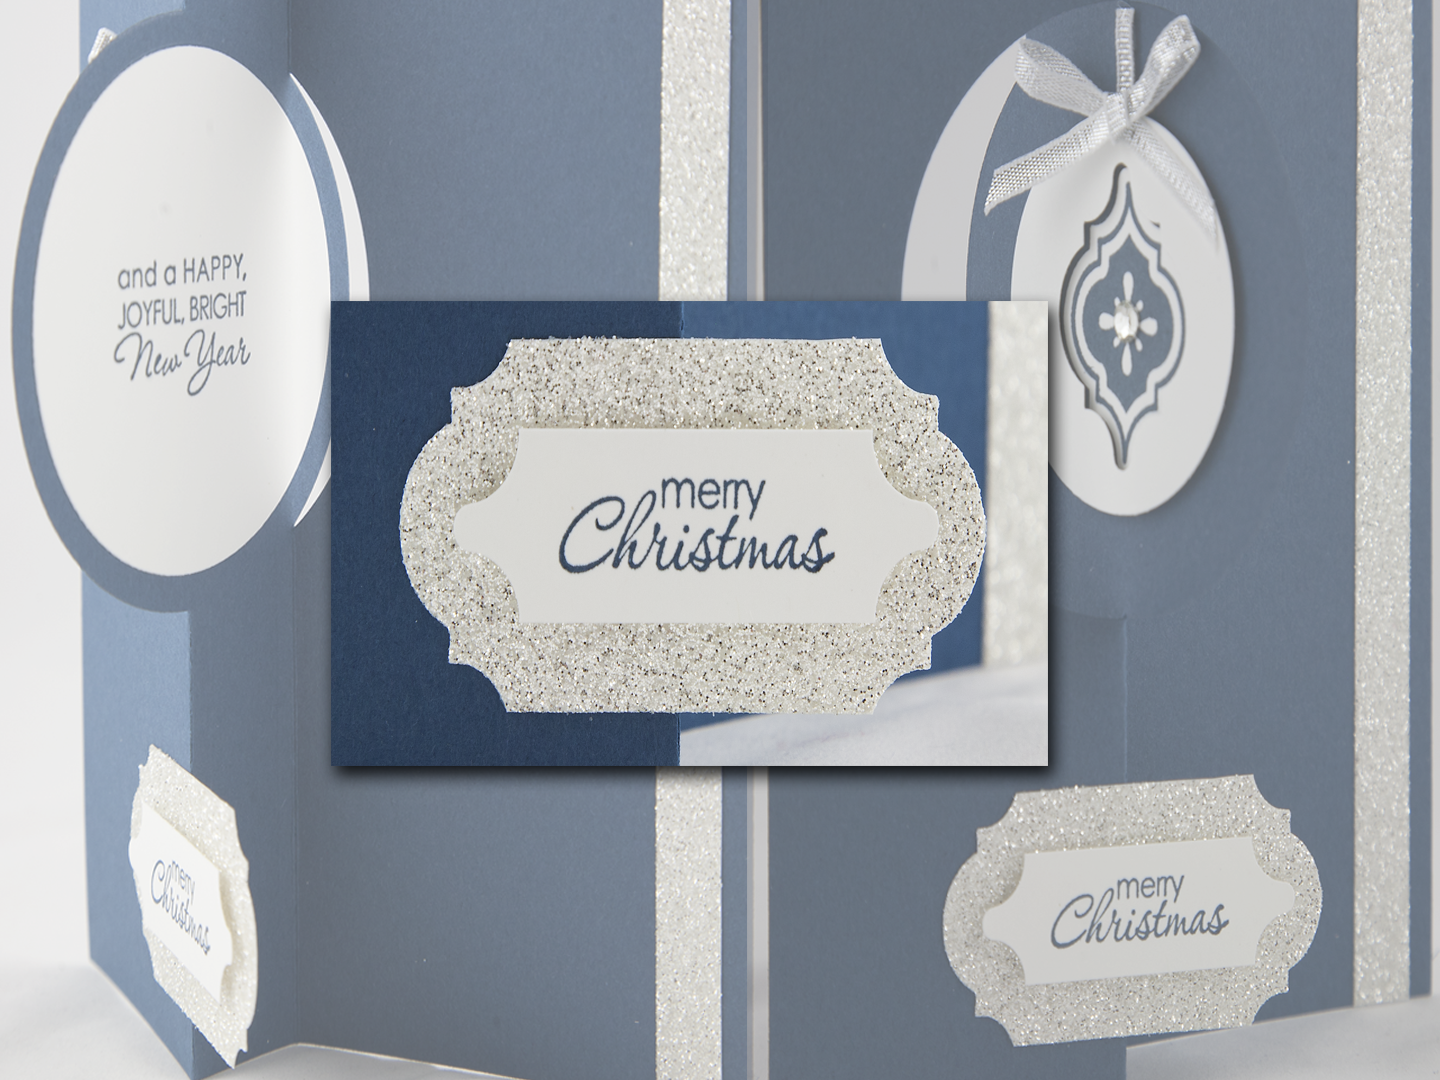
As promised, I have another Thinlit card for you today, this time with a Mosaic Madness bauble design - take a look:
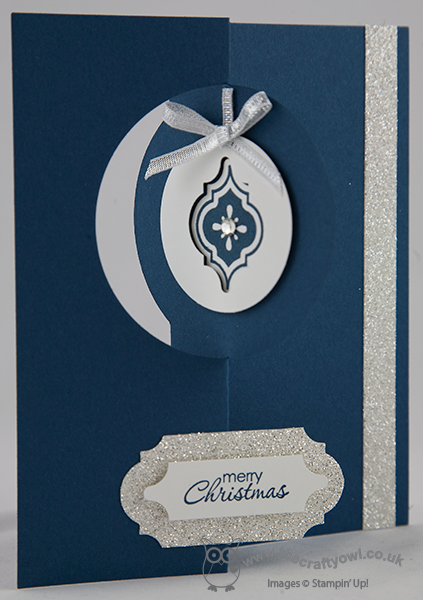
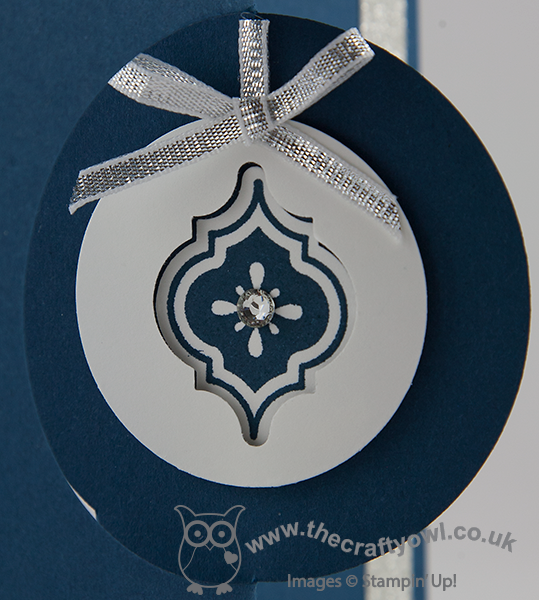
I created a simple 'layered' bauble using a circle punch and the mosaic punch, then layering by raising the outer circle on dimensionals and creating a ribbon hanger. Here's a close-up of my bauble:
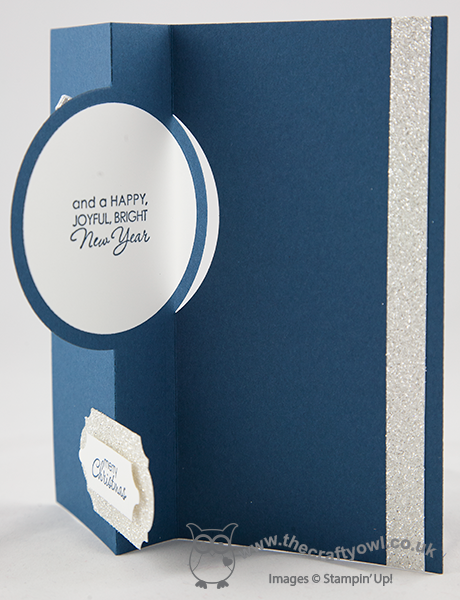
For a greeting on this card, I used a pair of sentiments from the 'Petite Pairs' stamp set, stamping one half on a layered label on the front of the card and the other half on the reverse of the flipped circle:
Lastly, are you wondering what punches I used for my raised sentiment label on the front of my card? Here's a closer look:
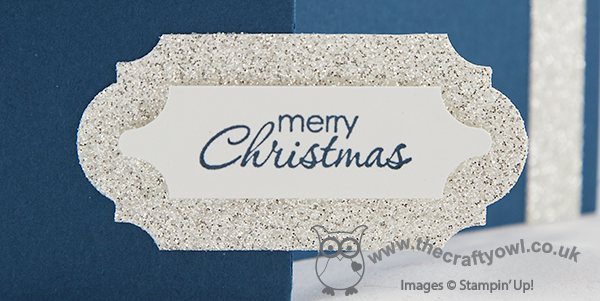
No, it's not a new label punch or two, I actually used my Mosaic Punch to create them! I'm all for making your tools work harder for you and this punch is great for creating labels as well as straight forward mosaic shapes. I shot a short video to show you how to make these labels; I actually made it a while ago, but didn't make a card to go with it, so haven't shared it until now. This also explains why the stamped pieces I used in the video are not the actual ones you see on today's card. If you're feeling confused, just watch the video - it will all make sense! Here's the link:

Just to recap on the measurements in the video: I recommend the narrow label is a maximum of 1.5cm in width, and the wider label 3.0cm in width. Either label can be of any length. I hope you found the video tutorial useful.

Lastly, don't forget, you have only until 11pm tomorrow night to order any of the 25 stamp sets that are 25% off - for details on the stamps on offer, click here.

Back tomorrow with another project; until then, happy stampin'!
 

Stampin' Up! Supplies Used:

Best of Christmas Santa Thinlit Card

by Joanne James25. October 2013 19:45

Apologies for the lack of blog posts for the last couple of days: Hubby has had a few days off so with him and the children, I've rather had my hands full! Yesterday however I had a largely child-free day as the James juniors were at Grandma's so, whilst the kiddies were away it was definitely an excuse to play and catch up on some crafting! Today I'm going to share my first Thinlits card with you, featuring the jolly Santa stamp from the 'Best of Christmas' anniversary set:

 I kept the card design quite simple as I wanted the detail on the santa stamp to take centre stage. I coloured him with markers and a blender pen, adding a little Dazzling Details to the fur on his hat for a little sparkle. Here's a close up: 

I then cut him out using the scalloped circle framelit that is one of the pieces that comes with circle thinlit set and adhered him to the card base. A little DSP on the back panel just finishes the card off.

So what do you think? These cards are so easy to make - they take just minutes to cut and roll and have lots of fun extra pieces in addition to the card body. I have another thinlit card to show you tomorrow, with a little video too, so I hope you'll pop back then and take a look. Already prepared as we have family coming for dinner tomorrow, so there will be little time for crafting. Hope to see you tomorrow; until then, happy stampin'!


Stampin' Up! Supplies Used:

Tags: , , , , , , , ,

Cards | Stamping

New Online Exclusives

There are new products available exclusively in the online store from 5 November - check them out here.

Latest Kits!

Stampin Cut and Emboss

The Layered Landscapes Kit and Nature's Paintings Kit are the latest kits in the online store - get yours here!

Shop Online

Access my online shop 24 x 7, 365 days of the year:

Current November hostess code:

9NKXDTTR

Shop Online

Mini Catalogue

BROWSE THE CATALOGUE

'Tis The Season - the new Stampin' Up! Mini Catalogue is here! For more details and to download your copy click here

Scrapbooking

Stampin' Up! has introduced a new range of 12x12" scrapbooking product and kit - the full range is now available to purchase online. To download a copy of the new digital Scrapbooking Catalogue click here.

2024-25 Annual Catalogue

BROWSE THE CATALOGUE

Click on the image to download your copy of the 2024-25 annual catalogue. For a full list of current SU! supplies, go to my online store. If you would like any help or advice, please drop me a line at joanne@thecraftyowl.co.uk or give me a call on 07773 421446 - I'd be happy to help.

Join My Team

It's always a great time to join Stampin’ Up! New team members can get £130 worth of products for only £99 + free business supplies + free shipping + all the fun being a part of Stampin’ Up! Stampin' Up! has something for everyone: join my growing team and benefit from my support to enjoy Stampin' Up! however you choose.

If you're interested, call me for a chat to understand how I can help you realise your goals. Alternatively, if you have already decided to sign up and you just can't wait, please click here for the link to the online form where you can sign up and order your starter kit right away! 

About Me

Hi I'm Joanne and live in Northampton and when I'm not looking after my husband and two beautiful children, am an avid crafter with a passion for all things Stampin' Up!

I must confess that I have never been a big rubber stamper - until I discovered Stampin' Up! that is. I love the fact that I can get such great results with co-ordinating stamps, inks, papers and punches - the possibilities are endless! Join me on my stamping journey as I share the things I love and be inspired to create amazing things yourself!

Follow Me

Monthly Newsletter

Box Builder

Click the button above to use Box Buster to create your custom box design using the Envelope Punch Board!

Kits Collection Now Available!

Stampin Cut and Emboss

The new Kits Collection from Stampin' Up! is now available!

Click here to see the current kits available and order yours online today.

I Design For


Stampin' Up Stuff

This is my personal blog and is not endorsed by Stampin’ Up! I hope you find it a plentiful source of ideas and personal inspiration but please don't copy my designs for contest submission or use for classes, publication or sale without express permission.