Paisleys Framelits Thankful Card

by Joanne James10. November 2016 08:05

Today it's time for a new challenge over at Create With Connie and Mary and this week we have a colour combination for you:


I was immediately drawn to the Petals and Paisleys Specialty Designer Series Paper as all of these colours can be found in this pack. I ended up only using a small piece of it though - here's my card:


Here's the low-down on today's card:

Copper Specialty Banner - I chose to use a piece of my favourite paper, the beautifully navy with copper-embossed pattern for the banner accent on my card. So pretty!

All About Copper - There are so many copper elements to my card: the foil die cuts and mat, the designer series paper and the copper-embossed sentiment - they all go together beautifully and I love them!

A Paper-Pieced Trio -  I die cut my shapes - not sure whether they are supposed to be leaves, feathers or fans...answers on a postcard! - and having die cut two in Mint Macaron and another in Night of Navy, I carefully paper-pieced the outer elements and in-filled the pattern. This is fiddly with such small pieces, but worth the effort I think. I then finished each shape with an enamel dot.

Here is the visual summary of the key products used on today's project for you to pin for easy reference:


I love the simple design of today's card, with the small details adding real interest.

You can see all of my 'How To' summaries on my 'How To - Tips and Techniques' Pinterest board in case you've missed any. 

Do visit the other Design Team members to see what they did with this week's colours; there's lots of inspiration over on their blogs too!

Enjoy your day and I'll be back tomorrow with another project. Until then, happy stampin'!


Stampin' Up! Supplies Used:

Table built using Product Table Builder by The Crafty Owl - Independent Stampin' Up! Demonstrator.

Petals and Paisleys Thankful Card

by Joanne James6. November 2016 09:00

It's Sunday and time for a new challenge over at The Paper Players! It's the turn of the lovely Laurie to host this week and she has a timely theme challenge for you to work with:


 Ultra clean and layered today (no surprise there then!) - I chose to showcase a wonderful sentiment and some fabulous paper on my card today - here it is:


Here's the low-down on today's card:

Petals and Paisleys - I chose to use one of the 'busy' papers from the Petals and Paisleys Specialty Designer Series Paper on my card today - a bold colour scheme with lots going on, so definitely a paper that needs to be allowed to shine on its own. 

I Am Blessed - Some lovely paisley stamps in the Paisleys and Posies stamp set, however it also contains great sentiments and this one is perfect to make a statement of thankfulness. I cropped mine with the Layered Ovals Framelits and backed with a scalloped oval, and a simple folded ribbon detail to tie the whole thing together.

A Rich Autumnal Colour Combination - There are so many wonderful colours in these papers - I focused in on Delightful Dijon, Night of Navy and the addition of Rich Razzleberry to emphasise the rich colours of the season. Feel free to save this combination if it appeals to you too:


Here is the visual summary of the key products used on today's project for you to pin for easy reference:


You can see all of my 'How To' summaries on my 'How To - Tips and Techniques' Pinterest board in case you've missed any. 

Before you reach for your ink and papers, check out what our amazing team has created to inspire you this week:

The Paper Players Design Team
 
 
Here's a quick recap of our challenge rules:
 
1.  Create a new paper project
2.  Upload your creation to your blog with a link back to us and provide a direct link to the post featuring your challenge submission.
3.  Please link your card to no more than four challenges, TOTAL.
4.  Have FUN! 


I look forward to seeing what you create with this week's theme. As you read this I will be travelling back from a few days away at our regional Stampin' Up! Onstage event in Telford, no doubt bursting with ideas for the Spring and Summer season. Don't worry - I won't be sharing on my blog here for a while, I still have so many Christmas projects to share!

Enjoy the rest of your weekend as it will be over all too quickly; I'll be back tomorrow with another project as my normal blogging schedule will resume; until then, happy stampin'!


Stampin' Up! Supplies Used:

Table built using Product Table Builder by The Crafty Owl - Independent Stampin' Up! Demonstrator.

Snow Place Snowmen Family Large Christmas Card

by Joanne James3. November 2016 08:05

Today it's time for a new challenge over at Create With Connie and Mary and this week we have a sketch for you:


I saw this sketch and immediately saw ... snowmen! Take a look:


Here's the low-down on today's card:

Snow Place Like The Front of a Christmas Card - Apologies for the pun, but these snowmen - and women - definitely deserve to be showcased on the front of a Christmas card. 'Snow Place' is such a fun stamp set with infinite dress up possibilities for the snowmen and penguin in the set. What's more, the co-ordinating Snow Friends Framelits Dies make cutting out the shapes easy-peasy.

Go Large - Bigger is not always better, granted, however to accommodate my snow family of five I needed more cardfront, so I decided to make my card A5 size (21cm x 14.9cm) instead of a more standard A6. This allowed me enough room for my mats and layers, without my family needing to jostle too much for a space on my card.

A Pattern Surprise - Do you recognise my patterned paper? Are you wondering where I found my seasonal snowfall? This paper isn't from one of the festive seasonal packs at all; it's actually one of the patterns in the Floral Boutique Designer Series Paper. As with many of our DSP packs, the reverse of the feature papers often has a more repetitive pattern with spots, stripes or solid colours. This gorgeous mix of navy and white papers hides this spotted pattern which makes perfect snow. The moral of the story? Always check both sides of your papers and don't assume that because a pack isn't designed with Christmas in mind, there won't be a hidden gem that is perfect for your card.

Here is the visual summary of the key products used on today's project for you to pin for easy reference:


You can see all of my 'How To' summaries on my 'How To - Tips and Techniques' Pinterest board in case you've missed any. 

Do visit the other Design Team members to see what they did with this week's sketch; there's lots of inspiration over on their blogs too!

Enjoy your day and I'll be back tomorrow with another project; until then, happy stampin'!


Stampin' Up! Supplies Used:

Table built using Product Table Builder by The Crafty Owl - Independent Stampin' Up! Demonstrator.

Forever Evergreen Project Kit Christmas Trees

by Joanne James2. November 2016 09:40

Wednesday already? Happy 'hump day' everyone! Today I have a 3D project for a change - I want to share the trio of Christmas trees I made using the Forever Evergreen Project Kit in the seasonal catalogue. My regular readers will know what a fan I am of Stampin' Up!'s kits: they are great for everyone from the complete novice to the seasoned crafter and are the perfect option for a fun afternoon or evening activity with friends.

The Forever Evergreen kit comprises three Christmas trees, one 33cm tall and two 27.9cm tall - complete with decorations. You then need some additional basic items to complete the project: the Forever Evergreen stamp set, ink pads and adhesives. Here are my trees in all their glory - first the largest one in Garden Green:


The second, smaller one also in Garden Green:


And lastly, the final smaller one, this time in Wild Wasabi:


I have to say the catalogue really doesn't do these trees justice; they are way more impressive in real life and having had them on display at the craft show I exhibited at recently they were the subject of many 'oohs' and 'aahs'. Many of my customers have passed comment on them as they've been in and out for classes too. If you would like to purchase these kits to make at home, Stampin' Up! has produced a very helpful video that is worth watching before you start putting the kit together:

If you would like to get together with me in person to make this kit, you have a couple of options: you can gather with friends and purchase a kit each and have me bring the extra supplies needed for a crafty afternoon or evening in with friends. Alternatively you could join me for my next Crafternoon Tea at Bell's in Kingsthorpe, Northampton, on Saturday 19th November from 10am-2pm, when we will be making this kit and finishing with an afternoon tea prepared by the Cafe @ Bells in store - contact me to book your place. 

I hope you've enjoyed your day today; I enjoyed a crisp autumn day kicking leaves in the country park and a hockey match (unfortunately no win today, but another match on Saturday so hopefully their luck will change!). I'll be back tomorrow with a Christmas card for this week's new challenge over at Create With Connie and Mary. Until then, happy stampin'!


Stampin' Up! Supplies Used:

Table built using Product Table Builder by The Crafty Owl - Independent Stampin' Up! Demonstrator.

Presents and Pinecones Large Square Double Display Christmas Card

by Joanne James1. November 2016 20:00

This is my second post of today - if you missed the first one about the new Stitched Shapes Framelits you are going to want to check that out here. No blog post yesterday as I still have one of the James Juniors on half term this week and then my evening was spent trick or treating. Today I've had full day with back to back classes, one of which was my first technique class of the month featuring the Christmas/Pretty Pines bundle. I've made lots of projects with this bundle, although I've yet to blog them all (so many projects, so little time!) Click here to see one of the cards that I've shared previously using this set, that was also one of our makes in our class. 

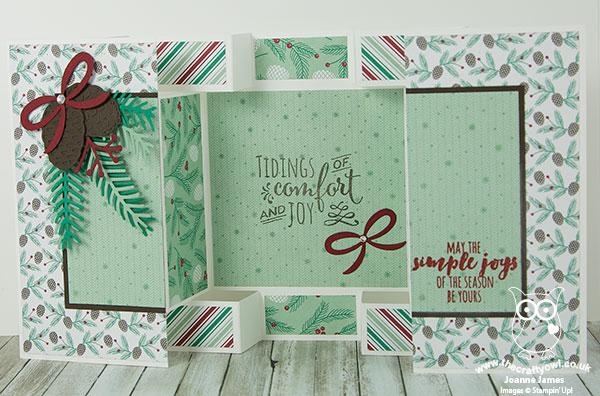
Today I want to share a card that I CASE'd from the lovely Amanda Bates over at The Craft Spa, who is for me the queen of fancy folds. She has made lots of versions of her Large Square Double Display Card but this one using the Presents and Pinecones Designer Series Paper and the Pretty Pines Thinlits Dies really caught my eye and I just had to have a go at re-creating it. Here's my card:


Here's the low-down on today's card:

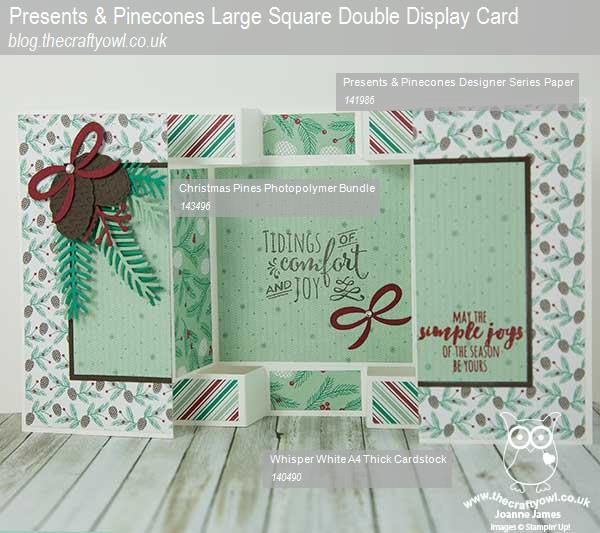
Presents & Pinecones - What can I say, the Presents & Pinecones Designer Series Paper is definitely the star of this card. Four of the twelve designs in this pack are showcased here, such a great layout to really let these papers shine. What's more, they are the perfect pairing for the Christmas/Pretty Pines stamp set thinlits combo. The colours are traditional yet fresh and modern, with the addition of the mint and white to the red and Emerald Envy green.

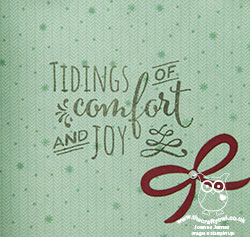
Christmas Pines - Whilst it's rare that I advocate buying a stamp set or thinlit set without its counterpart when it's available as a bundle (and this is most definitely not one of those times!), it is easy to focus on the detail of the thinlits with this set and rather overlook the stamp set. This would be such a mistake though, as it's a set choc full of great scripted sentiments in a variety of sizes, along with some useful border stamps, a fancy frame and a snowy background stamp that will have tons of uses on so many Christmas cards. This card showcases two of the sentiments and the snowflake background stamp, which adds subtle interest and detail to the panels on the front and inside. This set is definitely worthy of a place on your shelf!

The 'How' - I made a few tweaks to Amanda's tutorial when I made this card, so thought I would share the details with measurements below. This card is measured in cm and is a metric template for standard A4 cardstock; if you would like to make one in inches or using 12" x 12" cardstock, do check out Amanda's blog via the above link where she has lots of useful tutorials to follow. Here goes:

To make this A4 metric large square double display card, you will need:

  • Thick Whisper White A4 Cardstock 15x 29cm
  • Whisper White Cardstock 15cm Square
  • Early Espresso Cardstock 10 cm Square
  • Presents & Pinecones Paper Mint Macaron Mini Chevron 9.5cm Square (x2)
  • Presents & Pinecones Paper White Cones and Pines 4.5cm x 9.5cm (x2)
  • Presents & Pinecones Paper White Cones and Pines 4.5cm x 2cm (x2)
  • Presents & Pinecones Paper Stripes 4.5cm x 2cm (x4)
  • Stamps & Dies – Christmas Pines Stamp Set and Pretty Pines Thinlits Dies Bundle 
 Instructions:
  • PORTRAIT (short side): 
  • Line up at 2.5cm across the top ruler
  • Cut from 2 to 12cm. LIFT. Cut from 17 to 27cm
  • Turn 180 degrees and repeat both steps above.
  • LANDSCAPE (long side):
  • Score across whole width at 4.5cm and 9.5cm 
  • Score top and bottom sections only at 2cm and 12cm 
  • Turn 180 degrees and repeat both steps above.
  • From the PORTRAIT end (short side):
  • Fold the outer creases into a mountain, valley, mountain, valley set of folds
  • Fold the centre section score lines into first a mountain fold then a valley fold 
  • This gives you the basic layout for the base of your card.

I just love this card - a little time and effort but well worth it for the end result. Thank you Amanda for the inspiration!

Here is the visual summary of the key products used on today's project for you to pin for easy reference:


You can see all of my 'How To' summaries on my 'How To - Tips and Techniques' Pinterest board in case you've missed any. 

I'll be back tomorrow with another project. Until then, happy stampin'!


Stampin' Up! Supplies Used:

Table built using Product Table Builder by The Crafty Owl - Independent Stampin' Up! Demonstrator.

New Stitched Shapes Framelits and 25% Off Stamp Sets

by Joanne James1. November 2016 07:00

I'm back today with some great news for the start of November: from today we have the early release of a new product from the 2017-18 annual catalogue, Stitched Shapes Framelits, and a product promotion!

StitchFramelit_DemoHeader_SPUK

A Great New Product

Let’s start with the Framelits: the Stitched Shapes Framelits Dies are a set of 12 dies that include four circles, four ovals and four squares that coordinate with our Layering Circles, Ovals and Squares.  Brilliant!

These new dies are available for purchase beginning November 1 – that’s today!

So, what makes these Framelits a necessity?  When run through the Big Shot, these dies leave a detailed stitch around the edge of the Framelit.  The stitched look is so on-trend right now and will add a great extra touch to your stamped projects. Here’s a video with details about the new dies and some great project ideas:


Aren't they great? You are definitely going to want to add these to your framelit collection.

Here are the measurements for these new shapes:

Circles:  1-3/8″, 1-7/8″, 2-3/8″, 2-7/8″

Squares: 1-3/16″, 1-5/8″, 2-1/8″, 2-5/8″

Ovals: 1-3/4″ x 13/16″, 2-1/4″ x 1-5/16″, 2-3/4″ x 1-13/16″, 3-1/4″ x 2-5/16″


25% Off Selected Stamp Sets

What's more, there's a promotion to run alongside the launch of these new framelits too! As if the new Stitched Shapes Dies weren’t great enough…there is also a long list of stamp sets from the Autumn-Winter Catalogue and Annual Catalogue are available for 25% off during November.  Yes, you heard it - 25% OFF! here's the complete list:


Right - I'm off to put in my order for these fabulous new framelits and then get on with my busy day of back-to-back classes. I will be back later with today's project blog post; until then, happy shopping! Oh and don't forget to use this month's hostess code SQN297RD when placing your order online to get a little thank you in the post from me!

Table built using Product Table Builder by The Crafty Owl - Independent Stampin' Up! Demonstrator.


Mini Catalogue

BROWSE THE CATALOGUE

The mini catalogue is now live! Read and download your copy here.

Shop Online

Access my online shop 24 x 7, 365 days of the year:

Current April hostess code:

VDKNV7BH

Shop Online

Join My Team

It's always a great time to join Stampin’ Up! New team members can get £130 worth of products for only £99 + free business supplies + free shipping + all the fun being a part of Stampin’ Up! Stampin' Up! has something for everyone: join my growing team and benefit from my support to enjoy Stampin' Up! however you choose.

If you're interested, call me for a chat to understand how I can help you realise your goals. Alternatively, if you have already decided to sign up and you just can't wait, please click here for the link to the online form where you can sign up and order your starter kit right away! 

Latest Kit!

Stampin Cut and Emboss

The Rock Legend Kit has all you need to make 8 cards with coordinating envelopes. Along with the new Panda Friends Kit, both are available from January 4th for just £14 each - get yours here!

2023-24 Annual Catalogue

BROWSE THE CATALOGUE

Click on the catalogue for a full list of current SU! supplies - if you would like to order any of the items featured, please drop me a line at [email protected] or give me a call on 07773 421446 - I'd be happy to help.

New Online Exclusives

There are new products available exclusively in the online store from 5 March - check them out here.

About Me

Hi I'm Joanne and live in Northampton and when I'm not looking after my husband and two beautiful children, am an avid crafter with a passion for all things Stampin' Up!

I must confess that I have never been a big rubber stamper - until I discovered Stampin' Up! that is. I love the fact that I can get such great results with co-ordinating stamps, inks, papers and punches - the possibilities are endless! Join me on my stamping journey as I share the things I love and be inspired to create amazing things yourself!

Follow Me

Monthly Newsletter

Box Builder

Click the button above to use Box Buster to create your custom box design using the Envelope Punch Board!

Kits Collection Now Available!

Stampin Cut and Emboss

The new Kits Collection from Stampin' Up! is now available!

Click here to see the current kits available and order yours online today.

I Design For


Stampin' Up Stuff

This is my personal blog and is not endorsed by Stampin’ Up! I hope you find it a plentiful source of ideas and personal inspiration but please don't copy my designs for contest submission or use for classes, publication or sale without express permission.