Happy Birthday Gorgeous!

by Joanne James15. June 2017 09:00

Today is a special day in the James household: the eldest of my juniors turns 12. I'm not sure where those years went by, although I do know that what was once my chubby little baby girl is now rapidly turning into a wonderful young woman with thoughts, hopes and dreams. So today I thoughts I would share the birthday card I made for Rebecca - take a look:


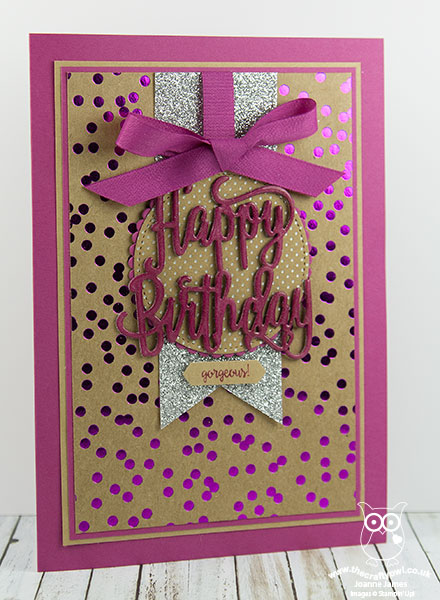
When I came to make Rebecca's card, I knew there were a number of things I needed to include: pink, sparkle and a big birthday wish and today's card is the result! Here's the low-down on my card:

Berry Burst: A Grown Up Pink - Whilst Rebecca isn't a girly-girl, she is most definitely a lover of pink! One of the new in-colours, Berry Burst, was my choice of pinks for her card; I think this pink is a rather grown-up pink and perfectly suited to a card for a discerning young lady. It also has some lovely co-ordinating accessories such as the 1/2" Finely Woven Ribbon, which ties beautiful bows.

Move Over Glimmer, There's A Foil Frenzy Going On! - So I had to include a small piece of silver glimmer paper on my card - Rebecca just loves the stuff! - but the real shimmer and shine comes from the new Berry Burst spotty Foil Frenzy kraft cardstock. With bright, colourful designs, this heavyweight foiled kraft cardstock will be perfect for boxes and I can't wait to start constructing, but for today it made a great base for the front of my card. 

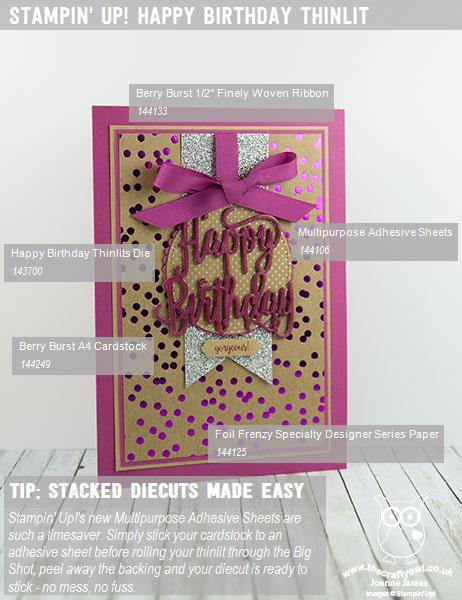
Stacked Diecuts Made Easy - For my sentiment I used the new Happy Birthday Thinlit to create my focal point, cutting and stacking three diecut pieces and brushing with clear Wink of Stella for a subtle sparkle before heat embossing with clear embossing powder a further three times. Effort? Yes. Worth it? Totally!  There is a new adhesive that you may not have noticed in the new catalogue that makes light work of stacking and adhering die cuts - the new Multipurpose Adhesive Sheets (page 203 - you are welcome!) are such a timesaver. Simply stick your cardstock to an adhesive sheet before rolling your thinlit through the Big Shot, then you can peel away the backing and your diecut is ready to stick - no mess, no fuss. 

Here is the visual summary of the key products used on today's project for you to pin for easy reference:


You can see all of my 'How To' summaries on my 'How To - Tips and Techniques' Pinterest board in case you've missed any. 

I'm pleased to report that Rebecca's card received the official 'thumbs up', which is really all you can ask for when you're making a card with a special someone in mind.

I'll be back tomorrow with another project. Until then, happy stampin'!


Stampin' Up! Supplies Used:

Table built using Product Table Builder by The Crafty Owl - Independent Stampin' Up! Demonstrator.

Comments (1) -

LeAnne Pugliese
LeAnne PuglieseUnited States
16/06/2017 02:07:22 #

Oooh, I am going to be CASing this one for sure!  This card packs a "WOW" punch for sure!  Awesome!

Comments are closed

Mini Catalogue

BROWSE THE CATALOGUE

The mini catalogue is now live! Read and download your copy here.

Shop Online

Access my online shop 24 x 7, 365 days of the year:

Current April hostess code:

VDKNV7BH

Shop Online

Join My Team

It's always a great time to join Stampin’ Up! New team members can get £130 worth of products for only £99 + free business supplies + free shipping + all the fun being a part of Stampin’ Up! Stampin' Up! has something for everyone: join my growing team and benefit from my support to enjoy Stampin' Up! however you choose.

If you're interested, call me for a chat to understand how I can help you realise your goals. Alternatively, if you have already decided to sign up and you just can't wait, please click here for the link to the online form where you can sign up and order your starter kit right away! 

Latest Kit!

Stampin Cut and Emboss

The Rock Legend Kit has all you need to make 8 cards with coordinating envelopes. Along with the new Panda Friends Kit, both are available from January 4th for just £14 each - get yours here!

2023-24 Annual Catalogue

BROWSE THE CATALOGUE

Click on the catalogue for a full list of current SU! supplies - if you would like to order any of the items featured, please drop me a line at [email protected] or give me a call on 07773 421446 - I'd be happy to help.

New Online Exclusives

There are new products available exclusively in the online store from 5 March - check them out here.

About Me

Hi I'm Joanne and live in Northampton and when I'm not looking after my husband and two beautiful children, am an avid crafter with a passion for all things Stampin' Up!

I must confess that I have never been a big rubber stamper - until I discovered Stampin' Up! that is. I love the fact that I can get such great results with co-ordinating stamps, inks, papers and punches - the possibilities are endless! Join me on my stamping journey as I share the things I love and be inspired to create amazing things yourself!

Follow Me

Monthly Newsletter

Box Builder

Click the button above to use Box Buster to create your custom box design using the Envelope Punch Board!

Kits Collection Now Available!

Stampin Cut and Emboss

The new Kits Collection from Stampin' Up! is now available!

Click here to see the current kits available and order yours online today.

I Design For


Stampin' Up Stuff

This is my personal blog and is not endorsed by Stampin’ Up! I hope you find it a plentiful source of ideas and personal inspiration but please don't copy my designs for contest submission or use for classes, publication or sale without express permission.