Flower Patch Thinlit Thankyou Card

by Joanne James2. April 2015 08:05

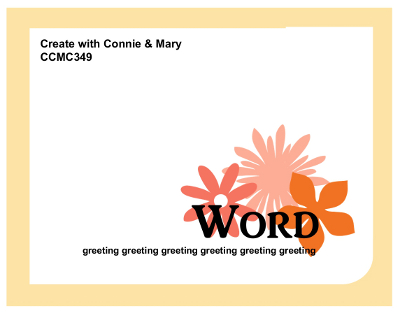
It's time for a new Thursday challenge over at Create With Connie and Mary and this week we have a great sketch challenge for you:
 

Here is my card today:
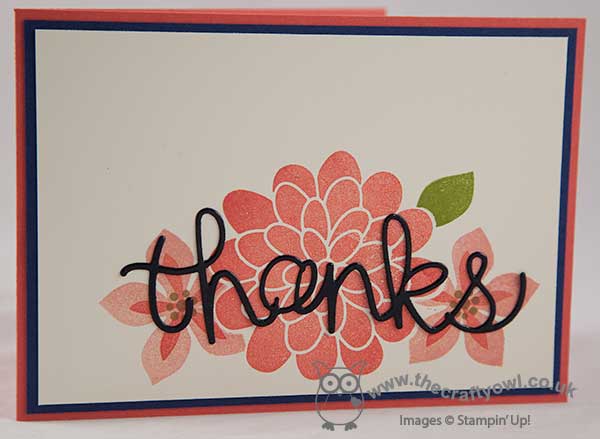
I decided to make a simple floral background for my word with a trio of flowers from the 'Flower Patch' stamp set, stamped in Calypso Coral, Crisp Cantaloupe and Baked Brown Sugar. I stamped the large central flower first, then created a mask using a post-it note and the co-ordinating Flower Fair framelits to create a mask before stamping the outer flowers, so that they appeared behind the central bloom. 

For my sentiment, I chose a 'thanks' cut with my 'Hello You' thinlits dies out of Night of Navy cardstock, but before adhering to my card I coated it in Versamark and heat embossed it in clear embossing powder several times, until it became beautifully shiny and glossy. One of those 'it looks much better in real life' moments I'm afraid, as the photo doesn't really show just how pretty this looks!

Don't forget to check out what the rest of the team have in store for you - we look forward to seeing your creations in the gallery this week!


Stampin' Up! Supplies Used:

  • Flower Patch Photopolymer Bundle
  • Big Shot Die-Cut Machine
  • Embossing Buddy
  • Versamark Pad
  • Clear Stampin' Emboss Powder
  • Heat Tool - Uk Plug
  • Hello You Thinlits Dies
  • Baked Brown Sugar Classic Stampin' Pad
  • Crisp Cantaloupe Classic Stampin' Pad
  • Old Olive Classic Stampin' Pad
  • Calypso Coral Classic Stampin' Pad
  • Calypso Coral A4 Card Stock
  • Night Of Navy A4 Card Stock
  • Very Vanilla A4 Card Stock


Comments (10) -

Connie Babbert
Connie BabbertUnited States
4/2/2015 1:03:33 PM #

So pretty!  Love how the black is really set off against the brighter colors!  Great job with the sketch challenge this week!

Bridgette Jones
Bridgette JonesUnited States
4/2/2015 2:42:37 PM #

This is super pretty! I tried to do the same layering/masking with my flowers but I couldn't get it to look right so I went an entirely different direction. You clearly have the technique mastered! Very pretty!

Lisa Young
Lisa YoungUnited States
4/2/2015 3:40:04 PM #

Joanne, I really like your card a lot. And even though the shiny embossing doesn't show up well in the photo, I think that is a great idea and one I am going to try! Great job on the masking too btw.

Caseye
CaseyeUnited States
4/3/2015 1:40:34 PM #

Really like your card!  I have a question that has stumped me for quite some time.  How do you "adhere" thinlets to your cards?  Do you use glue, do you put them thru a Zyron machine, or......?  Thanks for your help!

Joanne James
Joanne JamesUnited Kingdom
4/3/2015 10:25:24 PM #

Hi Caseye - thanks for popping by to leave a comment! I usually use Stampin' Up's Transfer Adhesive Sheets to adhere all my thinlit words to cards - here's the link to them in my store so that you can see the product I'm talking about: http://bit.ly/1P6aQOu
You get the best result by peeling back the protective layer and sticking your cardstock to it before you run the thinlit through the Big Shot, but I also sometimes cut out my word thinlit and then stick it onto the transfer sheet - when you peel it off, it is covered in tiny yet very strong adhesive dots. Great coverage, no seeping glue!

Jenny Engelke
Jenny EngelkeUnited States
4/3/2015 7:05:01 PM #

Hi Joanne! Your little patch of flowers is glorious and the colors are so complimentary!  Navy and coral are so striking!  I admire anyone who likes to mask....although I LOVE the look, it's probably one of my least favorite techniques to perform. You've pulled it off perfectly!

Alison Barclay
Alison BarclayAustralia
4/4/2015 9:47:09 AM #

Great card Joanne! I just read your tip re the transfer sheets in the comments - fabulous idea!

Chris Slogar
Chris SlogarUnited States
4/4/2015 12:59:25 PM #

What a great idea to emboss your word to make it shiny!  That would make it sturdier for 3D projects, too.  Very pretty card!

Lisa Martz
Lisa MartzUnited States
4/6/2015 9:24:30 PM #

Great card!  So many possibilities!  I can see this done up several ways...thanks, birthday, thinking of you.  

Margaret Raburn
Margaret RaburnUnited States
4/8/2015 5:03:27 AM #

Your card is simple yet so elegant and striking!  The black word on the soft flowers really pops the word!  What a great idea to clear emboss the diecut words before adhering them to the card; I'm sure that shine really catches the eye in person!

Comments are closed

New Online Exclusives

There are new products available exclusively in the online store from 5 November - check them out here.

Latest Kits!

Stampin Cut and Emboss

The Layered Landscapes Kit and Nature's Paintings Kit are the latest kits in the online store - get yours here!

Shop Online

Access my online shop 24 x 7, 365 days of the year:

Current November hostess code:

9NKXDTTR

Shop Online

Mini Catalogue

BROWSE THE CATALOGUE

'Tis The Season - the new Stampin' Up! Mini Catalogue is here! For more details and to download your copy click here

Scrapbooking

Stampin' Up! has introduced a new range of 12x12" scrapbooking product and kit - the full range is now available to purchase online. To download a copy of the new digital Scrapbooking Catalogue click here.

2024-25 Annual Catalogue

BROWSE THE CATALOGUE

Click on the image to download your copy of the 2024-25 annual catalogue. For a full list of current SU! supplies, go to my online store. If you would like any help or advice, please drop me a line at joanne@thecraftyowl.co.uk or give me a call on 07773 421446 - I'd be happy to help.

Join My Team

It's always a great time to join Stampin’ Up! New team members can get £130 worth of products for only £99 + free business supplies + free shipping + all the fun being a part of Stampin’ Up! Stampin' Up! has something for everyone: join my growing team and benefit from my support to enjoy Stampin' Up! however you choose.

If you're interested, call me for a chat to understand how I can help you realise your goals. Alternatively, if you have already decided to sign up and you just can't wait, please click here for the link to the online form where you can sign up and order your starter kit right away! 

About Me

Hi I'm Joanne and live in Northampton and when I'm not looking after my husband and two beautiful children, am an avid crafter with a passion for all things Stampin' Up!

I must confess that I have never been a big rubber stamper - until I discovered Stampin' Up! that is. I love the fact that I can get such great results with co-ordinating stamps, inks, papers and punches - the possibilities are endless! Join me on my stamping journey as I share the things I love and be inspired to create amazing things yourself!

Follow Me

Monthly Newsletter

Box Builder

Click the button above to use Box Buster to create your custom box design using the Envelope Punch Board!

Kits Collection Now Available!

Stampin Cut and Emboss

The new Kits Collection from Stampin' Up! is now available!

Click here to see the current kits available and order yours online today.

I Design For


Stampin' Up Stuff

This is my personal blog and is not endorsed by Stampin’ Up! I hope you find it a plentiful source of ideas and personal inspiration but please don't copy my designs for contest submission or use for classes, publication or sale without express permission.