Mosaic Trellis

by Joanne James18. July 2013 21:09

I'm back after another busy card class last night, which was great fun but I was home too late to post so am back on track this evening. We were using the 'Best of Flowers' set at yesterday's class and everyone made some great cards - I 'll share these another time. Today I have another Mosaic Madness card for you; something a little different:

To create this card, I used the mosaic stamp set along with the co-ordinating embossing folder and punch, but this time created a 'trellis' from the embossed sheet using the punch, and then stamping a two-tone pattern on the trellis so that it would really 'pop' against the Coastal Cabana ink and cardstock duo. I've been playing around with this idea in my head for a few days and having finally committed it to paper I'm really pleased with how it's turned out.

This set really is so versatile; I hope you're not tired of it yet, as there's lots more where this came from! I'll be featuring this stamp set in September's card class, so if you live in Northampton and would like to experience a little Mosaic Madness for yourself, then do get in touch for further details - whether an experienced crafter or first-time card maker, you will be more than welcome. We are not having a monthly card class in August due to the summer holidays, although on Saturday 3rd August I am holding an-all day Christmas Crafts Workshop, where we will be getting a headstart on our Christmas preparations - it pays to be organised, especially if you're a crafter!

Back tomorrow with another project; until then, happy stampin'!


Stampin' Up Supplies:

Stamps: Mosaic Madness, Really Good Greetings

Cardstock: Coastal Cabana, Whisper White

Ink/Stampin' Write Markers: Coastal Cabana, Strawberry Slush, Crisp Cantaloupe

Tools: Mosaic Punch, Mosaic Embossing Folder, Stamp-a-ma-jig

Finishing Touches: Basics Rhinestones

Mosaic In-Colour Card Swaps

by Joanne James15. July 2013 21:52

Today I'm sharing my team training swaps that I promised you on Saturday, but after a fun day at training yesterday was too tired to post. I completed one basic design, featuring the Mosaic Madness stamp set, but in five different colourways, each showcasing one of the new in colours. So here is the first one, with the base colour of Strawberry Slush:

The feature colours on this card are Crisp Cantaloupe and Coastal Cabana. Here is the second card, with a Crisp Cantaloupe base and feature colours of Coastal Cabana and Pistachio Pudding:

Here is the third card, with a Baked Brown Sugar base and feature colours of Crisp Cantaloupe and Bermuda Bay:

Here is the fourth card, with a Coastal Cabana base and feature colours of Calypso Coral and Smoky Slate:

Here is the fifth and last card, with a Pistachio Pudding base and feature colours of Strawberry Slush and Smoky Slate:

The design is intentionally simple - it needs to be when there are so many to make! I liked taking the opportunity to play around with new colour combinations and also I like the stamping of the same colour ink on cardstock that I used for the main card; this isn't something I do much of, usually but I like the effect and think I'll be doing it more often. So which colour combination is your favourite? Do you have a new 'number one' in-colour? Leave me a comment below or on my Facebook page - I'd love to know what you think. It's still neck-and-neck Strawberry Slush and Coastal Cabana for me; too close to call!

Back tomorrow with another card; until then, happy stampin'!

Stampin' Up Supplies:

Stamps: Mosaic Madness, Happy Day

Cardstock: 2013-15 In Colours

Ink/Stampin' Write Markers: As detailed above

Tools: Mosaic Punch, Itty Bitty Punch

Finishing Touches: Basics Rhinestones


Tags: , , , , , , , ,

Cards | Stamping | Swaps

Storytime Friends

by Joanne James13. July 2013 20:29

So shout 'yay!' if you've been enjoying the sunshine today - what a scorcher! I've spent much of it in my craft room preparing my swaps for quarterly team training tomorrow, but I'm not complaining! I'll be sharing swaps tomorrow, but today I'm sharing this post which was scheduled for earlier this week when I was cutting up my Storytime paper, but in the business of my week I totally forgot to post - go figure!

So here is today's creative post: another card I made this week as a 'friendship' card for Rebecca to give to one of her little friends who left school at the end of term:

The layout is simple and I know the red wagon is very American (we actually have friends stateside who have one of these - I think it's great!), but I love the feeling of friendship that the image gives. The check background also works to bring the whole card design and colours together.

Back tomorrow with news of quarterly training and pictures of my swaps. Until then, happy stamping'!


Stampin' Up Supplies:

Stamps: Sweet Essentials

Cardstock: Real Red, Pool Party, Night of Navy, Storytime DSP

Ink/Stampin' Write Markers: Real Red

Tools: 1 3/4" Circle Punch, 2 3/8" Scallop Circle Punch

Finishing Touches: Pool Party Baker's Twine

Tags: , , , , , , ,

Cards | Stamping

Embossed Daisies and new Build-a-Brad

by Joanne James11. July 2013 22:06

Another mad busy day today, working on several commissions, a few household chores and preparing for the last day of the school term tomorrow. As promised, here's the other card Barbara and I made when we were busy embossing the other day - a sunny yellow base with a heat embossed white daisy pattern:

Here's a close up of the embossed detail where you can see the raised pattern:

I love the simplicity of this kind of card and Barbara and I originally left ours with the embossed panel taking centre stage, but I later decided to add a sentiment from the Sweet Essentials stamp set and two of the lovely new build-a-brads with Daffodil Delight candy dots (did you guess the new product correctly?!)

Just a reminder too that 'Sweet Essentials' is one of the greeting stamp sets available at 25% off this month - it can be yours for £10.46 (clear mount).

Back tomorrow with another project - another of my new annual catalogue favourites. Until then, happy stampin'!


Stampin' Up Supplies:

Stamps: Sweet Essentials

Cardstock: Whisper White, Daffodil Delight

Ink/Stampin' Write Markers: Daffodil Delight, Versamark

Tools: Heat Gun

Finishing Touches: White Embossing Powder, Brights Candy Dots, Candy Dots Brad Bases

Tags: , , , , , , ,

Cards | Promotions | Stamping

Vellum Embossed Best of Butterflies

by Joanne James10. July 2013 22:14

A late blog post today, but a post none the less! I've been busy putting the finishing touches to some teacher gifts that I'll share with you later in the week, but for those of you who follow me on Facebook and saw my 'sneak peek' earlier today, you will know that today's card features a butterfly - one of the stamps from this month's 'Best of' anniversary set, Best of Butterflies.

I spent some time with my downline Barbara yesterday afternoon working on different embossing techniques and this is one of the cards we produced:

The butterfly takes centre stage on this card and is stamped in Versamark on vellum then embossed in black to give a textured outline. We then picked up the colours in the now retired Sale-A-Bration Sycamore Street paper to shade our butterfly, colouring with markers on the underside of the butterfly so that the muted colours show through. Here is a close up of the detail where you can really see the texture of the black embossing on the butterfly:

This is the first time I've tried this technique and I really like the effect that this gives. I will be sharing more cards featuring the Best of Butterflies stamp set in coming days, but if you can't wait to get started creating your own butterfly cards, contact me and I will happily order this stamp set for you.

Back tomorrow with more embossing and another new product ... any guesses? I'll give you a clue - it was one of my 'top 5' wishlist products in the video I shot to accompany the launch of the new annual catalogue this month. If you haven't yet seen it, you can find it here. Until then, happy stampin'!


Stampin' Up Supplies:

Stamps: Best of Butterflies

Cardstock: Island Indigo, Tangerine Tango, Sycamore Street DSP (Sale-A-Bration - retired), vellum

Ink/Stampin' Write Markers: Island Indigo, Pool Party, Tangerine Tango, Summer Starfruit, Basic Grey, Versamark

Tools: Window Framelits, Heat Gun

Finishing Touches: Black Embossing Powder

Tags: , , , , , ,

Cards | Promotions | Stamping

Pop Up Teacher Thank You Card

by Joanne James9. July 2013 21:38

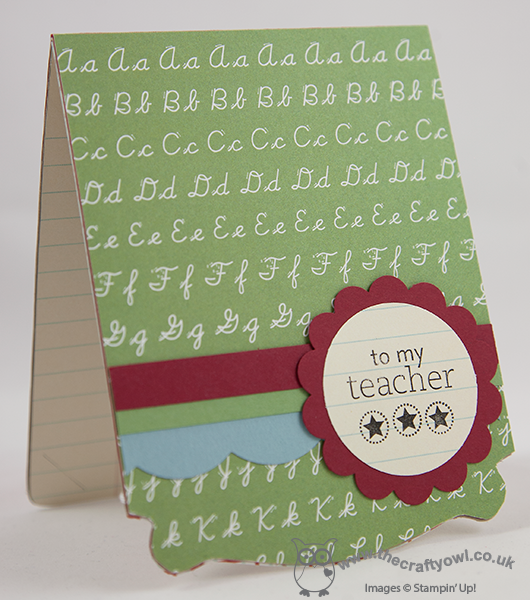
Back again with the last of my teacher cards (I think!) this year - this time a pop-up card using my dress up framelits. The credit for this design goes to Fran Sabad; you can see her original card, a teacher birthday card, here. If you're looking for ways to use your Dress Up Framelits, I thoroughly recommend you check out Fran's blog - she has made some amazing cards using the Pop 'n' Cuts base and co-ordinating framelits. I thought this card would work equally well as a teacher thank you card with a few minor alterations and give me yet another opportunity to get stuck in to my Storytime DSP. So here is the outside of my card:

It's the inside that is the real star of the show though - a teacher mannequin in her classroom, in front of a traditional blackboard:

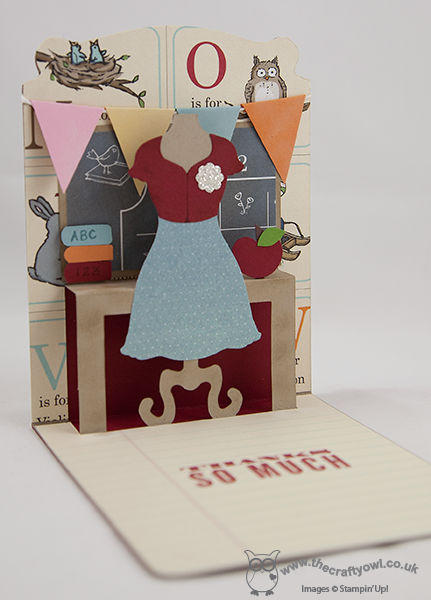
I absolutely love this card, complete with all the little details - check out the apple on the corner of the teacher's desk - how cute is that?! In case you're wondering about the glimmer paper 'brooch' pinned to the teacher's blouse, I know it looks a little out of place against the muted colours and traditional classroom feel, but Rebecca's teacher has what can only be described as a glitter obsession - she can't complete an art project without using tons of the stuff, so I know she wouldn't think this card complete without just a little bit of 'bling'. I wish I could convert her to the benefits of SU no-shed glimmer paper; well, Ben is likely to have her as his teacher the year after next, so there's still time!

The funniest thing about this card was when I showed it to Rebecca to see if it met with her approval; she said, "I love it - but why is there a blackboard? We've never had one of those in the classroom Mummy, all our classrooms have interactive whiteboards". What can I say? A sign of the times and made me feel quite old!

Back tomorrow with something different; until then, happy stampin'!


Stampin' Up Supplies:

Stamps: Word Play (retired), For My Family (retired)

Cardstock: Cherry Cobbler, Baja Breeze, Wild Wasabi, So Saffron, Pumpkin Pie, Pink Pirouette, Gumball Green, Crumb Cake, Storytime DSP

Ink/Stampin' Write Markers: Cherry Cobbler

Tools: 1 3/4" Circle Punch, 2 3/8" Scallop Circle Punch, Large Scallop Edgelits, Dress Up Framelits, Pop 'n' Cuts Card Base

Finishing Touches: White Baker's Twine, Silver Glimmer Paper

Blackboard Teacher Thank You Card

by Joanne James3. July 2013 20:51

Apologies for a few blog-less days - lots going on in the James household, and most of it not at home! Both James juniors have had their sports day this week and Rebecca has just finished a three night run singing in her school musical 'Bugsy Malone'; I honestly feel like I've been running around like a mad thing these last few days. Having put up tents and got out the sand and garden play toys this morning, I spent a couple of hours finishing my ironing before it got too hot (I'm not complaining - I love that summer has arrived at last!) and following a pleasant lunch in the garden, I'm now taking the opportunity to catch up with my blogging whilst cheering on Andy Murray in the Wimbledon Men's Final.

So, another teacher thank you card from me today - this time an old fashioned blackboard, which gave me the opportunity to have a little go at the 'chalkboard' technique that is so on-trend in the world of papercrafting at the moment. So here is my card:

It's based on a teacher Valentine's card that I saw on Pinterest but I think it makes a nice simple teacher thank you card. Once I stamped the sentiment, I just used a sponge to smudge some of the white ink across the card to give the impression of chalk dust. I stamped the inside with a bright red 'Thanks a MILLION' from the retired 'Word Play' stamp set, to pick up the red of the apple - well, it is for a teacher, right?!

I also made another teacher thank you card using my Storytime designer series paper - check it out:

I think this paper really lends itself to teacher thank you cards. I'm having fun creating these in between playing with some of the stamp sets from the new annual catalogue.

Should be back on course now with another project to post tomorrow; until then, enjoy the sunshine and happy stampin'!


Stampin' Up Supplies (Blackboard Card):

Stamps: For My Family

Cardstock: Crumb Cake, Basic Black, Whisper White, Real Red, Gumball Green, Chocolate Chip

Ink/Stampin' Write Markers: White, Real Red

Tools: Corner Punch, 1/2" Circle Punch, Sponge Dauber

Tags: , , , , , , , ,

Cards | Stamping

Mosaics ... And It's All Really Good!

by Joanne James3. July 2013 20:00

After all the excitement of yesterday's catalogue launch, today I'm sharing another mosaic card. This is a simple white card and features a small flag of the co-ordinating Quatrefancy Specialty paper:

This card was really easy to pull together and just goes to show you can get a nice card design without the need for a stamp-a-ma-jig to line up all the various mosaic tiles. The sentiment comes from a new greetings stamp set called 'Really Good Greetings' and is one of those general stamps that will suit lots of occasions.

Back tomorrow with another project; until then, happy stamping!


Stampin' Up Supplies:

Stamps: Mosaic Madness, Really Good Greetings

Cardstock: Strawberry Crush, Whisper White, Quatrefancy Specialty Designer Series Paper

Ink/Stampin' Write Markers: Pool Party, Island Indigo, Pumpkin Pie, Strawberry Crush

Tools: Mosaic Punch, Itty Bitty Punch

Finishing Touches: Basics Rhinestones, Island Indigo Bakers Twine

Teacher Thank You Cards

by Joanne James1. July 2013 20:30

I've had a busy day today, amongst other things shooting a video to share with you my absolute favourite new products from the new Stampin' Up! annual catalogue out tomorrow; but you're going to have to wait until tomorrow to see that!

For anyone reading this with children of school age, you will no doubt be looking forward to (or dreading - it depends on your perspective!) the long summer holidays that wigiftll be with us in a few weeks time. With that in mind, I've been making some teacher thank you cards for both of my children to take in and give to their teachers along with a small token of appreciation for their help and support throughout the year. I'll share the gift nearer the end of term, but today I thought I'd share the first two cards I've made. here is the first one:

This is a CASE of a Jen Arkfeld card that I saw on Pinterest and was perfect to use up some of my leftover Storytime DSP. This paper showcases some great images from childhood that make lovely teacher thank yous or even 'best friend' cards and requires very little actual stamping. Having made the above card, I then made a second one that had more of a masculine feel - perfect for my son to give to his teacher:

I even used a strip of the handwriting paper in the background, as this has been one of his key areas of focus this year and something I'm sure his teacher will remember him for!

I hope you like these cards; I have a few more ideas for teacher thank yous that I will be sharing in the next week or so, interspersed with lots of great projects using products from the new annual catalogue. Back tomorrow with the official launch of the new annual catalogue - I can't wait!

Until then, happy stampin'!


Stampin' Up Supplies:

Stamps: For My Family

Cardstock: Pool Party, Very Vanilla, Midnight Muse, Storytime DSP

Ink/Stampin' Write Markers: Midnight Muse

Tools: 1 3/4" Circle Punch, 2 3/8" Scallop Circle Punch

Finishing Touches: Natural Linen Thread, Brights Designer Buttons, Sycamore Street Buttons (Sale-a-bration - retired)


Tags: , , , , , , ,

Cards | Stamping

Elements of Style Mannequin Tri-Fold Card

by Joanne James30. June 2013 21:06

A busy day today with lots more swimming and family fun in the garden, making the most of the sunshine. Time for a little bit of crafting this evening, but today I'm going to share a card I made a little while ago when I was last playing with my Dress Up framelits that features two retiring products - the Elements of Style stamp set and the lovely Tea for Two DSP. This is a case of a card by Julie Kettlewell, who like me also seems to have had something of a love affair with the Dress Up framelits and has made some fabulous cards with this set: you can check out her card here and look at lots of other great examples of how to get the most from this versatile set. So here is my card:

As my regular blog followers will know, I don't really do 'fussy' and this card is about as vintage as I get! I really like the flower stamping over the newsprint though, and I think the Crumb Cake ribbon really finishes off this card. I used a Calypso Coral marker pen to colour the flowers to echo the colour of the flowers on the designer paper and used a blender pen to get some depth to the colour. The tri-fold design is also just a little different and yet the card still folds flat for postage.

That's all for today - tomorrow is the start of a very busy Stampin' Up! week: a new annual catalogue, a new monthly stamp set and lots of other great news and new products to share in the coming weeks, so lots of planning, making and fun to be had!

Back tomorrow with another project; until then, happy stampin'!


Stampin' Up Supplies:

Stamps: Elements of Style

Cardstock: Crumb Cake, Very Vanilla, Tea for Two DSP, First Edition Specialty DSP

Ink/Stampin' Write Markers: Early Espresso, Calypso Coral, Lucky Limeade

Tools: Dress Up Framelits, Blender Pen

Finishing Touches: Crumb Cake Seam Binding Ribbon

Shop Online

Access my online shop 24 x 7, 365 days of the year:

Current May hostess code:

3NR3FB9W

Shop Online

2024-25 Annual Catalogue

BROWSE THE CATALOGUE

Click on the image to download your copy of the 2024-25 annual catalogue. For a full list of current SU! supplies, go to my online store. If you would like any help or advice, please drop me a line at [email protected] or give me a call on 07773 421446 - I'd be happy to help.

Join My Team

It's always a great time to join Stampin’ Up but during May it's even better! New team members can get £78.25 of new In Color products for FREE! That's in addition to another £130 worth of products of your choice for only £99 + free business supplies + free shipping + all the fun being a part of Stampin’ Up! Stampin' Up! has something for everyone: join my growing team and benefit from my support to enjoy Stampin' Up! however you choose.

If you're interested, call me for a chat to understand how I can help you realise your goals. Alternatively, if you have already decided to sign up and you just can't wait, please click here for the link to the online form where you can sign up and order your starter kit right away! 

Latest Kits!

Stampin Cut and Emboss

The City Sights Kit has all you need to make 8 cards with coordinating envelopes for £20. Along with the new Happy Hollyhocks Kit, a no stamping kit including 9 cards for just £14, both are available from May 1st - get yours here!

New Online Exclusives

There are new products available exclusively in the online store from 5 March - check them out here.

About Me

Hi I'm Joanne and live in Northampton and when I'm not looking after my husband and two beautiful children, am an avid crafter with a passion for all things Stampin' Up!

I must confess that I have never been a big rubber stamper - until I discovered Stampin' Up! that is. I love the fact that I can get such great results with co-ordinating stamps, inks, papers and punches - the possibilities are endless! Join me on my stamping journey as I share the things I love and be inspired to create amazing things yourself!

Follow Me

Monthly Newsletter

Box Builder

Click the button above to use Box Buster to create your custom box design using the Envelope Punch Board!

Kits Collection Now Available!

Stampin Cut and Emboss

The new Kits Collection from Stampin' Up! is now available!

Click here to see the current kits available and order yours online today.

I Design For


Mini Catalogue


The next mini catalogue will be live in September! 

Stampin' Up Stuff

This is my personal blog and is not endorsed by Stampin’ Up! I hope you find it a plentiful source of ideas and personal inspiration but please don't copy my designs for contest submission or use for classes, publication or sale without express permission.