Christmas Tea Lights

by Joanne James8. August 2013 09:44

Another week, another late post - I'm loving the summer holidays but when school's out it sure is tricky to keep everything else on track! So today I'm posting nice and early, so that I don't run out of time again!

Today I'm sharing another of the makes from my Christmas workshop that I held last weekend: a lovely set of four tea lights in a handmade box. This workshop was less about the stamping and much more about the scoring - if my ladies weren't proficient with their Simply Scored scoreboard beforehand, they sure are now! So here is our finished box:


We made a box with a sliding sleeve cover, from which we cut out an oval aperture with the Oval Framelits and backed with a window sheet, to allow a glimpse of our lovely hand-stamped candles inside. Here's a picture of the open box, with a peek at our 'dressed up' tea lights:

We edged each of them with a strip of DSP; I'll be making more of these when my festive washi tape arrives, as this is perfect for this kind of project. The candle stamping was really easy to achieve and as none of the ladies present had done this before, was a real 'wow' moment for them. I suspect lots of their friends and neighbours will be receiving stamped tea light gift sets for Christmas now that they've learned this clever technique!

I love this spotted star/snowflake paper from the retired 'Be of Good Cheer' paper set; with so many designs to choose from, we all made different ones though - here's one of the other finished sets made by Kathy during the workshop:

These papers are just so lovely, but don't be too sad that they are now retired; I have had a 'sneak peek' of the new Autumn-Winter seasonal catalogue and can honestly say, you will not be disappointed with this year's offerings!

All being well, I will be back tomorrow with the last of my Christmas workshop projects. I'm off to have a quick spot of making before meeting friends in the park for a picnic - lovely! Until then, happy stampin'!


Stampin' Up Supplies:

Stamps: Four Seasons (hostess - retired)

Cardstock: Cherry Cobbler, Be of Good Cheer Designer Series Paper (retired)

Ink/Stampin' Write Markers: Cherry Cobbler

Tools: Simply Scored, Big Shot, 1 1/4" Circle Punch, 1 3/4" Scallop Circle Punches, Oval Framelits

Finishing Touches: Creped Filter Paper, Window Sheet,  Cherry Cobbler 1/2" Scallop Dots Ribbon (retired)

Christmas Rosette Door Wreath

by Joanne James4. August 2013 19:36

As I mentioned earlier this week, yesterday I held an all-day Christmas workshop with a lovely bunch of ladies and we made a good start with our preparations for the festive season with a number of 3D projects. I'm going to share the first of these with you today: a door wreath made out of paper rosettes and featuring the sadly recently retired Be Of Good Cheer Christmas DSP. After much scoring, gluing and decorating, this was the finished article:
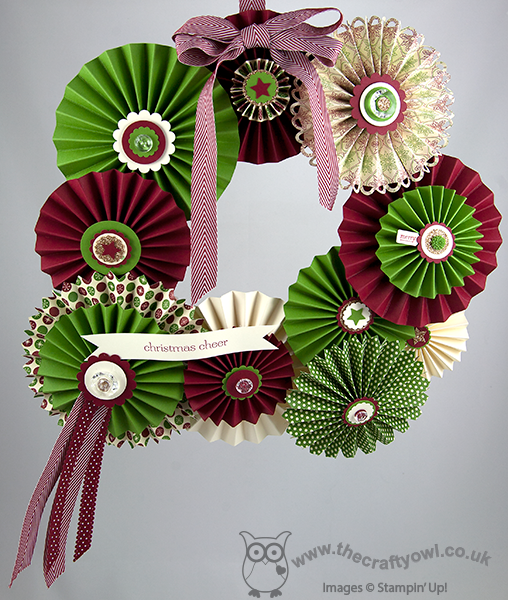
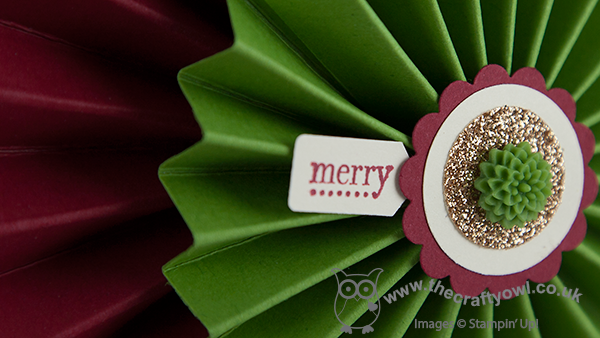
This picture shows my version of the wreath suspended. In hindsight, I should have photographed it in situ on my front door, although then my neighbours would have thought me completely mad (they already think I'm part way there, as I grow potatoes and pumpkins in my front garden, but that's a story for another time!!) The rosettes made from the patterned paper were cut using the Designer Rosette Bigx XL die, which is great for fast and easy cutting and scoring; unlike the ones made from the plain cardstock, which we scored using the Simply Scored scoreboard so they took a little longer. We used a variety of circle and scallop punches to create the centres; here's a close up of a couple of mine:
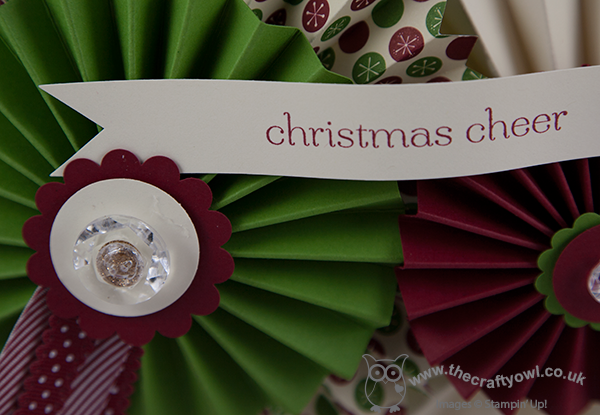
The one below was our focal point rosette, complete with ribbon trim - did you spot the lovely new Cherry Cobbler chevron ribbon in there? - and we also included a banner sentiment in keeping with the season:
The nice thing about a project like this though is that whilst everyone starts out with the same materials, each person has their own 'take' on what theirs should look like, so you end up with lots of similar but slightly different outputs. To illustrate, here is one of the finished wreaths of one of the ladies who attended:
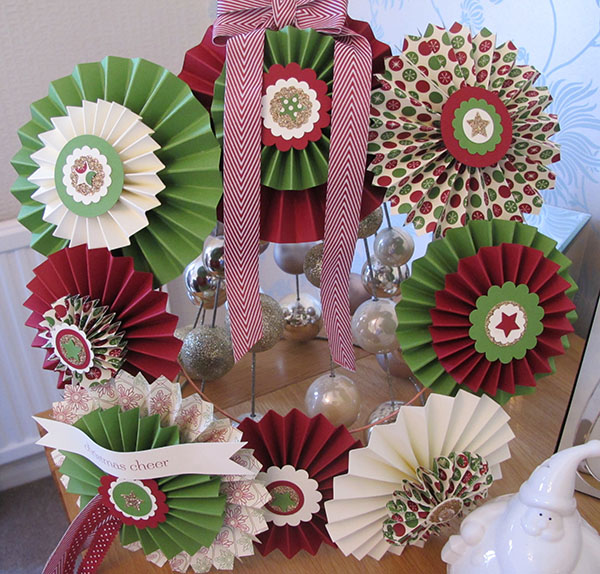
Isn't Maureen's wreath just lovely? I'll share the other projects we made with you later this week. I'm off now to recover from the party excesses of my day - my downline Barbara and I held a joint party for our 6 year old sons this afternoon: swimming party followed by birthday picnic in the park. I will share the invitations and thank you notes we made tomorrow; meanwhile, time for a nice quiet glass of wine and to put my feet up, I think!

Back tomorrow with another project; until then, happy stampin'!


Stampin' Up Supplies:

Stamps: Sweet Essentials, Tiny Tags (retired)

Cardstock: Very Vanilla, Gumball Green, Cherry Cobbler, Be of Good Cheer Designer Series Paper (retired)

Ink/Stampin' Write Markers: Cherry Cobbler

Tools: Simply Scored, Big Shot, Rosette Bigz XL Die, 1", 1 1/4", 1 3/8" Circle Punches, 7/8", 1 1/4" 1 3/4" Scallop Circle Punches, Itty Bitty Punches (circle), Merry Minis Punch Pack (star), Jewellery Tag Punch (retired)

Finishing Touches: Champagne Glimmer Paper, Vintage Faceted Designer Buttons, In Colour Dahlias, 3/4" Cherry Cobbler Chevron Ribbon,  Cherry Cobbler 1/2" Scallop Dots Ribbon


Raspberry Ripple Covered Notebook

by Joanne James16. July 2013 21:59

A really quick post from me today to share a covered notebook I made for Rebecca's teacher last week to go with her end of term thank you gift. As someone who loves arts and crafts herself, Rebecca was keen to give her teacher a special book she could use to jot down notes and such like and was adamant that it should sparkle! So this is what we made:

Some More Amore DSP, glimmer paper and trusty elegant butterfly punch were all that we needed to turn a plain notebook into something special. We also added some in-colour satin stitched ribbon to the bind as a finishing touch. We also added a personal message inside, along with the poem 'Unity' by Cleo Swarat, which is all about the role of teacher and parent in educating a child and talks of the teacher being a sculptor, which given Rebecca's teacher majored in Art seemed appropriate for her.

That's all for today - back tomorrow with another project. until then, happy stampin'!


Stampin' Up Supplies:

Cardstock: Raspberry Ripple, More Amore (DSP)

Tools: Elegant Butterfly Punch, 1 3/4" Scallop Circle Punch, Itty Bitty Punches

Finishing Touches: Raspberry Ripple Satin Stitched Ribbon, Silver Glimmer Paper, Basics Rhinestones

Tags: , , , , ,

3D Projects

Storytime Friends

by Joanne James13. July 2013 20:29

So shout 'yay!' if you've been enjoying the sunshine today - what a scorcher! I've spent much of it in my craft room preparing my swaps for quarterly team training tomorrow, but I'm not complaining! I'll be sharing swaps tomorrow, but today I'm sharing this post which was scheduled for earlier this week when I was cutting up my Storytime paper, but in the business of my week I totally forgot to post - go figure!

So here is today's creative post: another card I made this week as a 'friendship' card for Rebecca to give to one of her little friends who left school at the end of term:

The layout is simple and I know the red wagon is very American (we actually have friends stateside who have one of these - I think it's great!), but I love the feeling of friendship that the image gives. The check background also works to bring the whole card design and colours together.

Back tomorrow with news of quarterly training and pictures of my swaps. Until then, happy stamping'!


Stampin' Up Supplies:

Stamps: Sweet Essentials

Cardstock: Real Red, Pool Party, Night of Navy, Storytime DSP

Ink/Stampin' Write Markers: Real Red

Tools: 1 3/4" Circle Punch, 2 3/8" Scallop Circle Punch

Finishing Touches: Pool Party Baker's Twine

Tags: , , , , , , ,

Cards | Stamping

Pop Up Teacher Thank You Card

by Joanne James9. July 2013 21:38

Back again with the last of my teacher cards (I think!) this year - this time a pop-up card using my dress up framelits. The credit for this design goes to Fran Sabad; you can see her original card, a teacher birthday card, here. If you're looking for ways to use your Dress Up Framelits, I thoroughly recommend you check out Fran's blog - she has made some amazing cards using the Pop 'n' Cuts base and co-ordinating framelits. I thought this card would work equally well as a teacher thank you card with a few minor alterations and give me yet another opportunity to get stuck in to my Storytime DSP. So here is the outside of my card:

It's the inside that is the real star of the show though - a teacher mannequin in her classroom, in front of a traditional blackboard:

I absolutely love this card, complete with all the little details - check out the apple on the corner of the teacher's desk - how cute is that?! In case you're wondering about the glimmer paper 'brooch' pinned to the teacher's blouse, I know it looks a little out of place against the muted colours and traditional classroom feel, but Rebecca's teacher has what can only be described as a glitter obsession - she can't complete an art project without using tons of the stuff, so I know she wouldn't think this card complete without just a little bit of 'bling'. I wish I could convert her to the benefits of SU no-shed glimmer paper; well, Ben is likely to have her as his teacher the year after next, so there's still time!

The funniest thing about this card was when I showed it to Rebecca to see if it met with her approval; she said, "I love it - but why is there a blackboard? We've never had one of those in the classroom Mummy, all our classrooms have interactive whiteboards". What can I say? A sign of the times and made me feel quite old!

Back tomorrow with something different; until then, happy stampin'!


Stampin' Up Supplies:

Stamps: Word Play (retired), For My Family (retired)

Cardstock: Cherry Cobbler, Baja Breeze, Wild Wasabi, So Saffron, Pumpkin Pie, Pink Pirouette, Gumball Green, Crumb Cake, Storytime DSP

Ink/Stampin' Write Markers: Cherry Cobbler

Tools: 1 3/4" Circle Punch, 2 3/8" Scallop Circle Punch, Large Scallop Edgelits, Dress Up Framelits, Pop 'n' Cuts Card Base

Finishing Touches: White Baker's Twine, Silver Glimmer Paper

Teacher Thank You Cards

by Joanne James1. July 2013 20:30

I've had a busy day today, amongst other things shooting a video to share with you my absolute favourite new products from the new Stampin' Up! annual catalogue out tomorrow; but you're going to have to wait until tomorrow to see that!

For anyone reading this with children of school age, you will no doubt be looking forward to (or dreading - it depends on your perspective!) the long summer holidays that wigiftll be with us in a few weeks time. With that in mind, I've been making some teacher thank you cards for both of my children to take in and give to their teachers along with a small token of appreciation for their help and support throughout the year. I'll share the gift nearer the end of term, but today I thought I'd share the first two cards I've made. here is the first one:

This is a CASE of a Jen Arkfeld card that I saw on Pinterest and was perfect to use up some of my leftover Storytime DSP. This paper showcases some great images from childhood that make lovely teacher thank yous or even 'best friend' cards and requires very little actual stamping. Having made the above card, I then made a second one that had more of a masculine feel - perfect for my son to give to his teacher:

I even used a strip of the handwriting paper in the background, as this has been one of his key areas of focus this year and something I'm sure his teacher will remember him for!

I hope you like these cards; I have a few more ideas for teacher thank yous that I will be sharing in the next week or so, interspersed with lots of great projects using products from the new annual catalogue. Back tomorrow with the official launch of the new annual catalogue - I can't wait!

Until then, happy stampin'!


Stampin' Up Supplies:

Stamps: For My Family

Cardstock: Pool Party, Very Vanilla, Midnight Muse, Storytime DSP

Ink/Stampin' Write Markers: Midnight Muse

Tools: 1 3/4" Circle Punch, 2 3/8" Scallop Circle Punch

Finishing Touches: Natural Linen Thread, Brights Designer Buttons, Sycamore Street Buttons (Sale-a-bration - retired)


Tags: , , , , , , ,

Cards | Stamping

Best of Flowers - Scallop Daisy

by Joanne James23. June 2013 20:45

As anticipated, I didn't manage a blog post yesterday. After a full day on my feet, when I finally sat down yesterday evening I was absolutely good for nothing! Today has been a busy one too: swimming lessons and Rebecca's birthday pool party this afternoon. All good fun, if challenging as far as the weather is concerned - showers are most definitely the order of the day this weekend!

Anyway, on to today's project - I've another couple of cards to share with you, this time using the single daisy flower stamp. This is the new stamp in the set - and I love that it fits the 1 1/4" scallop circle punch. This is the first card I came up with:

A bright and cheery card - I love yellow! - with a shaped edge created by a row of punched daisies in shades of yellow with some colour blending on the petals. The centres were stamped separately and punched out with the circle from the Itty Bitty Punches pack. I also made another one with additional layering in a pink colourway:

I left this one sentiment-free as I sometimes do - I can always add the most appropriate sentiment at a later date. One last thing today before I go - as it was Rebecca's pool party today, I just thought I would share with you a picture of her amazing birthday cake:

I absolutely cannot take the credit for this work of art - it was made by Sharon, one of the ladies that attends my card classes. Isn't it just fabulous? Right down to the little flip flops. Perfect for my water baby, that's for sure.

I'll be back with something different to share tomorrow - until then, happy stampin'!


Stampin' Up Supplies:

Stamps: Best of Flowers, Sassy Salutations

Cardstock: Whisper White, So Saffron, Pretty in Pink

Ink/Stampin' Write Markers: So Saffron, Daffodil Delight, Early Espresso, Pretty in Pink, Melon Mambo, Regal Rose

Tools: 1 1/4" Scallop Circle Punch, 3/16" Corner Punch, Itty Bitty Shapes Punch (circle)


Tags: , , , , , , ,

Cards | Stamping

Number One Dad Card

by Joanne James6. June 2013 22:00

Keeping with the Father's Day theme, another quick Dad card from me today. This time I went with a rosette for a Number One Dad:

I went with a Cherry Cobbler base to match my designer paper. The striped paper actually comes from the Christmas Be of Good Cheer paper stack (retiring this month), but it is neutral enough to work well on a masculine card. I made a rosette in double-quick time using my Simply Scored score board, then layered my 'Number One' stamp with a couple of scalloped circles to balance the size. I quite like this card, although if I made it again I would substitute the green scalloped circle with a vanilla one; I don't know whether it's psychological or not, but adding the green into the colour combo makes it look more 'Christmassy', which isn't quite the effect I was after!

Back tomorrow with another project; until then, happy stampin'!


Stampin' Up Supplies:

Stamps: Ciao Baby!, For My Family

Cardstock: Cheery Cobbler, Very Vanilla, Be of Good Cheer DSP

Ink/Stampin' Write Markers: Cherry Cobbler

Tools: Simply Scored, 7/8" Scallop Circle Punch, 1 1/4" Scallop Circle Punch, 1 3/4" Scallop Circle Punch

Finishing Touches: Cherry Cobbler Baker's Twine

The Big 40 Mark Two - Post Friendly Version

by Joanne James28. May 2013 20:26

This evening I'm sat wrapped up against the elements, having taken my little ones to buy summer sandals today on another thoroughly wet day - I must be mad! Never mind, time to party on - as promised yesterday, I'm back today to share the second of my big 40 birthday cards this week, this time a post-friendly version:


I stayed with the same Patio Party background, but as I needed a design without buttons, I decided to make more of a feature of the number forty and cut it out of silver glimmer paper. I layered this with a circle and scallop circle and an alternative 'Happy Birthday' sentiment. So another take on the '40' theme.

Back tomorrow with another patio party card, but no numbers this time - until then, happy stampin'!


Stampin' Up Supplies:

Stamps: Sassy Salutations

Cardstock: Primrose Petals, Whisper White, Raspberry Ripple, Midnight Muse

Ink/Stampin' Write Markers: Midnight Muse

Tools: 1 3/4" Circle Punch, 2 3/8" Scallop Circle Punch, Large Scallop Edgelit, Typeset Alphabet Die

Finishing Touches: Silver Glimmer Paper

Oh Baby Washing Line

by Joanne James23. May 2013 21:26

Busy day revolving around my little ones today with music recitals, class assemblies, ballet lessons and visiting friends for tea - I swear my two have a better social life than me! Anyway, finally sitting down to share another card from this month's class with you - today, a cute baby card, complete with washing line:

I used the lovely Twitterpated designer paper for the dresses and dungarees, as the largely pastel colours suit a new baby card. I must confess to using some now retired ribbon that was lurking at the back of my drawer to edge the dresses because the pleated edge was perfect for the dress edge. The dresses and dungarees are all made from the 'waistcoat' section of the owl punch, with a few nips and tucks here and there. My most favourite thing about this card is the mini-brad dungaree buttons - I love them!

I've added a pink 'oh baby' sentiment circle to this card, but in class we made two: one pink and one blue, so that they could be added at a later stage when the recipient was known; now that's what you call organised! Back tomorrow with my last class card - until then, happy stampin'!


Stampin' Up Supplies:

Stamps: Ciao Baby!

Cardstock: Whisper White, Old Olive, Island Indigo, Baja Breeze, Pink Pirouette, Twitterpated DSP

Ink/Stampin' Write Markers: Baja Breeze, Pink Pirouette

Tools: Owl Punch, Cloudy Day Textured Impressions Embossing Folder, Simply Scored Borders Scoring Plate, 7/8" Scallop Circle Punch, 1" Circle Punch

Finishing Touches: 1/8" Mini Brads, Island Indigo Baker's Twine, Ruffled Ribbon (retired)

Mini Catalogue

BROWSE THE CATALOGUE

The mini catalogue is now live! Read and download your copy here.

Shop Online

Access my online shop 24 x 7, 365 days of the year:

Current March hostess code:

S9F2XJJW

Shop Online

Join My Team

It's always a great time to join Stampin’ Up! New team members can get £130 worth of products for only £99 + free business supplies + free shipping + all the fun being a part of Stampin’ Up! Stampin' Up! has something for everyone: join my growing team and benefit from my support to enjoy Stampin' Up! however you choose.

If you're interested, call me for a chat to understand how I can help you realise your goals. Alternatively, if you have already decided to sign up and you just can't wait, please click here for the link to the online form where you can sign up and order your starter kit right away! 

Latest Kit!

Stampin Cut and Emboss

The Rock Legend Kit has all you need to make 8 cards with coordinating envelopes. Along with the new Panda Friends Kit, both are available from January 4th for just £14 each - get yours here!

2023-24 Annual Catalogue

BROWSE THE CATALOGUE

Click on the catalogue for a full list of current SU! supplies - if you would like to order any of the items featured, please drop me a line at [email protected] or give me a call on 07773 421446 - I'd be happy to help.

New Online Exclusives

There will be new products available exclusively in the online store from 5 March - check them out here.

About Me

Hi I'm Joanne and live in Northampton and when I'm not looking after my husband and two beautiful children, am an avid crafter with a passion for all things Stampin' Up!

I must confess that I have never been a big rubber stamper - until I discovered Stampin' Up! that is. I love the fact that I can get such great results with co-ordinating stamps, inks, papers and punches - the possibilities are endless! Join me on my stamping journey as I share the things I love and be inspired to create amazing things yourself!

Follow Me

Monthly Newsletter

Box Builder

Click the button above to use Box Buster to create your custom box design using the Envelope Punch Board!

Kits Collection Now Available!

Stampin Cut and Emboss

The new Kits Collection from Stampin' Up! is now available!

Click here to see the current kits available and order yours online today.

I Design For


Stampin' Up Stuff

This is my personal blog and is not endorsed by Stampin’ Up! I hope you find it a plentiful source of ideas and personal inspiration but please don't copy my designs for contest submission or use for classes, publication or sale without express permission.