Sweet Songbirds Double Slider Card AYSI275

by Joanne James20. May 2022 12:00

Happy Friday everyone - the weekend is in sight! Today I'm sharing my design team card for our new challenge over at As you See It where it's time for a recipe challenge:


I made a very special card to share with you today! You know when you get an idea and you just can't rest until you make it a reality? Yes, that was today's card! My card to welcome a new baby features the new Sweet Songbirds bundle - take a look:


Here's the low-down on today's card:

Sweet Songbirds - Everyone loves a good punch bundle and the Sweet Songbirds bundle, comprising the stamp set of the same name and the Songbird Builder Punch, is definitrly a great addition to your crafting collection. Perfect to welcome someone to a new home or to welcome a new baby, for thank yous, news notes or any kind of celebration (even Christmas - these birds would make great robins!), the Sweet Songbirds bundle has it all. The punch will either punch the stamped image of the large bird in the set, or allow you to simply punch a bird from cardstock. This is particularly useful to easily create mirrored birds, as I've done on my card today. 

Double Slider Reveal - What might not be immediately obvious at first glance, is that today's card is a double slider card. When you pull the tab at the side of the card, the mama and papa birds slide out to reveal their baby bird in the nest:


I might be biased, but I think this is such a cute idea! 

Here's a short video clip showing you how that works:

I'm mindful that today's post doesn't show the detail of the 'how' I created my double slider; I watched a number of actually very frustrating YouTube videos, and ultimately ended up re-engineering the mechanism until it is so super easy! It really needs a video to explain it though and I didn't then have time to film one this week, but I will pick this up and share in another post with you next week since I feel like I owe it to the crafting community to demystify this type of card!! I finished my sentiment and re-stamped my baby songbird on the inside of my card to finish.


A Recipe For Success - Whilst I was all about bring my creative ideas to fruition this week, it's recipe week over at As You See It and so worth me recapping on how I incorporated the elements of the recipe in my card:

  • Diecut or punch - Songbird Builder Punch and Basic Borders Dies (I used the cloud shaped as a stencil to add clouds to my background with a blending brush and some Balmy Blue ink)
  • Embossing folder - Merry Melody 3D Embossing Folder (This covers my slider mechanism)
  • Something beginning with 'B' - Birds and baby
  • Pastel colours - Balmy Blue, So Saffron and Polished Pink
  • Something shiny - A sparkly in-colour vellum flower and single rhinestone jewel to decorate mama bird (almost missed this one!)

That's everything - phew! What a sweet little pair:


This was such a fun card to make!

Here is the visual summary of the key products used on today's project for you to pin for easy reference:


You can see all of my 'How To' summaries on my 'How To - Tips and Techniques' Pinterest board in case you've missed any.  

Here's a summary of our challenge rules:

  • Create any card, scrapbooking page, 3D project or packaging project that fits the challenge.
  • Please include the challenge graphic and link back to the challenge in your blog post. Turn off word verification so we can leave you lots of lovely comments. Make sure you link the post not the whole blog to the Linky. Use #AYSIXXX when uploading to a public gallery.
  • If you’re unsure about ‘the rules’, check the details under the Challenge Guidelines tab on the As You See It Challenge homepage.
We look forward to seeing your creations in the AYSI gallery.

Enjoy your day and I'll be back tomorrow with another project. Until then, happy stampin'!


Stampin' Up! Supplies Used:

Table built using Product Table Builder by The Crafty Owl - Independent Stampin' Up! Demonstrator.

Home Life New Home Congratulations Card TTT162

by Joanne James19. May 2022 18:00

It's Thursday and time for a new challenge over at TicTacToe! It's the turn of Team X to host this week and the lovely Betty is our featured designer this week. This is the fun board that we are playing along with: 


I have needed a few 'new home' cards lately so I went down the middle column with flowers/free/embellishments to create a new home congratulations card with a difference - take a look:


Here's the low-down on today's card:

A Golden Oldie - When I made my new home card for our challenge over at The Paper Players this week (you can see that card here if you missed it), I realised how few current stamps I have that work for a new home card. This had given me cause to rummage through the retired shelf and I came across the retired 'Home Life' stamp set with the co-ordinating Welcome Home Dies (also retired) so decided to use them for today's card. 

Fresh FloralsThis is a 3 step layered photopolymer stamp and the layers can be used separately or together, as I've done here, to create a house packed with florals. I paired my retired stamps with Blushing Bride and two of the 2021-23 In colours, Polished Pink and Pale Papaya, for a fresh new look. I accented the centres of some of the larger pink flowers with some of last year's in-color jewels for a touch of sparkle too.

Shape It - The house die in the Welcome Home Dies set fits the front of a standard card perfectly, but I thought it would be fun to follow the contours of the die to create a card that was actually shaped like a house. It was really straightforward to do and just required a little extra measuring and slicing with my trimmer to achieve the desired result:

The card hinges on the left and opens conventionally and I simple added a shaped insert to the inside too. Do you ever create shaped cards? Leave me a comment below and let me know - I'd love you to share your favourite tips too.

Here is the visual summary of the key products used on today's project for you to pin for easy reference:


You can see all of my Product and 'How To' summaries on my 'How To - Tips and Techniques' Pinterest board in case you've missed any. 

A tictactoe board offers so many creative possibilities - how does this week's board inspire you? Why not have a go? We would love to see you in the gallery and who knows - you might be selected for Designer's Choice and be eligible to be a guest designer on a future challenge.

Challenges: I'm also entering today's card over at Just Us Girls where it's trend week and they are looking for shaped cards and at The Card Concept where my clean and layered card was inspired by the flowers in the vase and the soft pink and peach tones of their colour palette this week. I'm also linking up over at Retro Rubber Challenge where the challenge is 'flowers' - my 'Home Life' stamp is definitely retro, dating back to 2017.

      RRCB 182

Enjoy your evening; I'll be back tomorrow with another project, this time for our new challenge over at As You See It - and it's recipe week. Until then, happy stampin'!


Stampin' Up! Supplies Used: 

Table built using Product Table Builder by The Crafty Owl - Independent Stampin' Up! Demonstrator.

Waves of Inspiration CAS Shaker Card CCS 470

by Joanne James17. May 2022 12:00

It's Tuesday and time for a new challenge over at CAS Colours & Sketches. Shannon is hosting this month and this week we have our second colour challenge of the month: 


I love Shannon's fresh colour palette of aquas with a touch of silver this week! These colours immediately made me think of the sea so for my card today I had to make another card using the Waves of Inspiration bundle - take a look: 


Here's the low-down on today's card:

Waves of Inspiration - These beautiful sea greens were perfect to showcase another of those cresting waves from the Waves of Inspiration stamp set. Since this card is all about the clean and simple, I wanted to minimise the layers on my card and be sure to preserve my 'white space'. I masked off the centre of my card base so that only a portion of the wave would be visible, leaving me a wide unstamped border. The Stamparatus is a must for easily achieving this kind of stamping - masking paper would be easier, but this is how I did it using post-it notes:


To Shake Or Not To Shake? - I decided to create a simple shaker card, using a mix of sparkle & shine sequins for a touch of silver along with a few odd Coastal Cabana coloured sequins from my stash, and a simple window frame in white made using my Stitched Rectangle Dies:


I debated with myself whether a shaker card could be considered clean and simple, but having consulted with my lovely teamies we agreed it could: this card meets our 'clean and simple' criteria of 'uncluttered, with white or open space and minimal layers and embellishments' - so I hope you like it!

Silver Surfer - I decided to add a touch more silver and cut out one of the wave dies from some retired metallic silver glimmer paper and added it to the front of my shaker window for some extra sparkle. 

Here is the visual summary of the key products used on today's project for you to pin for easy reference:


You can see all of my 'How To' summaries on my 'How To - Tips and Techniques' Pinterest board in case you've missed any. 

As a reminder, for our colour challenges, you must use all of the stated challenge colours. You may also use neutral colours; however, the challenge colours should be the most noticeable ones featured on your card. We use Stampin' Up! colour names for reference, but you are welcome to use any other companies' products as long as you match the challenge colours as closely as possible.

I'm also linking today's card up over at Paper Craft Crew where their 'shiny celebration' inspiration challenge closes today.

Enjoy your day and I'll be back tomorrow with another project. Until then, happy stampin'!


Stampin' Up! Supplies Used:

Table built using Product Table Builder by The Crafty Owl - Independent Stampin' Up! Demonstrator.

Artfully Layered Clean And Simple Leaf Card

by Joanne James16. May 2022 10:30

Happy Monday everyone! Today I'm sharing another card using Amy's fabulous sketch over at Freshly Made Sketches this week:


I went for a slightly more conventional take on the sketch than I did with yesterday's card. I was also inspired by that cheese plant leaf in the blue vase that is bottom left on the Hand Stamped Sentiments Inspiration photo badge - take a look:


Here's the low-down on today's card:

I already had a blank banner cut on my desk from making yesterday's card, and the piece of Artfully Composed designer series paper and the inside dark green pieces of my leaf were leftovers from other projects, so I cut another leaf in Bermuda Bay and paper-pieced the insides and border edge together, stamped the banner and added to my layered cardbase - simple!


This is a great sketch for using up bits and pieces and is definitely a keeper - thank you Amy! I'm also linking today's card up over at CASology where the cue word this month is 'botanical'.

Here is the visual summary of the key products used on today's project for you to pin for easy reference:


You can see all of my 'How To' summaries on my 'How To - Tips and Techniques' Pinterest board in case you've missed any. 

Enjoy your day - I am off to open my Stampin' Up! parcel that has just been delivered by my UPS driver - full of new catalogue goodies, how exciting!! I'll be back tomorrow with another project for the new challenge over at CAS Colours & Sketches. Until then, happy stampin'!


Stampin' Up! Supplies Used:

Table built using Product Table Builder by The Crafty Owl - Independent Stampin' Up! Demonstrator.

Let's Set Sail Adventure Awaits CCS469

by Joanne James10. May 2022 13:00

It's Tuesday and time for a new challenge over at CAS Colours & Sketches. This week's challenge is a sketch challenge and Shannon has asked that we layer some shapes along a vertical panel. Feel free to flip or rotate the sketch when making your card.


For my card today I did just that - I turned the sketch through 90 degrees and went with a very fluid interpretation of Shannon's sketch using the Let's Set Sail bundle:


Here's the low-down on today's card:

Let's Set Sail - The Let's Set Sail bundle is perfect for clean and simple cards and it works for everything from (masculine) birthdays and encouragement to baby cards. I added the sea directly to my white cardbase, along with my sentiment and some birds, then added my punched sailboat with dimensionals for a little extra lift. I love the sketchy appearance of the stamps in this set: 


Tuesday Tip - The Tuesday Tip that I'm sharing over in my Crafty Owl Creatives Facebook Group today is around the Sailboat Builder Punch - some clever stamping enables you to stamp and punch it out in one go:


This is such a time-saver and econimcal use of cardstock too. You can get the detail, see other Tuesday Tips and more by joining my Facebook Group here

Here is the visual summary of the key products used on today's project for you to pin for easy reference:


You can see all of my 'How To' summaries on my 'How To - Tips and Techniques' Pinterest board in case you've missed any. 

Today's card was also inspired by a couple of other challenges: the team over at Color Hues are asking us to create cards using the colours blue and tan and over at Time Out where the theme is 'vacation':


As a keen scuba diver, I am more like to be found beneath the waves rather than in a sailboat, but each to their own (and I don't have a stamp featuring a scuba diver ;-) )

Enjoy your day and I'll be back tomorrow with another project. Until then, happy stampin'!


Stampin' Up! Supplies Used:

Table built using Product Table Builder by The Crafty Owl - Independent Stampin' Up! Demonstrator.

Catch You Later And A Mother's Love AYSI274

by Joanne James6. May 2022 12:00

Today I'm sharing my design team card for our new challenge over at As you See It where it's time for a poignant 'fill in the blank' challenge:


I used this week's Global Design Project colour palette and the sketch layout over at Sunday Stamps and chose a set that might surprise you for my card this week - take a look:


Here's the low-down on today's card:

A Mother's Love - We have already had Mother's Day here in the UK, so instead of making a Mother's Day card I decided to make a card to send to my daughter. I filled in the blank for today's challenge with 'The best thing about Mothers is ...unconditional love' and I thought this sweet image of two birds from the 'Catch You Later' stamp set, alongside the sentiment of 'I'll always be here for you' sums this up nicely. The image of the protective mother bird keeping her little one close underlines the idea that a Mother is the one person who loves you - no matter what. As a Mother of two myself, that's exactly how I feel about my offspring and this simple card is a great way to make sure that they know it. 

Stylish Circles and Banners - I used the Stylish Shapes Dies both to edge my cutaway circle - I love that these dies have the stitched detail on both sides of the cut line - and for the trio of stitched banners that house my sentiment. This dieset is an absolute must-have!

Beautiful Blends - I coloured my pair of birds in this week's GDP colours; I think these birds are supposed to be quails, but since these are rather uninteresting, neutral coloured birds to look at, I thought a brighter look with a funky top feather was much more fun! 

Here is the visual summary of the key products used on today's project for you to pin for easy reference:


You can see all of my 'How To' summaries on my 'How To - Tips and Techniques' Pinterest board in case you've missed any. 

Here's a summary of our challenge rules:

  • Create any card, scrapbooking page, 3D project or packaging project that fits the challenge.
  • Please include the challenge graphic and link back to the challenge in your blog post. Turn off word verification so we can leave you lots of lovely comments. Make sure you link the post not the whole blog to the Linky. Use #AYSIXXX when uploading to a public gallery.
  • If you’re unsure about ‘the rules’, check the details under the Challenge Guidelines tab on the As You See It Challenge homepage.
  • In a Fill in the Blank challenge, complete the sentence in the Challenge Banner with the phrase that is true for you and create your project using the words you used. Tell us what you said in your blog or on your site.
We look forward to seeing your creations in the AYSI gallery.

Enjoy your day; I've a super busy end to my week but will hopefully be back tomorrow with another project. Until then, happy stampin'!


Stampin' Up! Supplies Used:

Table built using Product Table Builder by The Crafty Owl - Independent Stampin' Up! Demonstrator.

Sending Smiles Layered Slimline Birthday Card TTT160

by Joanne James5. May 2022 17:00

It's Thursday and time for a new challenge over at TicTacToe! It's the turn of Team X to host this week and the lovely Vicky is our featured designer this week. This is the fun board that we are playing along with: 


I went down the middle column with twine, flowers and leaves and today paired something old with something new - take a look:


Here's the low-down on today's card:

Color Throwdown - Today's card features the colours over at Color Throwdown this week - check out these fresh colours:


I was supposed to be this week's Featured Stamper over at Color Throwdown following my win with this card here a couple of weeks ago. But I got my dates muddled and thought I needed to be ready for next week not this week! So I added some twine to the card I'd prepared and thought I'd share with you today instead. Isn't this a great mix of colours?

Slimline Stripes - Today's card was not only inspired by the colours but also the striped pattern on the dress of the CTD inspiration photo. I thought the Slimline Dies would be a great way to incorporate the colours but also add interest to the front of my card, don't you think? The Mint Macaron co-ordinates beautifully with the slimline envelopes too.

Sending Smiles - I couldn't resist another outing with the Sending Smiles bundle on today's card. I backed my flower stem with a circle of vellum so that it wouldn't get lost against the background. The real star of today's card though is the sentiment; I just love that layered 'sending' diecut and it's so versatile as it can be paired with lots of other greetings in the set:  

I'm also linking up with the lovely ladies over at SUO Challenges who are featuring sentiments for their current challenge. They are also celebrating their 300th challenge - way to go!

Here is the visual summary of the key products used on today's project for you to pin for easy reference:


You can see all of my Product and 'How To' summaries on my 'How To - Tips and Techniques' Pinterest board in case you've missed any. 

A tictactoe board offers so many creative possibilities - how does this week's board inspire you? Why not have a go? We would love to see you in the gallery and who knows - you might be selected for Designer's Choice and be eligible to be a guest designer on a future challenge. 

Enjoy your day; I'm out at an art exhibition this evening, so looking forward to that. I'll be back tomorrow with another project. Until then, happy stampin'!


Stampin' Up! Supplies Used: 

Table built using Product Table Builder by The Crafty Owl - Independent Stampin' Up! Demonstrator.

A Clean and Simple Cup Of Tea With A Friend CCS468

by Joanne James3. May 2022 13:00

It's Tuesday and time for a new challenge over at CAS Colours & Sketches.  We are into May and so a new month means a new hostess! This month it's the turn of Shannon and our first challenge is a colour challenge: 


I also used the sketch layout over at Just Add Ink for my layout. Today's card is all about the new - well it is the Stampin' Up! annual catalogue launch day, after all! I used two new stamp sets and two new dies - take a look:


Here's the low-down on today's card:

A stitched circle courtesy of the Stylish Shapes Dies in Pale Papaya forms the backdrop for my sweet heat-embossed teacup brimming with flowers, courtesy of the new Cup of Tea bundle. A fussy cut sentiment from the 'Happiness Abounds' stamp set (I just love that script/font!) and a few in-colour gems complete my clean and simple card:

And that's all there is to it! Here is the visual summary of the key products used on today's project for you to pin for easy reference:


You can see all of my 'How To' summaries on my 'How To - Tips and Techniques' Pinterest board in case you've missed any. 

As a reminder, for our colour challenges, you must use all of the stated challenge colours. You may also use neutral colours; however, the challenge colours should be the most noticeable ones featured on your card. We use Stampin' Up! color names for reference, but you are welcome to use any other companies' products as long as you match the challenge colours as closely as possible.

Enjoy your day and I'll be back tomorrow with another project. Until then, happy stampin'!


Stampin' Up! Supplies Used:

Table built using Product Table Builder by The Crafty Owl - Independent Stampin' Up! Demonstrator.

Waves of The Ocean Pocket Edge To Edge Shaker Card

by Joanne James2. May 2022 10:00

Happy Bank Holiday Monday to my UK readers! Today I'm sharing a card that uses the colour palette over at Hand Stamped Sentiments

I'm loving all of the blue colour palettes that are about at the moment, especially since I have been giving my Waves of The Ocean Suite a workout and the two pair perfectly! I thought the HSS colours were perfect for a little project that I've been wanting to have a go at for a while - an edge to edge pocket shaker card. My good blog friend and fellow Tic Tac Toe challenge team member Stef Perry over at Perry Papercrafts made this fabulous card a while ago and I have been wanting to have a go and thought that the Waves of Inspiration bundle would be just the thing to make my own version - take a look:


Here's the low-down on today's card:

Waves Of The Ocean - Since this card is really all about the shaker, the stamping is fairly simple. I used all three ink colours to create my blended seascape background using my blending brushes and stamped a single wave in Versamark and heat embossed it in white; this forms the base of my shaker. 

A Pocket Shaker - creating the shaker itself is rally easy. You just need a flimsy acetate pocket - the wrapping that your new dies come in is perfect for this - then you attach it to the back of the panel on three sides to form a pocket, fill with the sequins on your choice (I used some retired ones from the Whale of a Time suite, minus the pink shells, along with some clear, white and silver ones) before taping the fourth side shut. You then mount this panel on your card front, and add any additional diecuts to the front of your card; I layered a Coastal Cabana foil and white cardstock pair of waves cut with the Waves Dies over my stamped image, and snipped a sentiment and added it to the opposing corner:


The sequins still move around the front of the card, although a little less freely than with a traditional shaker. On the upside there is less bulk though so this kind of card is great for posting. I just love this idea and am really happy with how this card turned out - thanks Stef for the inspiration, I knew I'd get around to making one eventually!

Going, Going, Gone - Today is your final reminder that lots of things are ending today - it is the last day that the following items will be available:

  • Last Chance Products, stamps and accessories from the current 2020-21 Stampin' Up! Annual Catalogue
  • All Together exclusive paper, stamps and dies (only the skin tone Blends are carrying over to the new annual catalogue)
  • Waves of The Ocean Suite exclusive papers, foils and embellishments (only the stamp set and dies are carrying over to the new annual catalogue)

When tomorrow comes, it will be all about the new annual catalogue so if any of the above are still on your list, you best click the links below and hop over to the online store today! 

Here is the visual summary of the key products used on today's project for you to pin for easy reference:


You can see all of my 'How To' summaries on my 'How To - Tips and Techniques' Pinterest board in case you've missed any. 

Enjoy your day; I will be back later with one (maybe two!) posts as I have a few makes 'in progress' on my desk along with news of a great new joining offer that will be starting tomorrow to coincide with the new annual catalogue launch - exciting stuff! Until then, happy stampin'!


Stampin' Up! Supplies Used:

Table built using Product Table Builder by The Crafty Owl - Independent Stampin' Up! Demonstrator.

Playful Alphabet Brilliant Rainbow and Sequins CAS Shaker Cards CCS 467

by Joanne James26. April 2022 13:00

00It's Tuesday and time for a new challenge over at CAS Colours & Sketches. This week it's our final challenge for the month of April and Bhavya has asked that we create something with three distinct sentiment elements for her final sketch challenge:


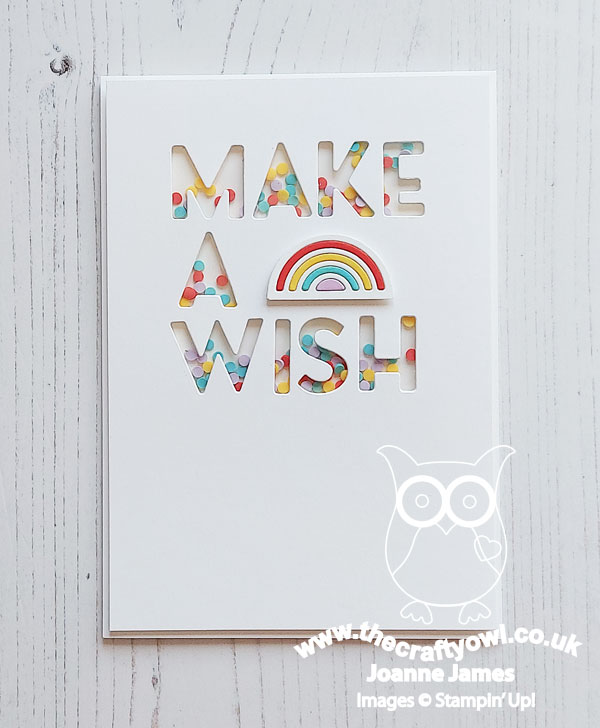
Feel free to flip or rotate the sketch when making your card. For my card today I ended up creating not one, not two but three cards! I'm sharing my favourite one first - a clean and simple shaker card - take a look:


Here's the low-down on today's card:

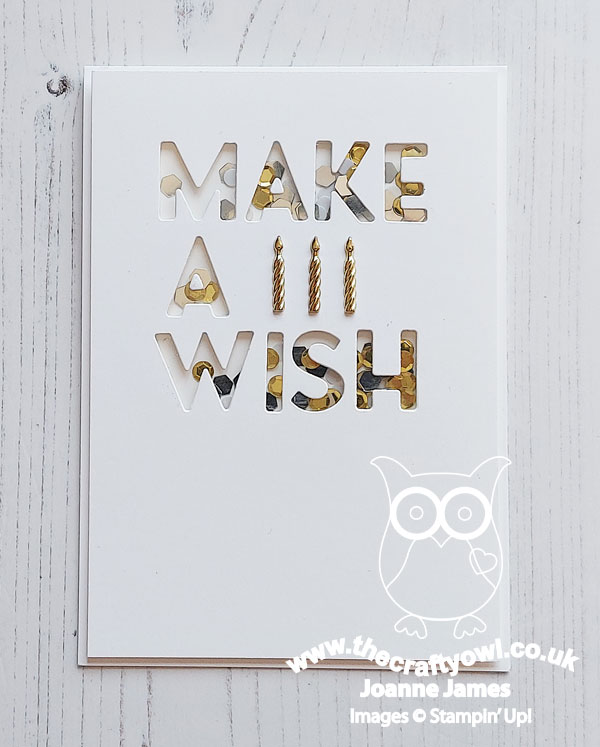
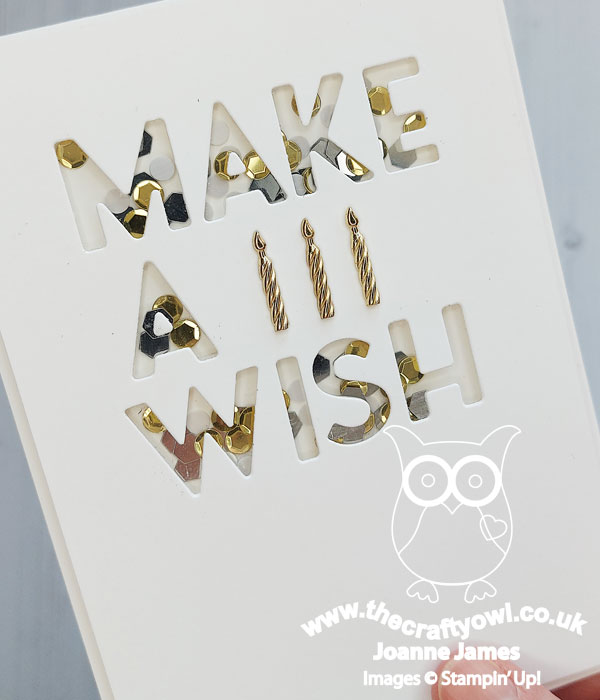
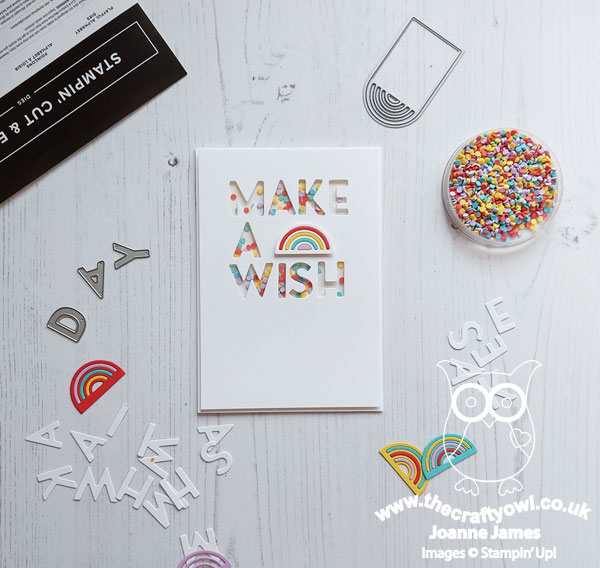
Farewell Playful Alphabet Dies - Time to say goodbye to a craftroom staple - the Playful Alphabet Dies! Yes, they are retiring with current annual catalogue next week and newsflash - there are NO alphabet die sets in the new annual catalogue, so not only will I be hanging on to my set, if you don't have them you have just one week to nab a set! I can't recommend them highly enough: they are so useful for personalising cards, but also to create bespoke messages or greetings. Use them flat or on dimensionals, or as I've done here to create a bespoke message that I then backed with window sheet to create a fun clean and simple shaker card! How cool is this?


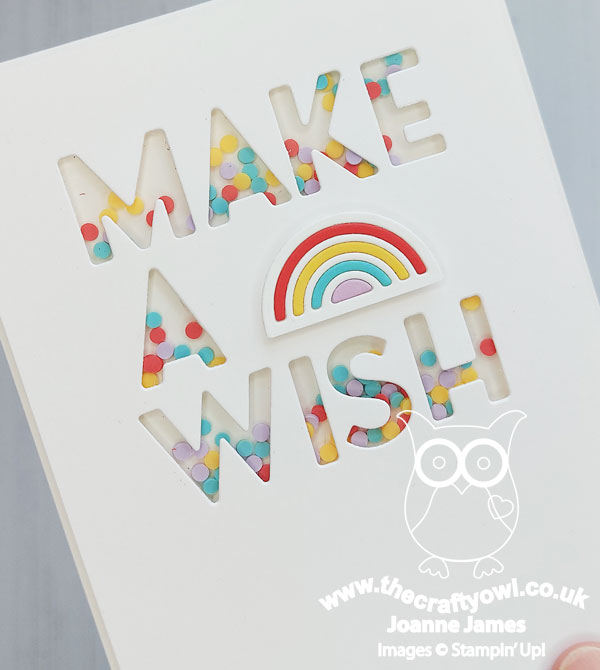
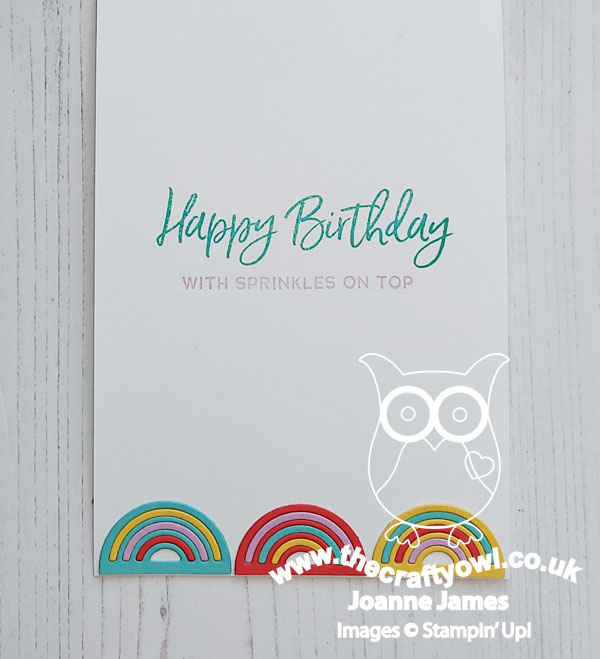
Rainbows or Candles? - My initial shaker was inspired by the inspiration challenge of 'make a wish - rainbows' over at TGIF Challenges this week and I paired my simple message with a paper-pieced rainbow made using my Beautiful Rainbow Dies and some scraps of cardstock in Poppy Parade, Daffodil Delight, Coastal Cabana and Fresh Freesia to co-ordinate with the (retired) Ice Cream Shaker Sprinkles that I used inside my shaker. I used my rainbow offcuts to add a decorative border to the inside of my card, along with a sentiment from the retiring 'Sweet Ice Cream' stamp set:


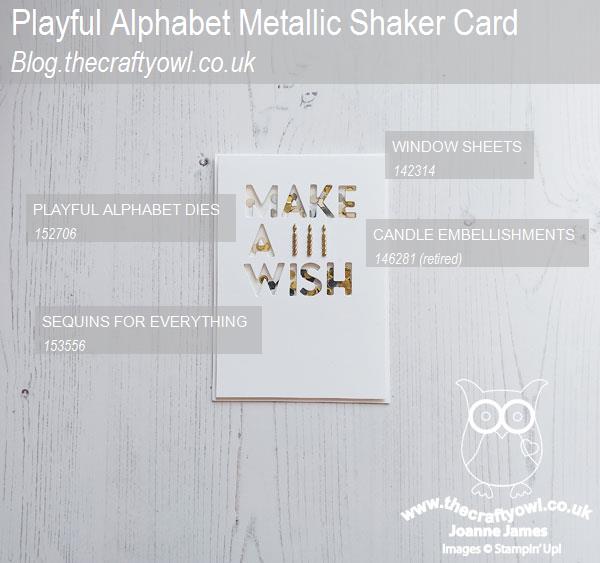
I liked this card so much, I made another one, this time using the retiring white, gold and silver Sequins For Everything (currently half price) for my shaker and a trio of (retired) gold Candle Embellishments I found on my shelf:


Check out the sparkles - how fun!


Here are both shakers together - which one do you prefer?


I honestly can't decide - I love this design so much I think I'm going to make a whole bunch more!!

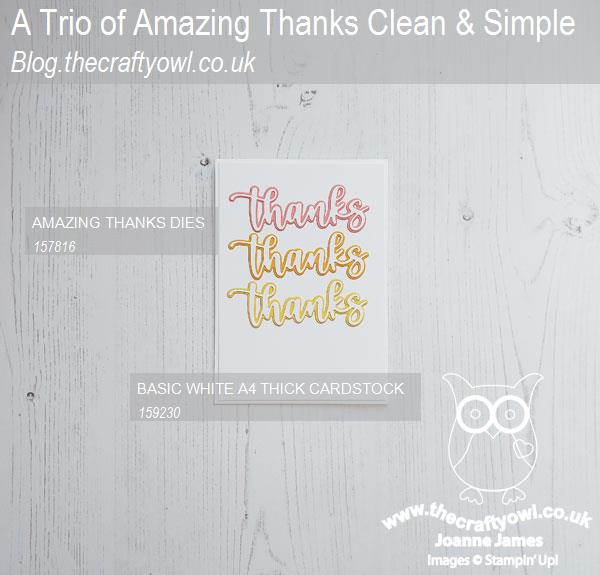
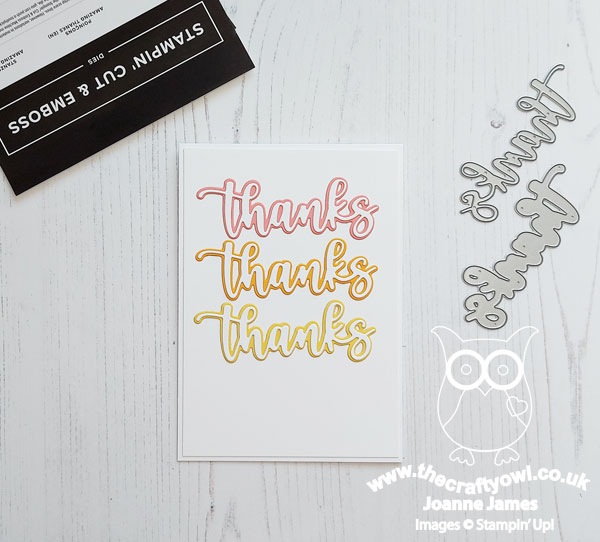
A CAS Thankyou Trio - Finally I have one extra 'bonus' card for you, that was the one I made before my shakers - a super simple repeating 'thanks' sentiment using a trio of dies cut with the Amazing Thanks Dies, with each one backed by the fresh colours of the current Color Dare challenge:


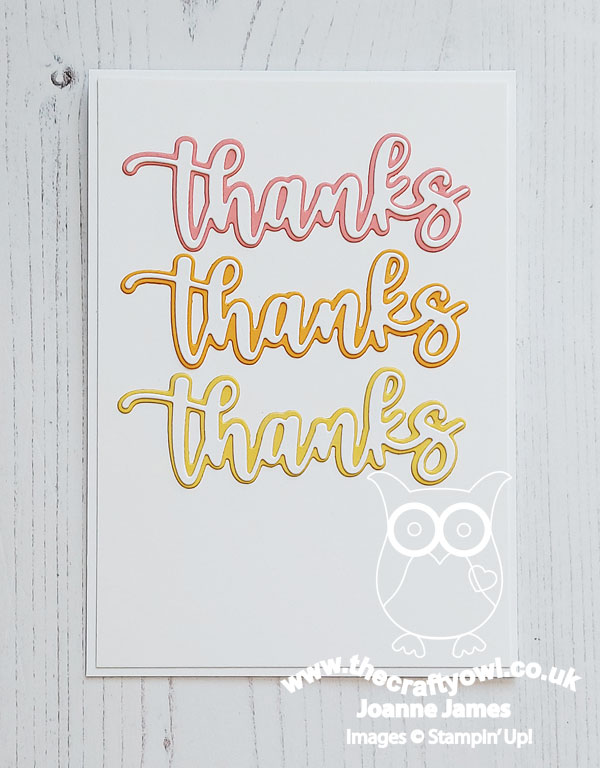
By using the colour for the base layer of the diecut and making the top layer white, it allows for a white base and preserves the clean and simple feel with all that 'white space'. This is a great way to use up scraps and whilst I love the fresh colour combo I used on today's card - Flirty Flamingo, Mango Melody, Daffodil Delight - this simple layout would work with whatever colours you have available.

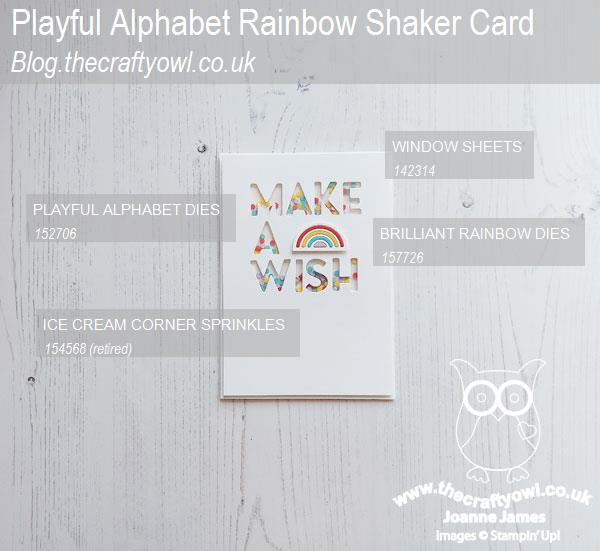
Here are the visual summaries of the key products used on today's projects for you to pin for easy reference:


You can see all of my 'How To' summaries on my 'How To - Tips and Techniques' Pinterest board in case you've missed any. 

I actually made four cards for today's challenge; the first one was mediocre at best; I had an idea that just didn't look right when I made it - so much so, I'm not even going to share it with you!  So I left it and when I went back to desk 24 hours later, I started fresh and came up with my thankyou trio, quickly followed by my fun shaker cards - suddenly I was on a creative roll! Does that ever happen to you when your creating? How do you combat that feeling you get when you've made something but are just not 'feeling' it? Do leave me a comment below - I'd love to hear from you!

Enjoy your day; the James Juniors are both back to school today following the Easter break so I will be aiming to get more work done this week. This is a super-busy term, with everything from cricket fixtures to the school musical production, internal exams, speech days, university open days and lots more besides! I really do need to get organised!! On that note, I'll be back tomorrow with another project. Until then, there's work to do - happy stampin'!


Stampin' Up! Supplies Used:

Table built using Product Table Builder by The Crafty Owl - Independent Stampin' Up! Demonstrator.


Shop Online

Access my online shop 24 x 7, 365 days of the year:

Current May hostess code:

3NR3FB9W

Shop Online

2024-25 Annual Catalogue

BROWSE THE CATALOGUE

Click on the image to download your copy of the 2024-25 annual catalogue. For a full list of current SU! supplies, go to my online store. If you would like any help or advice, please drop me a line at [email protected] or give me a call on 07773 421446 - I'd be happy to help.

Join My Team

It's always a great time to join Stampin’ Up but during May it's even better! New team members can get £78.25 of new In Color products for FREE! That's in addition to another £130 worth of products of your choice for only £99 + free business supplies + free shipping + all the fun being a part of Stampin’ Up! Stampin' Up! has something for everyone: join my growing team and benefit from my support to enjoy Stampin' Up! however you choose.

If you're interested, call me for a chat to understand how I can help you realise your goals. Alternatively, if you have already decided to sign up and you just can't wait, please click here for the link to the online form where you can sign up and order your starter kit right away! 

Latest Kits!

Stampin Cut and Emboss

The City Sights Kit has all you need to make 8 cards with coordinating envelopes for £20. Along with the new Happy Hollyhocks Kit, a no stamping kit including 9 cards for just £14, both are available from May 1st - get yours here!

New Online Exclusives

There are new products available exclusively in the online store from 5 March - check them out here.

About Me

Hi I'm Joanne and live in Northampton and when I'm not looking after my husband and two beautiful children, am an avid crafter with a passion for all things Stampin' Up!

I must confess that I have never been a big rubber stamper - until I discovered Stampin' Up! that is. I love the fact that I can get such great results with co-ordinating stamps, inks, papers and punches - the possibilities are endless! Join me on my stamping journey as I share the things I love and be inspired to create amazing things yourself!

Follow Me

Monthly Newsletter

Box Builder

Click the button above to use Box Buster to create your custom box design using the Envelope Punch Board!

Kits Collection Now Available!

Stampin Cut and Emboss

The new Kits Collection from Stampin' Up! is now available!

Click here to see the current kits available and order yours online today.

I Design For


Mini Catalogue


The next mini catalogue will be live in September! 

Stampin' Up Stuff

This is my personal blog and is not endorsed by Stampin’ Up! I hope you find it a plentiful source of ideas and personal inspiration but please don't copy my designs for contest submission or use for classes, publication or sale without express permission.